Let us check How Make Packagers Life Easier – Part 3. The application packaging team is a closed technical community. There are not many contributors to the application packaging community.
In this post, you will learn to get more Smart package studio training to make your packagers’ life easier.
[Related Post – Learn How to Make Application Packagers Life Easier – Part 1 & How to Make Application Packagers Life Easier – Part 2]
Recap Smart Package Studio Training
I worked with many smart packers in my career as an SCCM and Intune admin. I have often seen them struggle to test the packages, mostly because of testing infra-related issues.
In this series of posts, I tried to make packagers’ life more comfortable with many tips and tricks. Also, I introduced you to the smart package studio to ease up the packaging process with the next level of automation.
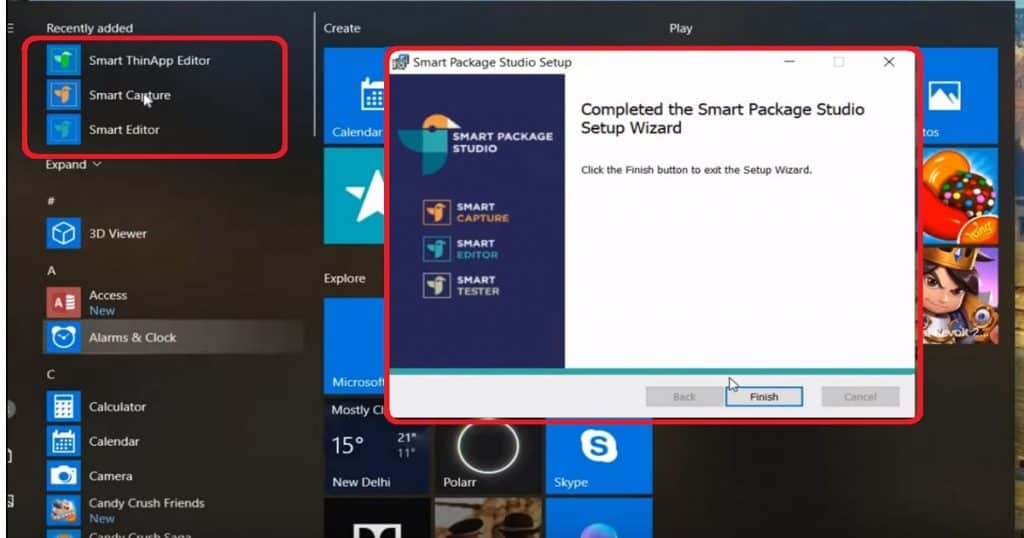
Previous Posts – How to Make Application Packagers Life Easier – Part 1 & How to Make Application Packagers Life Easier – Part 2
Smart Capture Integration with Windows 10 Virtual Machine
I know the application packages need to rebuild the machine or take a snapshot of the VMs several times. The smart package studio smart capture tool helps packagers automate this repetitive task.
I recommend reading the following blog post to setup a smart package studio lab before continuing with this post.
Follow the steps to integrate the Smart capture tool with the Windows 10 VirtualBox virtual machine you built in the previous post.
- Launch Smart Capture tool from Start Menu – Smart Package Studio.
- You need to log in with your user name and password. Authentication of user names and passwords requires an internet connection.
- Select Virtual Machine from the Welcome screen of the Smart Capture wizard and click on the Next button. This integration will help to capture from a VirtualBox virtual machine snapshot.
- Click on Add Snapshot button to select the latest Snapshot (Snapshot 1). Make sure you have created the snapshot using the best practices.
- Enter the local administrator user name and password on “Add virtual machine snapshot Window.” (Smart Package Studio training stage 2).
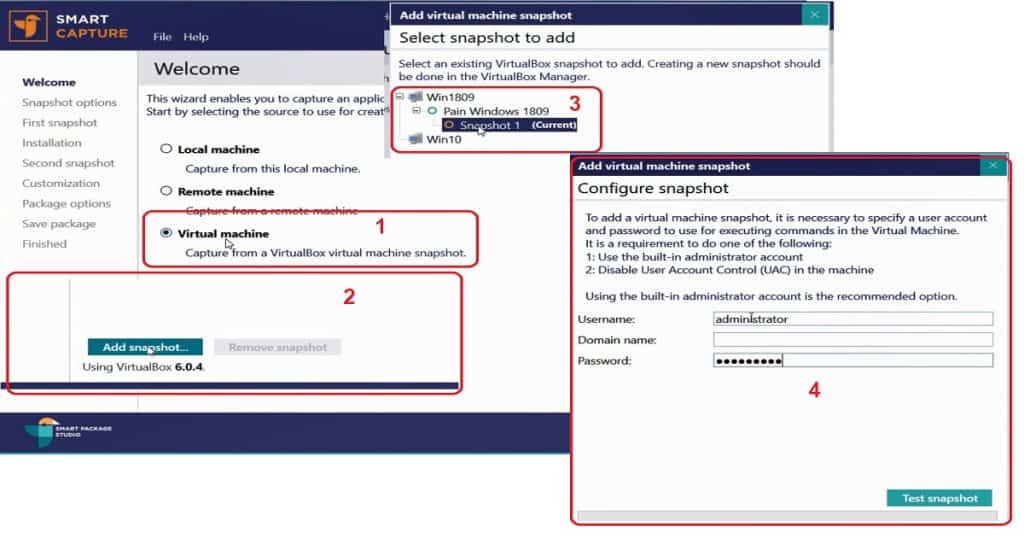
- To complete the Smart capture tool integration with VirtualBox VM, click on the Test Snapshot button after selecting the snapshot.
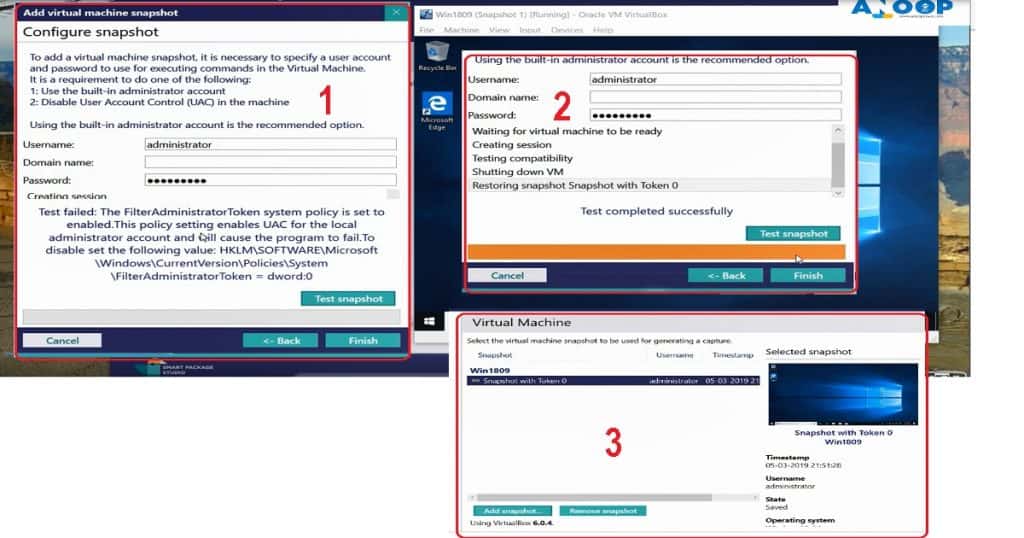
- [Optional step – Needed only when if the TEST SNAPSHOT stage fails] The testing snapshot failed on VirtualBox VM during the Creating Session stage
- Starting VM Win 1809
- Waiting for the Virtual Machine to be ready
- Creating Session
- Fixed the error “Test failed: The filter AdministratorTockensystem policy is enabled. This policy setting enables UAC for the local administrator account and will cause the program to fail.” Creating the following registry key in the VM and retaking the snapshot as shown in the video tutorial.
- To disable UAC, set the following value in the registry: HKLM\Software\Microsoft\Windows\CurrentVersion\Policies\System
- Create Dword value FilterAdministratorToken with value 0
- Click on the Test Snapshot button to retry the integration testing of the Smart Capture tool and VirtualBox Windows 10 VM.
- The Test Snapshot stage was completed with the following checks:
- Starting VM Win 1809
- Waiting for the Virtual Machine to be ready
- Creating Session
- Testing Compatibility
- Shutting Down VM
- Restoring snapshot Snapshot with Token 0
- Click on the FINISH and Next button to complete the Smart Capture and VirtualBox VM snapshot integration (Smart Package Studio training stage 2)
Smart Capture Snapshot Options
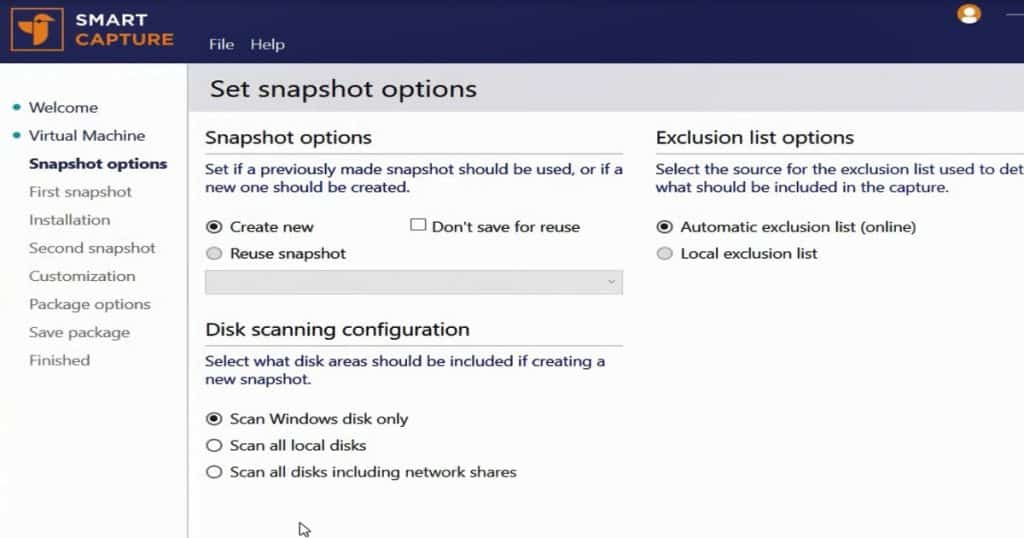
This section of the Smart capture tool helps packagers Set Snapshot Options for VirtualBox Windows 10 VM. I selected the default options or best practices set by the smart package studio engineering team.
I selected the following out-of-box options on the Set Snapshot Option page of the Smart capture wizard. But depending on your requirement, you can choose the best-suited option for your packaging environment.
- Snapshot Options
- Create New Snapshot (Default Option)
- Don’t Save for reuse
- Reuse any of the existing snapshots
- Disk Scanning Configuration
- Scan Windows Disk Only (Default Option)
- Scan All local Disks
- Scan all Disks, including network shares
- Exclusion list options
- Automatic Exclusion list (online) (Default Option)
- Local exclusion list
- Click on the NEXT button to complete this configuration section (Smart Package Studio training – section 2).
Take the First Snapshot of VirtualBox VM
In this section of the Smart package studio training guide, you will learn how to take the first snapshot of the VirtualBox Windows 10 VM using the Smart Capture tool.
You should complete the integration of the Smart Capture tool and VirtualBox VM before continuing with the following steps.
Two snapshots should be taken during the packaging process with the Smart capture tool.
- One snapshot will be taken before the application installation. The first snapshot will mostly be of a vanilla Windows 10 64-bit machine.
- The second snapshot should be taken after the installation of the
application in the VM.
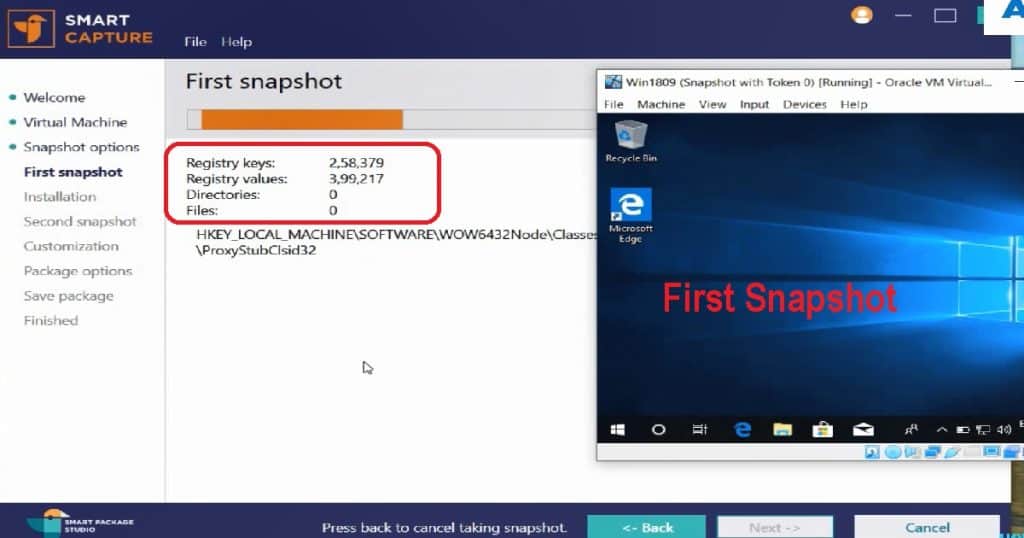
This section will then see how to take the First snapshot of VirtualBox VM. The smart capture snapshot will capture the details of the registry, files, and directories of the VM.
- Registry Keys
- Registry Values
- Directories
- Files
Install Application on VirtualBox VM from Smart Capture Tool
The Smart Capture tool helps application packagers to make their life easier. There is no need to copy the application source from the file server to Virtual Machine (VM).
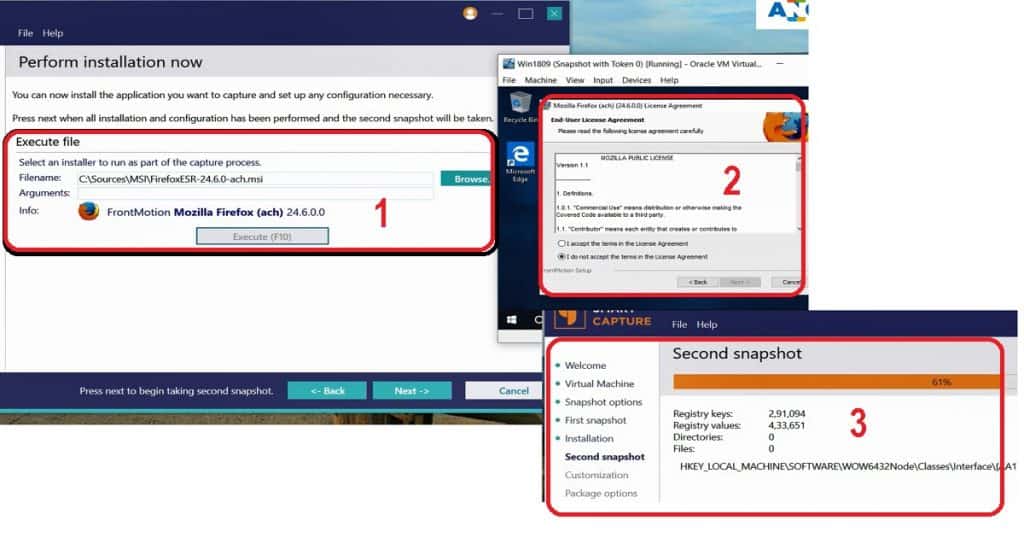
The smart capture tool lets you EXECUTE application installation from the tool itself — no headache of copying sources from here to there in a complex corporate network environment.
Also, there is no need to run a complex command line in the VM to complete the application installation test. All these things are automatically taken care of by the Smart Capture tool.
- You can now install the application you want to capture and set up any configuration necessary.
- Click on the Browse button to select the application source you want to install.
- Do you want to test any specific arguments as part of the application installation? Smart capture has that option in the GUI.
- Click on Execute (F10) button to start the application installation on VirtualBox VM.
- You might need to complete the application installation wizard and all the configurations before clicking the NEXT button from Perform installation now page of smart capture. Once the application installation is completed, the Execute (F10) button will be enabled again.
- Press the NEXT button when all installation and configuration have been completed.
- Once you click on the Next button, the Smart capture will initiate the second capture.
NOTE! – Click on the BACK button to discard the 2nd snapshot (Smart package studio Training). I love this type of option!!
How Easy to Customize Packages Smartly?
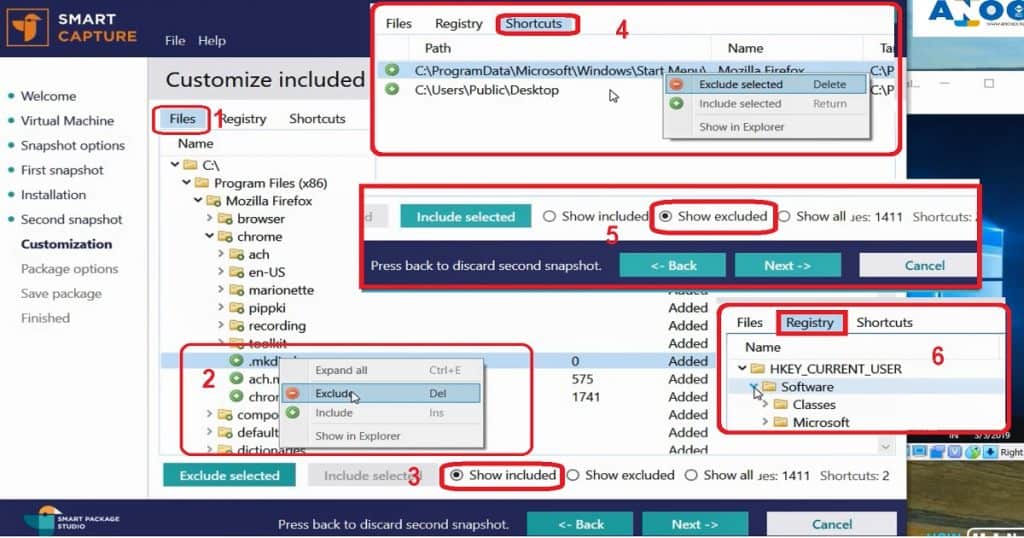
Smart capture makes it easy to customize packages and make a template for your customization. This helps to make packagers’ life easier.
- You can browse through the files and folders and select the required one(s).
- Right-click on the file(s) or folder(s) to Include selected or Exclude selected, depending on your packaging requirements.
- You have an option to Include and Exclude the following items
- Files
- Registry
- Shortcuts
- Click the Next button to create a smart package (Smart package studio Training )
Save Customized Package as *.AXI
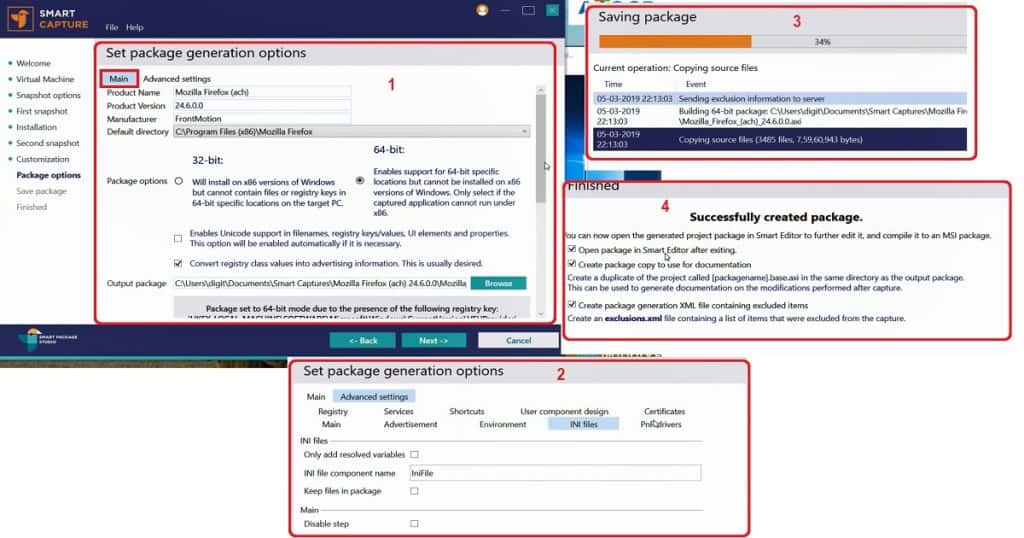
The package Options section of the Smart Capture tool is the page where you can save the customized packages as *.AXI file. Set package generation options page in a smart package tool helps configure the package behavior.
I selected the default options as explained below. There are two types of settings in the smart capture tool (Smart package studio Training), and those are:
- Main
- Product Name – Mozilla
- Product Version – 26.4.1
- Manufacturer – FrontMotion
- Default Directory – Application Installation Directory C:\Program Files(x86)\Mozilla Firefox
- Package Options –
- 32-bit
- 64-bit (I selected 64 bit to save the AXI file)
- [Check Box] to enable Unicode support in filenames, registry keys/values, UI elements, and properties.
- This option will be enabled automatically if it is necessary (I love this option)
- [Check Box] to convert registry class values into advertising information. This is usually desired.
- Advanced Settings – Change the advance
- Registry
- Services
- Shortcuts
- User Component Design
- Certificates
- Main
- Advertisement
- Environment
- INI Files
- PnP drivers
- Save the customized package path as Mozilla.AXI by clicking the NEXT button
Video Tutorial – Smart Package Studio Training
Continued…
In the next blog post, you will learn how to compile AXI packages to MSI with Smart package Editor. Let’s continue the learning with smart package studio training in the next blog post.


Great 3 part tutorial. Was this the pro or free version you were demo.
I think all these features are available in Trial version