Let’s explore the 3 Easy Methods to Delete Alternate Rows in Microsoft Excel. Excel arranges data in a grid with numbered rows and lettered columns. This lets users easily perform calculations and other tasks using formulas and functions. In this article, I will explain how to delete every other row in Excel.
There are three basic methods to accomplish this task. The first method is manually selecting and deleting the rows you want to remove. While this approach can be tedious and time-consuming, it may be suitable for small tables. The second way is to use Excel’s Filter tool, and the third way is to use an Excel add-on.
You can manually delete every other row in a small table. However, for larger tables, use Excel’s Filter tool. This tool helps you easily hide the rows you want to keep deleting the others. You can also use an add-on like Kutools for Excel to help with this process.
Excel is powerful spreadsheet software from Microsoft that provides tools for calculations, data visualization (graphing), data analysis (pivot tables), and automation (VBA). It is available on multiple platforms, such as Windows, macOS, Android, iOS, and iPadOS. It is part of the Microsoft 365 and Office suites.
Table of Contents
What is Kutools for Excel?

Kutools for Excel is a set of add-ons that makes Excel more powerful. It helps you with common tasks, such as combining worksheets, merging cells without losing data, pasting only into visible cells, counting cells by color, and performing tasks in bulk. These tools aim to make your work more efficient and give you better control over your data.
A Brief Details of Versions and Rows in an Excel
Excel versions up to 7.0 can handle a maximum of 16,384 rows (2^14 = 16384). Versions 8.0 to 11.0 can manage 65,536 rows (2^16 = 65536) and 256 columns (2^8, labeled ‘IV’). From Version 12.0 onwards, including the current Version 16.x, Excel can work with more than 1,048,576 rows (2^20 = 1048576) and 16,384 columns (2^14, labeled ‘XFD’).
| Versions | Rows Details | Columns Details |
|---|---|---|
| Up to 7.0 | Maximum of 16,384 rows (2^14 = 16384) | |
| 8.0 to 11.0 | 65,536 rows (2^16 = 65536) | 256 columns (2^8, labeled ‘IV’) |
| 12.0 to 16.x | More than 1,048,576 rows (2^20 = 1048576) | 16,384 columns (2^14, labeled ‘XFD’). |
- Generic Windows 11 Product Keys to test | How to Retrieve Windows 11 Product keys
- New Copilot Excel Table Feature Simplify and Transform Data Analysis
- Microsoft 365 Copilot in Excel with Python | Unformatted Data XLOOKUP SUMIF and Restricted Formatting
3 Easy Methods to Delete Alternate Rows in Microsoft Excel
As I mentioned above, there are three main ways to delete or remove every other row in Excel. The first way is to manually select and delete the unwanted rows. This method is easy, but larger datasets can take a lot of time. Another option is to use Excel’s built-in Filter tool or third-party add-ons, which can make this process more efficient. Choose the method that best fits your needs and let’s begin!
Manually Removing Alternate Rows
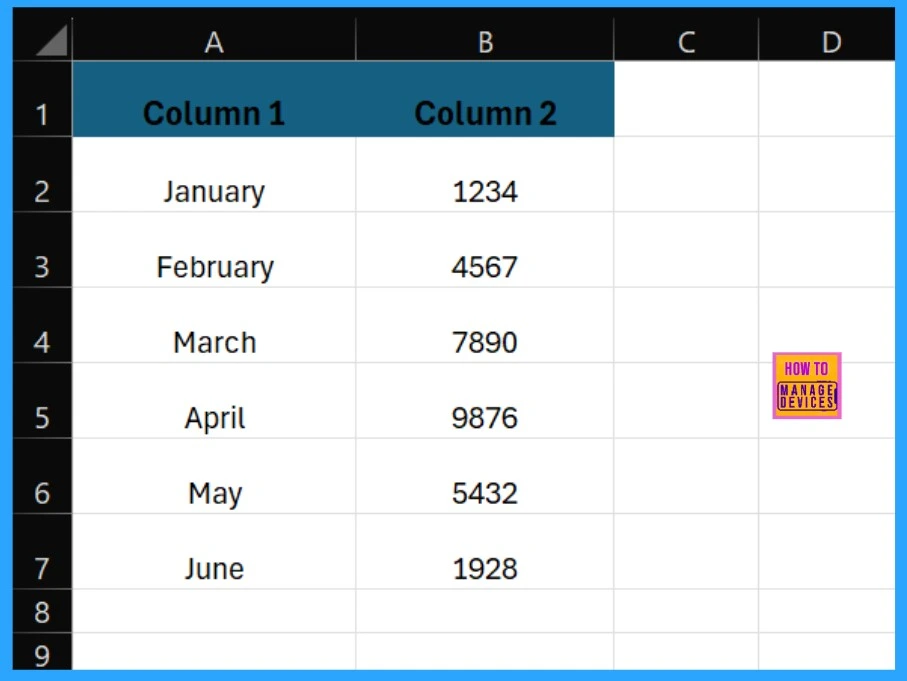
For small tables, manually deleting rows is often the fastest method. However, this method can take a lot of time for larger datasets. To represent the manual removal of alternate rows, please follow these steps:
- Create a sample table in a new Excel spreadsheet.
- Type “Column 1” in cell A1 and “Column 2” in cell B1.
- In column A, from cell A2 to A7, put the following month names: January to June.
- Next, populate cells B2 through B7 with any random numbers you choose.
- This will create a table with two columns and six data rows (plus the header row). (Refer the following screenshot)
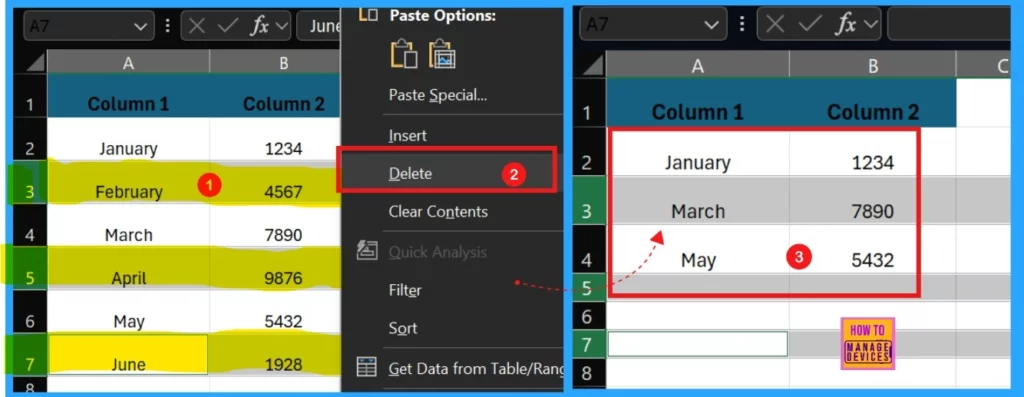
To delete every other row, first select row 3. Then, hold down the Ctrl key and select rows 5 and 7. These are the rows we will remove.

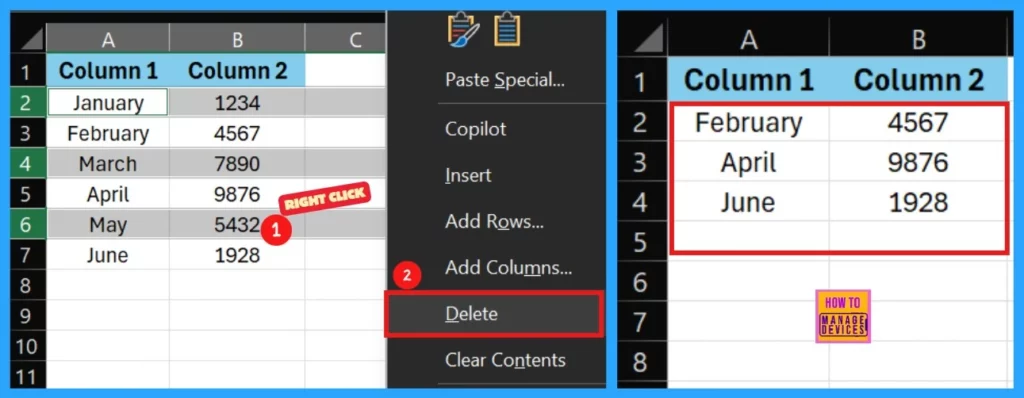
With rows 3, 5, and 7 selected (February, April and June), you can now delete them. Either press Ctrl + – (the minus key) on your keyboard or right-click and choose Delete from the context menu (screenshot below). This action will remove the selected rows. Now, in your original table, only the remaining three rows represent January, March, and May.
Removing Alternate Rows with Excel’s Filter Tool
Excel’s Filter tool provides a more efficient way to delete rows for larger tables. This method allows you to hide the rows you want to keep, making selecting and deleting the others easy. You must first add a helper column to your table to use this approach. This column will contain markers that indicate which rows should be deleted and which should be retained.
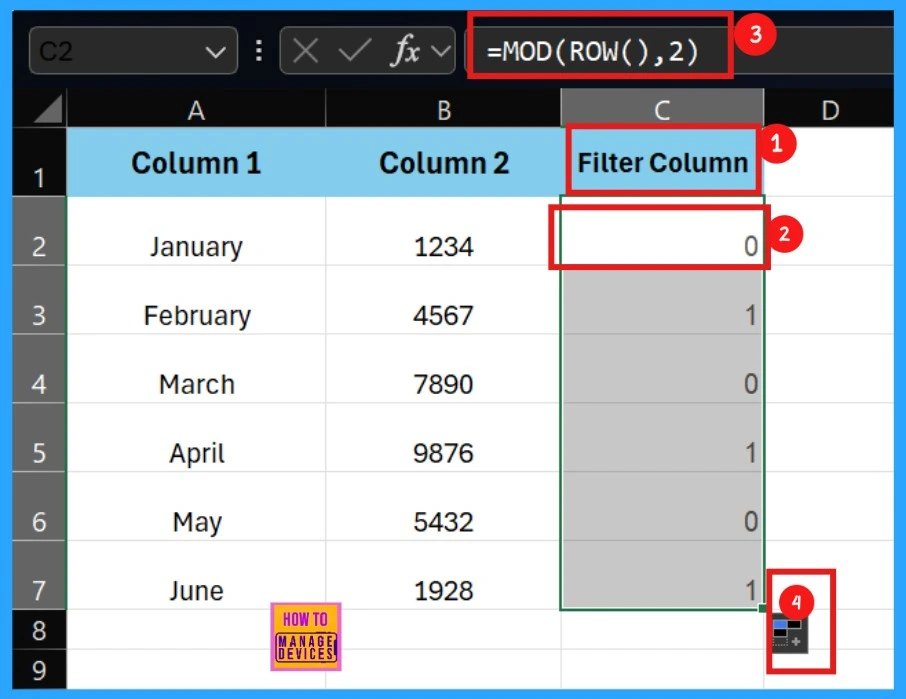
- To begin using the Filter method, add a new column and label it Filter Column in cell C1.
- In cell C2, enter the formula =MOD(ROW(),2) and press Enter.
- The formula assigns alternating 0s and 1s to each row.
- Click the small square at the bottom right of cell C2 and drag it down to C7 to apply the formula to all the rows in your table.
- Now the Filter Column filled with alternating 0s and 1s.
Click on the header of column C, then go to the Data tab and click the Filter button. This will add a small dropdown arrow to the Filter Column header, indicating that filtering is now enabled.
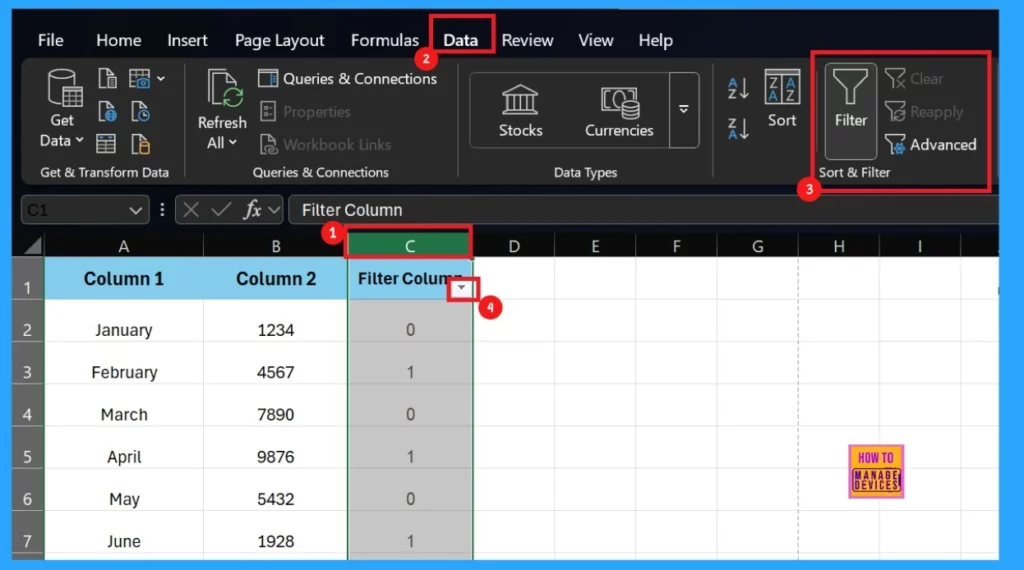
Click the dropdown arrow in the Filter Column header to open the filter options. You will see checkboxes for 0 and 1. Check or uncheck these boxes to control which rows appear in the table. If you uncheck a number, all rows with that value in the filter column will be hidden.
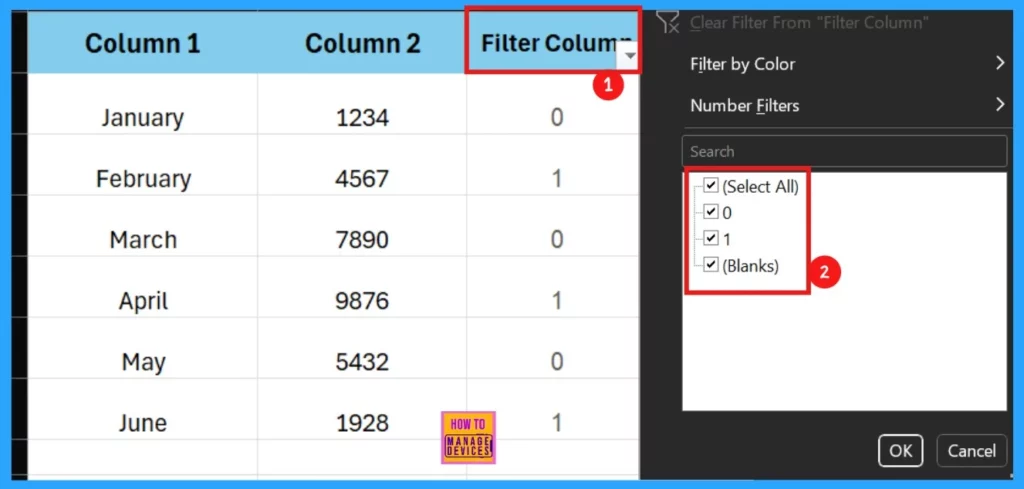
To remove the alternate row, select the 0 checkbox in the filter options and click OK. This will filter the table, displaying only the rows with a 1 in the Filter Column, hiding the rows marked with a 0.
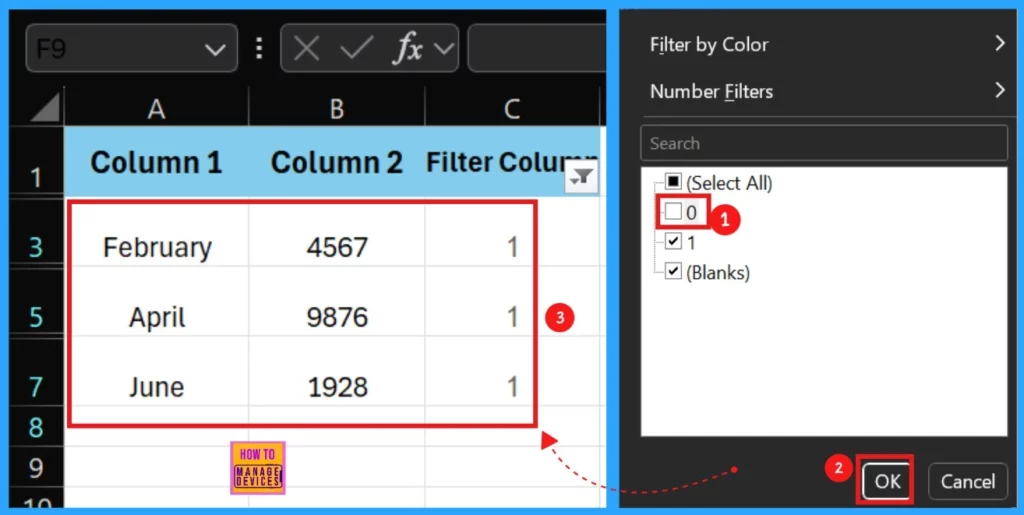
Now you can easily erase every other second row from the table. To do so, follow the below steps: First, click on the header of row 3. Then, drag your cursor down to row 7, selecting rows 3, 5, and 7.
- Next, go to the Home tab.
- Click on the Delete dropdown, and choose Delete Sheet Rows.
Your table may look empty, but the rows you need are still there; they are just hidden by the filter. To show them again,
- Click the dropdown arrow in the Filter Column header,
- Check the 0 box, and then click OK.
- This will bring back the hidden rows, like January, March, and May in our example, to the table.

Now you should delete the Filter Column. To remove the filtering column, right-click on column C and choose the Delete option. This will remove column C from the table.

In this example, we added two filters to the table. We can change the MOD function to add more filters and delete every third row, every fourth row, or more. The function =MOD(ROW(),2) offers two options. To remove every third row, use the function =MOD(ROW(),3).
Just change the number in the function to decide how many rows to filter. We can also manually enter filter numbers in the column without using MOD, which may take longer for large tables.
| MOD Function | Removable Rows |
|---|---|
| =MOD(ROW(),2) | To remove every Second Row |
| =MOD(ROW(),3) | To remove every Third Row |
Removing Alternate Rows with Kutools for Excel (Third-Party Add-Ons)
Kutools for Excel add-on includes a tool called Select Interval Rows & Columns. This tool lets you choose rows and columns at specific intervals. You can also use it to select and delete every other row in Excel. After you install Kutools for Excel, follow these steps to select rows:
- Click Select on the Kutools tab, then choose Select Interval Rows & Columns.
- A window will open where you can set the intervals for your row selection.
- Change the Interval of and Row values to choose which rows to select.
- Click OK

Now, you can see that every other row in Excel is highlighted. Click your Right mouse button and select Delete to remove your desired rows.
Need Further Assistance or Have Technical Questions?
Join the LinkedIn Page and Telegram group to get the latest step-by-step guides and news updates. Join our Meetup Page to participate in User group meetings. Also, Join the WhatsApp Community to get the latest news on Microsoft Technologies. We are there on Reddit as well.
Author
Anoop C Nair has been Microsoft MVP for 10 consecutive years from 2015 onwards. He is a Workplace Solution Architect with more than 22+ years of experience in Workplace technologies. He is a Blogger, Speaker, and Local User Group Community leader. His primary focus is on Device Management technologies like SCCM and Intune. He writes about technologies like Intune, SCCM, Windows, Cloud PC, Windows, Entra, Microsoft Security, Career, etc.

