Let’s discuss Enable Sign in Click to Action Dialog Policy in MS Edge for Accessing Resources using Intune. Sign in Click to Action Dialog is a feature that is available on Microsoft Edge, used to ensure that users are prompted to sign in when they perform actions in Edge that require authentication.
The Actions that require authentication include Syncing browser data (favorites, passwords, history), accessing organisational resources etc. With the Microsoft Intune Settings Catalog policy, you can easily implement this policy in your organisation. Configuring this policy provides many benefits in your organisation.
To enhance security, this policy helps to ensure users are authenticated before accessing sensitive features. In a managed environment, identity verification. Admins can prevent that confusion by prompting users to sign in when needed, rather than silently failing.
This policy is especially helpful in Autopilot or shared device scenarios. Admins can quickly monitor and control sign-in behavior and troubleshoot issues more effectively in their organisation. Users will get a personalised browser experience (e.g., synced settings, extensions.
Table of Contents
Enable Sign in Click to Action Dialog Policy in MS Edge for Accessing Resources using Intune
By implementing this policy, Admins can reduce unauthorised access in your organization. This policy acts as a protection layer in a shared or unmanaged devices scenario. By minimizes the data leakage organizational security will improve.
Example
For example, If you are managing an IT firm and using Microsoft Edge browser. Before implementing the policy, when a user opens Edge and clicks “Turn on sync nothing happens if they’re not signed in. After the policy is implemented a dialog appears prompting them to sign in making the process smooth and intuitive.
How to Access Sign in Click to Action Dialog Policy in MS Edge
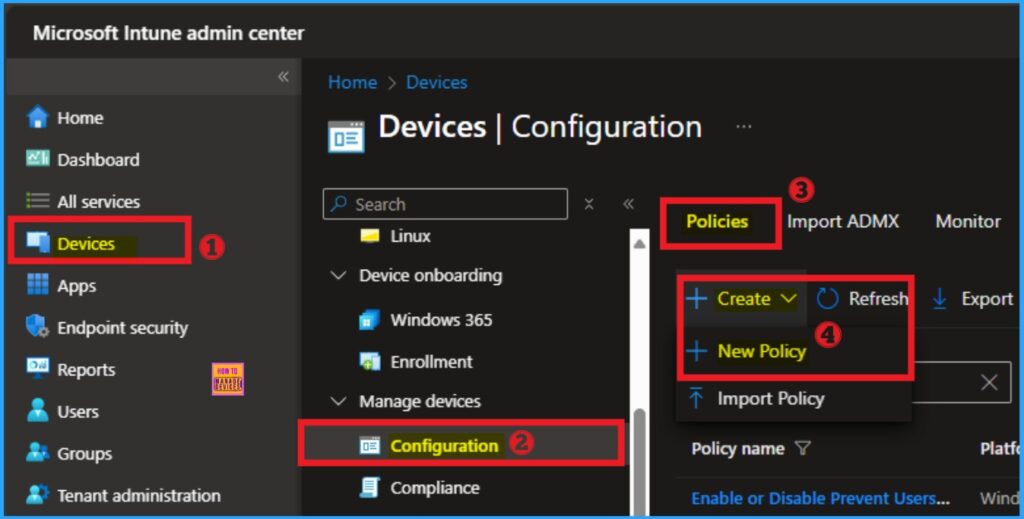
Microsoft Intune portal allows you to easily access Sign in Click to Action Dialog Policy in MS Edge. To configure the policy Sign in to Microsoft Intune Admin Center. Then go to to Devices > Windows >Configuration > Create > New Policy.
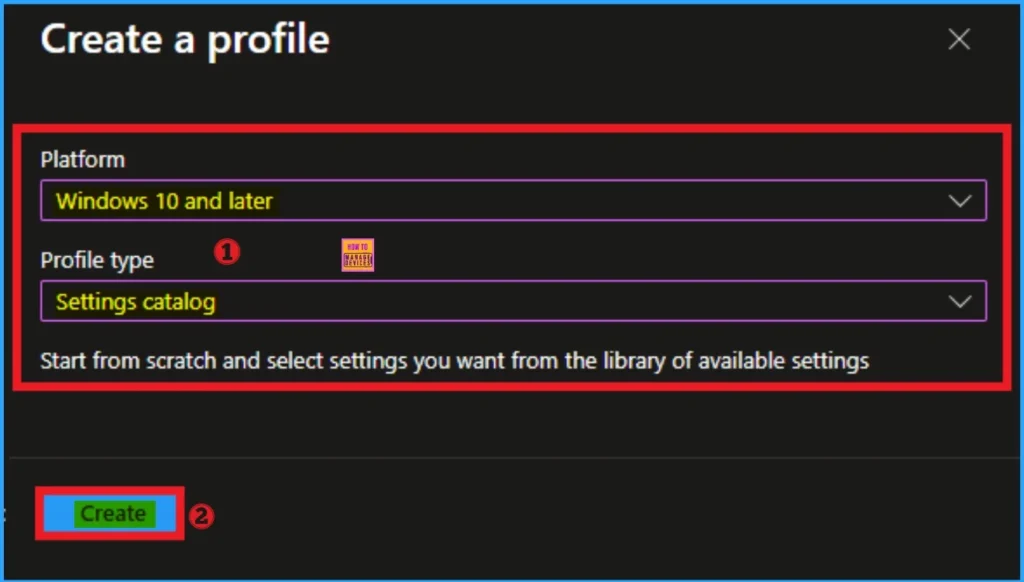
Profile Creation
Profile Creation is a necessary step in policy creation to assign the policy to accurate platform and profile. Here I selected Windows 10 and later as the Platform and Settings catalog as the profile type. Then click on the Create button.
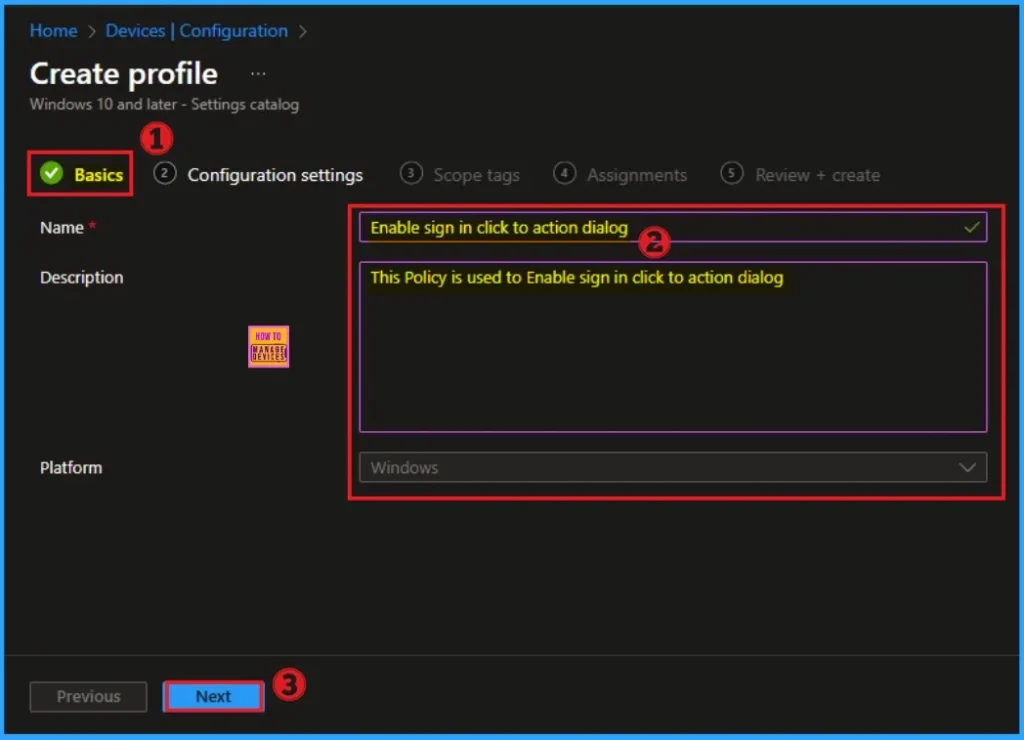
Basic Tab for Beginning Step
On the Basic tab you can add a appropriate name and description for the policy which you want to configure. The Name is necessary and description is not mandatory. After adding these you can click on the Next Button.
Selecting Settings from Configuration Settings Tab
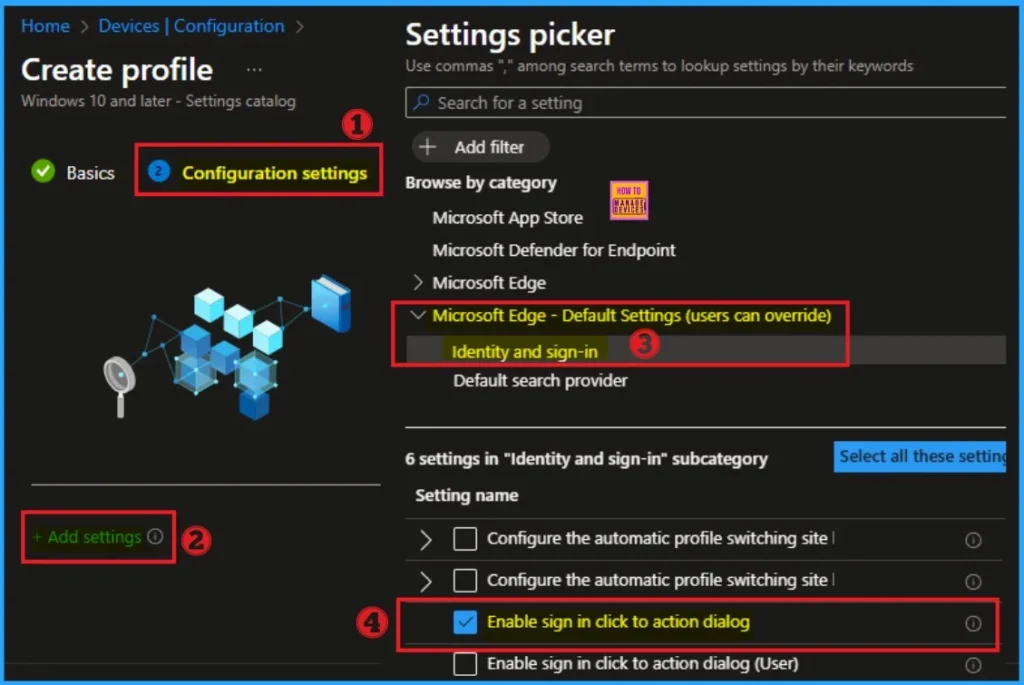
Configuration Settings Tab allows you to select Sign in Click to Action Dialog. o select a setting, click on the +Add settings hyperlink. Then you will get Settings Picker. After clicking on the +Add settings, you will get the Settings Picker.
Here you can select a particular setting by searching or browsing by category. Here, I would like to select the settings by browsing by Category. I choose Microsoft Edge – Default settings (Users can override) and choose Identity and sign-in settings. From this sub-category, I choose Configure Enable sign in click to action dialog settings.
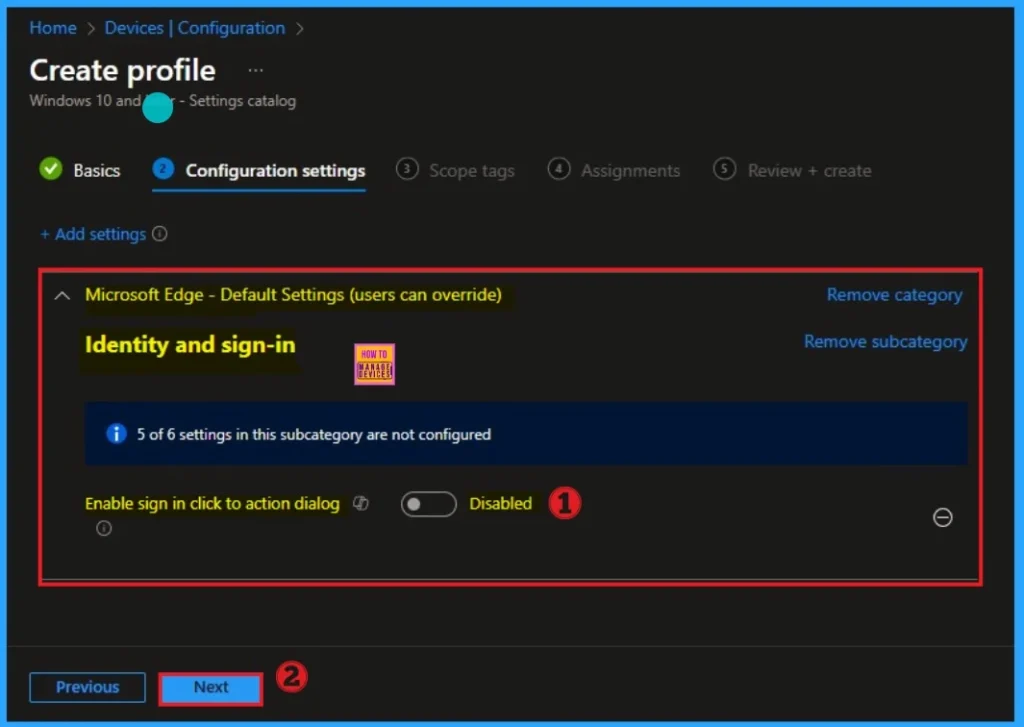
Disable Sign in Click to Action Dialog
If you disable this policy, sign in click to action dialog isn’t shown on the New tab page. By default value of this policy is disable. If you are go with this click on the Next Button.
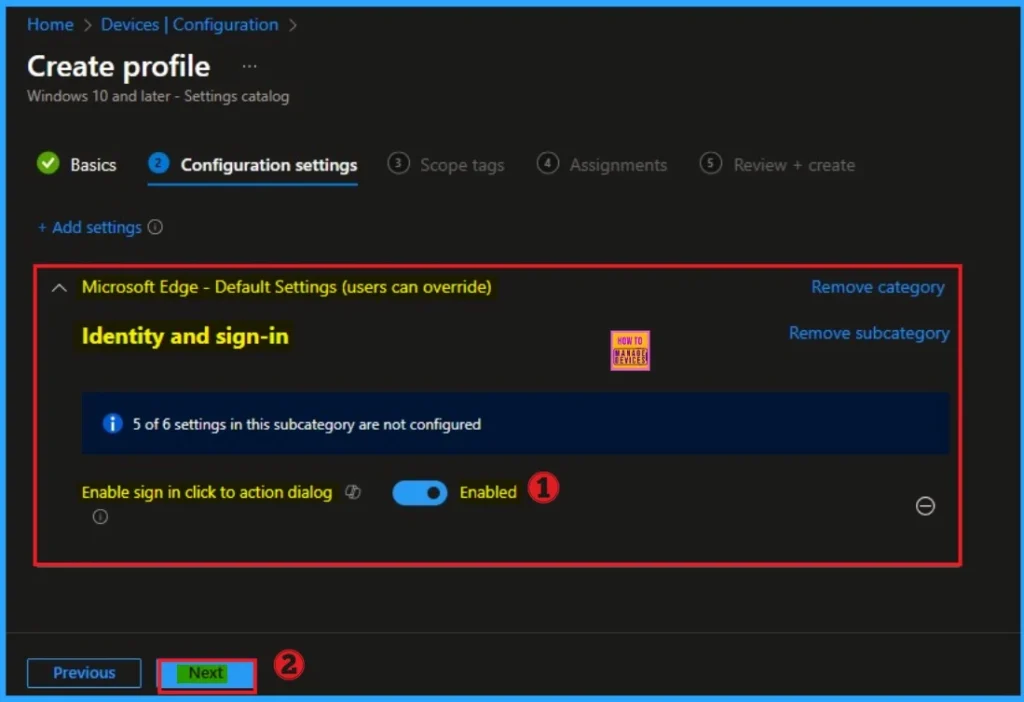
Enable Sign in Click to Action Dialog
If you enable or this policy, sign-in click-to-action dialog is shown on New tab page. By enabling this policy, you can ensure your organizations security. Here, I would like to enable this policy.
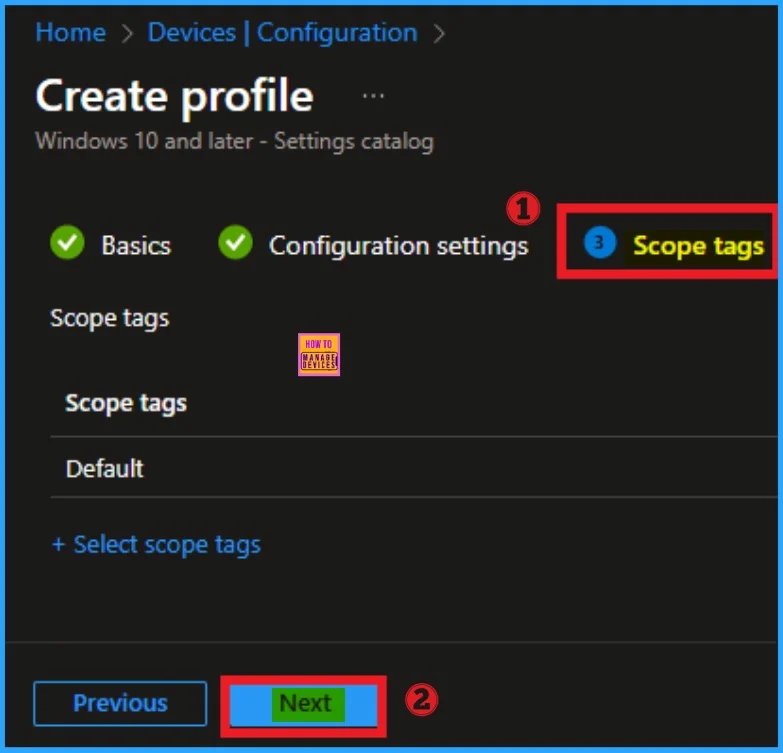
Scope Tags
Scope tags helps you to ensure the visibility and restrict the Sign in Click to Action Dialog. It is not a necessary step, so you can skip this section. Here I would like to skip this section, because it is not mandatory. Click on the Next button.
Assignment Tab for Policy
You can assign Sign in Click to Action Dialog policy to specific groups easily. Here I click, +Add groups option under Included groups. I choose a group from the list of groups and click on the Select button. Again, I click on the Select button to continue.
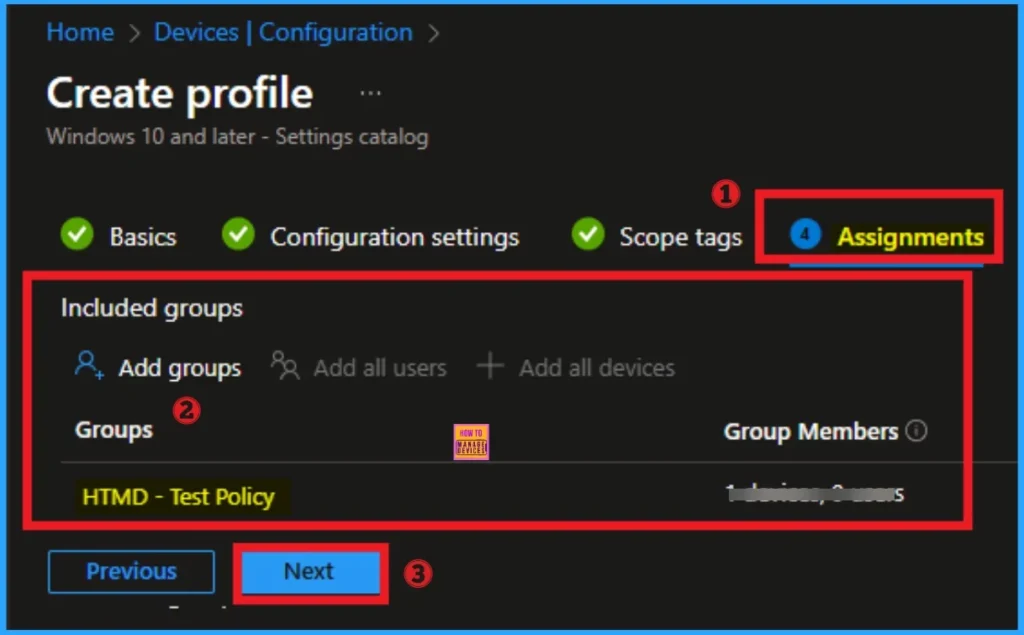
Completing Policy Creation
To complete the policy creation you can review all the policy details on the Review + create tab. It helps to avoid mistakes and successfully configure the policy. After verifying all the details, click on the Create Button. After creating the policy you will get success message.
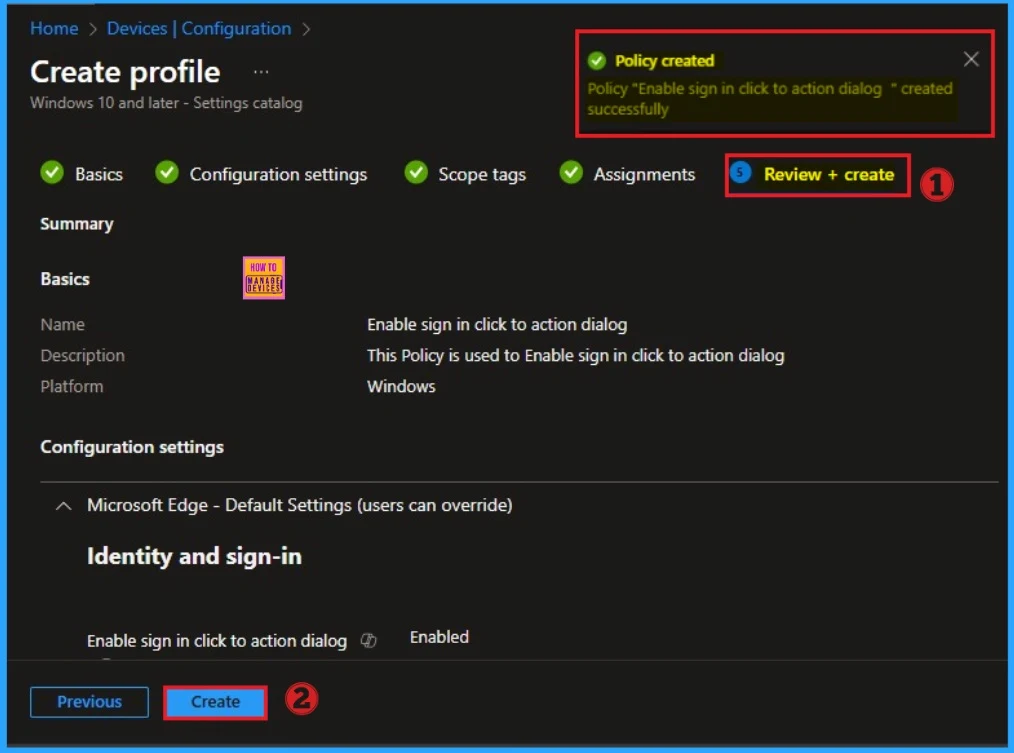
Monitoring Status
To quickly configure the policy and take advantage of the policy sync the assigned device on Company Portal. Open the Intune Portal. Go to Devices > Configuration > Search for the Policy. Here, the policy shows as succeeded.
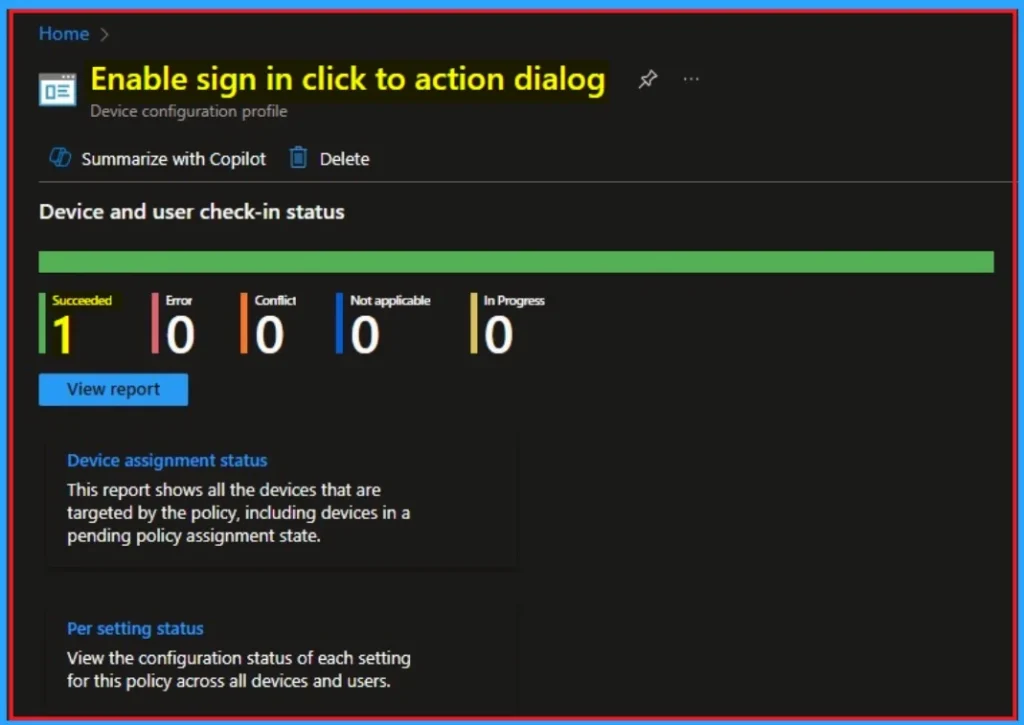
Event Viewer Details
Event Viewer helps you to verify the client side device. Open Event Viewer: Go to Start > Event Viewer. Navigate to Logs: In the left pane, go to Application and Services Logs > Microsoft > Windows > DeviceManagement-Enterprise-Diagnostics-Provider > Admin. Filter for Event ID 814: This will help you quickly find the relevant logs.
| Event ID Details |
|---|
| MDM PolicyManager: Set policy string, Policy: (SignlnCtaOnNtpEnabled_recommended), Area: (microsoft_edgev99~Policy~microsoft_edge_recommended~Identity_recommended), EnrollmentID requesting merge: (EB427D85-802F-46D9-A3E2-D5B414587F63), Current User: (Device), String: (), Enrollment Type: (0x6), Scope: (0x0). |
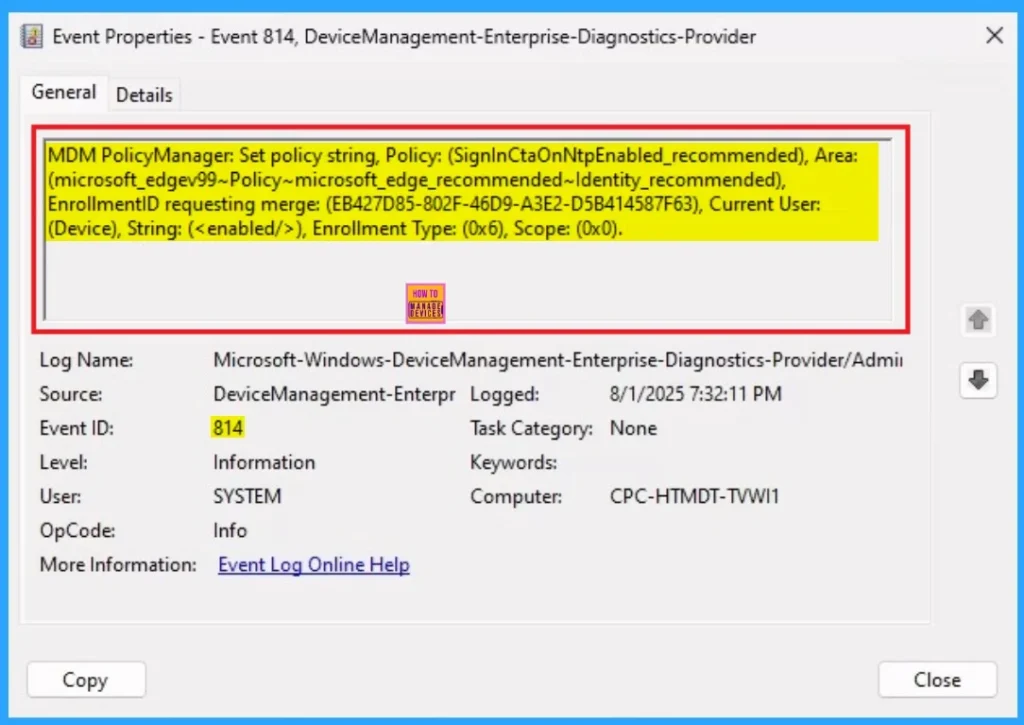
How to Remove Sign in Click to Action Dialog
If you want to remove the Assigned group from the policy, it is possible from the Intune Portal. Removing the policy from the assigned group is necessary for some time. To do this, open the Policy on Intune Portal and edit the Assignments tab and the Remove Policy.
To get more detailed information, you can refer to our previous post – Learn How to Delete or Remove App Assignment from Intune using by Step-by-Step Guide.

How to Delete Sign in Click to Action Dialog
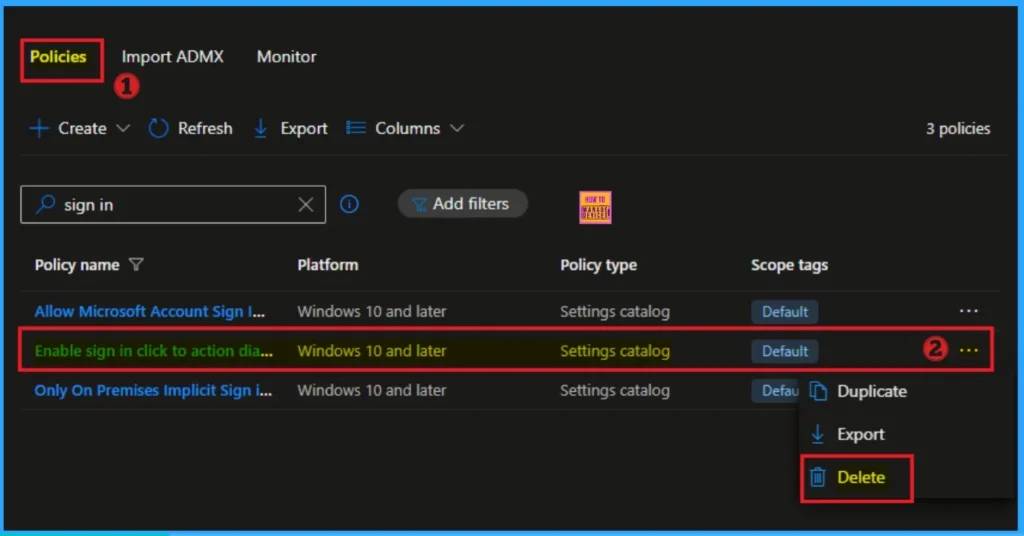
You can easily delete the Policy from the Intune Portal. From the Configuration section, you can delete the policy. It will completely remove from the client devices.
For detailed information, you can refer to our previous post – How to Delete Allow Clipboard History Policy in Intune Step by Step Guide.
Need Further Assistance or Have Technical Questions?
Join the LinkedIn Page and Telegram group to get the step-by-step guides and news updates. Join our Meetup Page to participate in User group meetings. Also, Join the WhatsApp Community to get the latest news on Microsoft Technologies. We are there on Reddit as well.
Author
Anoop C Nair has been Microsoft MVP for 10 consecutive years from 2015 onwards. He is a Workplace Solution Architect with more than 22+ years of experience in Workplace technologies. He is a Blogger, Speaker, and Local User Group Community leader. His primary focus is on Device Management technologies like SCCM and Intune. He writes about technologies like Intune, SCCM, Windows, Cloud PC, Windows, Entra, Microsoft Security, Career, etc.


According to MS, this option is obsolete and stopped working in Edge version 130.
https://learn.microsoft.com/en-us/deployedge/microsoft-edge-browser-policies/signinctaonntpenabled