Hey, let’s learn how to Enable Automatic HTTPS Policy to Switch Connections from HTTP to HTTPS using Intune. This policy lets admins set Microsoft Edge to switch websites from using HTTP (not secure) to HTTPS (secure). HTTPS helps keep information private and stops hackers from seeing or changing what people send or receive on websites.
Admins can choose to turn this feature off, only upgrade websites that are likely to work with HTTPS, or force every website to use HTTPS. If they don’t set anything, Edge will upgrade websites that probably support HTTPS automatically.
For this to work well, Edge needs an updated list of websites that can use HTTPS. This list is kept up to date by allowing component updates in Edge. If updates are turned off, the automatic HTTPS feature won’t work properly.
Using this policy helps protect the company by making sure employees connect to secure websites. It keeps data safer from hackers. But if some websites don’t support HTTPS, people might see more connection errors. Overall, it makes internet use much safer for the organisation.
Table of Contents
What are the Advantages of enabling Automatic HTTPS using Intune?
Enabling the Automatic HTTPS policy in Microsoft Edge improves security by making sure users are connected to websites through a secure, encrypted connection. It helps protect sensitive data, prevents online attacks, and gives admins an easy way to enforce safer browsing across the organisation.
1. Improves website security using HTTPS
2. Keeps user data private and encrypted
3. Protects against hackers and online attacks
4. Makes internet browsing safer for employees
5. Reduces IT workload by working automatically
6. Supports organisation-wide security compliance
Enable Automatic HTTPS Policy to Switch Connections from HTTP to HTTPS using Intune
Before enabling Automatic HTTPS, websites in an organisation may load using the less secure HTTP protocol, which does not encrypt the data sent between the user and the site. This can leave sensitive information, like passwords and personal details, open to interception by attackers, especially on public or unsecured networks.
After enabling Automatic HTTPS, the browser will automatically try to upgrade all connections from HTTP to the more secure HTTPS protocol. This improves security by encrypting the data and protecting it from being read or modified by attackers. It also helps build user trust, as most browsers mark HTTPS sites as secure.
- Take Control of Your Browser Security Manage Web Bluetooth in Edge Browser with Intune Policy
- How to Track Windows Security Patch Installation Details using Intune Inventory
- Maester Microsoft Security Test Automation Framework
Create a Profile
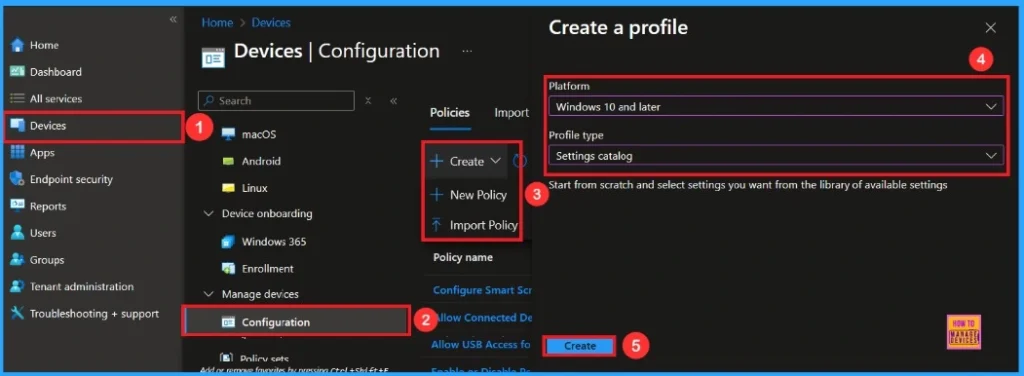
You can start the policy creation of the Automatic HTTPS in Intune. Using simple steps, you can easily complete the policy creation. Open the Intune admin center. Go to Devices > Configuration > Policies> + Create > New policy.
- Platform – Windows 10 and later
- Profile type – Settings catalog
Basic Step
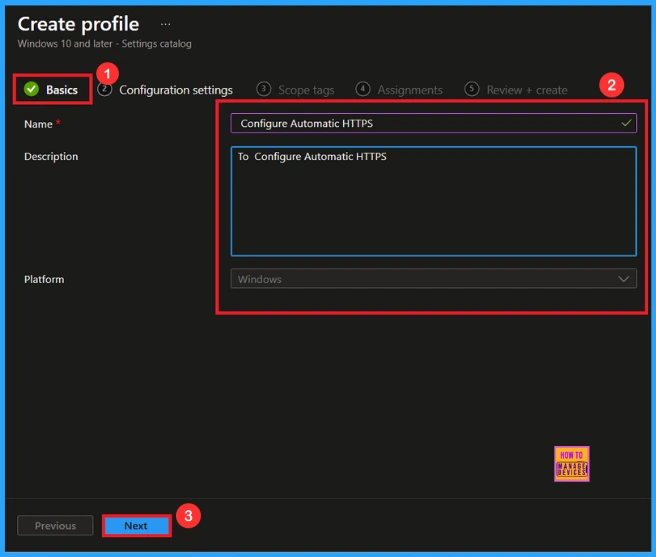
After creating a profile, your next step is to add the basic details. These usually include the name, description, and platform information. You should give the policy name (Configure Automatic HTTPS), so it’s easy to identify later. You can also add a description to help you understand the purpose of the policy in the future.
Configuration Settings – Settings Picker
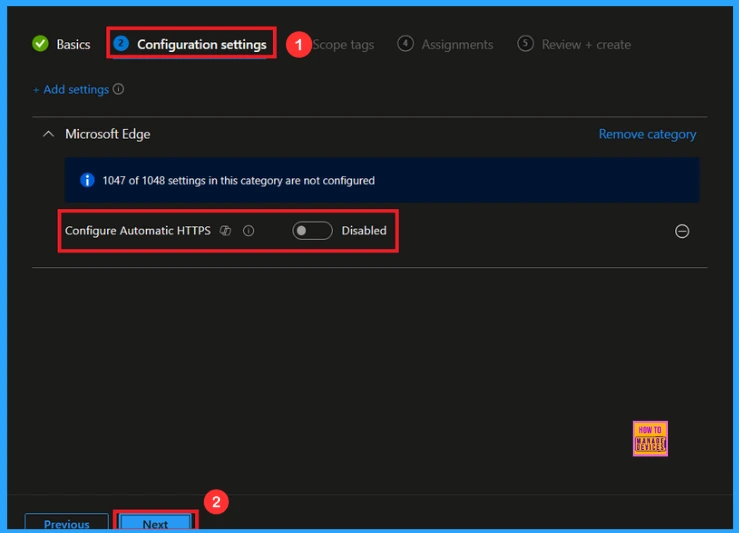
On this page, we click on the + Add Settings hyperlink. Then you will get a settings picker that will show different types of categories to select specific settings. Here, I choose to Microsoft Edge category and select the Configure Automatic HTTPS settings.
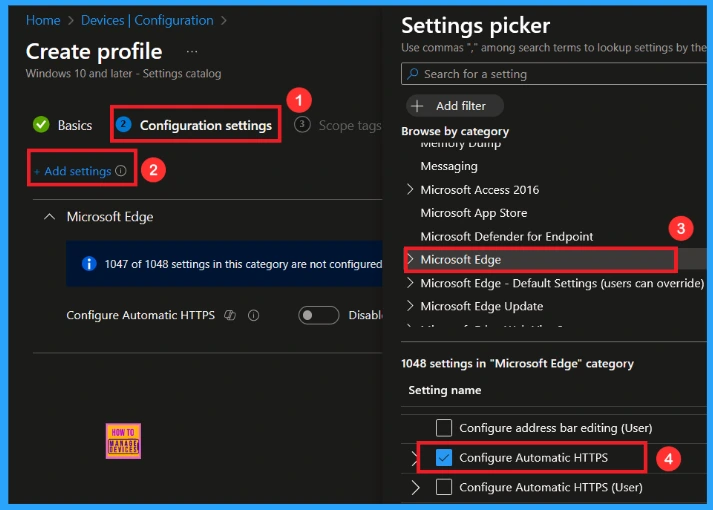
After closing the Settings Picker, you will see it on the Configuration Settings page. Here we have only two settings: Enable or Disable. By default, Automatic HTTPS will be set to Disabled.
Enable Automatic HTTPS Policy
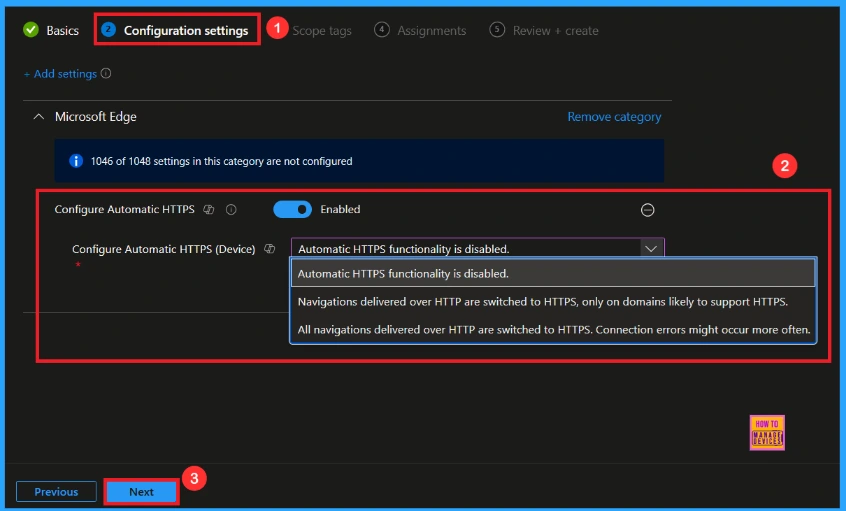
If you want to enable this policy, look for the toggle switch next to the Configure Automatic HTTPS. After that, you can see three options. Click Next to continue.
Scope Tag
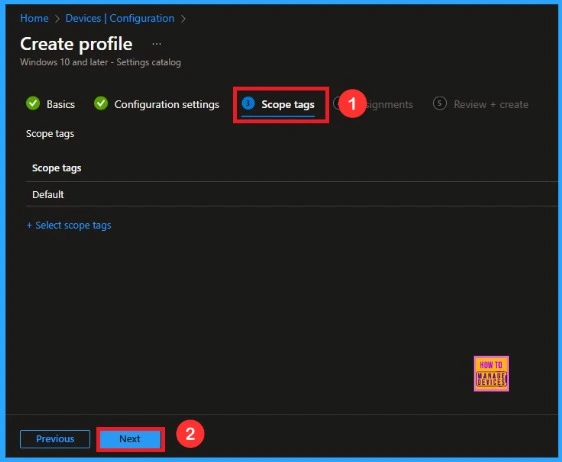
The next section is the Scope tag and which is not a mandatory step. It helps to assign this policy to a defined group of users or devices. Here, I skip the section and click on the next button
Assignments
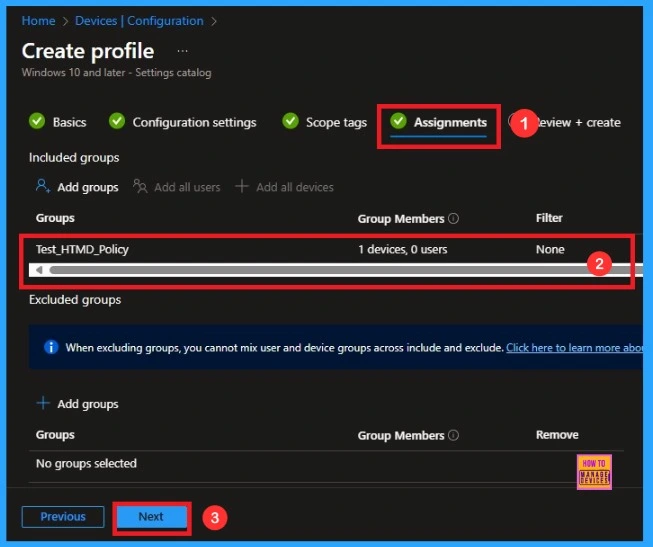
The assignments tab is the crucial step that determines which groups can be selected to assign the policy. Click on the +Add groups option under included groups. Select the group from the list of groups on your tenant. Click on the Select button. And you can see the selected group on the Assignments tab. Click on the Next button to proceed.
Review+ Create
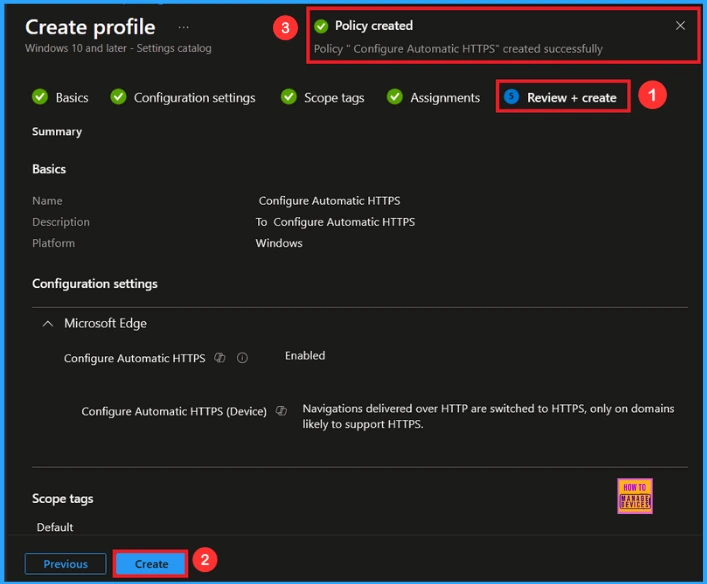
In this section, you can see a summary of everything you entered in the previous steps, such as basic details, configuration settings, assignment details, and more. If you want to change or edit anything, you can easily go back to the previous section. Click Create to finish, and a message will confirm that the Configure Automatic HTTPS was created successfully.
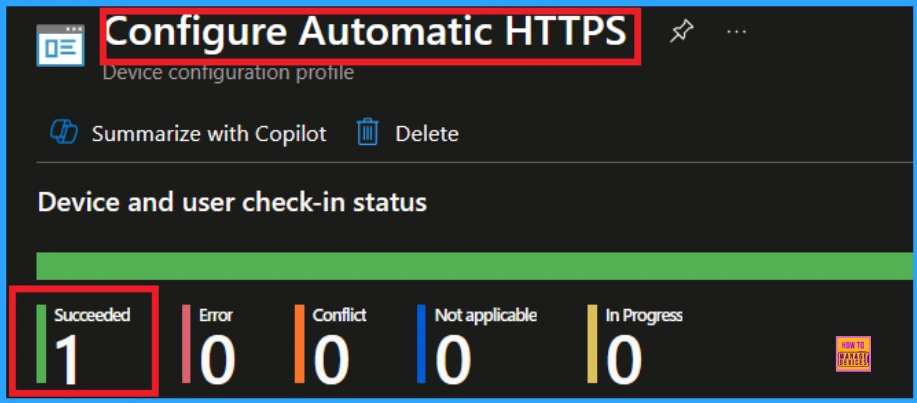
Device and User Check-in Status
To view a policy’s status, go to Devices > Configuration in the Intune portal, select the policy (Configure Automatic HTTPS), and check that the status shows Succeeded (1). Use manual sync in the Company Portal to speed up the process.
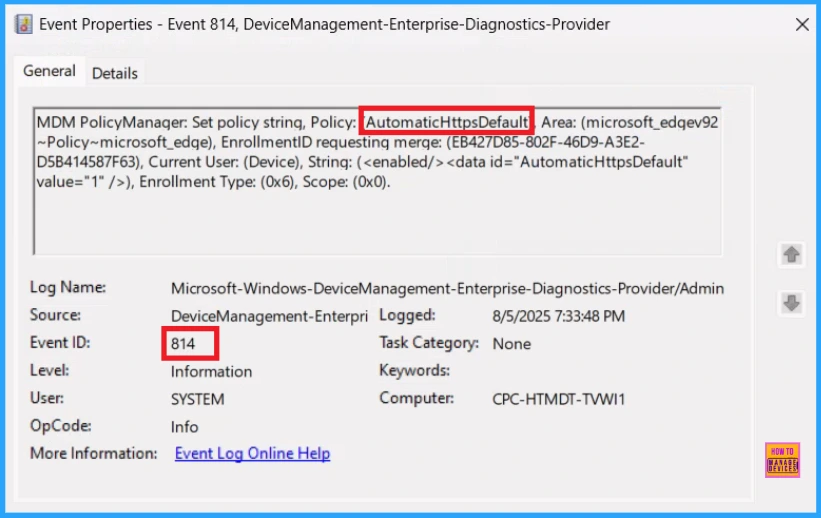
Client-side Verification
To confirm whether the policy is successful or not, you can use the Event Viewer. First, open Event Viewer and navigate to Applications and Services Logs > Microsoft > Windows > Device Management > Enterprise Diagnostic Provider > Admin. Use Filter Current Log and search the Event ID 814.
MDM PolicyManager: Set policy string, Policy: AutomaticHttpsDefault Area: (microsoft_edqev92
~Policy~microsoft_edqe), EnrollmentID requesting merqe: (EB427D85-802F-46D9-A3E2-
D5B414587F63), Current User: (Device), String: (), Enrollment Type: (0x6), Scope: (0x0).
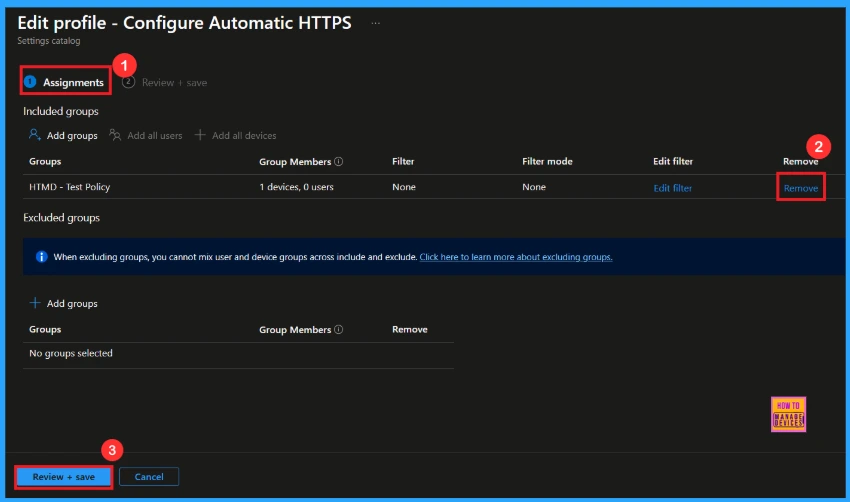
How to Remove a Group from Automatic HTTPS Policy
After creating the policy, if you want to remove the specific group that you previously selected, you can easily do that. First, go to Devices > Configuration policies. In the Configuration policy section, search and select the policy(Configure Automatic HTTPS). In the Assignment section, you will find an Edit option and click on it. Then, click the Remove option and Review+ save button.
For detailed information, you can refer to our previous post – Learn How to Delete or Remove App Assignment from Intune using by Step-by-Step Guide.
How to Delete Automatic HTTPS Policy from Intune
If you want to delete this policy for any reason, you can easily do so. First, search for the policy name in the configuration section. When you find the policy name, you will see a 3-dot menu next to it. Click on the 3 dots, then click the Delete button.
For detailed information, you can refer to our previous post – How to Delete Allow Clipboard History Policy in Intune Step by Step Guide.

Need Further Assistance or Have Technical Questions?
Join the LinkedIn Page and Telegram group to get the latest step-by-step guides and news updates. Join our Meetup Page to participate in User group meetings. Also, Join the WhatsApp Community to get the latest news on Microsoft Technologies. We are there on Reddit as well.
Author
Anoop C Nair has been Microsoft MVP from 2015 onwards for 10 consecutive years! He is a Workplace Solution Architect with more than 22+ years of experience in Workplace technologies. He is also a Blogger, Speaker, and Local User Group Community leader. His primary focus is on Device Management technologies like SCCM and Intune. He writes about technologies like Intune, SCCM, Windows, Cloud PC, Windows, Entra, Microsoft Security, Career, etc.


