Let’s discuss the Turn off OneNote Auto-Linked Note Taking policy using Intune Policy. As you know, Microsoft Intune allows administrators to configure many different types of policies through the Settings Catalog. One of these categories is OneNote, which includes the policy for managing OneNote Auto-Linked Note Taking policy feature.
This policy setting is designed to control the OneNote auto note-taking feature. The feature allows users to take notes while working on different items such as webpages, Word documents, or other application. When this feature is active, OneNote automatically records the page or document that was open at the time the note was taken.
This creates a link between the note and the source, making it easier for users to return to that item later. By enabling this policy setting, you are turning off the auto note-taking feature. This means OneNote will no longer create automatic links between notes and the content being viewed.
If you disable this policy setting, or if you leave it unconfigured, OneNote will continue to automatically link notes. In this case, whenever the user takes a note, it will connect to the webpage, Word document, or other content that was ope
Table of Contents
Why Might an Organization Enable this Policy?
An organization may enable this policy to prevent automatic linking of notes, giving users more control and avoiding unnecessary or unwanted connections between notes and documents.
Turn off OneNote Auto-Linked Note Taking policy using Intune Policy
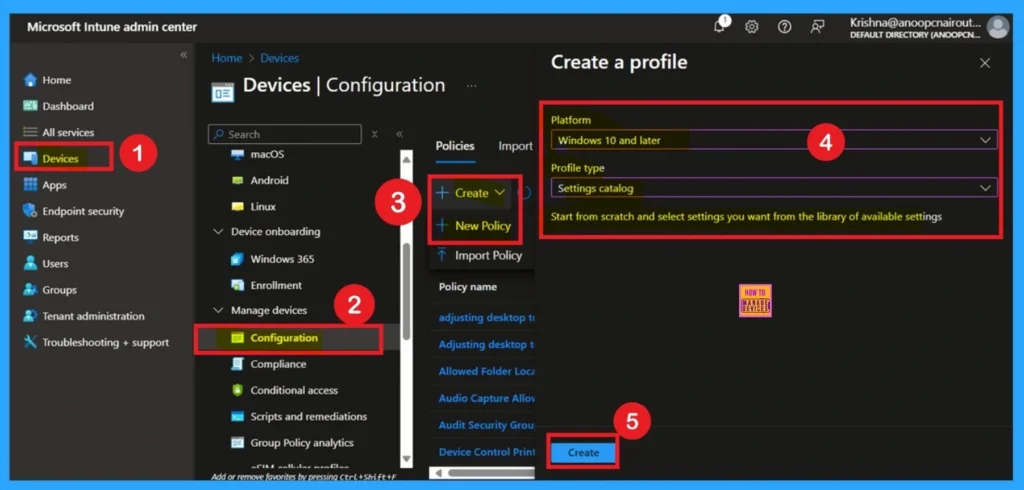
We have already discussed the key details of this policy. Now, let’s look at how it can be deployed through the Microsoft Intune Admin Center. First, go to the Devices section in the Intune Admin Center. Next, click on Configuration profiles and then select + Create profile. When creating the profile, you will need to provide the required details such as the Platform and Profile type. For the Platform, select Windows 10 and later.
- For the Profile type, choose Settings catalog. Finally, click on Create to complete the process. This will deploy the policy through Intune.
- Enable Disable OneNote Audio Search for User Policy using Intune
- OneNote Text Prediction for user Policy Deployment using Intune
- Enable Disable Full Screen Mode in MS Edge Browser using Intune Policy
Start With Basics
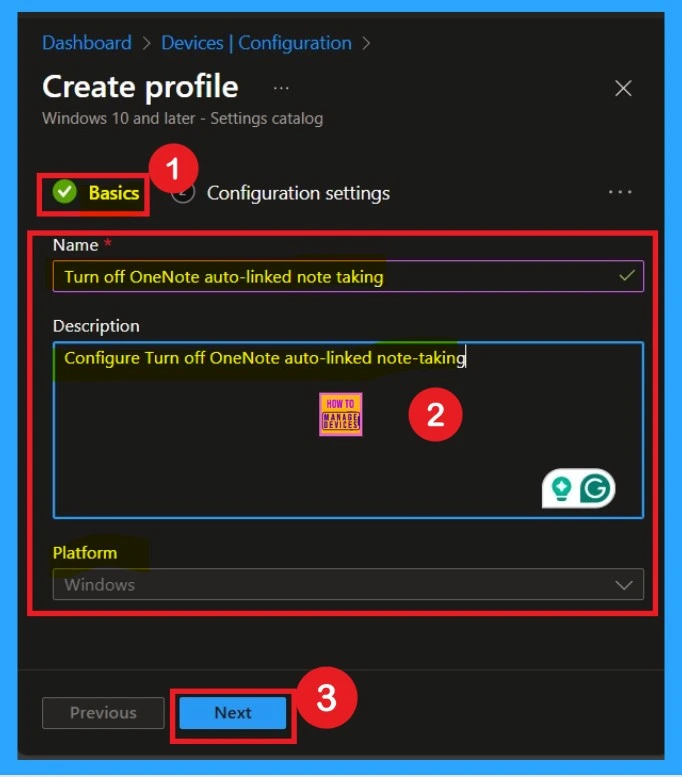
After creating the profile, you will be taken to the Basics tab. Here, you need to enter the basic details such as the Name and Description of the policy. Provide an appropriate name that clearly identifies the purpose of the policy. The policy name act as an identifier, making it easier to recognize and manage later. You may also add a description to give more context about what the policy is for or how it should be used.
- Once the required details are filled in, click on Next to proceed.
What is Configuration Settings
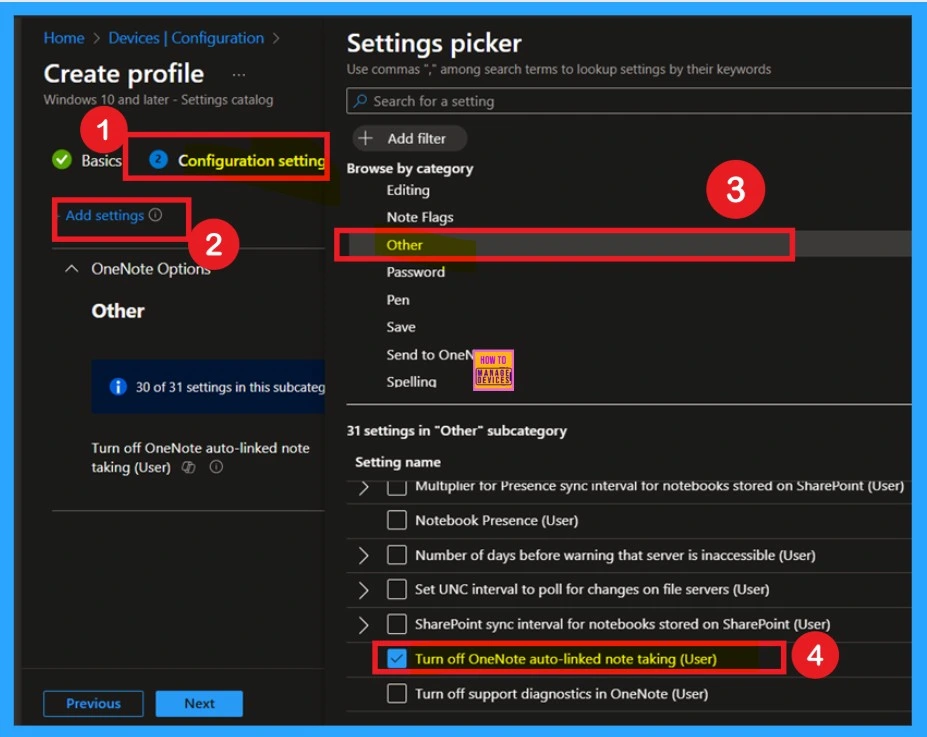
After entering the basic details, you will move to the Configuration settings section. Here, you will see an option to Add settings. Click on this option to proceed. When you click on Add settings, a new window will open showing the available categories of settings.
In this window, scroll down and select the Other category. Under this category, you will find different types of policy settings related to OneNote. From the list, select the policy named Turn off OneNote Auto-Linked Note Taking. This will allow you to configure whether the OneNote auto note-taking feature is enabled or disabled for users.
- Now you can close Settings Picker.
The Policy Disabled Mode
After selecting the configuration settings, you can now close the Settings picker window. Once it is closed, you will see the selected policy listed on the Configuration settings page. By default, the policy is set to Disabled. If you want to proceed with the current settings or make changes later, simply click Next to continue with the policy creation process.
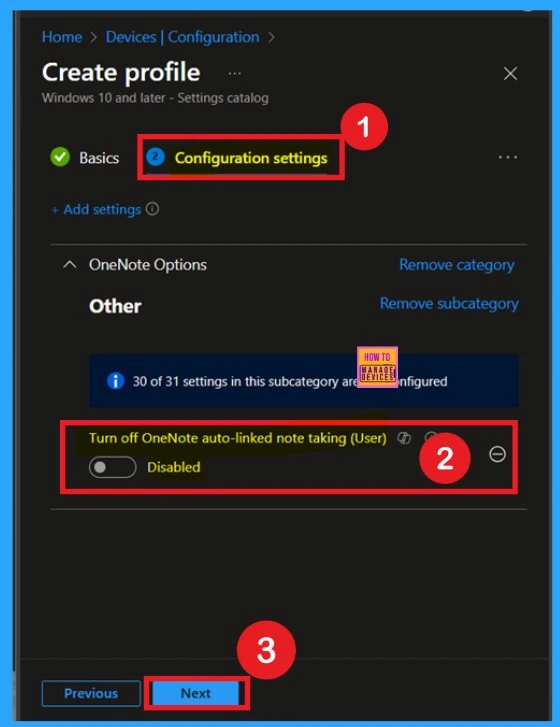
How to Enable the Policy
Enabling this policy is very simple. You just need to move the toggle button from left to right, and it will turn blue, indicating that the policy is enabled. After that, click on Next. You can proceed this policy in enabled mode.
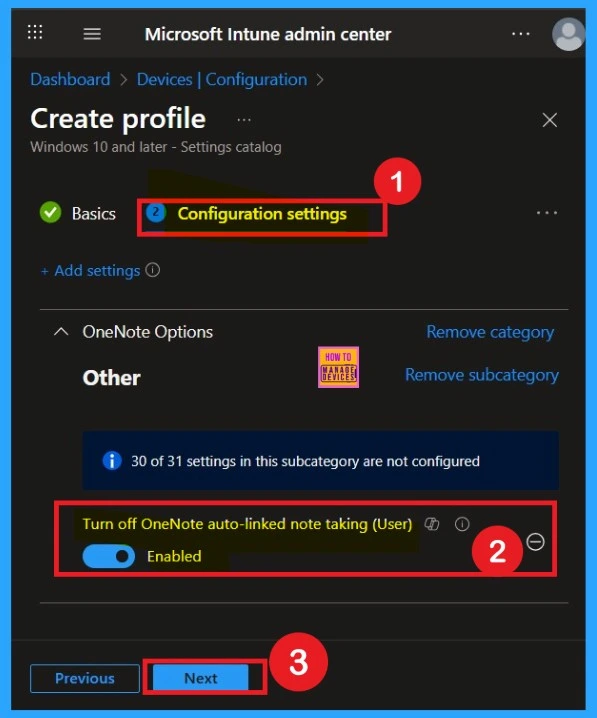
Know about the Scope Tags
The purpose of scope tags is to categorize and associate your policy with a specific scope, making it easier to manage assignments for particular environments. Here, you can add a scope tag for the policy, although it is not mandatory.
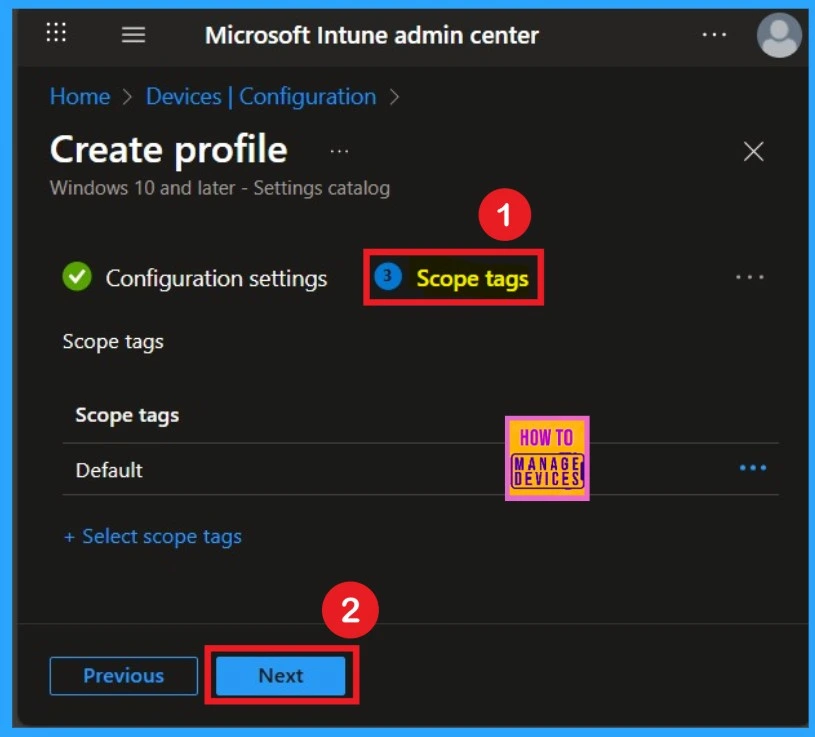
Importance of Assignments in Intune
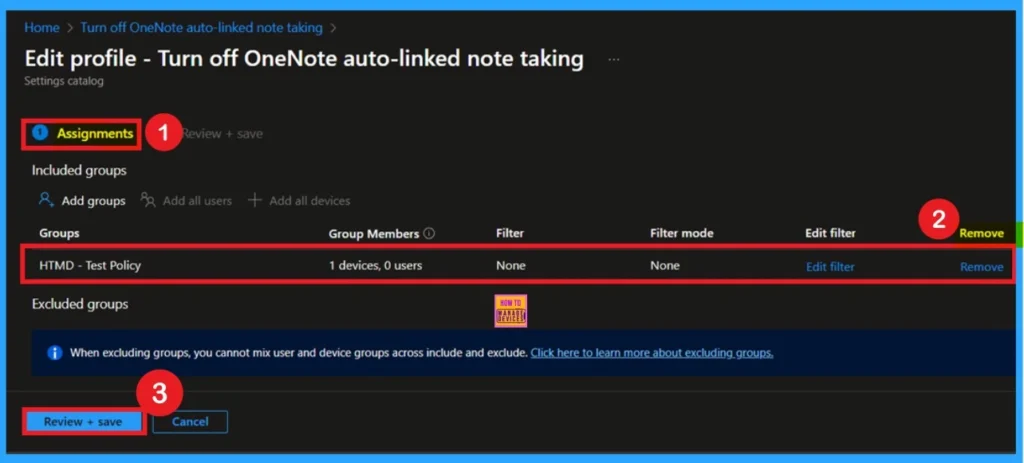
The next step is the Assignment tab, which is crucial for deploying policies. In this section, you can specify the group to which you want to apply the policy. I clicked on “Add Groups” under the Include Groups option. After selecting the group I want to deploy the policy to, I clicked Next to continue.
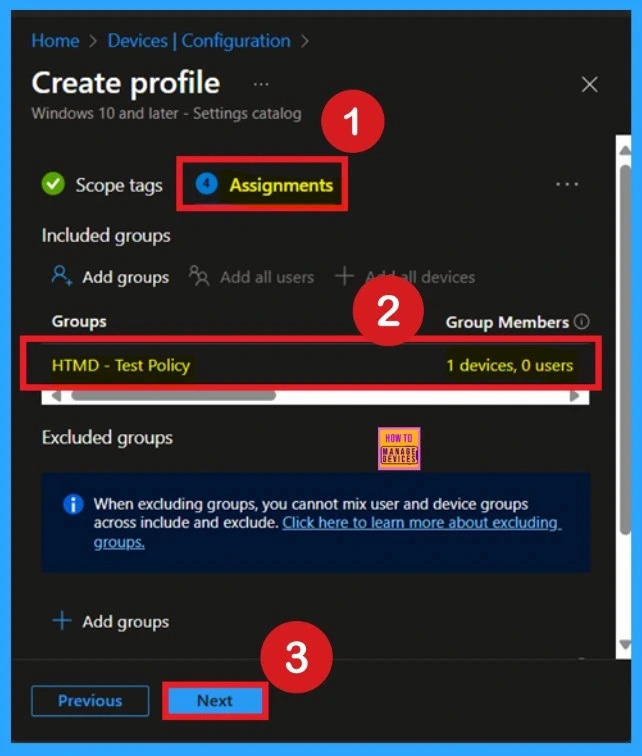
What is the Review + Create Step
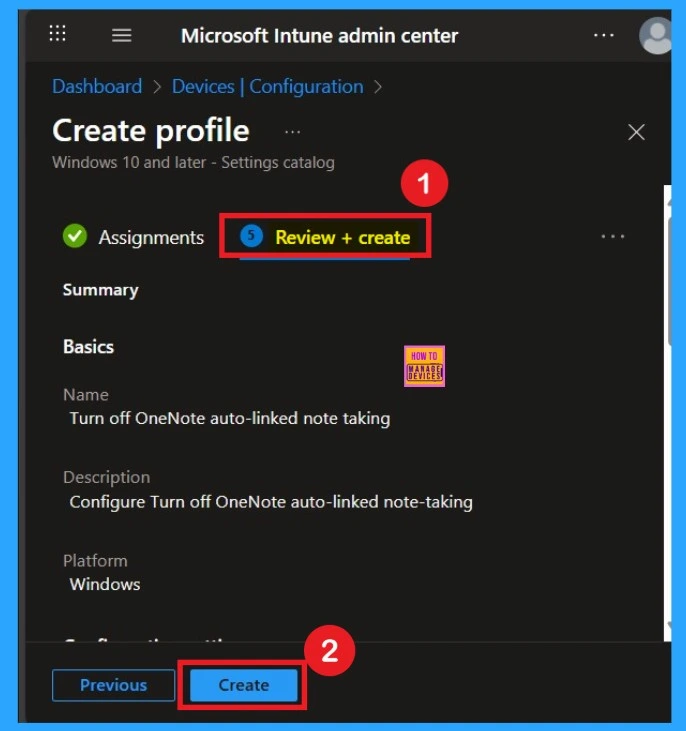
After completing the assignments, you will reach the review and create option, which is the final stage of policy creation. Here, you can review all the details about the policy, including the basics details and configuration detials etc.
- If you have reviewed all the summaries and are satisfied with the settings, click on the Create option.
Monitoring Status – How Important
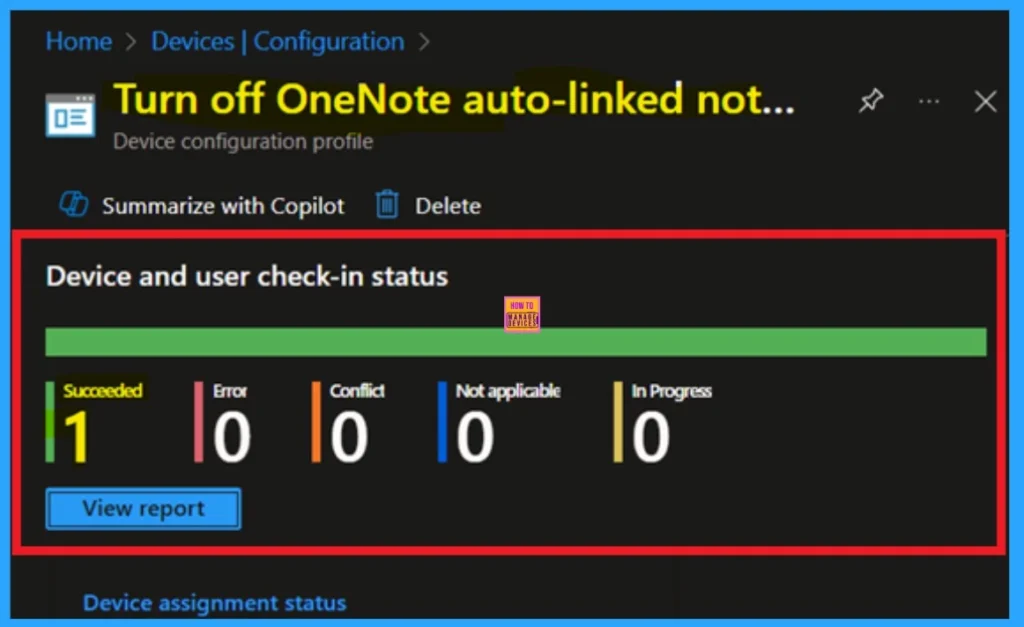
After creating the policy, administrators may want to confirm whether it has been successfully deployed. To check this, go to Devices > Configurations and search for the policy name you created. Once you find the policy, click on it to open the Monitoring Status page. On this page, you can view the deployment details for both devices and users. The status will show if the policy has been applied successfully.
- If it is as Succeeded, it means the deployment worked as expected.
- You may see 1 or 2 under “Succeeded.” If there are no entries under Error, Conflict, Not Applicable, or In Progress, it indicates that the policy has been deployed without issues.
Client Side Verification
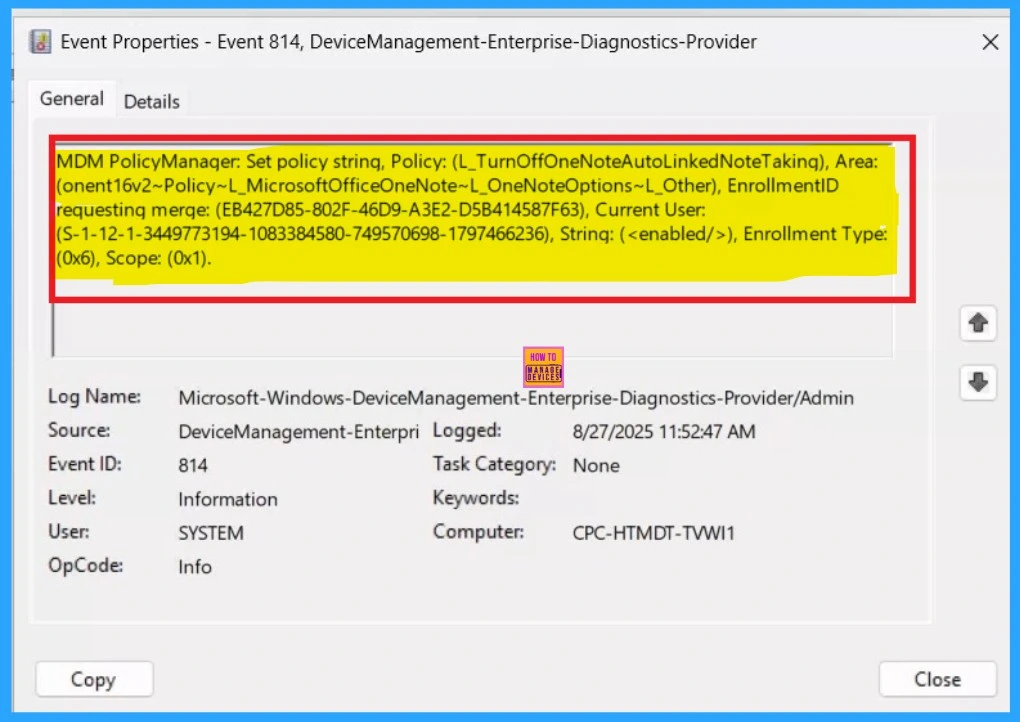
You can verify the confirmation in the Event Viewer by looking for Event ID 813 or 814. To access this, open Event Viewer and navigate to Applications and Services Logs > Microsoft > Windows >Device Management Enterprise Diagnostic Provider > Admin.
- You can see a list of policy-related events now.
- I found the policy details in the Event ID 814.
| Policy Details |
|---|
| MDM PolicyManager: Set policy string, Policy: (L_TurnOffOneNoteAutoLinkedNoteTaking), Area: (onent16v2~Policy~L_MicrosoftOfficeOneNote~L_OneNoteOptions~L_Other), EnrollmentID requesting merqe: (EB427D85-802F-46D9-A3E2-D5B414587F63), Current User: (S-1-12-1-3449773194-1083384580-749570698-1797466236), Strinq: (), Enrollment Type: (0x6), Scope: (0x1). |
How to Delete a Policy Permenently
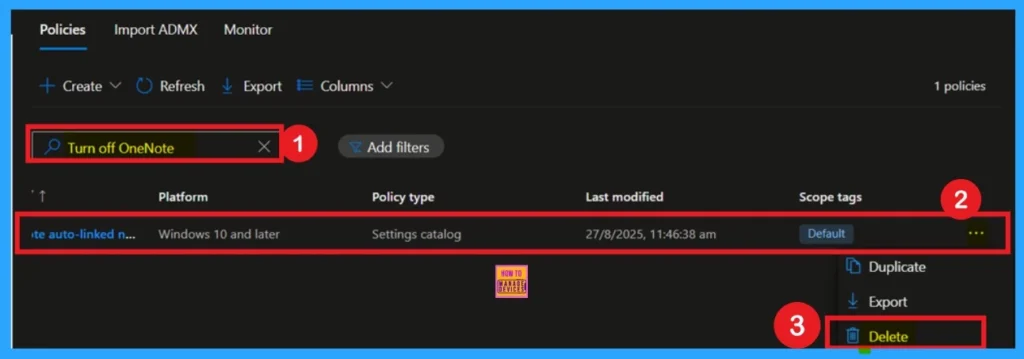
If you want to permanently delete a policy, search for the policy name in the Configuration search bar. Once the policy appears, click on the 3-dot menu next to it. You will see 3 options: Duplicate, Export, and Delete. Select Delete, and the policy will be permanently removed.
How to Remove Policy Group
Start by navigating to the Monitoring status page via Devices > Configuration. Search for the policy by name and click on it to open its monitoring details. Scroll down to the Assignments section and click Edit. This will take you back to the policy’s assignment settings. From here, you can remove the group you no longer want the policy to apply to. For a view of the process, refer to the screenshot belo
For detailed information, you can refer to our previous post – Learn How to Delete or Remove App Assignment from Intune using by Step-by-Step Guide.
Need Further Assistance or Have Technical Questions?
Join the LinkedIn Page and Telegram group to get the latest step-by-step guides and news updates. Join our Meetup Page to participate in User group meetings. Also, join the WhatsApp Community to get the latest news on Microsoft Technologies. We are there on Reddit as well.
Author
Anoop C Nair has been Microsoft MVP for 10 consecutive years from 2015 onwards. He is a Workplace Solution Architect with more than 22+ years of experience in Workplace technologies. He is a Blogger, Speaker, and Local User Group Community leader. His primary focus is on Device Management technologies like SCCM and Intune. He writes about technologies like Intune, SCCM, Windows, Cloud PC, Windows, Entra, Microsoft Security, Career, etc.

