Today, we are discussing how to manage automatic update check intervals in Microsoft Edge using Intune Policy. Microsoft Intune provides a wide range of policies within its settings catalog that help organizations control device and application behavior. Among these, one important policy focuses on update management, ensuring that Microsoft Edge stays secure and efficient through regular updates.
The specific policy, known as Auto-Update Check Period Override, allows administrators to define the minimum time between automatic update checks. By default, Edge checks for updates every 10 hours, but with this policy, IT teams can adjust the interval to match organizational needs.
This flexibility helps the performance, bandwidth usage, and timely security patches. Updates play a vital role in maintaining both browser performance and system security. Each update can include important bug fixes, performance improvements, or critical security patches that protect against evolving threats.
Ensuring that these updates are delivered and installed efficiently minimizes vulnerabilities and keeps the browsing experience smooth. If enabled, this policy lets you set a value for the minimum number of minutes between automatic update checks. Otherwise, by default, auto-update checks for updates every 10 hours.
Table of Contents
How is this Policy Helpful for Organizations, and why should they Enable it?
This policy is helpful because it allows organizations to control how often Microsoft Edge checks for updates, instead of relying on the default 10-hour interval. By customizing the update frequency, IT administrators can reduce unnecessary network load, ensure timely delivery of critical patches, and keep browsers running smoothly.
Managing Automatic Update Check Intervals in MS Edge using Intune Policy
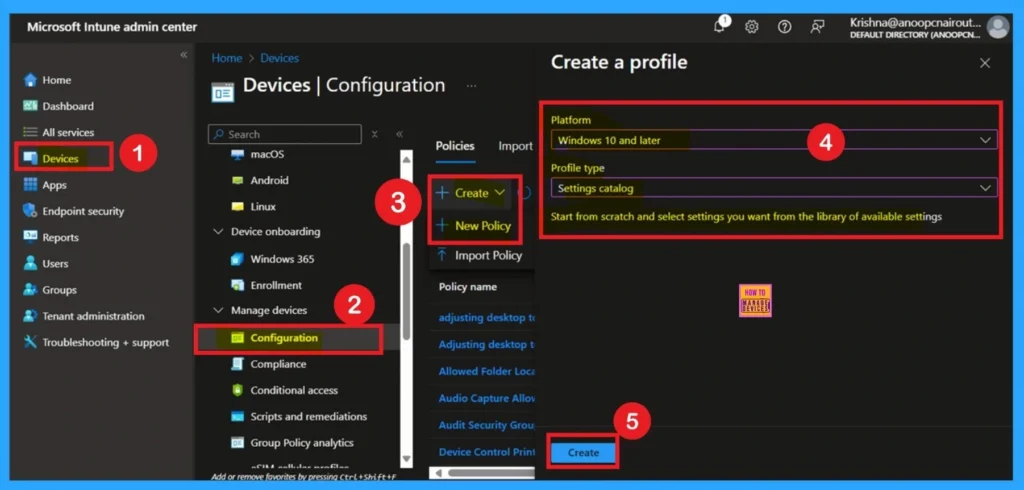
We have already discussed many aspects of updates and how they are helpful to organizations in real time. Now, let’s move on to how this specific policy can be deployed in Microsoft Intune. Now, let’s see how this policy can be deployed through the Microsoft Intune Admin Center. First, go to the Devices section. In Devices, select Configurations. In Configurations, click on the + Create policy option.
- Then click on the Next.
- Next, fill in the Platform and Profile type details in the Create profile window.
- Set Platform to Windows 10 and later and set Profile type to Settings catalog.
- How to Delete Undecryptable Passwords in MS Edge using Intune Policy
- Enable Microsoft Edge Update Policy in All Channels for Controlling Edge Installation using Intune
- Simplify Microsoft Edge Updates Management with Windows Autopatch
Describe the Basic Tab
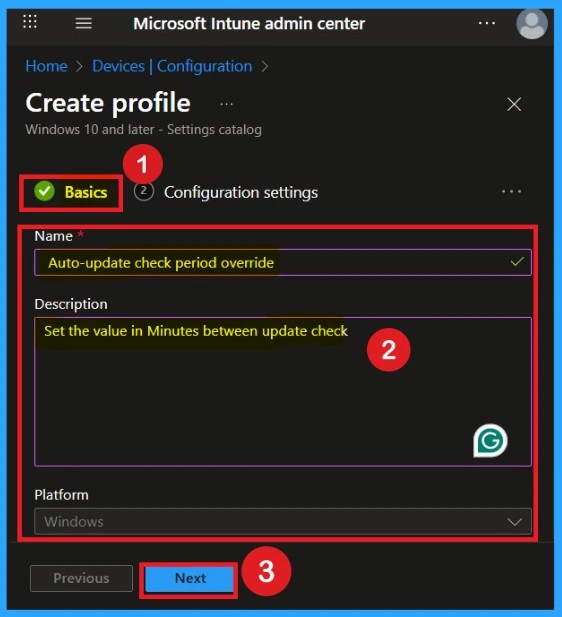
Now, you are on the Basics tab, which is the first step you need to complete. Here, you will see blank fields such as Name and Description. You need to fill in these basic details carefully, as they are very important. For example, you can enter the name as Auto Update Check Period Override. You can also choose any name that helps you easily identify the policy later.
Then, add a description for better clarity. The platform is already set to Windows, so you don’t need to make any changes there. Once done, click on Next to proceed.
What is Configuration Settings
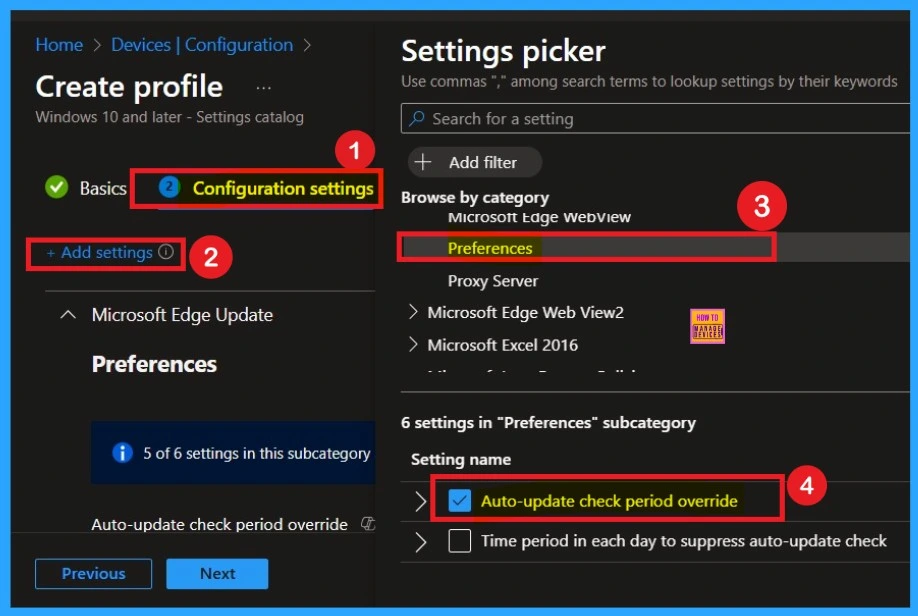
After completing the Basics tab, you will move on to the Configuration settings section. In this section, click on the Add settings option. This will open a settings picker window where you can browse different categories. From the list, select Microsoft Edge Update.
Within the Microsoft Edge Update category, you will see different types of subcategories. Here, you need to choose the Preferences category. Under Preferences, you will find multiple setting options. Select the Auto-Update Check Period Override option.
- Once selected, close the settings picker window to continue.
Disabled by Default
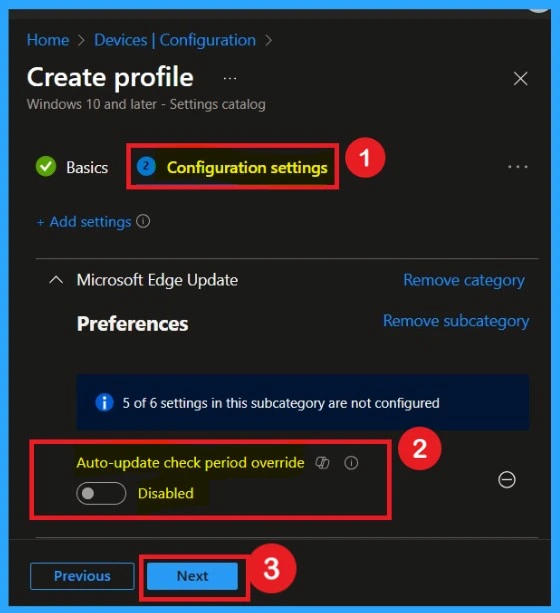
When you close the settings Picker , now, you are on the configuration settings. Here you can see the policy is disabled by default if you want to continue with that, click on the next to continue.
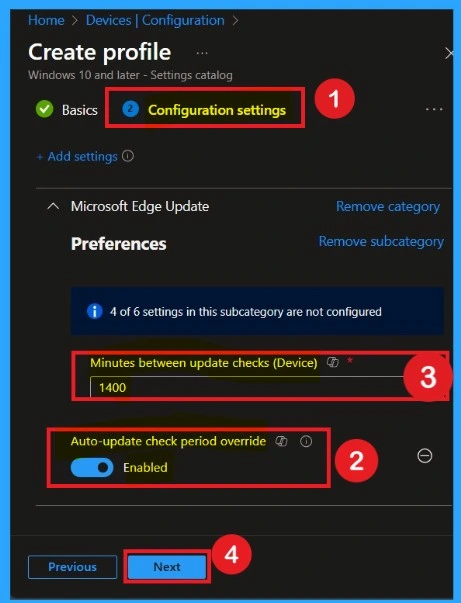
Enable the Policy
To enable the policy, move the toggle from Left to Right. Once enabled, the button will turn blue, indicating that the policy is active. You will then see an additional field where you can enter the number of minutes between automatic update checks. Fill in the desired interval according to your organization’s requirements
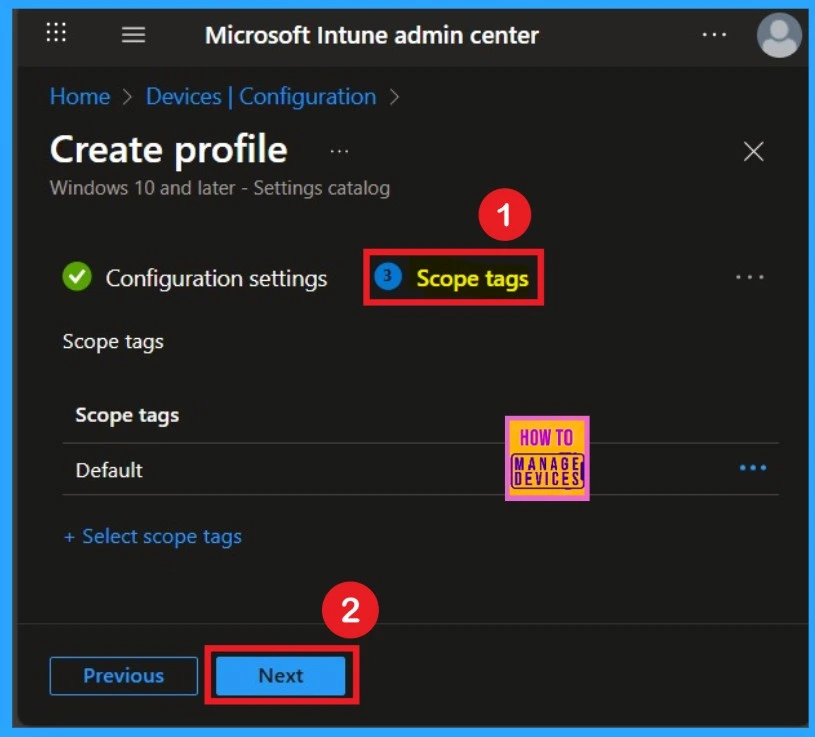
Scope Tags
Now you are on the Scope tags section. Scope tags are used to assign policies to specific admin groups for better management and filtering. If needed, you can add a scope tag here. However, for this policy, I chose to skip this section.
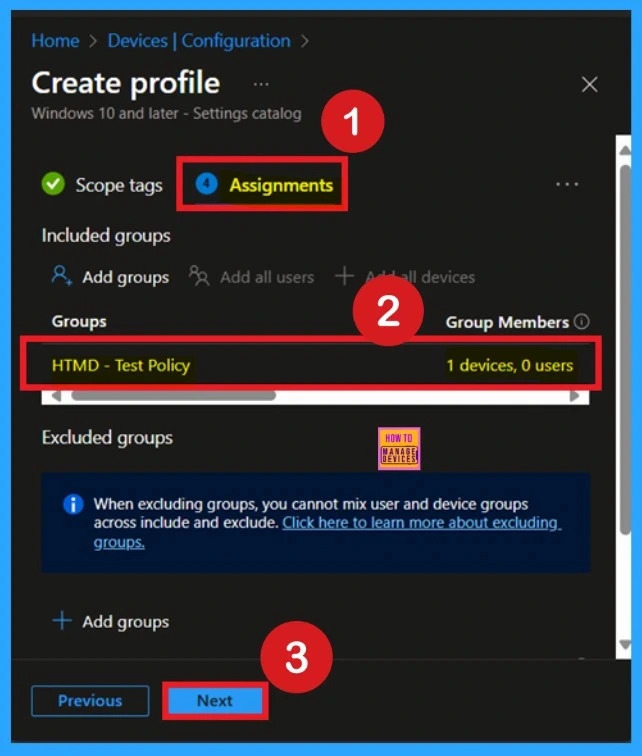
Important of Assignments
Next, you’ll reach the Assignments section, which is a very important step. This is where you decide which user or device groups should receive the policy. In this case, I selected the specific group I wanted to apply the policy to. After selecting the group, click Next to continue.
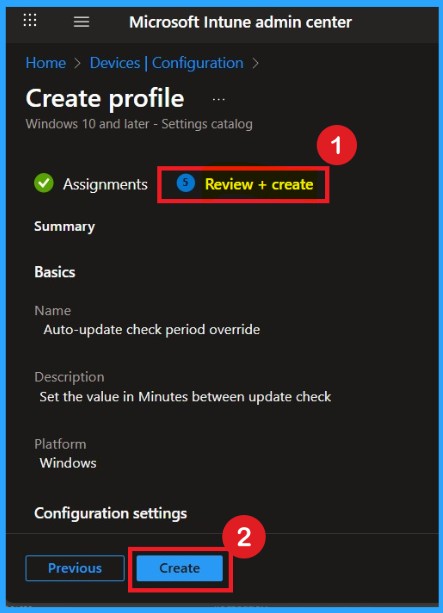
Review + Create
Once the assignments are complete, you’ll reach the Review +Create stage, which is the final step in policy creation. Here, you can review all the details of the policy, including the basic information and configuration settings.
- If you’re satisfied with the summaries and settings, click the Create button to finalize the process.
Monitoring Status
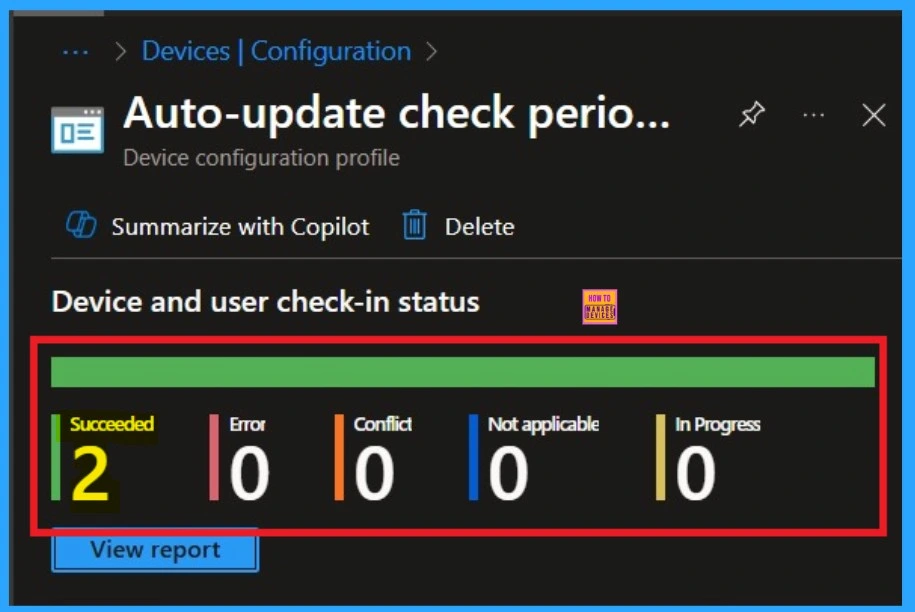
When you create a new policy for a device, it typically takes up to 8 hours for the policy to apply automatically. However, you can speed up this process by manually syncing the policy. After syncing, you can confirm that the policy has been successfully applied by checking in Intune.
- To do this, go to Device > Configuration and select the policy.
Understand the Client-Side Verification
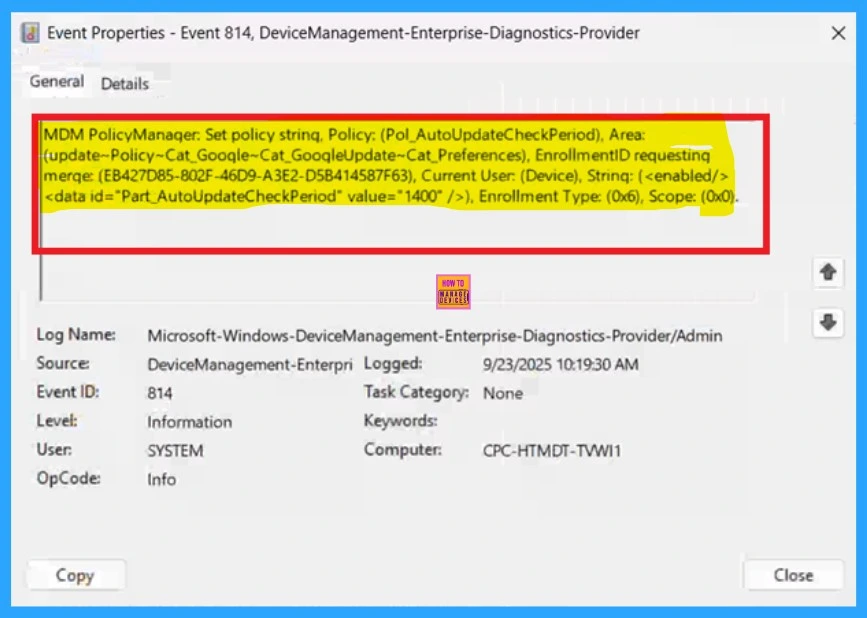
To get the client-side verification, open the Event Viewer and navigate to Applications and Services Logs > Microsoft > Windows > Device Management > Enterprise Diagnostic Provider > Admin. Once there, you can search for specific policy results by using the Filter Current Log feature located in the right pane. This helps quickly get the relevant results within the log.
| Policy Info |
|---|
| MDM PolicyManager: Set policy strinq, Policy: (Pol_AutoUpdateCheckPeriod), Area: (update-Policy~Cat_Gooqle~Cat_GooqleUpdate~Cat_Preferences), EnrollmentID requesting merqe: (EB427D85-802F-46D9-A3E2-D5B414587F63), Current User: (Device), Strinq: ( ), Enrollment Type: (0x6), Scope: (0x0). |
How to Remove Policy Group
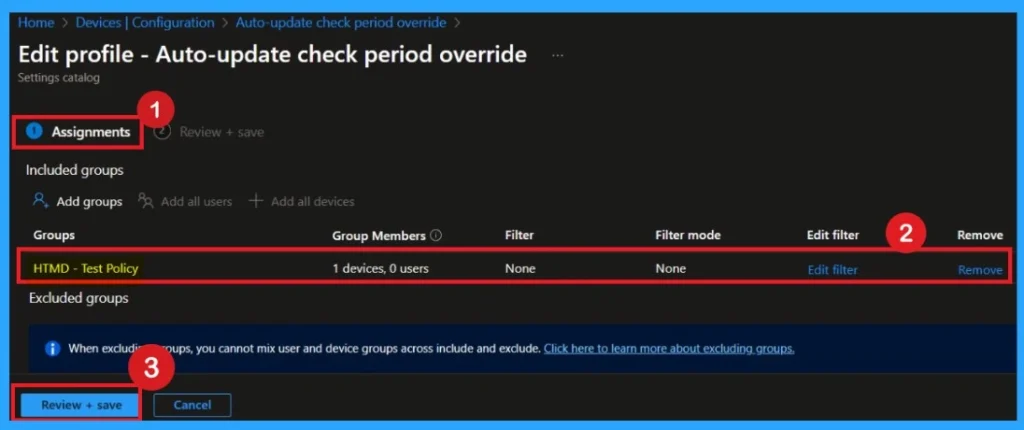
Start by navigating to the Monitoring status page via Devices > Configuration. Search for the policy by name and click on it to open its monitoring details. Scroll down to the Assignments section and click Edit. This will take you back to the policy’s assignment settings.
- From here, you can remove the group you no longer want the policy to apply to.
For detailed information, you can refer to our previous post – Learn How to Delete or Remove App Assignment from Intune using by Step-by-Step Guide.
Delete the Policy
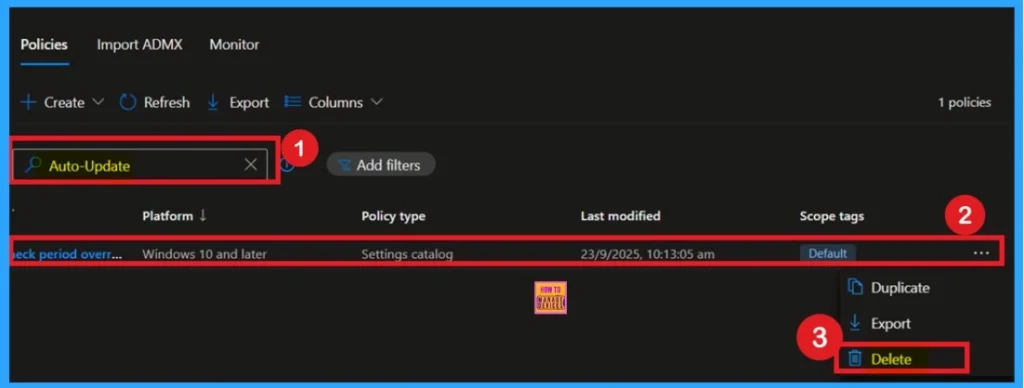
To delete a policy in Microsoft Intune, first sign in to the Microsoft Intune Admin Center. Navigate to Devices and then select Configuration. Locate and select the specific policy you want to remove. Once you’re on the policy details page, click the 3 -dot menu in the top right corner and choose Delete from the available options.
Need Further Assistance or Have Technical Questions?
Join the LinkedIn Page and Telegram group to get the step-by-step guides and news updates. Join our Meetup Page to participate in User group meetings. Also, Join the WhatsApp Community to get the latest news on Microsoft Technologies. We are there on Reddit as well.
Author
Anoop C Nair has been Microsoft MVP for 10 consecutive years from 2015 onwards. He is a Workplace Solution Architect with more than 22+ years of experience in Workplace technologies. He is a Blogger, Speaker, and Local User Group Community leader. His primary focus is on Device Management technologies like SCCM and Intune. He writes about technologies like Intune, SCCM, Windows, Cloud PC, Windows, Entra, Microsoft Security, Career, etc
