Let’s discuss how to allow or block Fast Reconnect Policy using Intune. Microsoft Intune allows admins to efficiently secure device enrollment and access to corporate resources with authentication-related Policies. With authentication-related policies, the authentication process is customizable.
Today’ we are going to explore an Authentication policy in Intune called Fast Reconnect. Fast Reconnect is a policy setting that enables EAP Fast Reconnect for EAP Method TLS. This feature allows sessions to resume without requiring a full authentication process.
Do you know what is EAP? Extensible Authentication Protocol that allows a device to resume a session without undergoing a full authentication process. We have a similar post which is explaining how to Enable or Disable TLS13 for EAP Client Authentication.
The Fast Reconnect Policy is helpful for many scenarios. This blog post will guide to dive deeper into Fast Reconnect Policy. You can enable or disable this policy according to your organizational needs by go through this blog post.
Table of Contents
Which are the Scenarios Fast Reconnect Useful?
Fast Reconnect is particularly useful in scenarios where seamless authentication is required. Different use cases of Fast Reconnect policy is listed below.
1. Wireless Roaming
2. Enterprise Networks
3. Public Wi-Fi
Enable or Disable Fast Reconnect Policy using Intune
With Fast Reconnect Policy Users experience seamless connectivity, especially in environments where frequent authentication would be disruptive, such as corporate networks or public Wi-Fi.
- How to Allow EAP Cert SSO User in Windows using Intune Settings Catalog
- Enable Fast First Sign In Policy under Authentication in Intune Settings Catalog
- Passwordless Authentication Now Users Can Sign-In With TAP
CSP Details of Fast Reconnect Policy
Allows EAP Fast Reconnect from being attempted for EAP Method TLS. Most restricted value is 0. This policy helps to enhance security by ensuring that authorization checks are still performed even when fast reconnect is used.
Description Framework Properties
The table below shows the technical attributes and behavior of the Saving History. It includes Property Name and Property Value.
| Property Name | Property Value |
|---|---|
| Format | int |
| Access Type | Add, Delete, Get, Replace |
| Default Value | 0 |
Allowed Values
These values help organisations determine which value is suitable for each device. You can refer to he following table to understand the values.
| Value | Description |
|---|---|
| 0 | Not allowed. |
| 1 (Default) | Allowed. |
./Device/Vendor/MSFT/Policy/Config/Authentication/AllowFastReconnect

Steps to Configure Web Sign-in
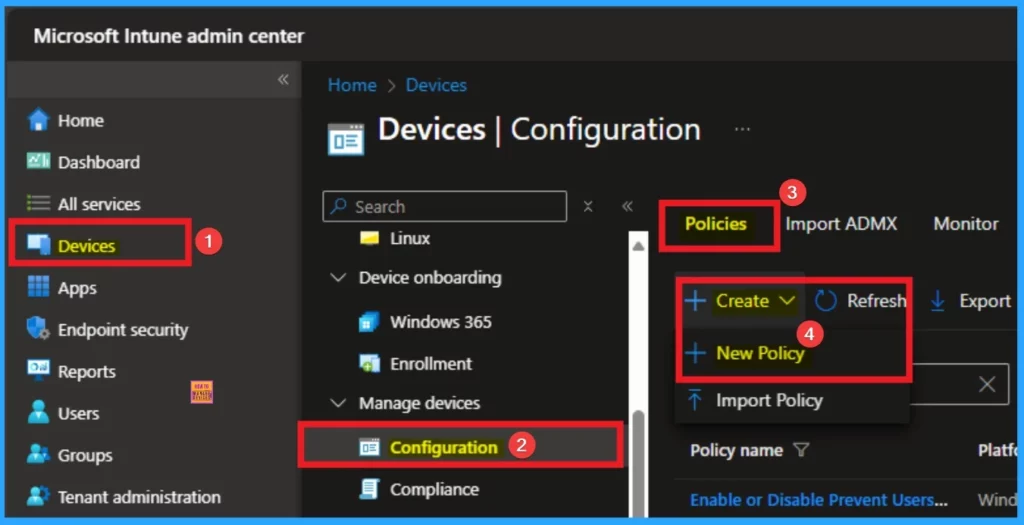
You can start the policy creation of the Web Sign-in Policy in Intune. Using simple steps, you can easily complete the policy creation. Open the Intune admin center. Go to Devices > Configuration > Policies> + Create > + New policy.
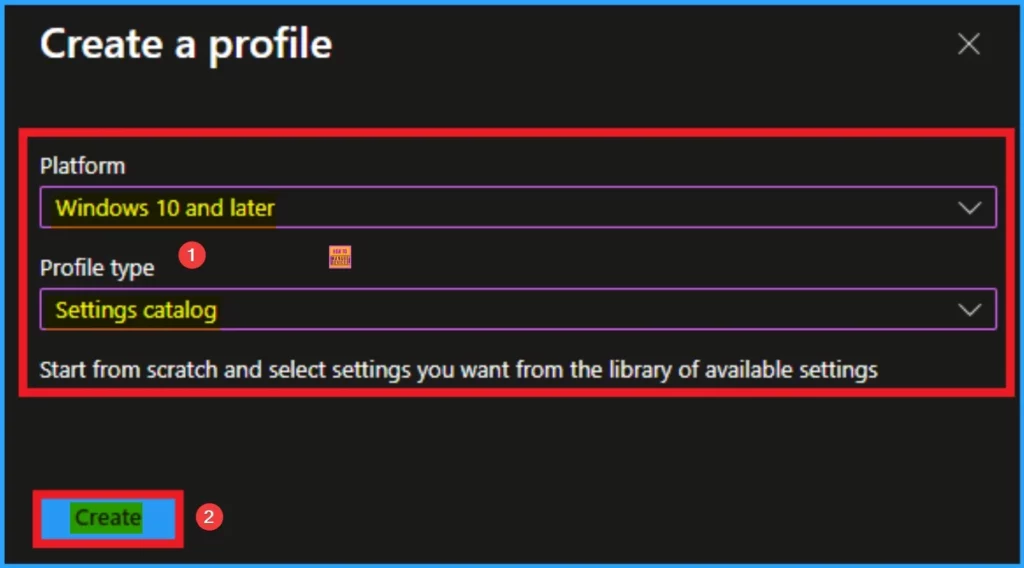
After that, you will get a profile window to select the platform and profile type. First of all, you select the platform, then you can select the profile type. Select Windows 10 and later as the platform, and select settings catalog as the profile type. Click on the create button.
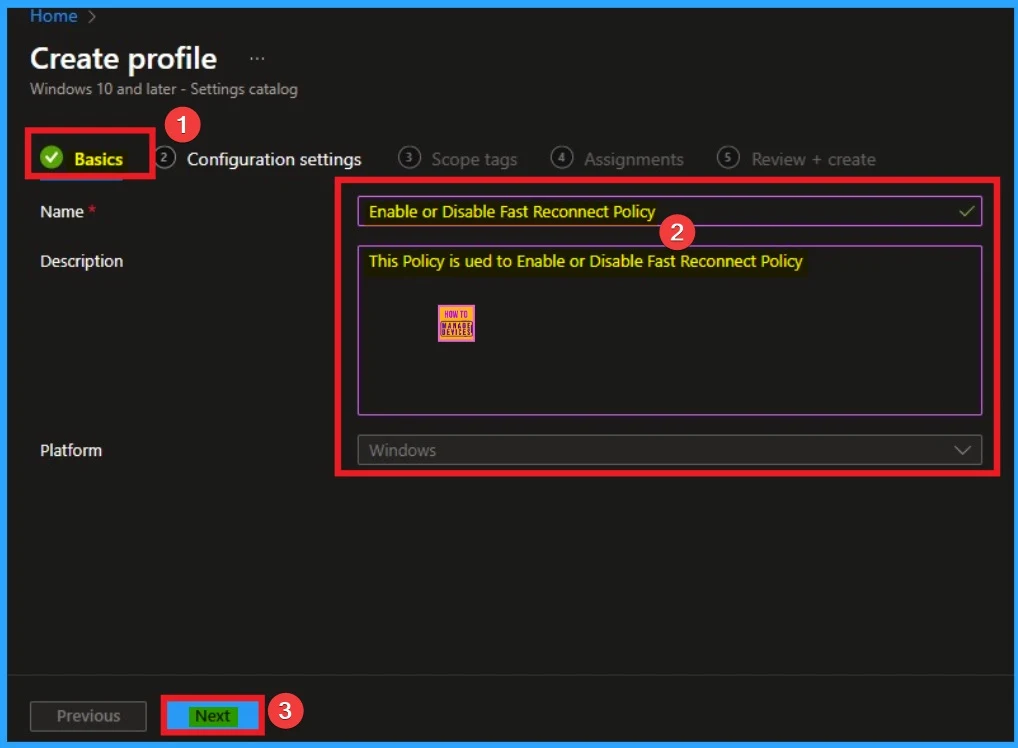
Basic Tab
The basic tab is starting step of policy creation. On this tab, you have to give a name for the policy that you want to create. The name field is mandatory. Without giving a name, you can’t create a policy on the basic tab. You can also describe the policy, which description is not compulsory. Click on the next button.
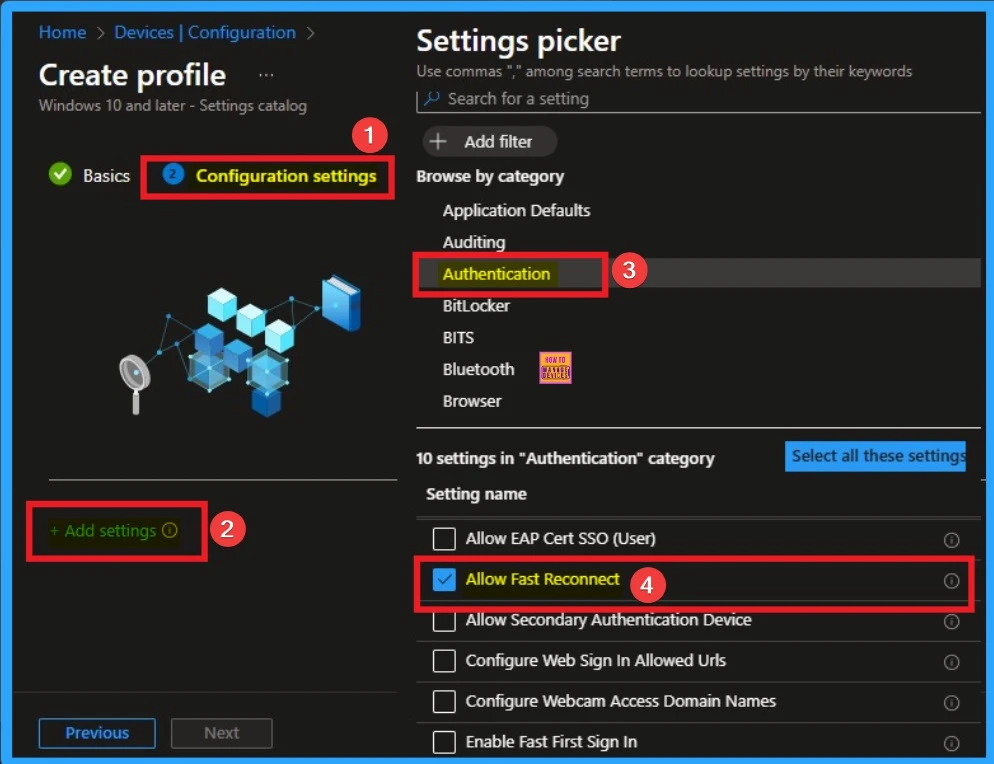
Configuration Settings
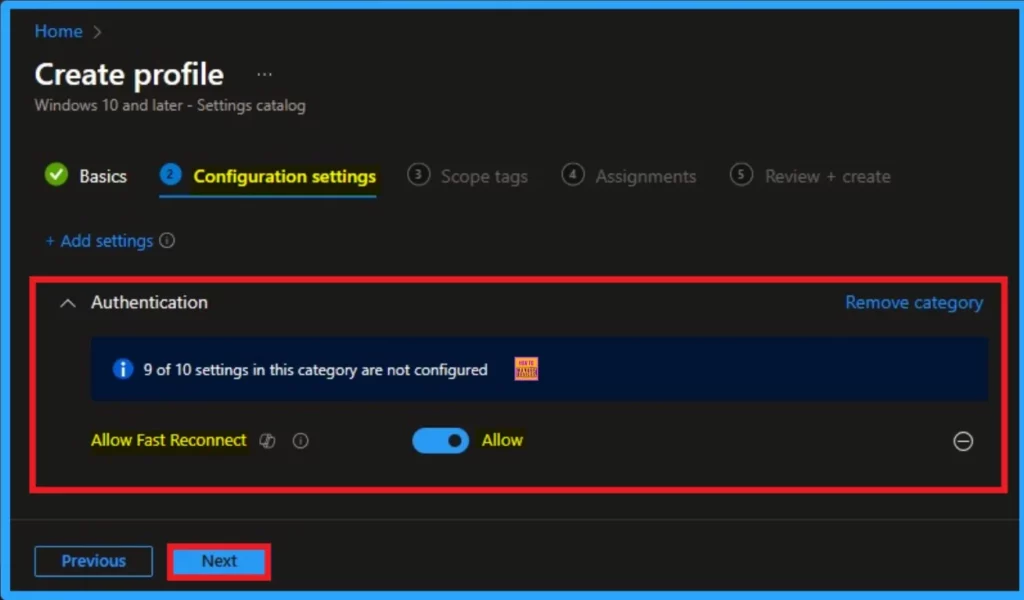
The configuration tab allows you to select specific policy settings to manage your organisation’s devices. On this page, we click on the + Add Settings hyperlink. Then you will get a settings picker that will show different types of categories to select specific settings. Here, I choose to authentication category and select the Allow Fast Reconnect settings.
Enable Fast Reconnect Policy
The Default value of Fast Reconnect Policy is enable. By enabling this policy, authentication time can be reduced. It allows sessions to resume without requiring a full authentication process, minimizing delays when switching between access points.
- To enable this policy, choose Enabled
- Click on the Next button
Disable Fast Reconnect Policy
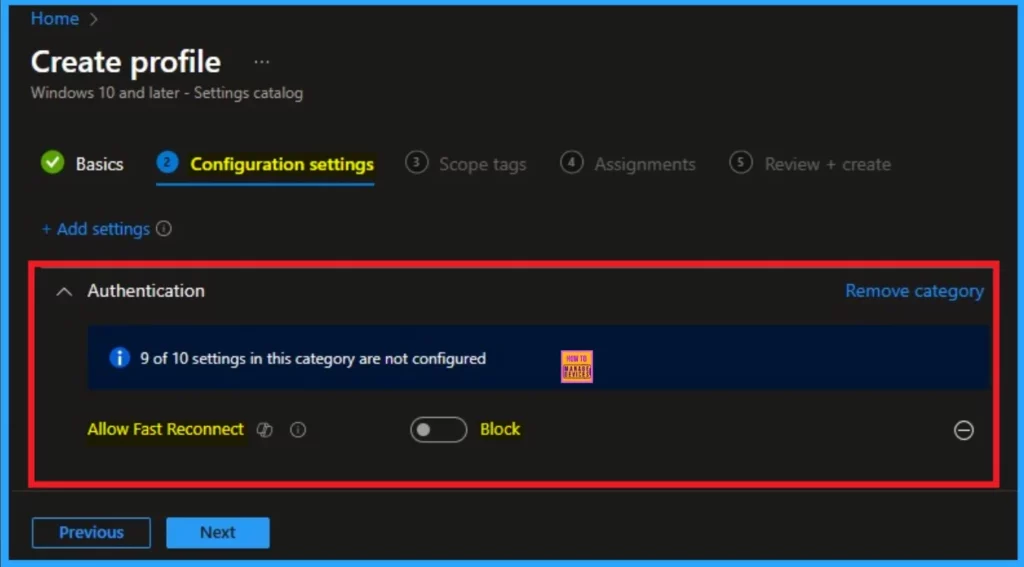
Here I would like to Disable this policy. By disabling EAP Fast Reconnect, you can ensure that credentials are verified every time. It helps to provide full authentication process for each session. To Disable this policy, toggle the pane to left side. Click on the Next button.
Scope Tags
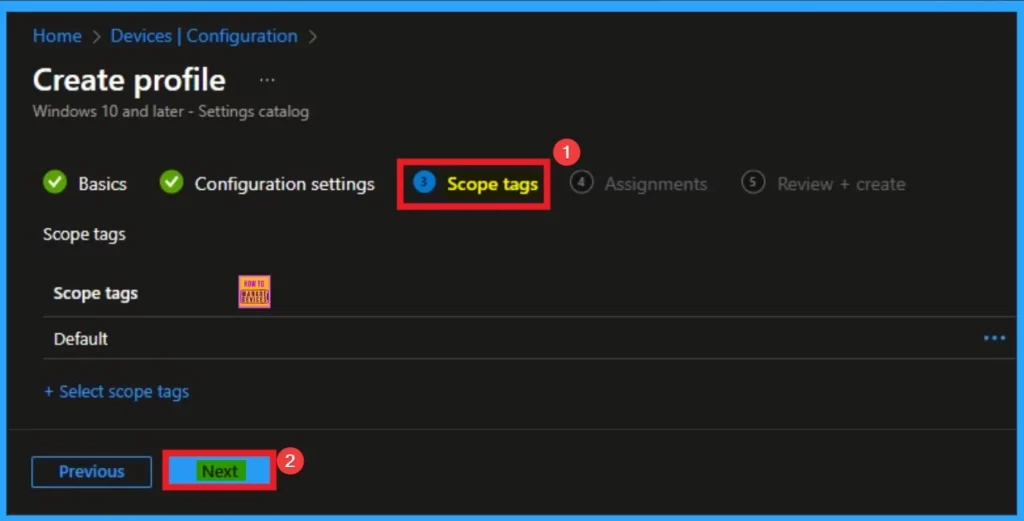
The next section is the Scope tag and which is not a compulsory step. It helps to assign this policy to a defined group of users or devices. Here, I skip the section and click on the next button.
Assignments Tab
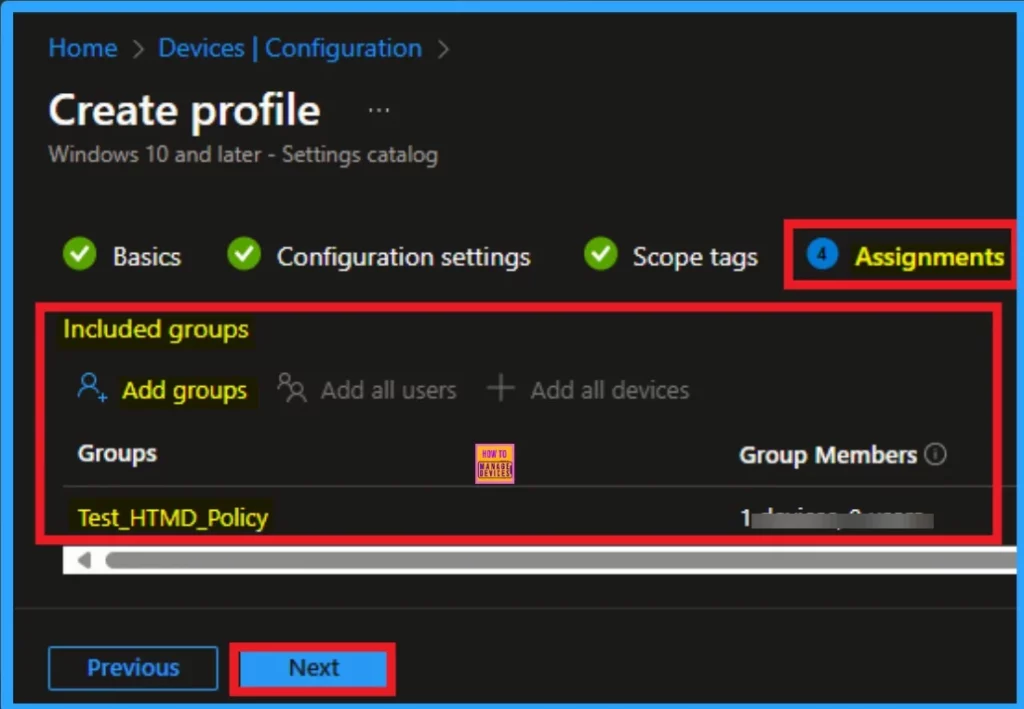
The assignments tab is the crucial step that determines which groups can be selected to assign the policy. Click on the +Add groups option under included groups. Select the group from the list of groups on your tenant.
Click on the Select button. And you can see the selected group on the Assignments tab. Click on the Next button in the window below.
Review + Create
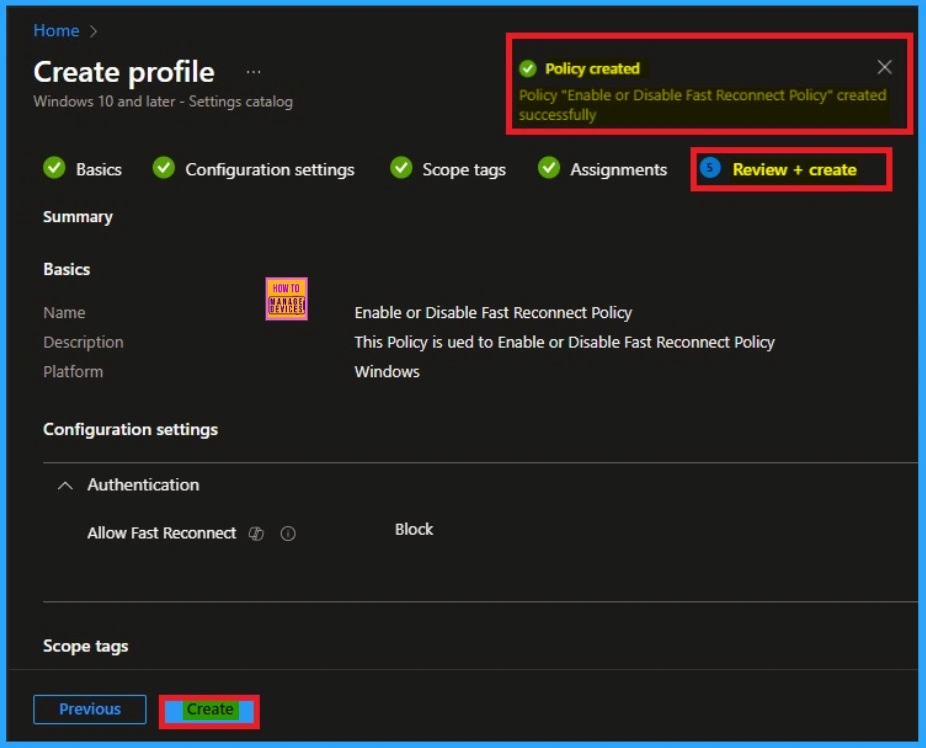
The Review + Create tab is the last step of policy creation. On this tab, you can verify every detail of the policy which are added in the previous steps (basic configuration settings, scope tag assignments s etc). If you want to make any changes, click on the previous button; otherwise, you can click on the Create button.
Monitoring Status
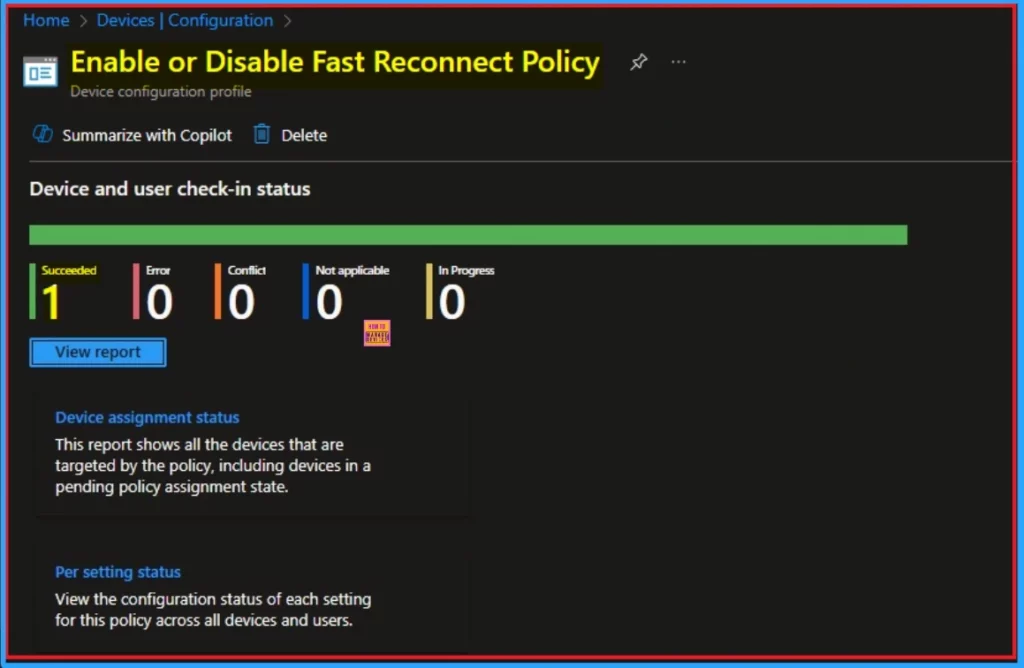
When the Policy is created successfully, you can sync the device on the Company portal for faster deployment. After syncing is completed, you can check the status on the Intune Portal. Go to Devices > Configuration and search for the policy.
Client Side Verification – Event Viewer
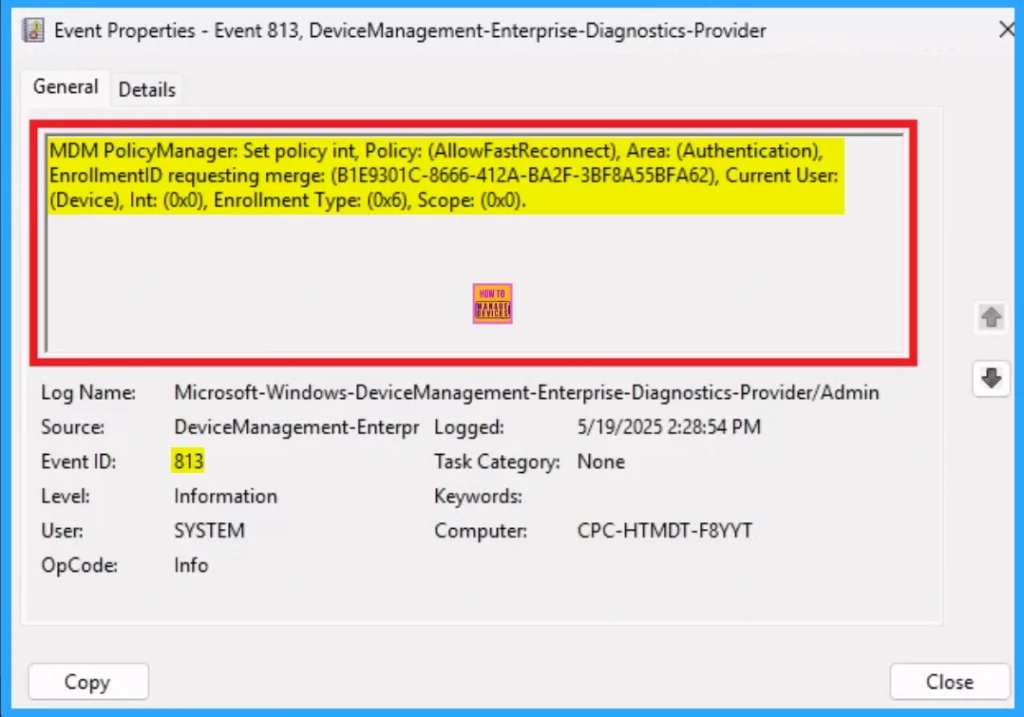
By accessing Event Viewer you can easily complete Client Side Verification. Open the Event Viewer on the assigned device. Go to Applications and Services Logs > Microsoft > Windows > Devicemanagement-Enterprise-Diagnostics-Provider > Admin to open it. Here, you can see the success event ID in 813.
| Event ID Details of Fast Reconnect Policy |
|---|
| MDM PolicyManager: Set policy int, Policy: (AllowFastReconnect), Area: (Authentication), EnrollmentID requesting merge: (B1E9301C-8666-412A-BA2F-3BF8A55BFA62), Current User: (Device), Int: (0x0), Enrollment Type: (0x6), Scope: (0x0). |
Remove Fast Reconnect Policy
Intune helps you to easily remove the Fast Reconnect Policy from your tenant. To do this, open the policy from the Configuration tab and click on the Edit button on the Assignment tab. Click on the Remove button on this section to remove the policy.
For detailed information, you can refer to our previous post – Learn How to Delete or Remove App Assignment from Intune using by Step-by-Step Guide.

Delete Fast Reconnect Policy
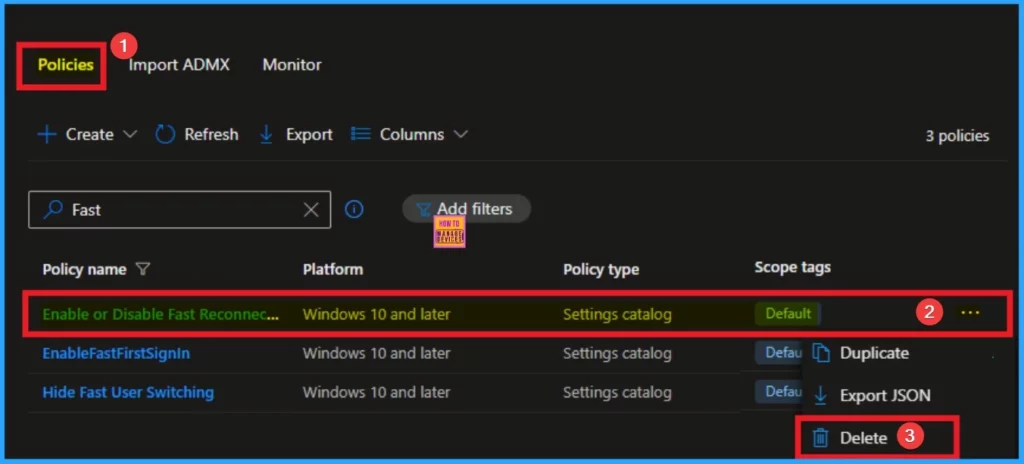
Admins may delete policies in Intune due to different reasons. If you want to quickly delete a Policy, Intune helps you to do that. To do this, search for this policy on the Intune admin center. Click on the 3-dot option and then click on the Delete button.
For more information, you can refer to our previous post – How to Delete Allow Clipboard History Policy in Intune Step by Step Guide.
Need Further Assistance or Have Technical Questions?
Join the LinkedIn Page and Telegram group to get the latest step-by-step guides and news updates. Join our Meetup Page to participate in User group meetings. Also, Join the WhatsApp Community to get the latest news on Microsoft Technologies. We are there on Reddit as well.
Author
Anoop C Nair has been a Microsoft MVP for 10 consecutive years from 2015 onwards. He is a Workplace Solution Architect with more than 22+ years of experience in Workplace technologies. He is a Blogger, Speaker, and Local User Group Community leader. His primary focus is on Device Management technologies like SCCM and Intune. He writes about technologies like Intune, SCCM, Windows, Cloud PC, Windows, Entra, Microsoft Security, Career, etc.


