Hey there, let’s discuss on the topic Allow or Block Windows Entitlement Reactivation using Intune Policy. The Windows Entitlement Reactivation policy helps Windows activate again after big hardware changes, like replacing the motherboard.
It lets Windows use a digital license linked to the user’s Microsoft or work account to activate automatically. It makes life easier for IT admins. They don’t have to manually fix activation problems after hardware repairs. This saves time and reduces support work, especially when many devices are used in the company.
It’s safe because only the original user with the same account can reactivate Windows. This stops others from using the license on stolen or reused devices. It adds extra protection using the user’s identity.
Here we are going to deploy Set Allowed Allow or Block Windows Entitlement Reactivation using Intune Policy using Intune Policy. It is a step-by-step instruction on how to enable or disable this policy, monitor its status, and understand client-side verification. You can fid a detailed walkthrough on configuring the Allow or Block Windows Entitlement Reactivation using Intune Policy on our HTMD YouTube channel.
Table of Contents
What are the Advantages of Enabling Windows Entitlement Reactivation using Intune?
It helps both users and IT teams by making Windows activation easier and more secure after hardware changes. It saves time, reduces manual work, and ensures devices stay properly activated without user confusion or support requests.
1. Windows auto-reactivates after major hardware changes
2. Reduces IT team workload
3. Works well for many devices in large organizations
4. Users won’t face activation issues
5. Managed easily from one place using Intune
Allow or Block Windows Entitlement Reactivation using Intune Policy – CSP Details
The policy Configuration Service Provider (CSP) is a tool for businesses to manage settings on Windows 10 and 11 devices. It details each policy’s function (Description Framework Properties), available choices (Allowed Values), and how it relates to older Group Policy settings (Group Policy Mapping details).
Description Framework Properties
| Property Name | Property Value |
|---|---|
| Format | Int |
| Access type | Add, Delete, Get, Replace |
| Default value | 1 |
Assigned Value
| Value | Description |
|---|---|
| 0 | Disable Windows license reactivation on managed devices. |
| 1(Default) | Enable Windows license reactivation on managed devices. |
| Name | Value |
|---|---|
| Name | AllowWindowsEntitlementReactivation |
| Friendly Name | Control Device Reactivation for Retail Devices |
| Location | Computer Configuration |
| Path | Windows Components > Software Protection Platform |
| Registry Key Name | Software\Policies\Microsoft\Windows NT\CurrentVersion\Software Protection Platform |
| Registry Value Name | AllowWindowsEntitlementReactivation |
| ADMX File Name | AVSValidationGP.admx |
./Device/Vendor/MSFT/Policy/Config/Licensing/AllowWindowsEntitlementReactivation

- What are ConfigMgr SCCM V Packs or Extensions for Windows Intune
- How to Create Autopilot Device Preparation Policy for Windows 365 Frontline Devices using Intune
- Disable Windows Snipping Tool Capture and Recording Policy using MS Intune
Create a Profile
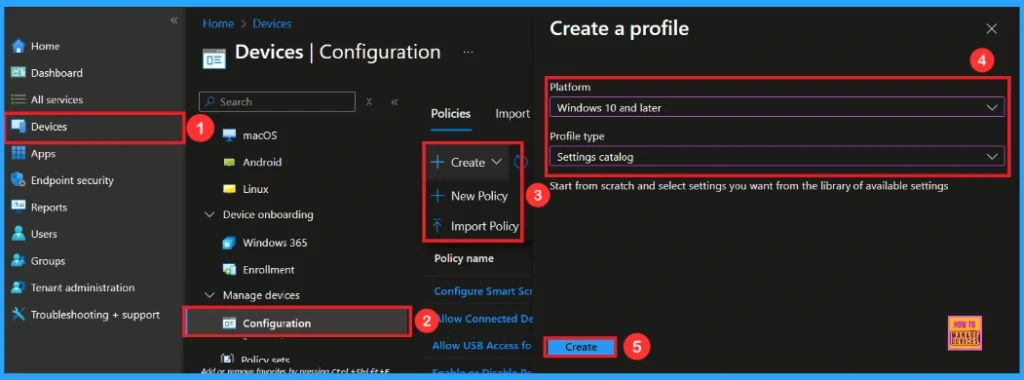
First, log in to the Microsoft Intune admin center. Then, navigate to Devices. Under Devices, go to Configuration. In the Configuration section, you’ll see an option to create a New Policy. Click on that.
A new window will appear titled Create Profile. In this section, you need to set the platform to Windows 10 and later, and choose the Profile Type as Settings Catalog. Then, click Create to proceed.
Basic Step
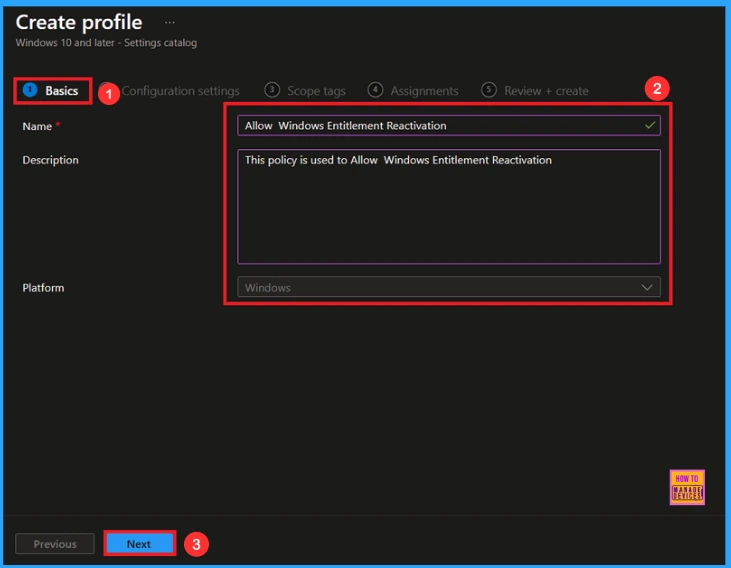
After creating profile, your next step is to fill in the basic details. These usually include the name, description, platform information. we can add the name (e.g Allow Windows Entitlement Reactivation) of the policy and give a brief description (e.g This policy is used to Allow Windows Entitlement Reactivation). Click Next to continue.
Configuration Settings – Settings Picker
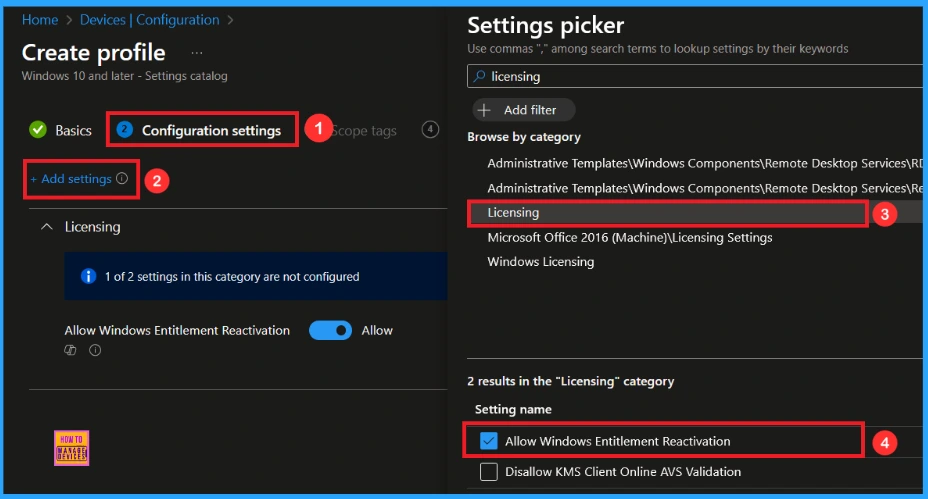
In this tab, you will see an option to Add Settings. Click on it. Once you click, a new window called Settings Picker will appear. In the Settings Picker window, you need to select the Licensing category. Under this category, select Allow Windows Entitlement Reactivation.
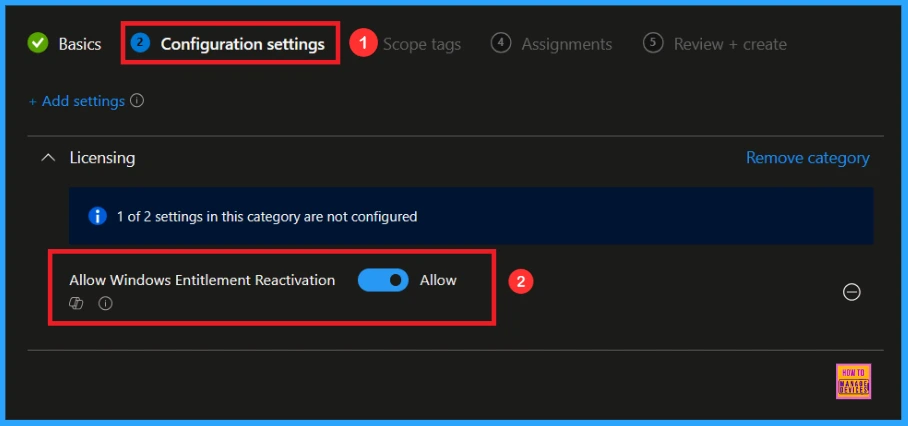
You can close the Settings Picker window. Once you close it, you’ll return to the Configuration Settings page. Here, you’ll notice that the policy is set to Allow or Block by default. If you want to continue with this setting, click Next to proceed.
Block Windows Entitlement Reactivation Policy
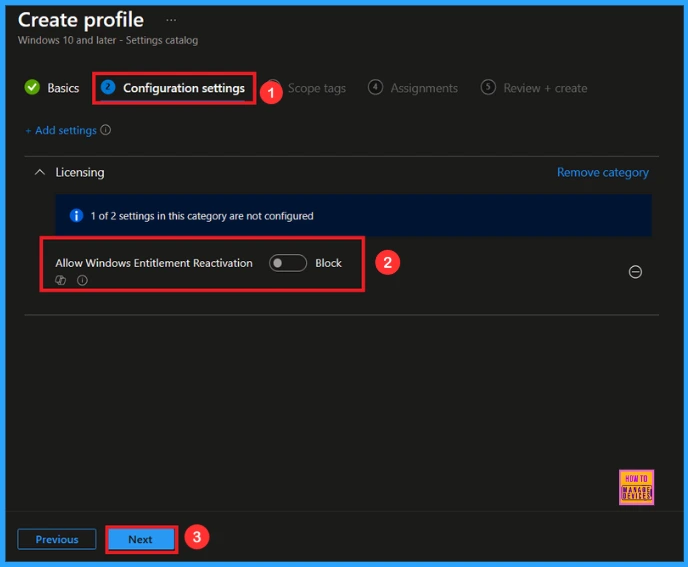
If you want to block this policy, look for the toggle switch next to the Allow Windows Entitlement Reactivation setting. By default, this toggle is set to Allow. To block the policy, you have to move the toggle from right to left.
Scope Tag
A scope tag is used to assign policies to specific groups within an organisation. The scope tag is not mandatory, so you can skip this section. Click Next if they’re not required for your setup.

Assignments
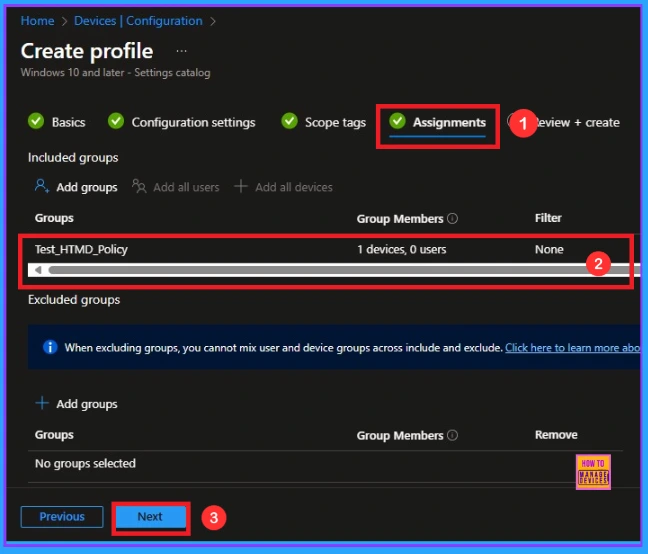
Here, you will see an option called Add Groups under the Include Groups section. Click on it. When you click, a list of available groups will appear. You can search for the group you want (e.g Test_HTMD_Policy). Then click the Next button.
Last step for Windows Entitlement Reactivation Policy
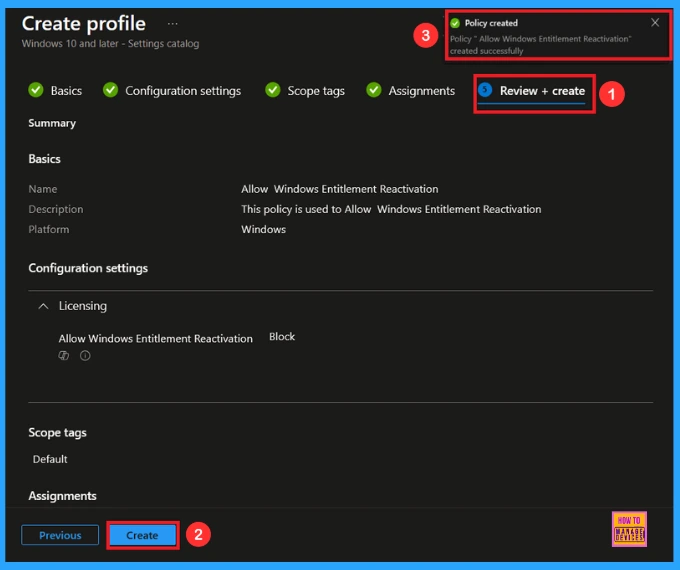
In this section, you can see a summary of everything you entered in the previous steps, such as basic details, configuration settings, assignment details, and more. If you want to change or edit anything, you can easily go back to the previous section.
Click Create to finish, and a message will confirm that the Windows Entitlement Reactivation was created successfully.
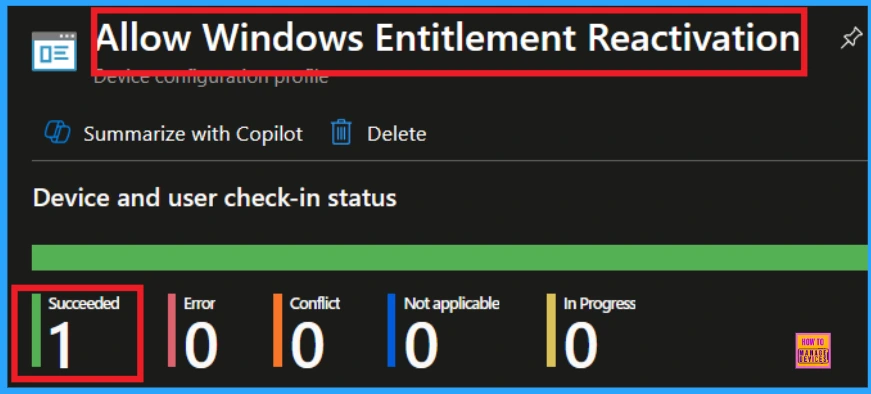
Device and User Check-in Status
To view a policy’s status, go to Devices > Configuration in the Intune portal, select the policy (like Allow Windows Entitlement Reactivation), and check that the status shows Succeeded (1). Use manual sync in the Company Portal to speed up the process.
Client-Side Verification
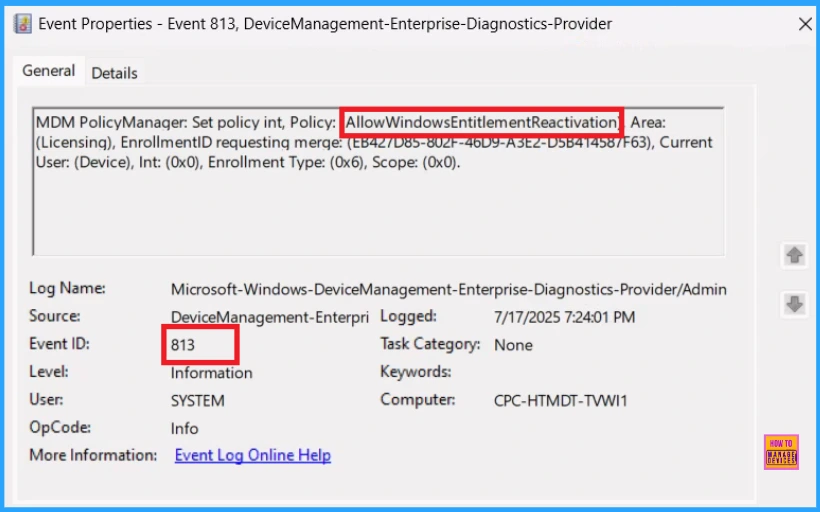
To confirm whether the policy is successful or not, you can use the Event Viewer. First, open Event Viewer and navigate to Applications and Services Logs > Microsoft > Windows > Device Management > Enterprise Diagnostic Provider > Admin. Use Filter Current Log and search the Event ID 813.
MDM PolicyManager: Set policy int, Policy:AllowWindowsEntitlementReactivationArea:
(Licensing), EnrollmentID requesting merqe: (EB42/D85-802F-46D9-A3E2-D5B414587F63), Current
User: (Device), Int: (0x0), Enrollment Type: (0x6), Scope: (0x0).
How to Remove a Group from Windows Entitlement Reactivation Policy
After creating the policy, if you want to remove the specific group that you previously selected, you can easily do that. First, go to Devices > Configuration policies. In the Configuration policy section, search and select the policy, for example, Allow Windows Entitlement Reactivation. In the Assignment section, you will find an Edit option and click on it. Then, click the Remove option.
For detailed information, you can refer to our previous post – Learn How to Delete or Remove App Assignment from Intune using by Step-by-Step Guide.

Delete Windows Entitlement Reactivation from Intune Portal
If you want to delete this policy for any reason, you can easily do so. First, search for the policy name in the configuration section. When you find the policy name, you will see a 3-dot menu next to it. Click on the 3 dots, then click the Delete button.
For detailed information, you can refer to our previous post – How to Delete Allow Clipboard History Policy in Intune Step by Step Guide.

OMA-URI Settings to Power Sleep Policy
An OMA-URI is a unique string used to configure specific settings on Windows 10 or 11 devices through a Configuration Service Provider (CSP). Its format is determined by the CSP and is used to apply custom device configurations.
To create a new policy in Microsoft Intune, sign in and navigate to Devices > Configuration. Click on Create to start a new policy. Choose the platform as Windows 10 or later. For the Profile type, select Templates, then choose Custom. Provide a name for the policy, such as Allow Windows Entitlement Reactivation and add a description if needed.
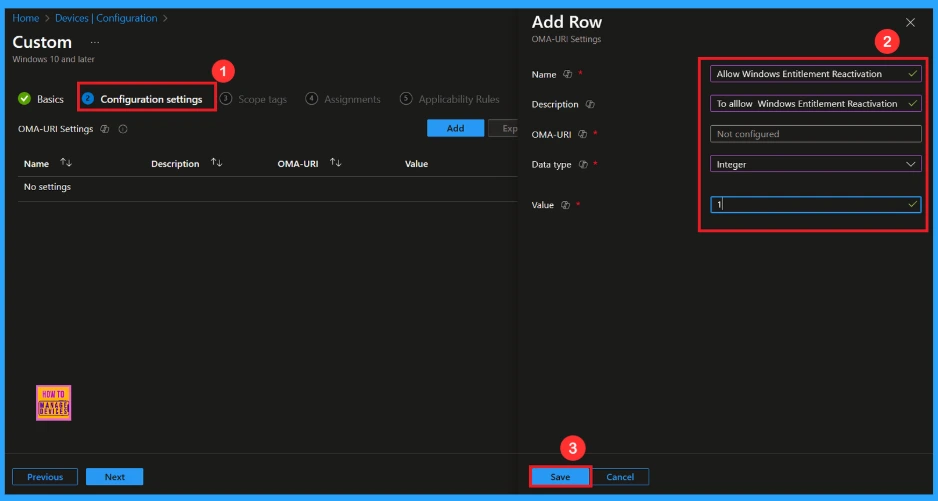
- Click on + Add under OMA-URI Settings to configure the specific setting.
- To Configure the OMA-URI Setting, do the following
- Enter a name for this setting, such as Allow Windows Entitlement Reactivation
- Description of the setting: To Allow Windows Entitlement Reactivation.
- Enter the following OMA-URI path: ./Device/Vendor/MSFT/Policy/Config/Licensing/AllowWindowsEntitlementReactivation
- Set the Data type to Integer.
- Enter the value
- 1 to Allow Windows Entitlement Reactivation
- 0 to Block Windows Entitlement Reactivation
- After entering the above details, click the Save button.
Need Further Assistance or Have Technical Questions?
Join the LinkedIn Page and Telegram group to get the latest step-by-step guides and news updates. Join our Meetup Page to participate in User group meetings. Also, Join the WhatsApp Community to get the latest news on Microsoft Technologies. We are there on Reddit as well.
Author
Anoop C Nair has been Microsoft MVP from 2015 onwards for 10 consecutive years! He is a Workplace Solution Architect with more than 22+ years of experience in Workplace technologies. He is also a Blogger, Speaker, and Local User Group Community leader. His primary focus is on Device Management technologies like SCCM and Intune. He writes about technologies like Intune, SCCM, Windows, Cloud PC, Windows, Entra, Microsoft Security, Career, etc.

