Today, we are discussing on a new topic how to Allow or Block Non-Admin User Install using Intune Policy. As we all know that a Admins can always control and manage their users. Admins can assign different roles to users with specific permissions, ensuring proper management and limiting the privilege.
Also an Admins can enroll, reset passwords, and take administrative actions across the organization. Admin has an important role in organizations Admins can enroll devices, reset passwords, and take administrative actions across the organization.In this post we are deploying Block Non admin user installation policy.
This policy is also known as prevent non admin users from installing packaged windows apps. This policy controls whether non-Administrator users can install Windows app packages on a device. When enabled, it restricts non-Administrators from initiating the installation process for Windows app packages, effectively limiting app installations to users with administrative privileges.
If this policy is block or not configured, then any user can install Windows app packages whenever they want. This could cause problems because users might add apps that aren’t safe. So in this post lets look how to Allow Block Non-Admin User Install using Intune Policy.
Table of Contents
What Happens When the Policy is Enabled?
When you enable this policy, non-Administrators will be unable to initiate installation of Windows app packages. Administrators who wish to install an app will need to do so from an Administrator context (for example, an Administrator PowerShell window).
How to Allow Block Non-Admin User Install – CSP Details
This policy allows you to control whether Non-Admin User Installation. By reviewing the CSP (Configuration Service Provider) details, you can correctly configure the policy on supported devices. Refer to the screenshot for information on the applicable operating systems, scope, and editions.
| Property name | Property value |
|---|---|
| Format | int |
| Access Type | Add, Delete, Get, Replace |
| Default Value | 0 |
./Device/Vendor/MSFT/Policy/Config/ApplicationManagement/BlockNonAdminUserInstall
- How to Allow or Block Trusted LOB or Developer-Signed Apps in Microsoft Store using Intune Policy
- How to Allow or Block Wi-Fi Direct Policy using Intune
- Enable or Disable Internet Sharing Using Intune Security Polic
Create Custom Intune Policy to Block Non-Admin User Installations via OMA-URI
To create a new custom policy in Microsoft Intune, start by signing in to the Intune admin center. Navigate to Devices > Configuration and click on Create to begin setting up a new policy. When prompted, choose Windows 10 and later as the platform. For the Profile type, select Templates, and then choose the Custom option to proceed with defining your custom configuration settings.
- Provide a Name – e.g. “Block Non-Admin User Install.”
- Add a Description if needed
- Click on + Add under OMA-URI Settings to configure the specific setting.
- To Configure the OMA-URI Setting, do the following
- Enter a name for this setting, such as Block Non-Admin User Install.
- Briefly describe the setting, e.g., “Block Non-Admin User Install through Microsoft App store setting.”
- Enter the following OMA-URI path
- ./Device/Vendor/MSFT/Policy/Config/ApplicationManagement/BlockNonAdminUserInstall
- Set the Data type to Integer.
- Enter the value
- 1 to enable the administrator account.
- 0 to disable the administrator account.
- After entering the above details, click Save.

Create a Profile
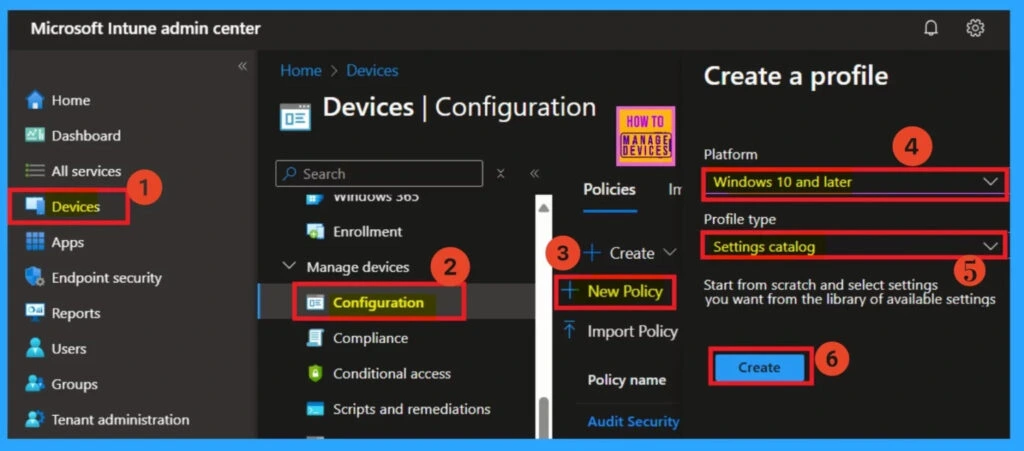
To begin in the Intune portal, the first step is to create a configuration profile. Sign in to the Microsoft Intune Admin Center, then go to Devices > Configuration profiles and select + New policy. In the “Create a profile” window, choose Windows 10 and later as the platform and select Settings catalog as the profile type.
- Once you’ve made your selections, click Create to move forward.
Basics
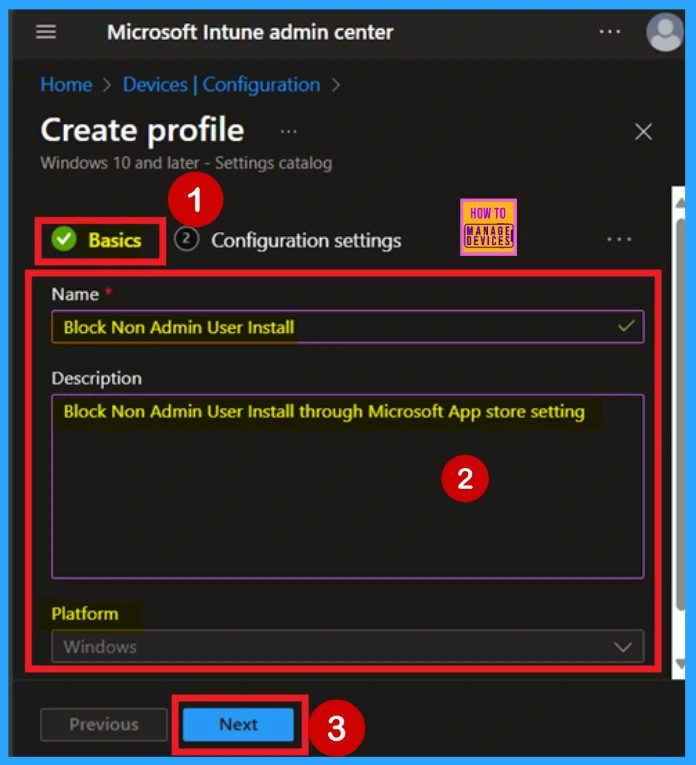
The next step in deploying a policy is to enter the basic details. Start by providing a name for the policy, along with an optional description to help clarify its purpose for future reference. Since the platform defaults to Windows, you only need to focus on naming the policy. Make sure the name is clear and Simple enough to easily identify the policy later.
- After filling in the details, click Next to continue.
Configuration Settings
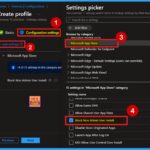
The next step is configuring the settings. In this section, you’ll see a + Add settings option—click on it. Remember, this part is crucial. After clicking Add settings, a new window called the Settings picker will open. In the Settings picker, navigate to the Microsoft App Store category. Once selected, you’ll see a list of available options and there are 15 settings in this category.
- Find and select Block non-admin users from installing apps, then close the Settings picker window to continue.
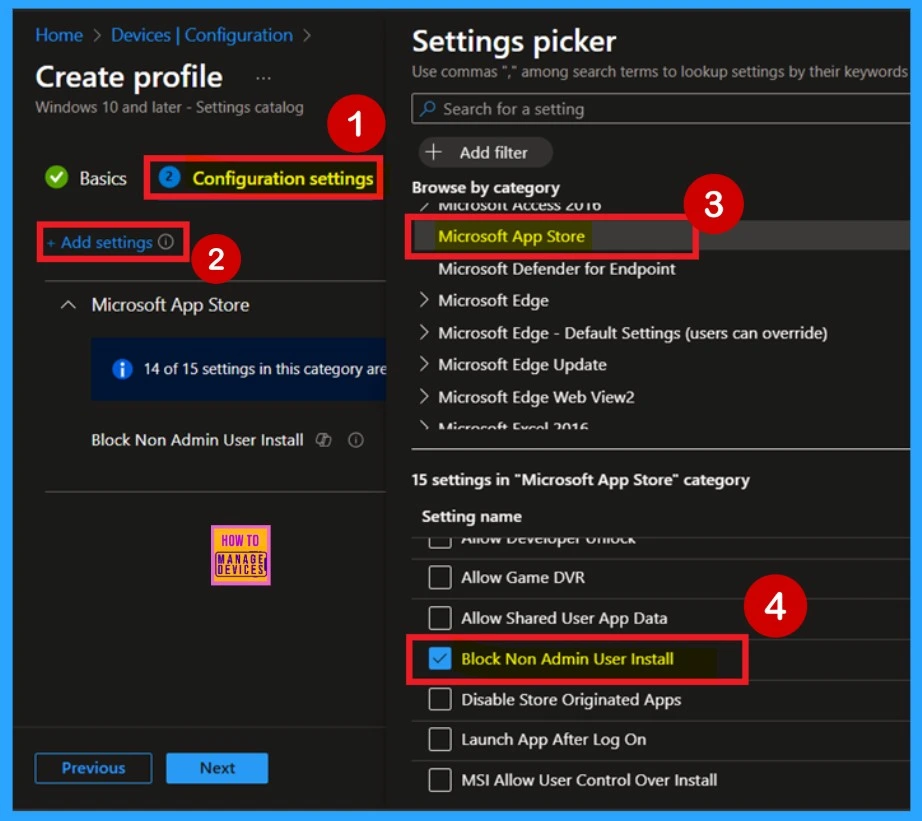
Disable the Policy
After closing the Settings picker window, you’ll return to the Configuration settings page. Here, you’ll see the policy you just added displayed. By default, the selected setting is configured to in a Disabled by Block non-admin users from installing apps. If you ‘want to deploy with this configuration, click Next to proceed.
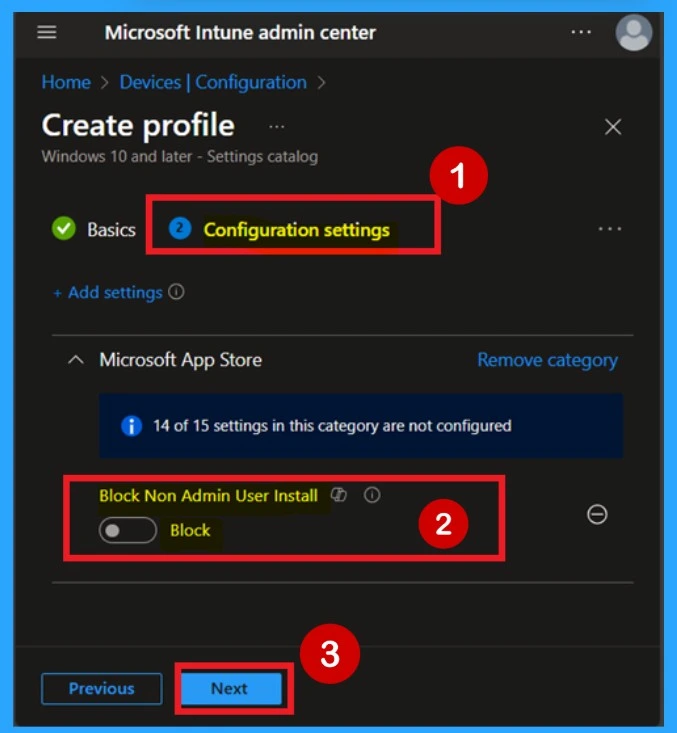
Enable the Policy
In this tutorial, I am going to enable the policy. To do this, I click on the toggle pane switch and drag it from left to right to set the policy to Allow. Then, I click Next to continue with the process. Enabling the policy ensures that non-admin users are permitted to install apps from the Microsoft Store. Make sure to review the setting before proceeding to the next step.

Scope Tags
In Intune, Scope Tags allow you to better organize and manage access to policies. They can be useful for control and grouping resources, but adding them is entirely optional. If you don’t need to use scope tags, you can just click Next to move on without assigning any.
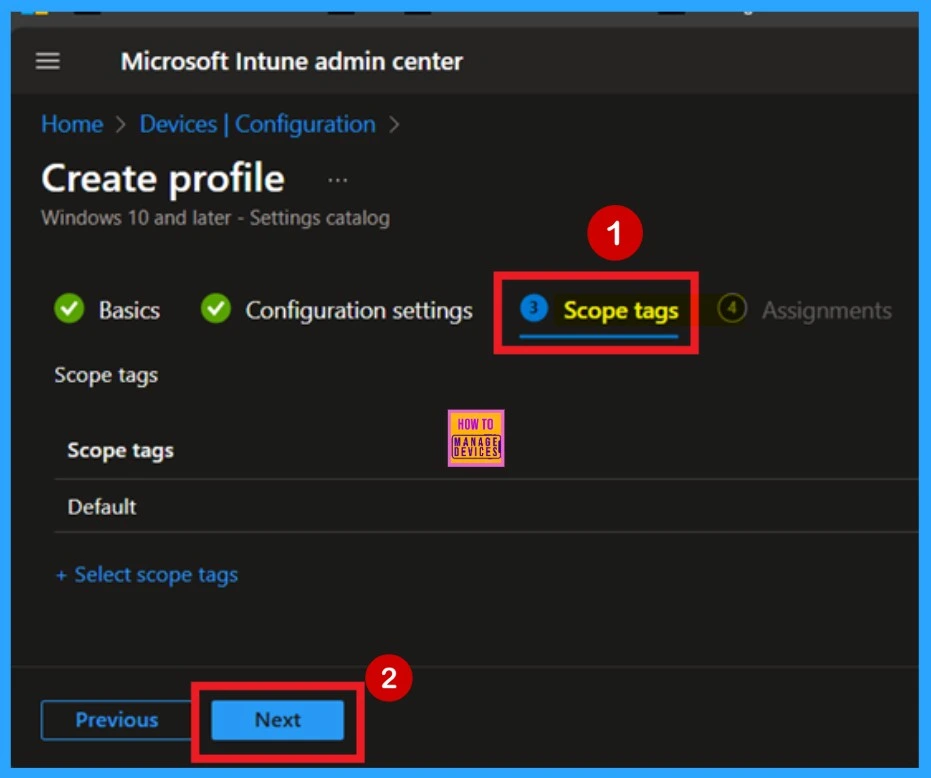
Assignments
Next, you’ll move on to the Assignments tab, which plays a key role in determining who receives the policy. Here, you’ll specify the user or device group that the policy should target. To do this, click Add Groups under the Include Groups section. A list of available groups will be displayed and choose the appropriate group for the policy.
- Once selected, the group will be added to the assignment list.
- After confirming everything is correct, click Next to proceed.
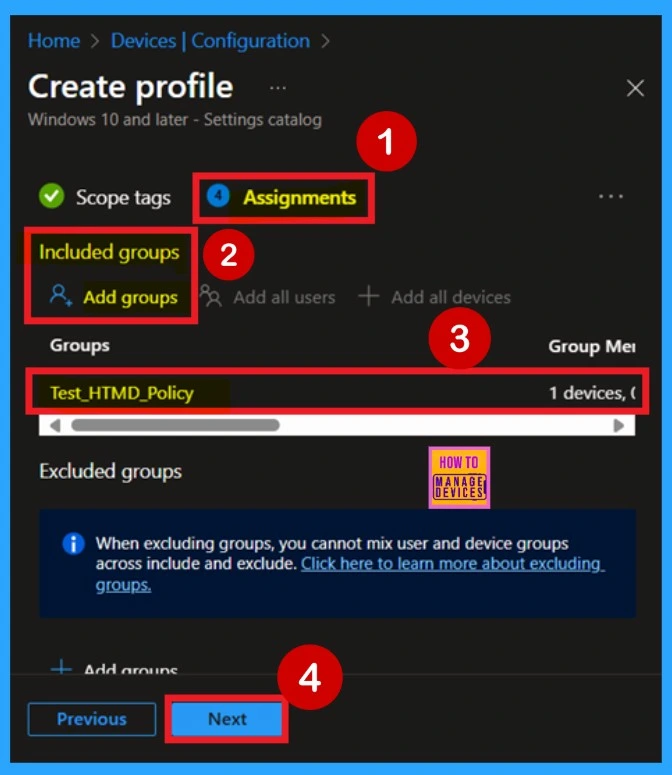
Review + Create
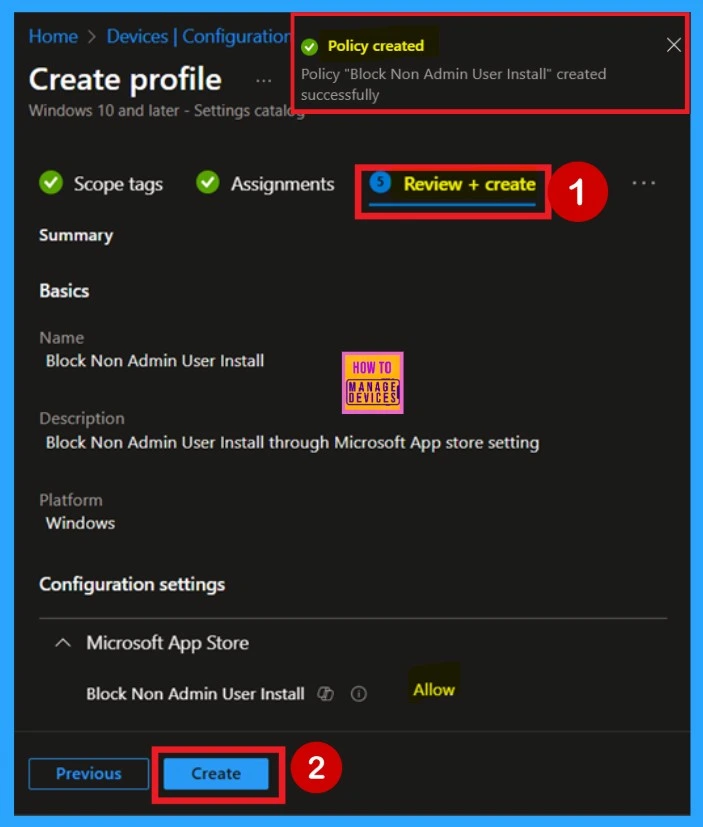
The last step in setting up the policy is the Review + Create page. This section shows a full overview of all your settings, including the basic info, configuration settings, and assignments. Look over everything to make sure it’s correct. If something doesn’t look right, you can go back and make changes before finishing. When you’re ready, click Create to complete the setup.
- This will apply and save your policy. After that, a message will appear confirming the policy was created successfully.
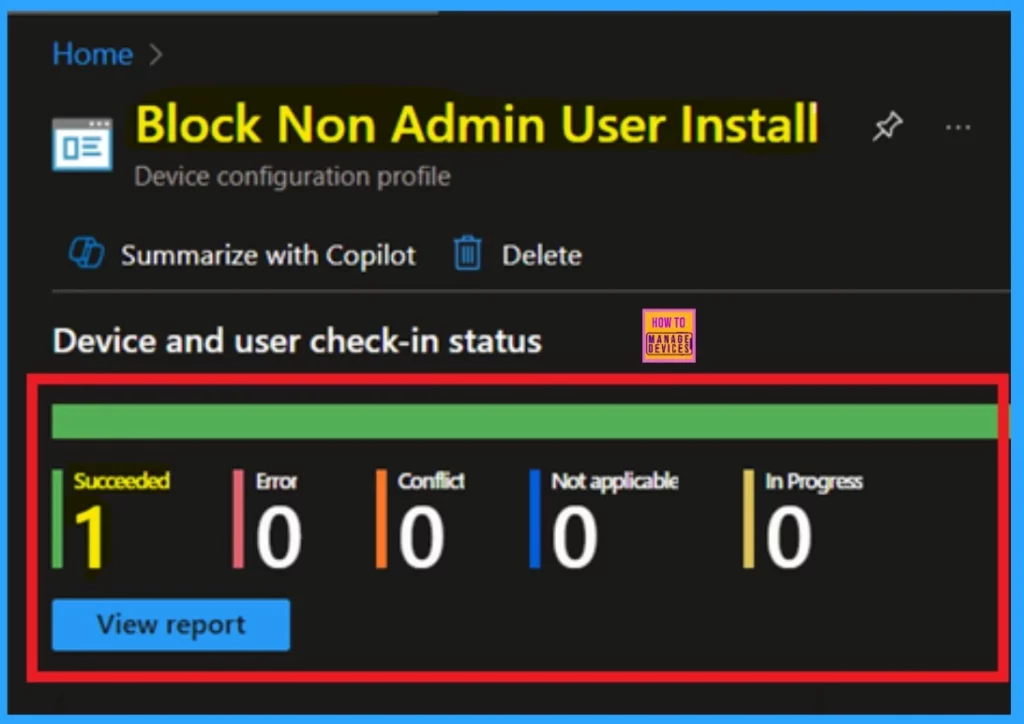
Device and User Check in Status
After creating the policy, the next important step is to check if it has been deployed correctly. Normally, policies may take up to 8 hours to automatically apply to devices. However, you can manually speed up this process by syncing the device using the Company Portal app. To check if the “Block non-admin users from installing apps” setting has been successfully deployed:
- Log in to the Microsoft Intune Admin Center.
- Navigate to Devices > Configuration profiles.
- Find the profile you created in the list.
- Click on it to view its details and deployment status.
- Here, you’ll be able to see if the policy has been assigned and whether it’s deployed on the devices.
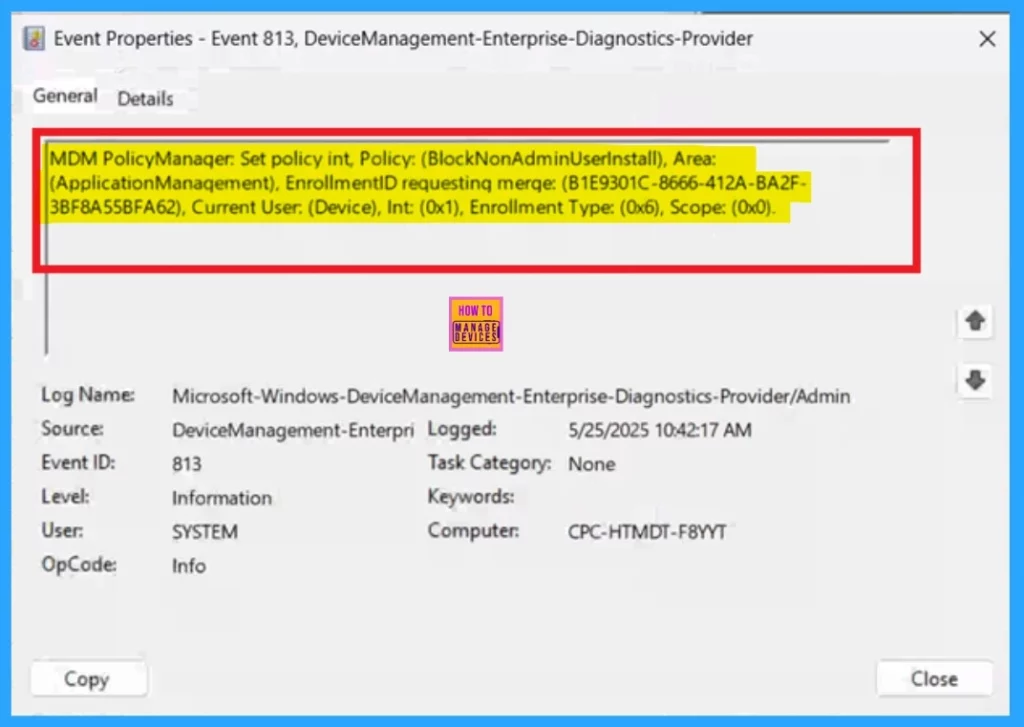
Client-Side Verification
To check the policy on the client side, open Event Viewer and then go to the Applications and Services Logs > Microsoft > Windows > Device Management > Enterprise Diagnostic Provider > Admin. After accessing the Admin log, use the Filter Current Log option on the right-hand side. This helps you quickly find specific results related to the policy, simplifying the review process and confirming whether the policy was applied successfully.
- I get the Results from the 813 Event ID.
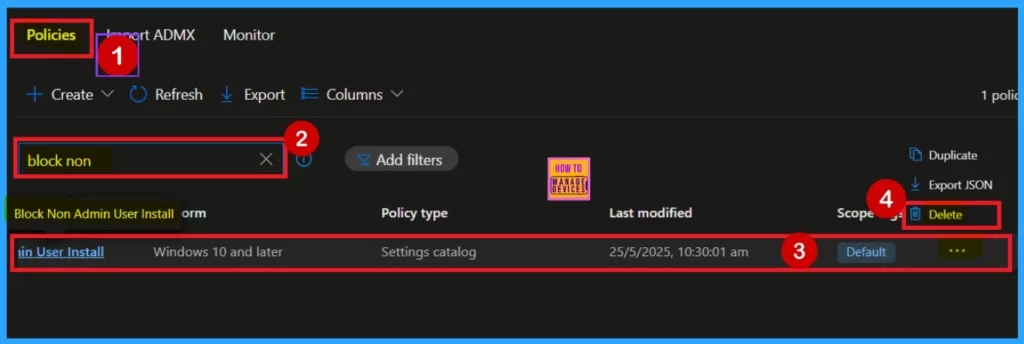
Delete the Policy
If you want to delete the policy for any reason, you can do so easily. Go to the device configuration section in the Configuration list. Search for the policy name, and it will appear in the Policy section. Click on the 3-dot menu (More options) next to the policy. From the available options, select Delete.
- Once you Click , the policy will be completely removed.
Remove Group From the Policy
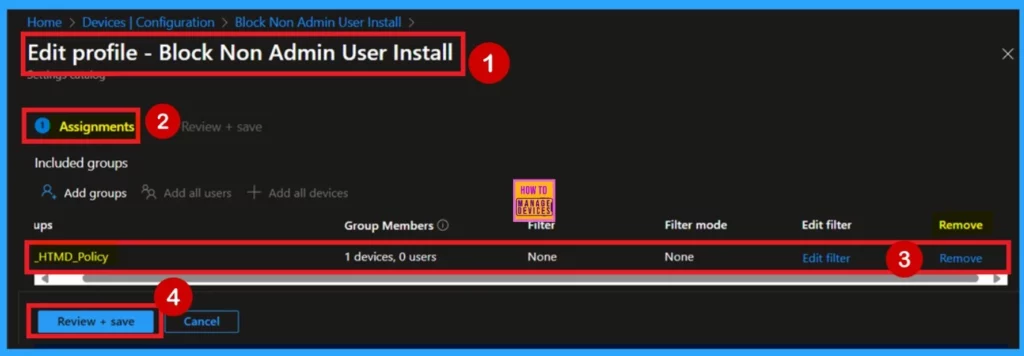
If you want to remove a policy group, you can do it easily. First, go to the device configuration and search for the policy you created. Click on the policy to open the monitoring status page. Scroll down to find the Assignments section, where you’ll see an Edit option. Click on Edit to enter the assignment settings.
- In the policy details, you’ll see a Remove button in blue.
- Click on it, and the policy group will be removed.
Need Further Assistance or Have Technical Questions?
Join the LinkedIn Page and Telegram group to get the latest step-by-step guides and news updates. Join our Meetup Page to participate in User group meetings. Also, Join the WhatsApp Community to get the latest news on Microsoft Technologies. We are there on Reddit as well.
Author
Anoop C Nair has been Microsoft MVP for 10 consecutive years from 2015 onwards. He is a Workplace Solution Architect with more than 22+ years of experience in Workplace technologies. He is a Blogger, Speaker, and Local User Group Community leader. His primary focus is on Device Management technologies like SCCM and Intune. He writes about technologies like Intune, SCCM, Windows, Cloud PC, Windows, Entra, Microsoft Security, Career, etc.

