Hi, Let’s discuss how to show or hide Company Logo on MS Edge Browser New Tab Page using M365 Admin Center. As you all know that Company logos are very important to an organization. In the M365 Admin center allowing you to deploy to Hide and Show the Company Logo in MS Edge.
Administrators have the option to customize the appearance of the new tab page. One key feature is the ability to display the company logo, which helps brand identity and creates a smooth user experience across the organization. By default, if a company logo has been configured through the Admin Portal, it automatically appears on the new tab page in Microsoft Edge.
Admins can choose to turn off this policy if they don’t want the company logo to appear on the Edge new tab page. Disabling it overrides the default setting and hides the logo for all users. That means If you enable or don’t configure this policy, there is no change on the Microsoft Edge new tab page and the company logo is there for users.
Sometime its very benifial to disply the Company logo and It gives browsers a customized look across all organization-managed devices, helping maintain a professional environment. So in this post let’s discuss how to Hide and Show the Company Logo on the Microsoft Edge New Tab Page Policy using M365 Admin Center.
Table of Contents
What is the Purpose of Hiding the Company Logo on the Microsoft Edge New Tab Page Policy?
If the logo is set in the Admin Portal, it shows by default. Enabling or not configuring the policy keeps it visible. Disabling the policy hides the logo from the new tab page.
Hide and Show the Company Logo on the Microsoft Edge New Tab Page Policy using M365 Admin Center
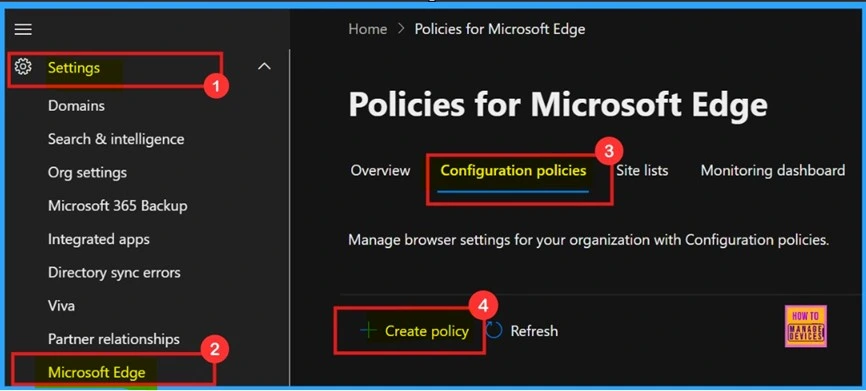
Above we discussed a lot of things about Company Logo on the Microsoft Edge New Tab Page. Let’s look at how this policy can be deployed through the Microsoft 365 Admin Center. First, sign in to the Microsoft 365 Admin Center. Then, go to Settings. Under Settings, select Microsoft Edge.
- In the Microsoft Edge section, choose Configuration policies, and then click on the + Create policy option.
- Enable Or Disable New Tab Page Content Policy In MS Edge Browser Using M365 Admin Center
- Allow or Block Audio Capture Policy in MS Edge Browser using M365 Admin Center
- Enable or Disable Open in Sidebar Policy in MS Edge Browser using M365 Admin Center
Basic Informations for the Policy
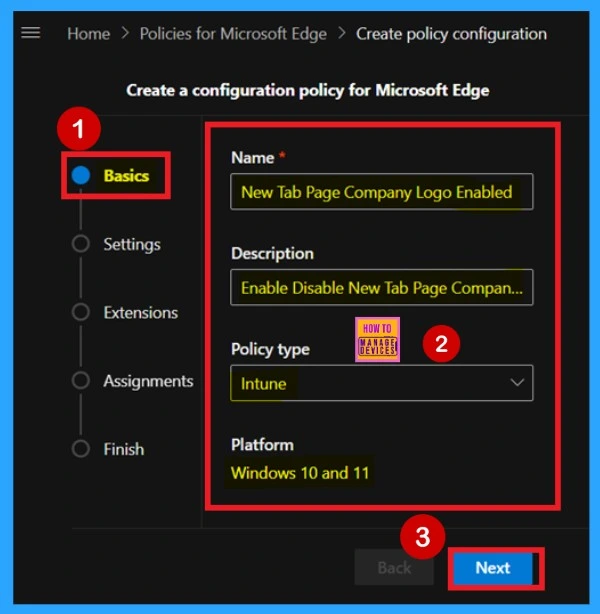
After clicking on Create policy, you will be taken to the Basic tab. The basic information for a policy is very important because, in this section, you need to enter details such as the name, description, policy type, and platform. For the policy type, you need to set it to Intune. You can name the policy whatever you prefer.
Add Settings for the Policy
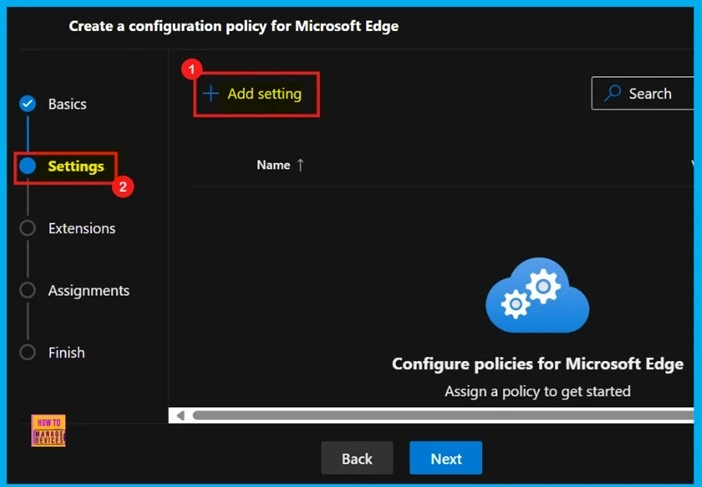
After completing the Basic section, you will move to the Settings tab. Here, you will see a + Add settings option. Click on it, and you will be get with a diffrent policy settings.
Configure a Setting With Value Tab
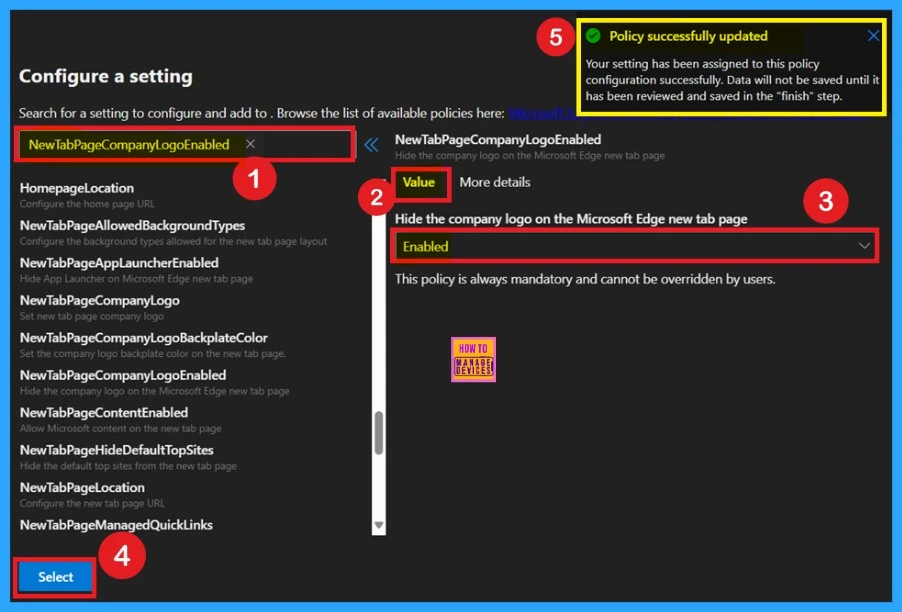
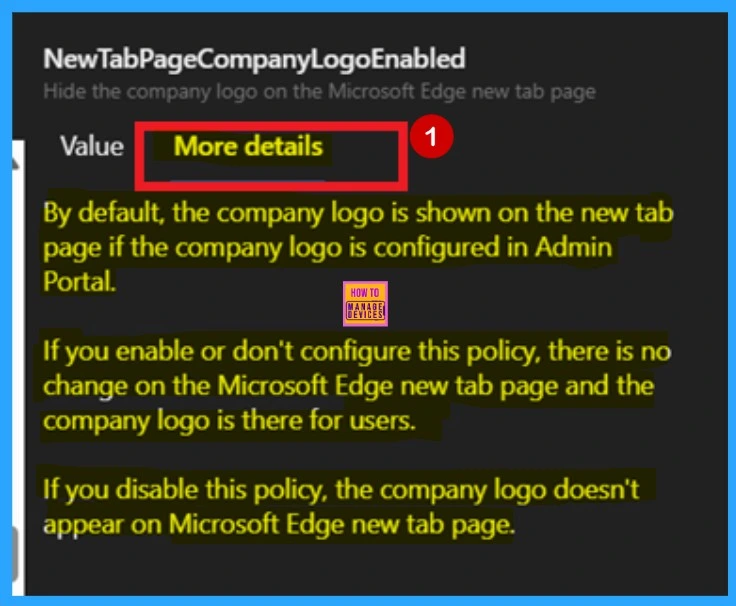
When you click on + Add settings, you will be taken to the Configure a setting page. Here, you’ll see a search bar where you can search for the policy name, or you can browse through different categories listed below. Once you find the policy name, it will appear in the right pane. In that pane, you’ll see a Value tab and a More details tab.
Under the Value tab, there is a drop-down menu, you can click it and it will allow you to select either Enable or Disable. I selected the Enable option and clicked Select. After clicking Select, a notification appears confirming that the policy has been updated.
Get to Know the More Details
You can see the Value and More details tabs on the right pane. In the More details tab, you will find additional information about the policy. This includes what happens when the policy is Enabled, Disabled, or Not configured. This information is always available in this tab, so it’s important to read it carefully and not skip this section.
- It may also indicate whether the policy is deprecated or contains other important notes.
Add Extension to the Policy
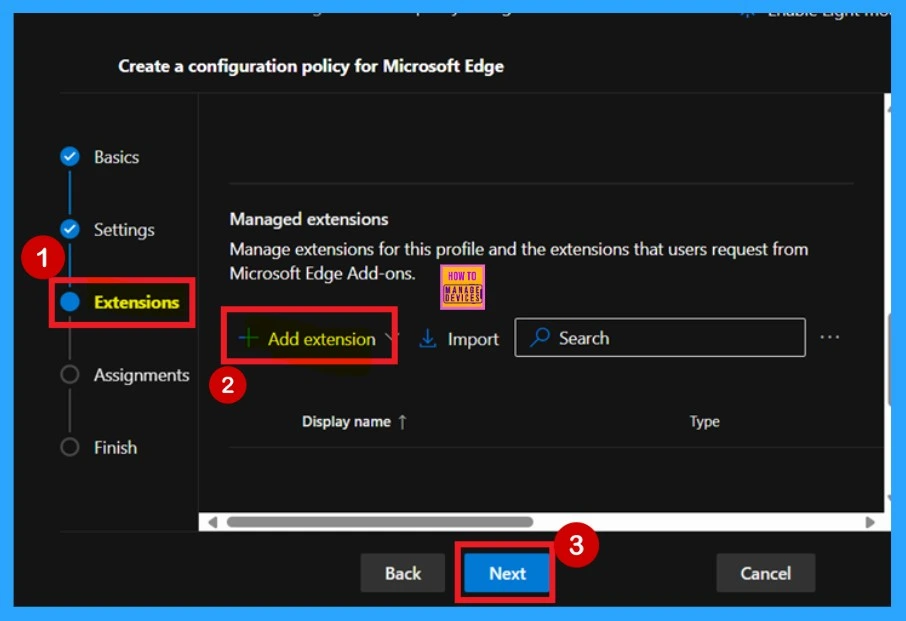
The next is the Extensions section, we can manage how extensions customize using various policies, like installation settings, permissions, and URLs. If we want more features, click + Add extension. Otherwise, we can just proceed with the default extensions. Here in this step i skip this section and click on the Next.
Assignment Groups
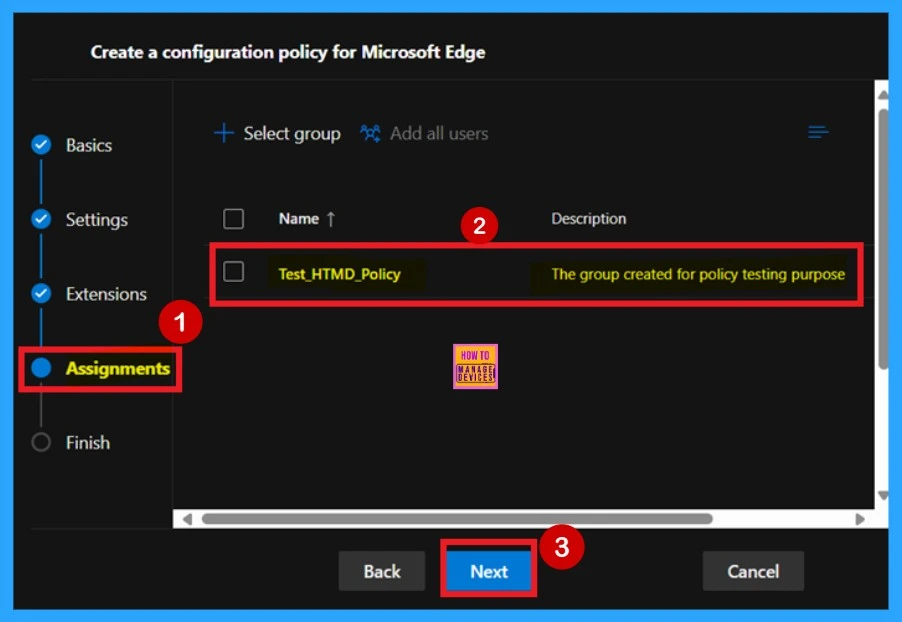
Next up is Assignments, where we can decide who gets this policy. To assign it, just click + Select group and pick the group from the available Microsoft Entra groups. Here I select Test_HTMD_Policy as the group for this policy.
Finish with Review and Create
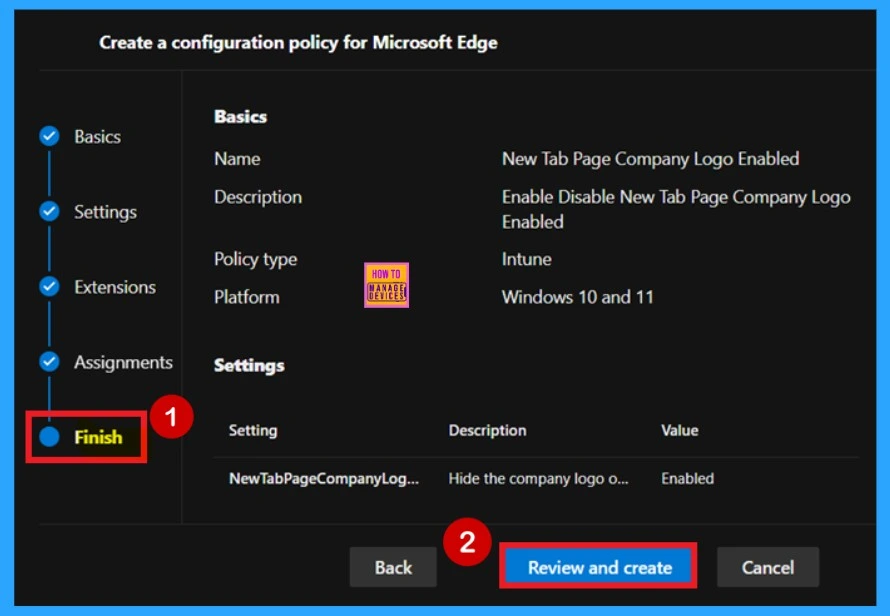
The final stage of policy creation is the Review and create section. In this section, you will see a summary of all the details you entered in the previous tabs, such as Basic, Settings, Extensions, Assignments, and Details. If you need to make any changes, you can go back to the previous tab and edit the information easily. Once everything looks correct, click Next to proceed.
Device and User Check in Status
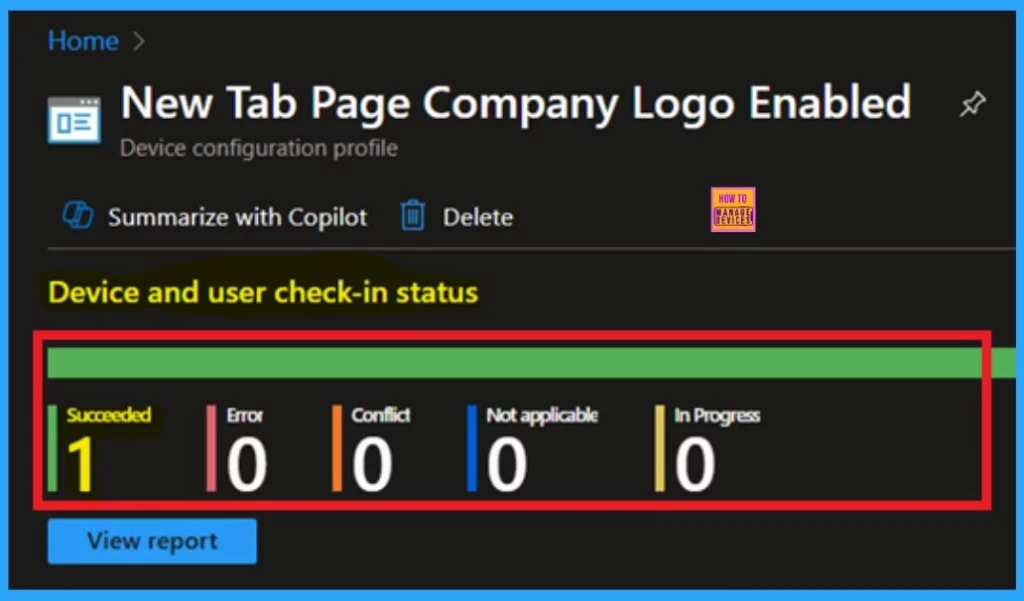
You can get to know the new policy applies to devices through the Monitoring status page. For that we will need to manually sync through the Company Portal. Once synced, the policy will appear in Microsoft Intune. To verify it installed successfully, check the policy’s status in the Intune Portal.
- Navigate to Devices > Configuration, find the policy under the Policies tab.
- Now you will get the Below screenshot as your result.
Client – Side Verification
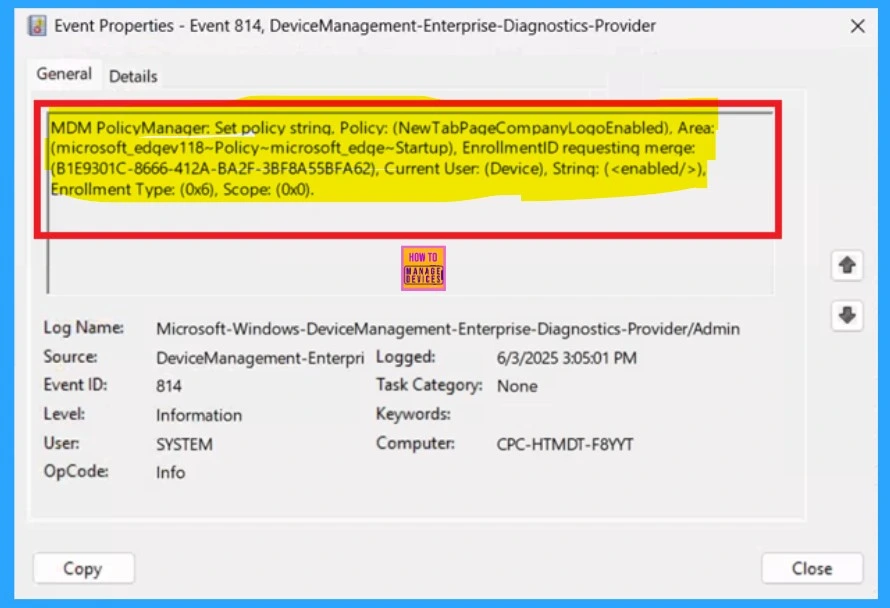
You can use the Event Viewer on the client device to check if the policy has been applied successfully or not. To navigate through the Event Viewer > Applications and Services Logs > Microsoft > Windows > Device Management > Enterprise Diagnostic Provider > Admin. Now, you will see a list of policies. Use the Filter Current Log option on the right pane to find the one you want to check.
- Look for the Event ID 814 and 813.
- I get the result from Event ID 814.
| Policy Details |
|---|
| MDM PolicyManager. Set policy string. Policy: (NewTabPaqeCompanyLogoEnabled), Area: (microsoft_edqev118~Policy~microsoft_edqe~Startup), EnrollmentID requestinq merge: (B1E9301C-8666-412A-BA2F-3BF8A55BFA62), Current User: (Device), Strinq: (), Enrollment Type: (0x6), Scope: (0x0). |
Need Further Assistance or Have Technical Questions?
Join the LinkedIn Page and Telegram group to get the latest step-by-step guides and news updates. Join our Meetup Page to participate in User group meetings. Also, Join the WhatsApp Community to get the latest news on Microsoft Technologies. We are there on Reddit as well.
Author
Anoop C Nair has been Microsoft MVP for 10 consecutive years from 2015 onwards. He is a Workplace Solution Architect with more than 22+ years of experience in Workplace technologies. He is a Blogger, Speaker, and Local User Group Community leader. His primary focus is on Device Management technologies like SCCM and Intune. He writes about technologies like Intune, SCCM, Windows, Cloud PC, Windows, Entra, Microsoft Security, Career, etc


