Let’s discuss Configure Intune Defender Catch-up Scans for scheduled Quick Scans Properly to Stop Missing Vulnerabilities. Disable Catchup Quick Scan” under the Microsoft Defender Antivirus category, controls whether a missed scheduled quick scan is automatically initiated when the device becomes active again.
Catch-up Scan is a security scan that automatically runs because a regularly scheduled scan was missed. This usually happens if the computer was turned off, in sleep mode, or hibernating at the specific time the scheduled scan was set to run.
By enabling Catchup Quick Scan policy, you can Prioritizes User Experience or Performance. Prevents potentially disruptive or resource-intensive scans from starting automatically and unexpectedly when a user first logs in or resumes work, especially on devices that are frequently turned off.
Allows admins to use this policy specifically on high-priority or performance-critical devices (e.g., development machines, shared workstations, trading terminals) to prevent performance-related help desk tickets.
Table of Contents
Configure Intune Defender Quick Scan Catch-up Properly to Stop Missing Vulnerabilities
By preventing unexpected performance hits, the organization ensures that employee time is spent on productive work, not waiting for the machine to respond or calling the help desk.
- How to Configure Check for Signatures before Running Scan Policy using Intune
- How to Allow or Block Email Scanning using Intune Policy
- Allow or Disallow Scanning of Archives using Intune Policy
Example Scenario
Imagine a scenario in which a company’s field sales team uses laptops that are frequently shut down overnight, making them miss the 2:00 AM scheduled quick scan. by enabling Catchup Quick Scan policy, admins can ensures that when a sales rep powers on their laptop the next morning, a quick scan runs shortly after the second consecutive missed scan.
How to Configure Catchup Quick Scan Policy
By configuring this policy, Admins can ensure and prove that laptops and remote devices (which are frequently turned off) are not developing long security gaps between scans, maintaining a consistent security baseline across the entire devices.
- Open the Intune admin center
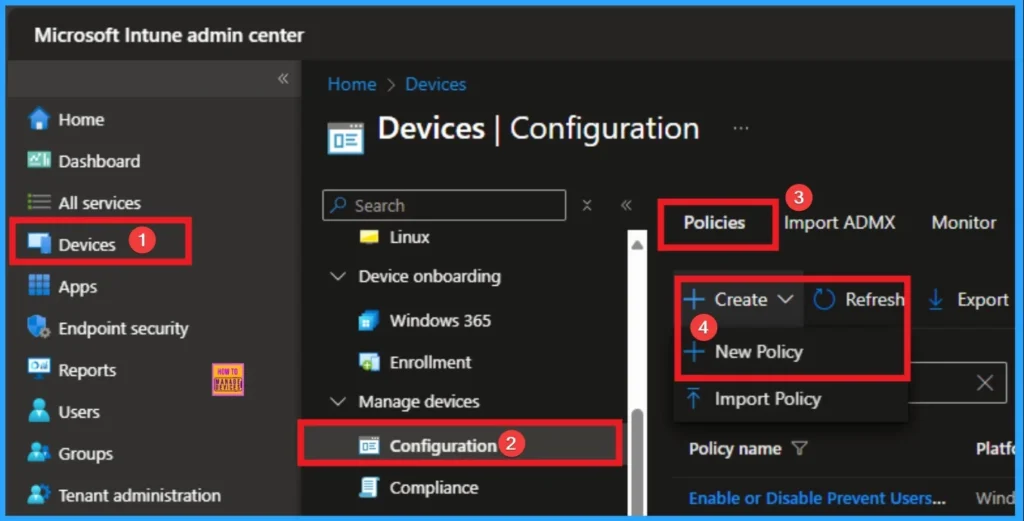
- Go to Devices > Configuration > Policies> + Create > + New policy.
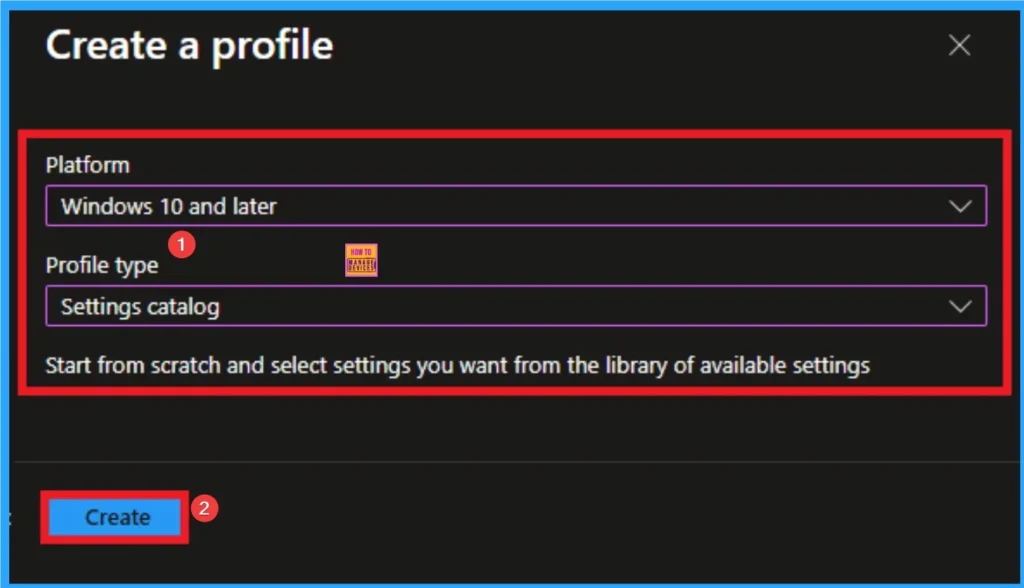
Selecting Profile and Platform
After that, you have to select platform and profile. It is important to select the platform and profile before configuring the policy. Here, I selected Windows 10 and later as the Platform and Settings catalog as the profile type. Then click on the Create button. Then you will get the basic tab.
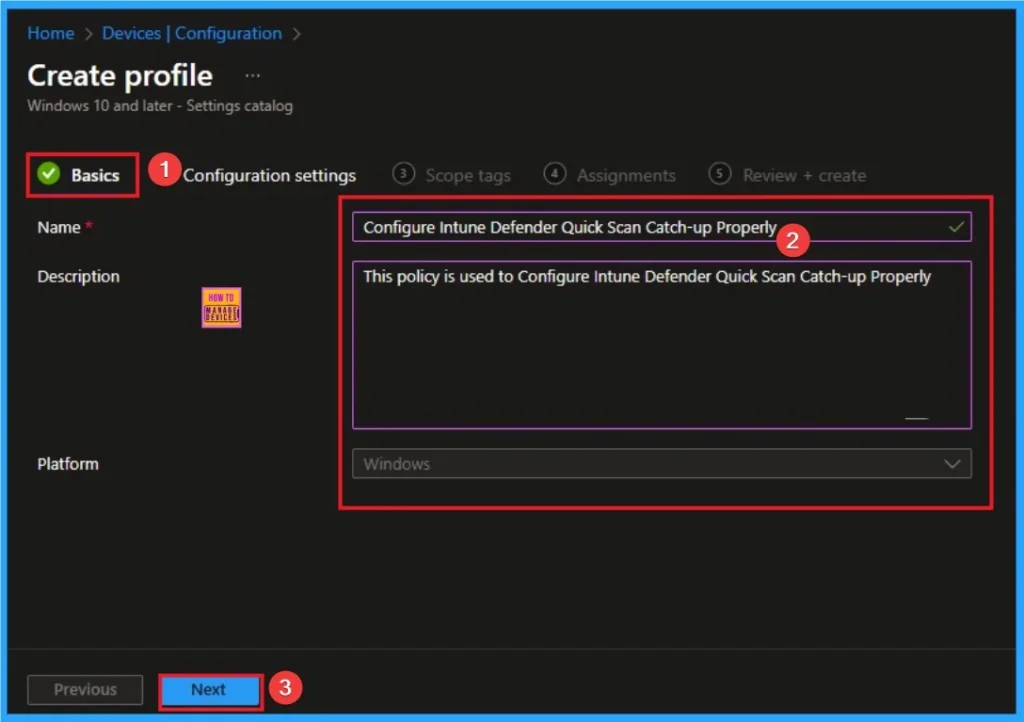
Adding Basic Details
Adding basic details is necessary and important in policy creation. It gives an identify for the settings you will select to create the policy. Policy name and description is useful for identifying the policy purpose. After adding this, click on the Next button.
Configure the Settings from Settings Picker
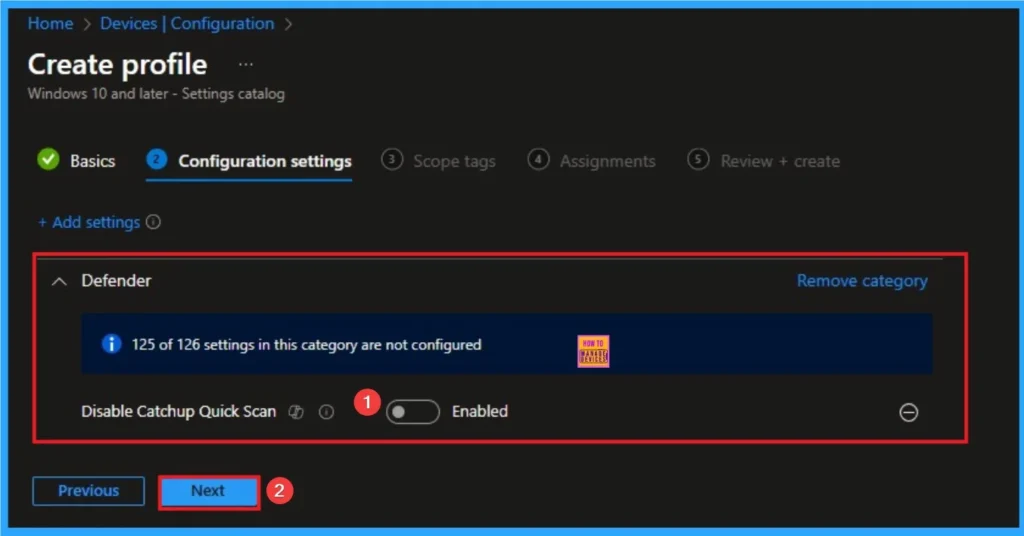
Using configuration settings tab, you can access the specific settings. For this you have to click on the +Add settings hyperlink to get the settings picker. From the Settings Picker I choose Defender category and select Allow users to proceed from the Disable Catchup Quick Scan settings. Then you can close settings picker.

Choosing Default Value
The dafualt value of this policy is Enabled, which means disable the policy. If you enable this setting, catch-up scans for scheduled quick scans will be disabled. Click on the Next button.
Enable Policy
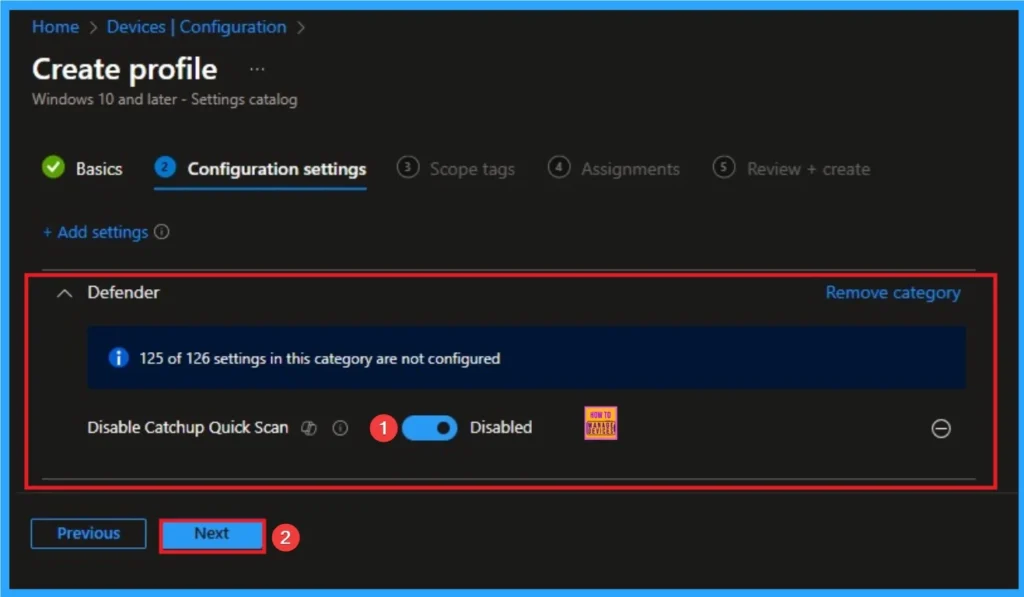
If you disable or this setting, catch-up scans for scheduled quick scans will be turned on. If a computer is offline for two consecutive scheduled scans, a catch-up scan is started the next time the computer powers on or resumes from sleep or hibernation. If there’s no scheduled scan configured, there will be no catch-up scan run.
Scope Tags
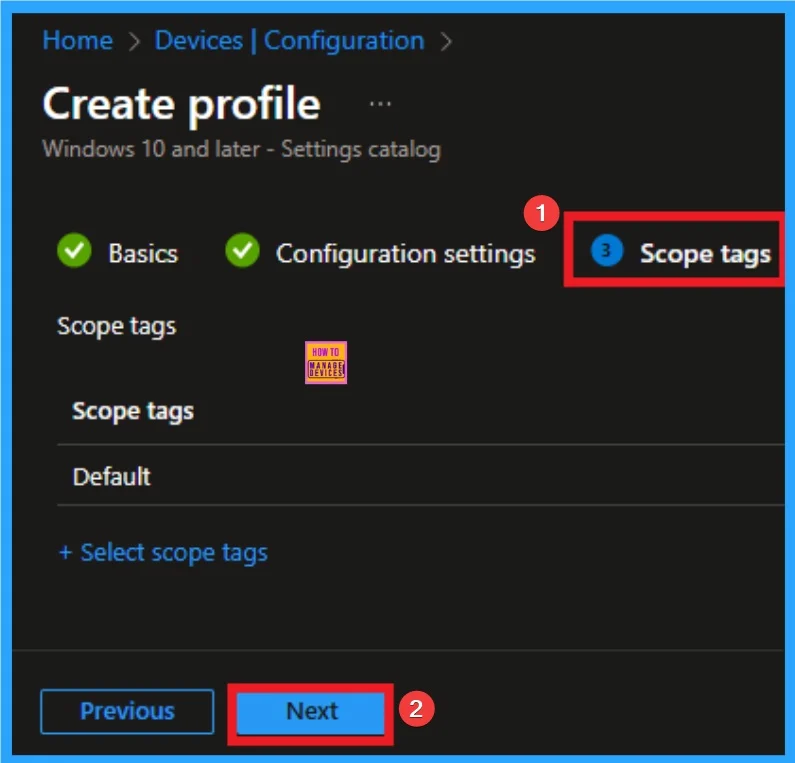
The next section is the Scope tag and which is not a compulsory step. It helps to assign this policy to a defined group of users or devices. Here, I skip the section and click on the next button.
Assignments Tab
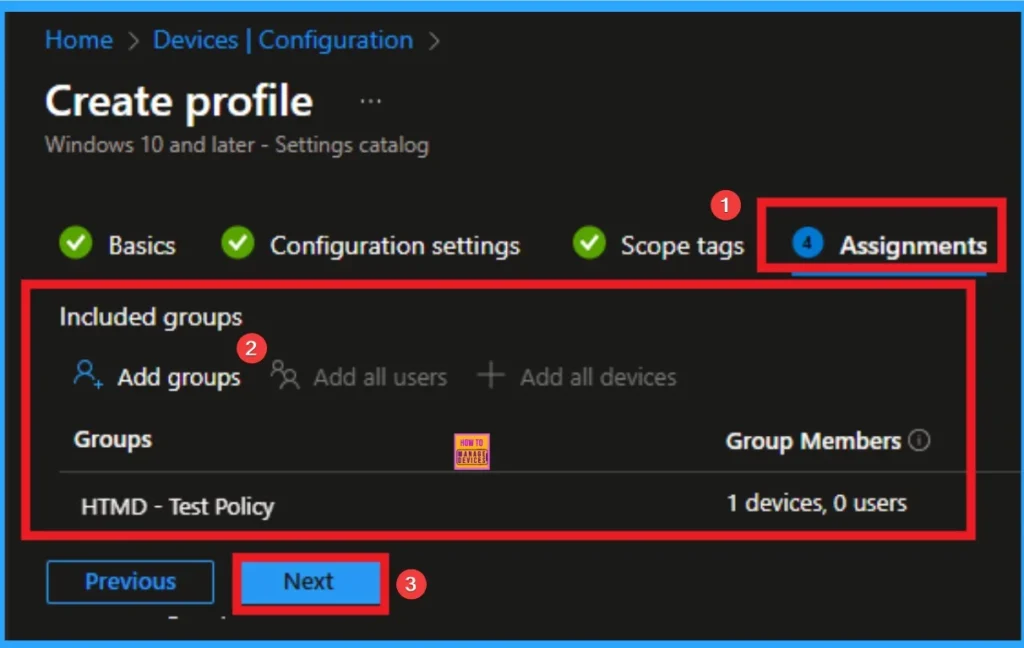
The assignments tab is the crucial step that determines which groups can be selected to assign the policy. Click on the +Add groups option under included groups. Select the group from the list of groups on your tenant.
Click on the Select button. And you can see the selected group on the Assignments tab. Click on the Next button in the window below.
Review + Create Tab
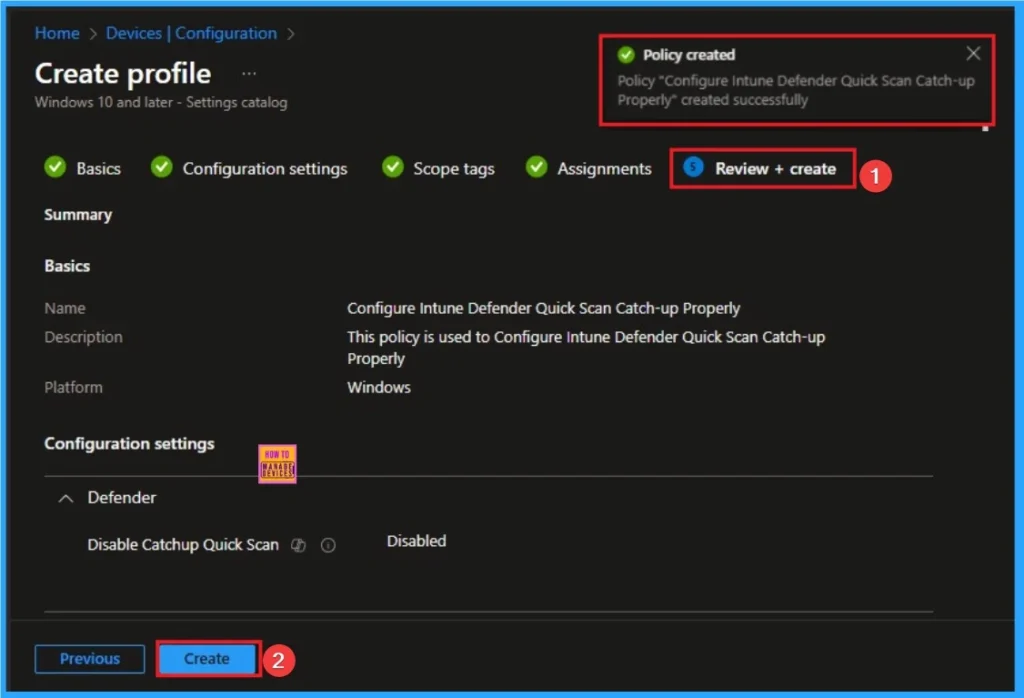
Before completing the policy creation, you can review each tab to avoid misconfiguration or policy failure. After verifying all the details, click on the Create Button. After creating the policy, you will get a success message.
Monitoring Status
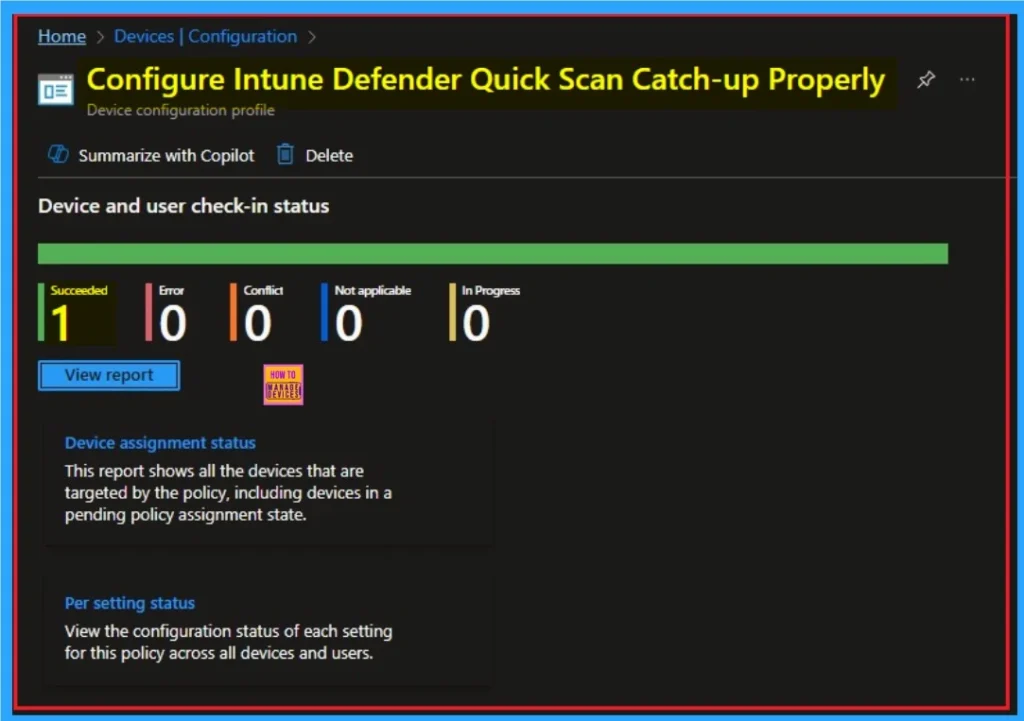
When the Policy is created successfully, you can sync the device on the Company portal for faster deployment. After syncing is completed, you can check the status on the Intune Portal. Go to Devices > Configuration and search for the policy.
Client Side Verification – Event Viewer
By accessing Event Viewer you can easily complete Client Side Verification. Open the Event Viewer on the assigned device. Go to Applications and Services Logs > Microsoft > Windows >

Remove Enterprise Network Domain Names Policy
Intune helps you to easily remove the Enterprise Network Domain Names Policy from your tenant. To do this, open the policy from the Configuration tab and click on the Edit button on the Assignment tab. Click on the Remove button on this section to remove the policy.
For detailed information, you can refer to our previous post – Learn How to Delete or Remove App Assignment from Intune using by Step-by-Step Guide.

Delete Enterprise Network Domain Names
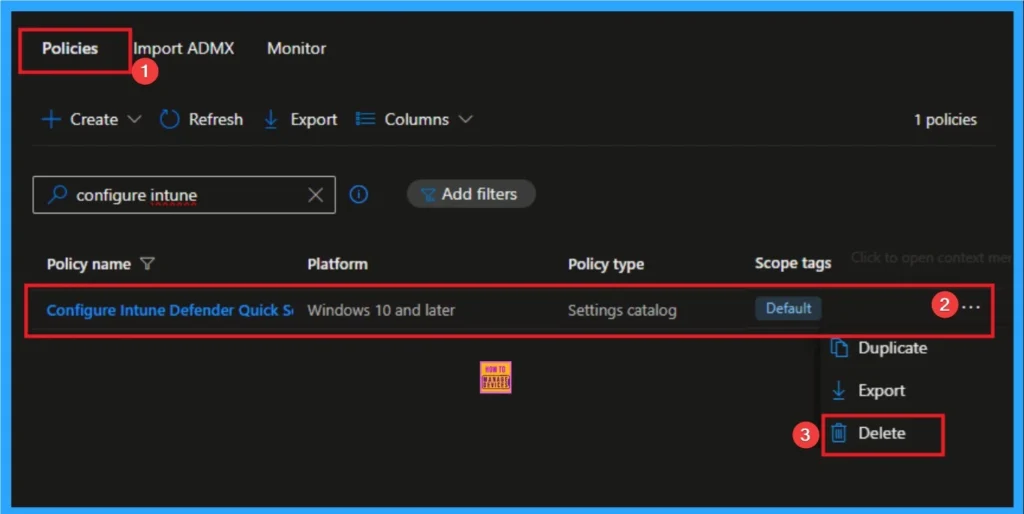
Admins may delete policies in Intune due to different reasons. If you want to quickly delete a Policy, Intune helps you to do that. To do this, search for this policy on the Intune admin center. Click on the 3-dot option and then click on the Delete button.
For more information, you can refer to our previous post – How to Delete Allow Clipboard History Policy in Intune Step by Step Guide.
Windows CSP Details
This policy setting allows you to configure catch-up scans for scheduled quick scans. A catch-up scan is a scan that’s initiated because a regularly scheduled scan was missed. Usually these scheduled scans are missed because the computer was turned off at the scheduled time.
| Name | Value |
|---|---|
| Name | Scan_DisableCatchupQuickScan |
| Friendly Name | Turn on catch-up quick scan |
| Location | Computer Configuration |
| Path | Windows Components > Microsoft Defender Antivirus > Scan |
| Registry Key Name | Software\Policies\Microsoft\Windows Defender\Scan |
| ADMX File Name | WindowsDefender.admx |

Need Further Assistance or Have Technical Questions?
Join the LinkedIn Page and Telegram group to get the latest step-by-step guides and news updates. Join our Meetup Page to participate in User group meetings. Also, Join the WhatsApp Community to get the latest news on Microsoft Technologies. We are there on Reddit as well.
Author
Anoop C Nair has been a Microsoft MVP for 10 consecutive years from 2015 onwards. He is a Workplace Solution Architect with more than 22+ years of experience in Workplace technologies. He is a Blogger, Speaker, and Local User Group Community leader. His primary focus is on Device Management technologies like SCCM and Intune. He writes about technologies like Intune, SCCM, Windows, Cloud PC, Windows, Entra, Microsoft Security, Career, etc.

