Let’s discuss how to enable or disable the New Tab Page Quick Links policy in MS Edge Browser using the Microsoft 365 Admin Center. The M365 admin center is a web-based portal where administrators can manage all their organization’s Microsoft 365 services, such as users, subscriptions, and security settings, all in one place.
Quick Links in Microsoft Edge’s New Tab Page offer quick access to frequently visited websites. They automatically show your saved shortcuts and top browsing sites. Administrators can also set limits on the number of these links.
If you enable or don’t configure the New Tab Page Quick Links policy, Microsoft Edge will show quick links on the new tab page. But users can still decide to show or hide them using the provided control. This policy does not override the user’s preference.
Disabling this policy in Microsoft Edge will prevent quick links from appearing on the new tab page. It also removes the user’s ability to enable them through the NTP settings. This policy applies to local, Microsoft Account, and Active Directory profiles. Azure AD profile configuration for the Enterprise new tab page is done in the M365 admin portal.
Table of Contents
What are the Benefits of the New Tab Page Quick Links Enabled Policy in MS Edge Browser?
This policy allows organizations to standardize the new tab page, promote key websites, and improve user productivity through direct access to frequently used resources.
Enable New Tab Page Quick Links Policy in MS Edge Browser
Our existing blog post (Enable Disable Quick Links on New Tab Page in MS Edge Browser) explained how to turn the Quick Links feature on or off in Microsoft Edge’s New Tab Page through Edge settings, Registry edits, and Intune policies. Now, I will guide you through the process of enabling the New Tab Page Quick Links Policy in the MS Edge Browser using the M365 Admin Center.
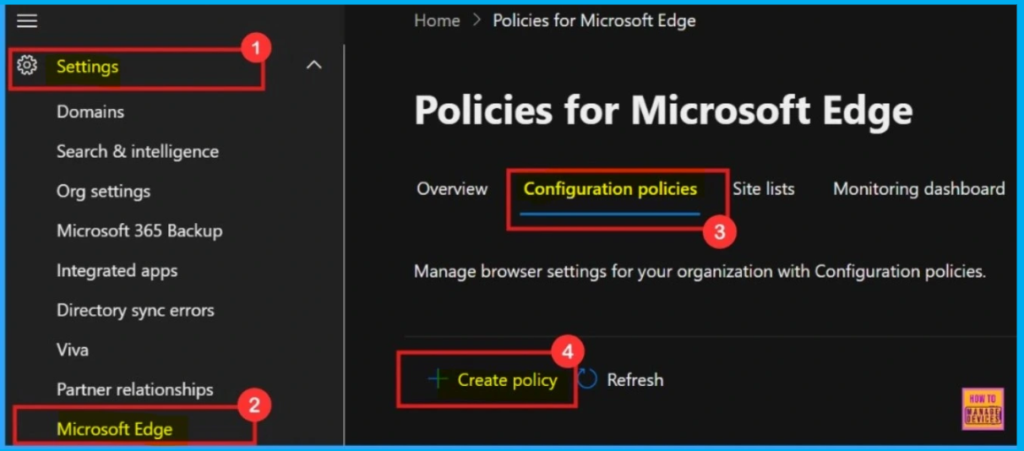
- To set up this policy, start by opening the Microsoft 365 admin center.
- Navigate to Settings and select Microsoft Edge
- On the Configuration Policies tab, click + Create policy.
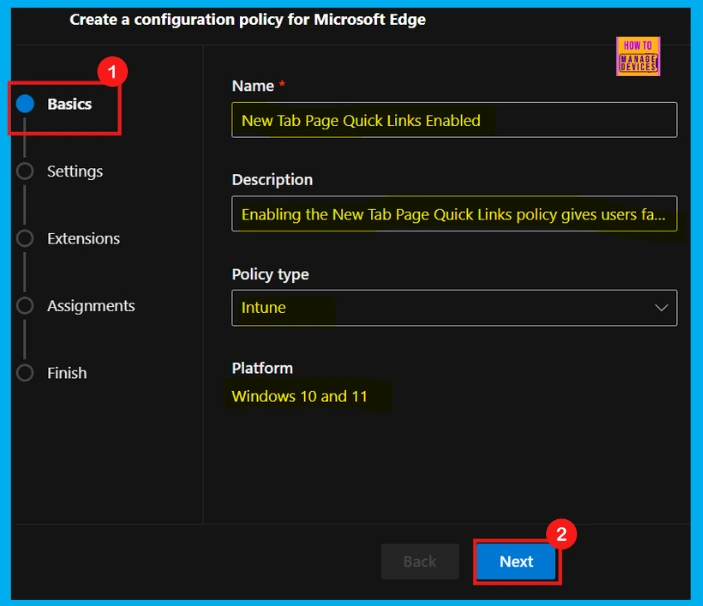
Basics
Basics is the first step to configure a policy. Here we can give this policy a name and a short description. We can ignore the policy type and platform since those are already set. A clear name and description will help us to find this policy easily later. Then, click Next.
- Enable Or Disable New Tab Page Content Policy In MS Edge Browser Using M365 Admin Center
- Allow or Block Audio Capture Policy in MS Edge Browser using M365 Admin Center
- Enable or Disable Open in Sidebar Policy in MS Edge Browser using M365 Admin Center
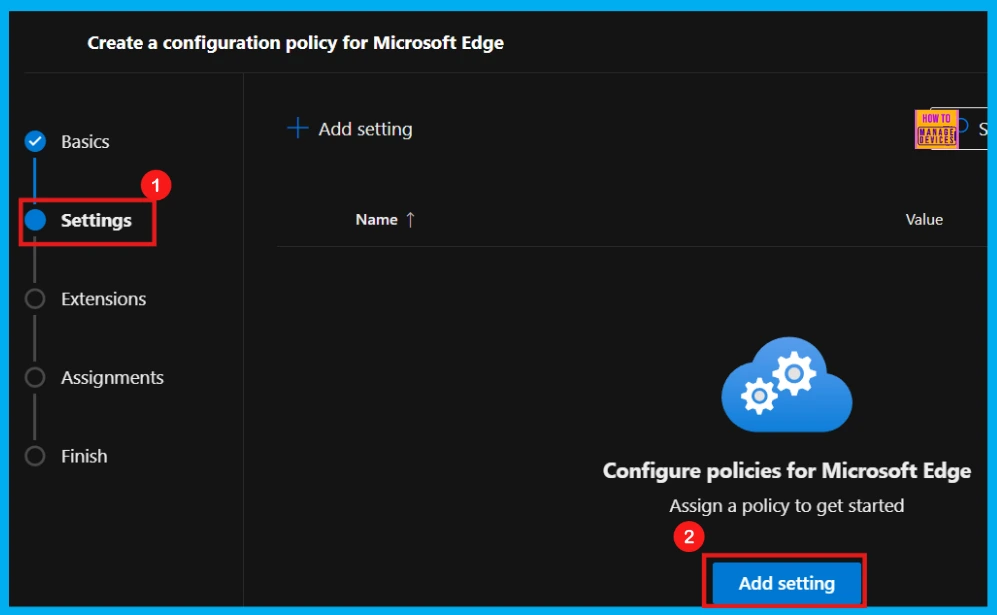
Settings
After we finished with the basics, the next section is the Settings. Once we are in the Settings tab, we will see an Add settings button – click it.
Configure a Settings
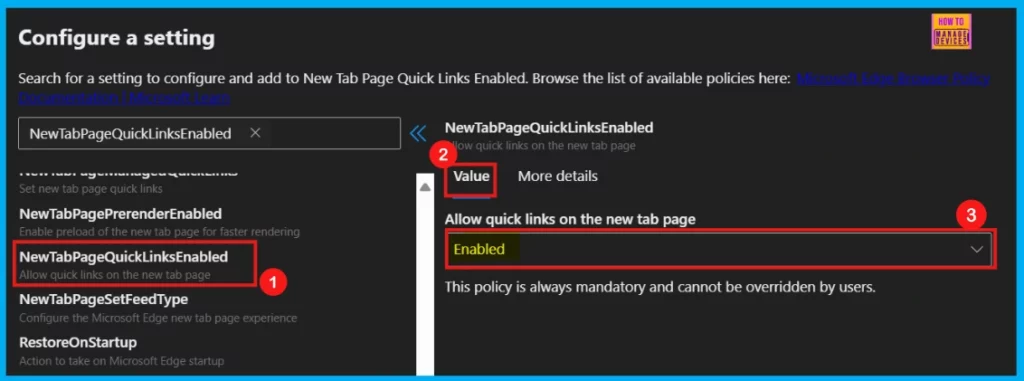
Upon clicking Add settings will bring up Configure a Settings page. Here we can see a list of all the policy settings we can choose from. Just find and select the specific policy we need to configure from that list. I select the New Tab Page Quick Links Enabled policy to configure. In the left pane, we can see Value and More details tabs.
- Within the Value tab, a drop-down arrow provides the option to enable, disable or selecting a particular feature of the policy.
- I want to display the Quick Links on the New Tab Page, so I select the Enable option from the drop-down arrow.
| Policy Setting | Quick Links on New Tab Page | User Control of Quick Links |
|---|---|---|
| Enable / Not Configured | Displayed | User can turn on or off |
| Disable | Hidden | Control disabled |
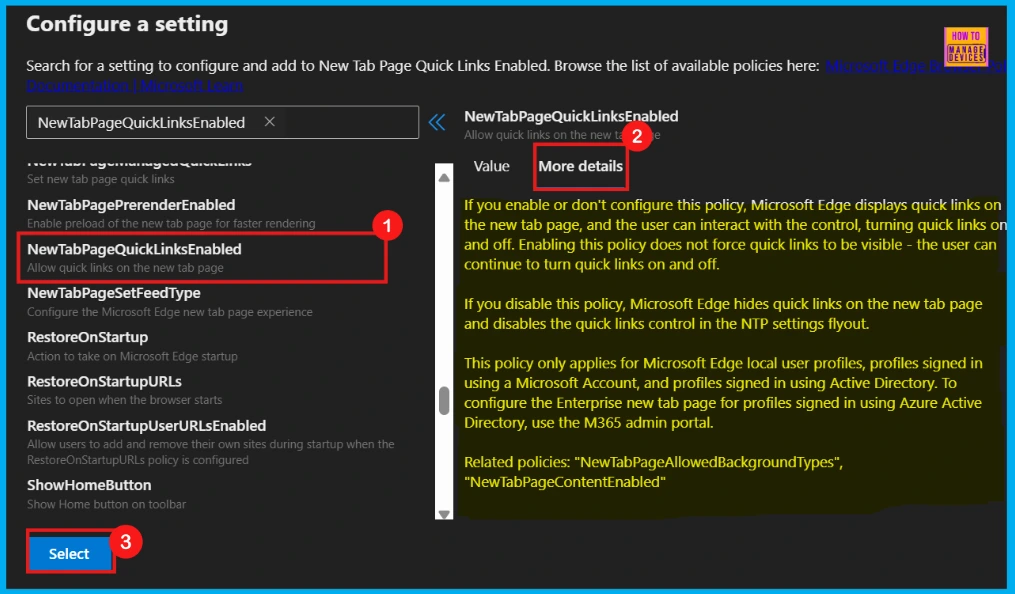
Make sure to read the More Details section before selecting the policy. It contains important information, such as whether the policy is deprecated. Always review this section before clicking Select to configure the policy.
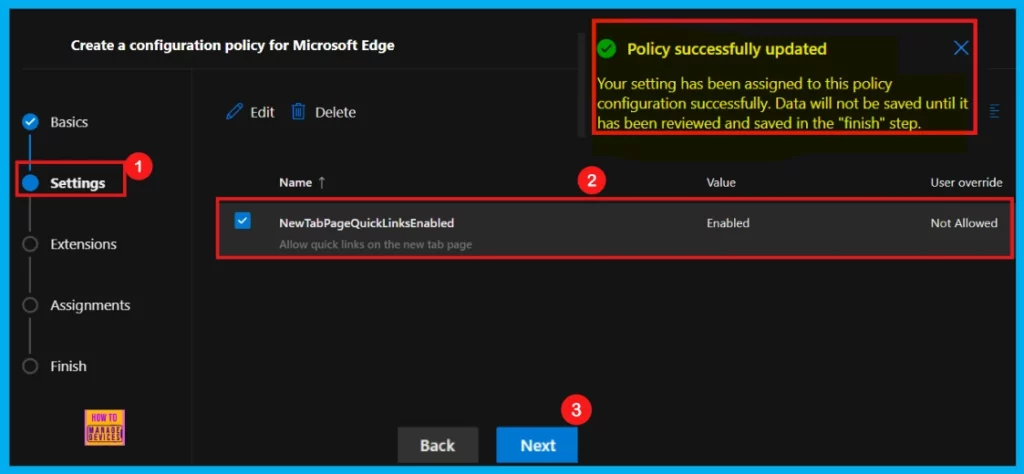
Once we hit Select, we will see a confirmation that the policy is successfully updated. The new policy will then show up in the list on the Settings page. Just tick the box next to its name to choose it and click Next to move forward with the setup.
Extensions
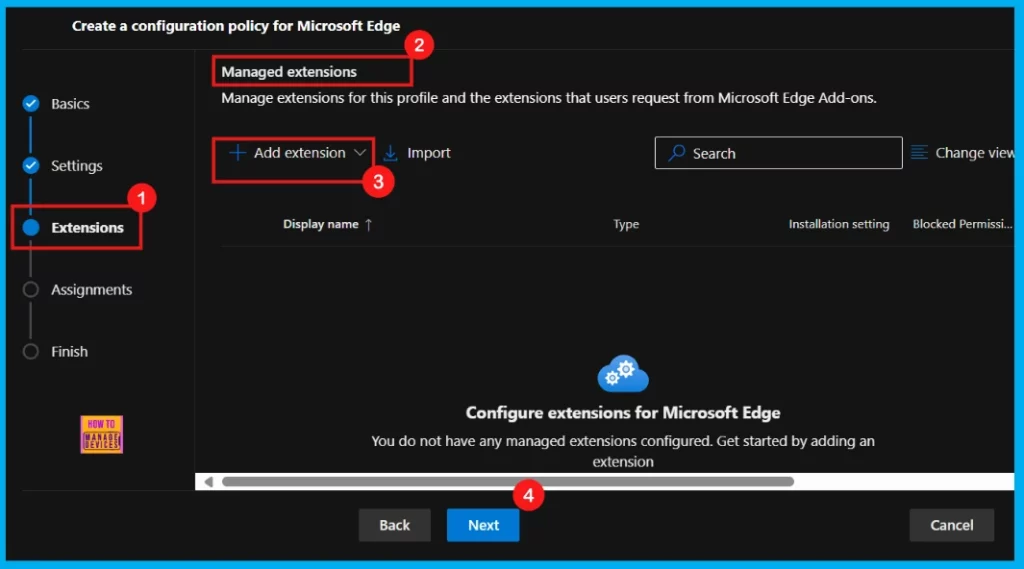
On the Extensions tab, we have the option to include extensions such as Edge Add-ons and sidebar apps in our policy. If want to manage extensions, including those from the Microsoft Edge Add-ons store, simply click Add Extension.
- For the moment, I will skip this step and proceed to the policy settings by clicking Next.
Assignments
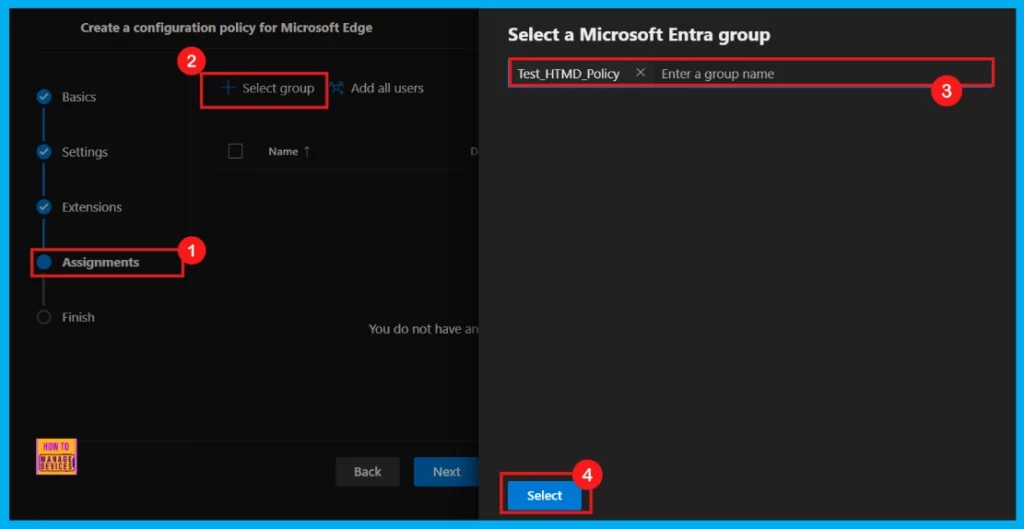
Now we are in the Assignments section to specify who this policy will apply to. To do this, click the + Select group button. This will bring up a list of available Microsoft Entra groups. From this list, we will select the group we want to target – in this case, Test_HTMD_Policy.
- After picking the group, we will see a confirmation of our selection.
- Your configurations will be saved only after you finalize with Finish.
- Click Next to proceed.
Finish
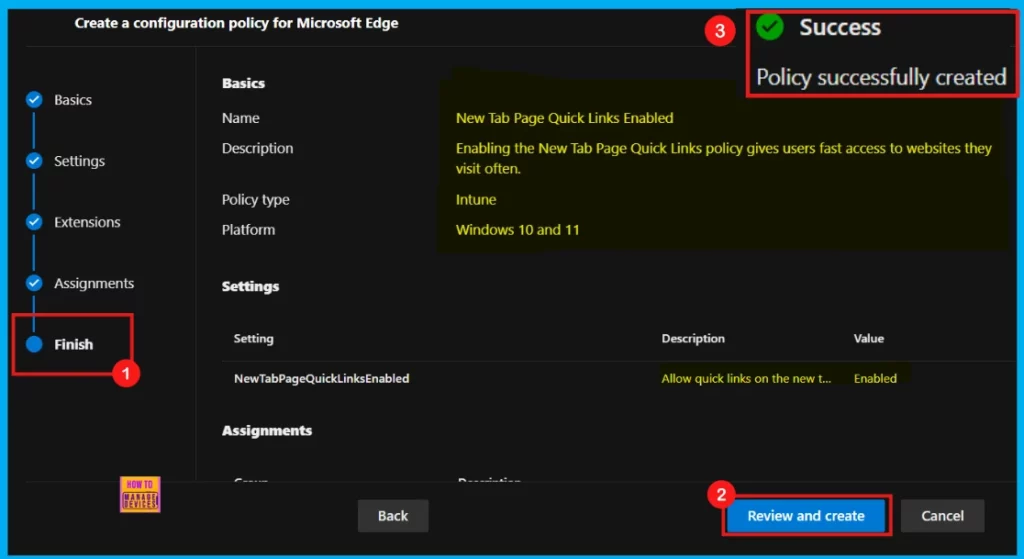
Now we have reached the Finish stage. Here we will see a summary of all the policy settings we have configured. If anything looks off, just hit the Back button to make corrections. Once we are satisfied with everything, click Review and Create to create the policy. After clicking that, we will get a confirmation saying, Policy successfully created.
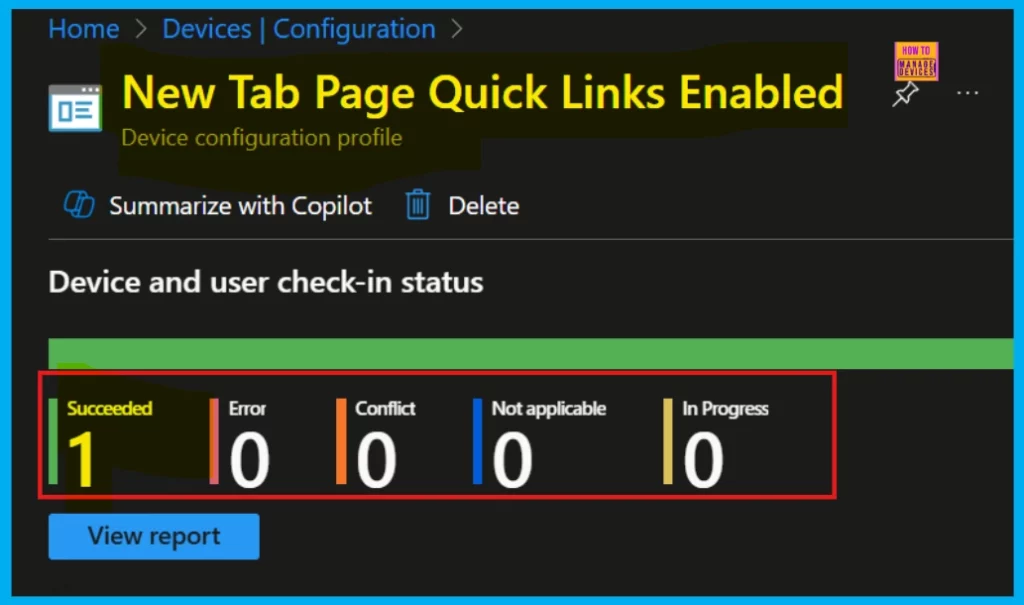
Device and User Check-in Status
To make sure the new policy applies to devices, we will need to manually sync them using the Company Portal app. After syncing, you can see the policy in Microsoft Intune. To confirm, go to Devices > Configuration in the Intune Portal, find your policy in the Policies tab, and check that its status shows succeeded (1). This means the policy has been successfully applied to the device.
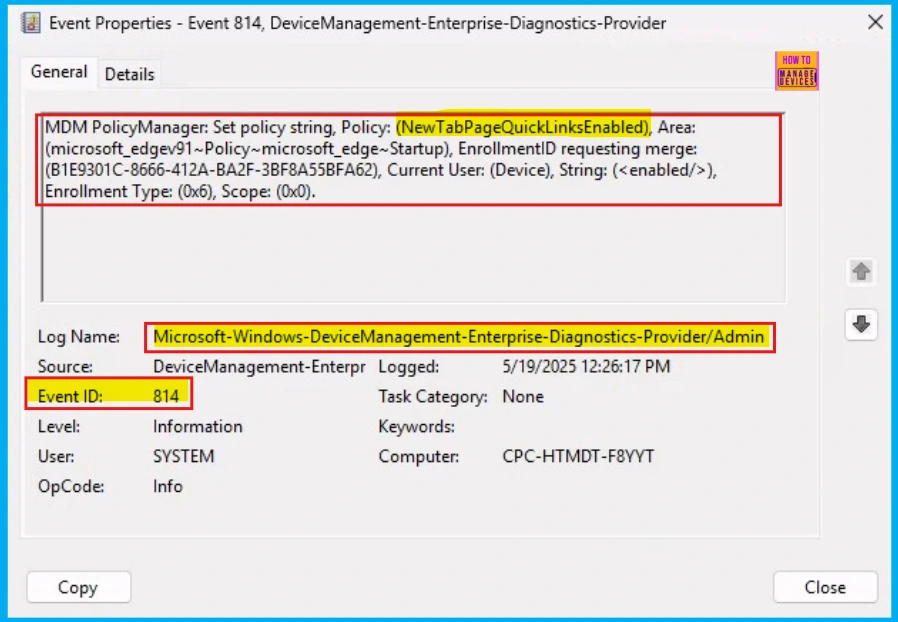
Client Side Verification of New Tab Page Quick Links Policy in MS Edge
Admins can also double-check if a policy applied to a specific device by using the Windows Event Viewer. Just go to Applications and Services Logs > Microsoft > Windows > DeviceManagement-Enterprise-Diagnostics-Provider > Admin and look for Event ID 814. If you see this event, it means the New Tab Page Quick Links Policy was successfully applied to that device.
MDM PolicyManager: Set policy string, Policy: (NewTab PageQuickLinksEnabled), Area: (microsoft_edge91~Policy~microsoft_edge~Startup), EnrollmentID requesting merge: (B1E9301C-8666-412A-BA2F-3BF8A55BFA62), Current User: (Device), String: (<enabled/>), Enrollment Type: (0x6), Scope: (0x0).
Need Further Assistance or Have Technical Questions?
Join the LinkedIn Page and Telegram group to get the latest step-by-step guides and news updates. Join our Meetup Page to participate in User group meetings. Also, Join the WhatsApp Community to get the latest news on Microsoft Technologies. We are there on Reddit as well.
Author
Anoop C Nair has been Microsoft MVP from 2015 onwards for ten consecutive years! He is a Workplace Solution Architect with more than 22+ years of experience in Workplace technologies. He is also a Blogger, Speaker, and leader of the Local User Group Community. His primary focus is on Device Management technologies like SCCM and Intune. He writes about technologies like Intune, SCCM, Windows, Cloud PC, Windows, Entra, Microsoft Security, Career, etc.


