Today we are discussing Set Retention Period for OneNote Version History using Intune Policy. As you all know, the Settings Catalog is one of the important features in Microsoft Intune. It provides many different types of policies that organizations can use to manage their devices and apps.
Policies in Intune control how devices and apps work. They can manage things like updates, security, and app usage. One such policy is for OneNote. It helps admins decide how long OneNote should keep old page versions.
When you make changes in OneNote, it saves older versions of your pages. This is useful if you want to go back and check or restore something. But if not managed, these old versions keep collecting and take up a lot of space. This Policy prevents OneNote from storing unnecessary copies of pages for too long and helps keep notebooks organized
For organizations, this policy is very useful in managing storage space. When version history grows without control, it can take up a lot of space on devices and servers. By applying this policy, admins can make sure that only recent versions are kept, which reduces storage costs and improves overall system performance.
Table of Contents
What are the Security Benefits of this Policy?
With this policy, organizations can limit how long such data is kept, which helps protect company information and ensures better compliance with data retention rules.
What Happens if Enabled?
If you enable this policy setting, you can set the number of days back to delete version history. If you disable or do not configure this policy setting OneNote will default to keeping previous versions for all days in the past.
Set Retention Period for OneNote Version History using Intune Policy
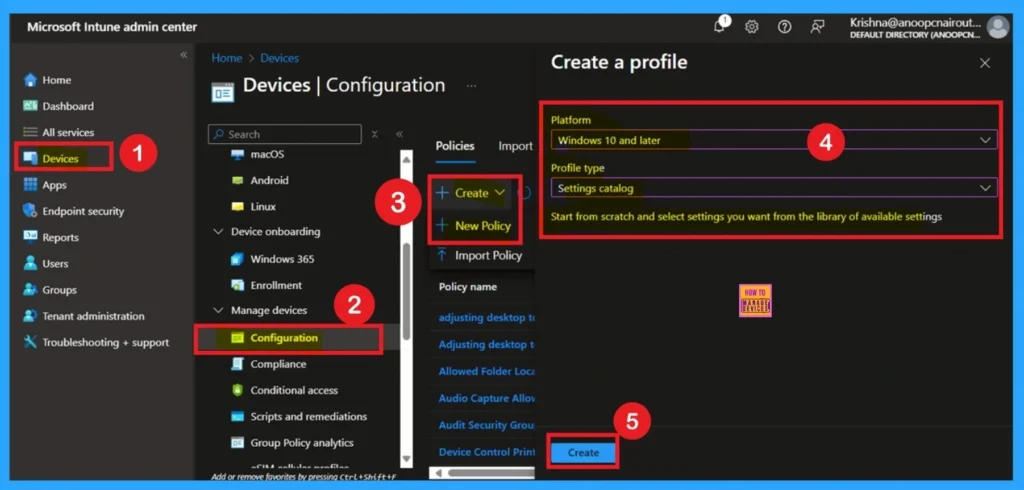
We have already discussed a lot about the number of days to keep version history for users in OneNote. Now, let’s move on to how this policy can be deployed through Microsoft Intune. First, we go to Device Configuration in Intune, and from there, we create a new policy.
- Next, fill in the Platform and Profile type details in the Create profile window.
- Set Platform to Windows 10 and later, and set Profile type to Settings catalog.
- Then click Create.
- Enable Disable OneNote Audio Search for User Policy using Intune
- OneNote Text Prediction for user Policy Deployment using Intune
- Enable Disable Full Screen Mode in MS Edge Browser using Intune Policy
Know the Basic Tab Importance
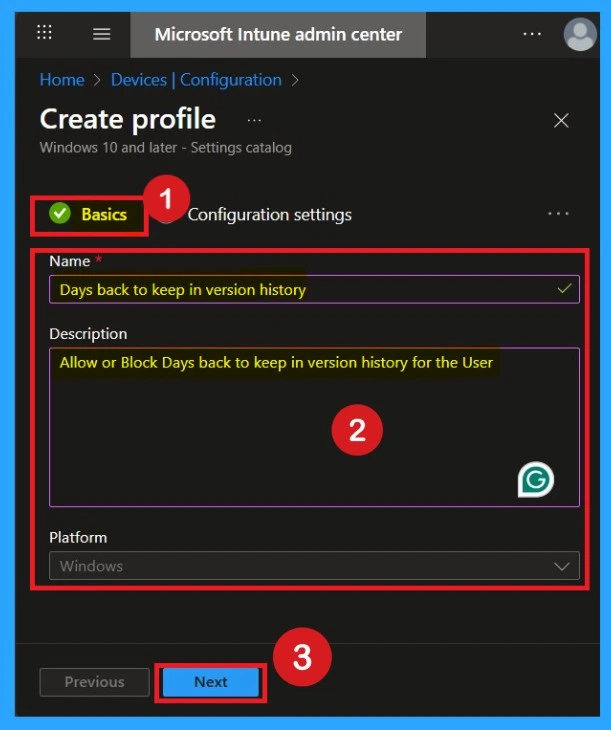
The Basics tab is the quickest step. Here, you need to enter the basic details such as the Name, Description, and Platform information. Since the platform is already set to Windows, you only need to provide a specific name and description for the policy, then click Next.
How to Handle Configuration Settings
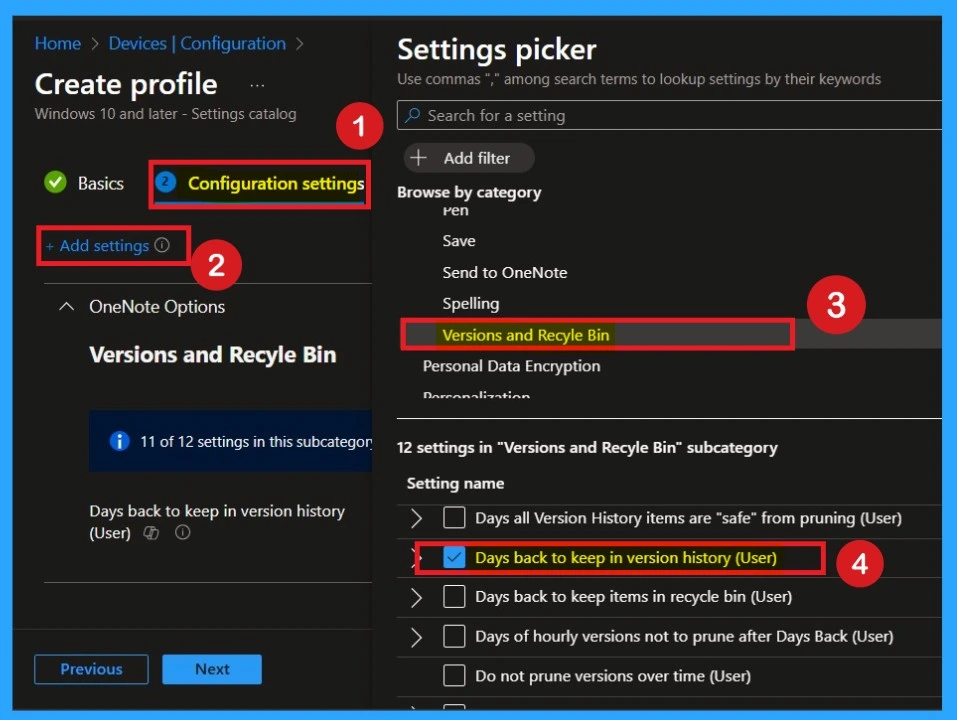
Handling configuration settings is very important, and you need to understand the steps carefully. First, click on the Add settings option, which appears as a hyperlink. When you click on it, a settings window will open. In this window, you need to browse and select the OneNote category.
Inside the OneNote category, you will see a dropdown arrow. Clicking this will show you different types of policy settings. From these options, you need to select Default Search Provider. Under Default Search Provider, you will find around 34 settings. Here, you can choose the option called Default Search Provider URL for Suggestions.
Defaulted Mode
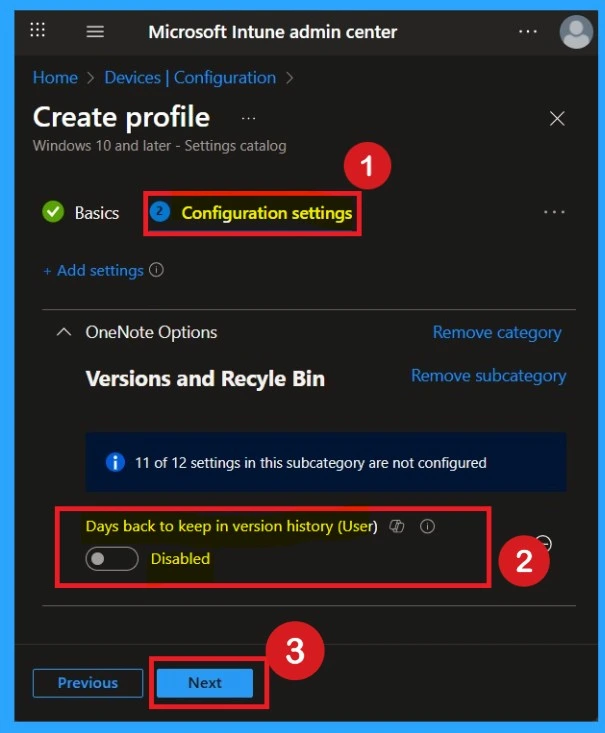
You know by default, you should understand that a policy can be either enabled or disabled. In this case, the policy is disabled by default. If you want to keep it in the disabled mode, you have to click Next to continue.
How to Enable Days Back to Keep in Version History in OneNote Policy
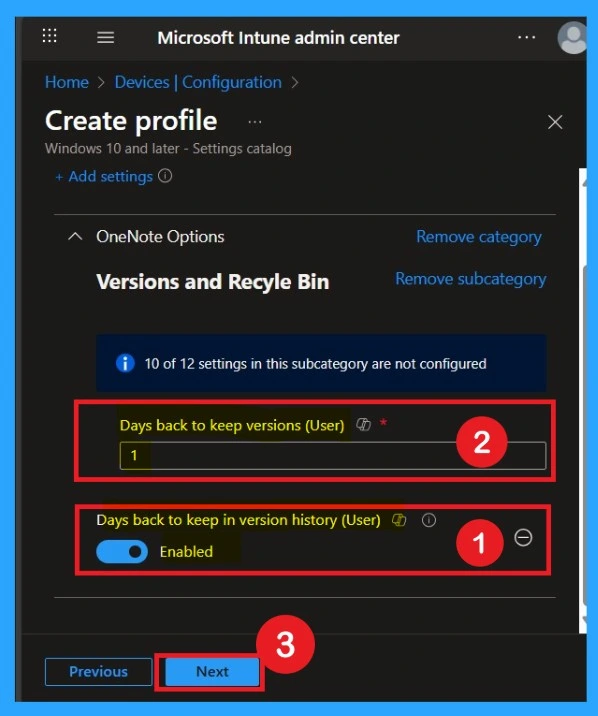
You can also enable a policy that is disabled by default. To do this, toggle the switch from left to right. Once enabled, the switch will turn blue and display the label Enabled. When the policy is enabled, an additional text box will appear. In this text box, you have to enter the Value 1. Then click on the Next.
Know about the Scope Tags
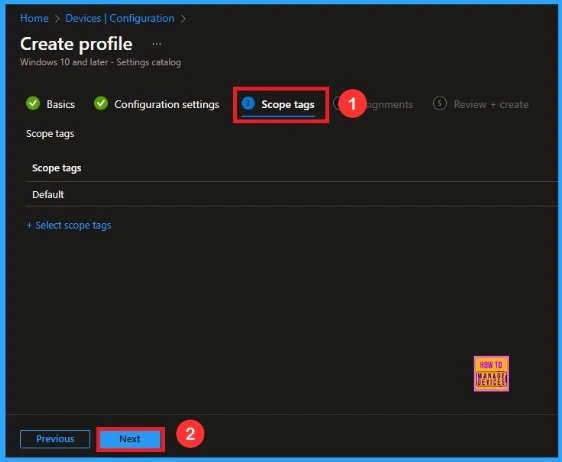
The next section is the Scope tag and which is not a mandatory step. It helps to assign this policy to a defined group of users or devices. Here, I skip the section and click on the next button
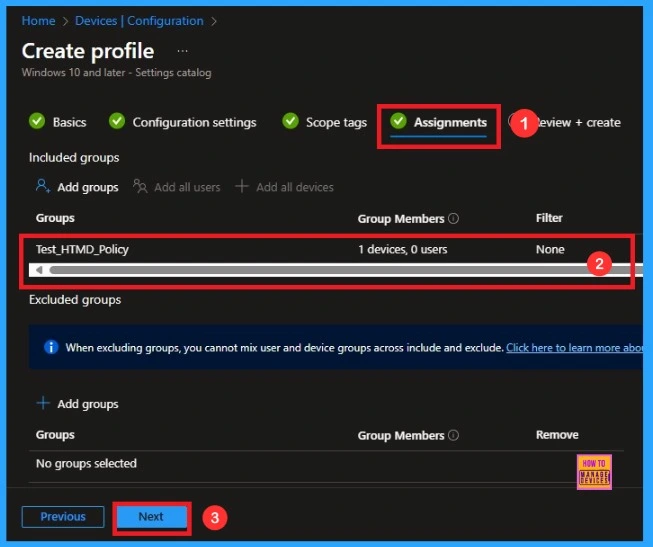
What are Assignments
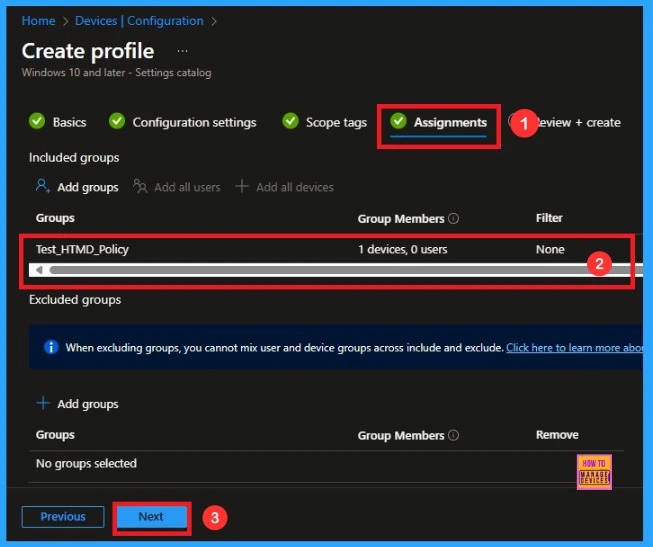
The assignments tab is the crucial step that determines which groups can be selected to assign the policy. Click on the +Add groups option under included groups. Select the group from the list of groups on your tenant. Click on the Select button. And you can see the selected group on the Assignments tab. Click on the Next button to proceed.
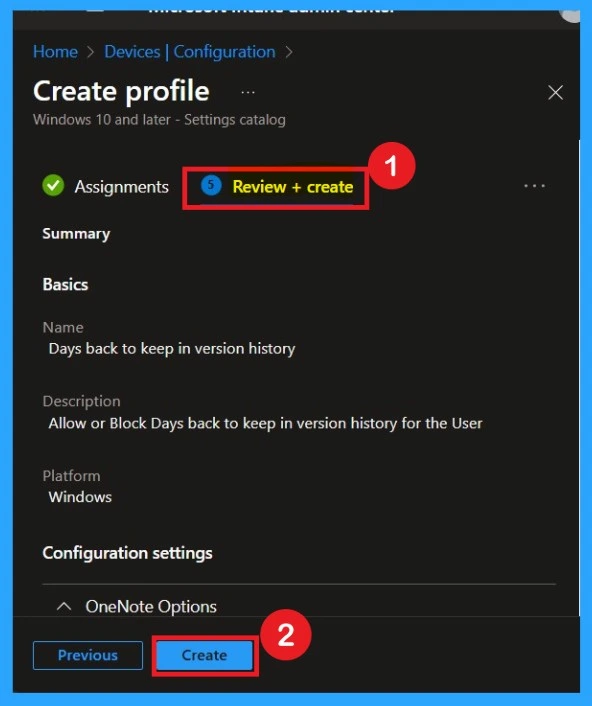
Review + Create
In this section, you can see a summary of everything you entered in the previous steps, such as basic details, configuration settings, assignment details, and more. If you want to change or edit anything, you can easily go back to the previous section. Click Create to finish, and a message will confirm that the Configure Automatic HTTPS was created successfully.
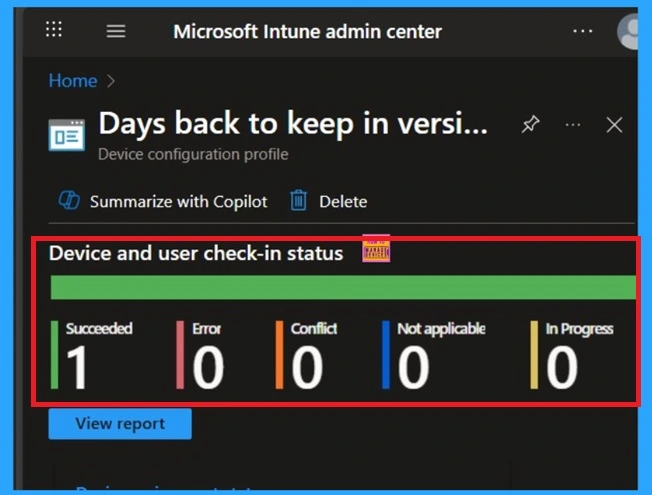
Device and User Check-in Status
To check the status of a policy in the Intune portal, navigate to Devices > Configuration, then select the policy by name. Look for a status of Succeeded 1, which indicates that the deployment was successful. Keep in mind that the status may not update that time and wait a few minutes for the sync to finish before checking again.
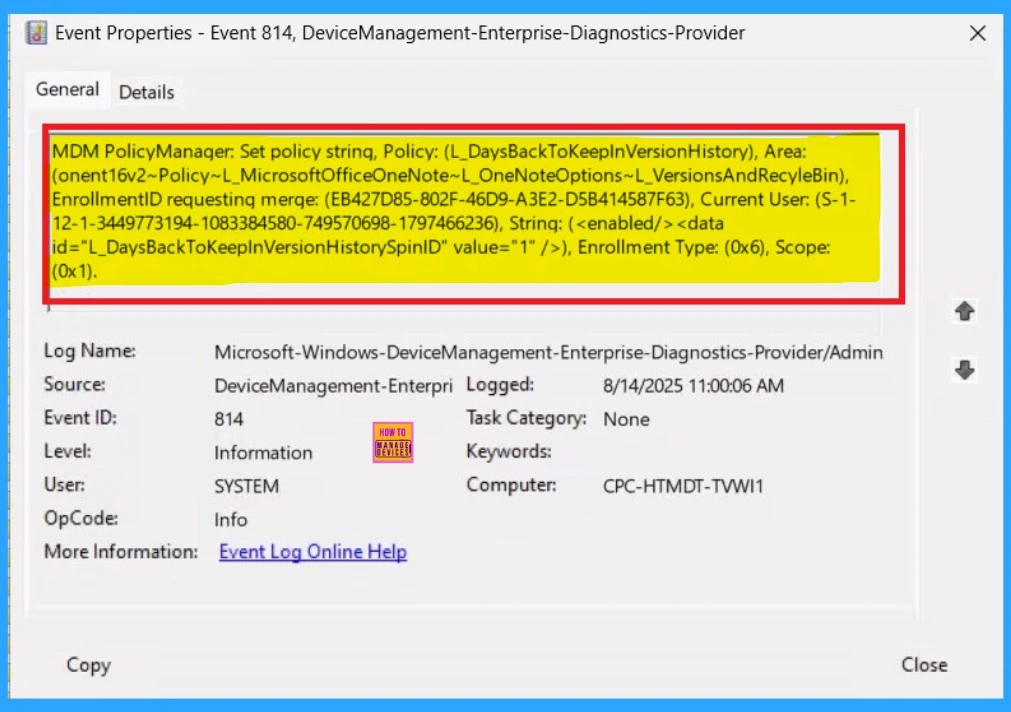
Client Side Verification
Now you can check the confirmation in the Event Viewer by looking for Event ID 813 or 814. To access this, open Event Viewer and navigate to Applications and Services Logs > Microsoft > Windows >Device Management Enterprise Diagnostic Provider > Admin.
- You can see a list of policy-related events now.
- I found the policy details in the Event ID 814.
| Policy Details |
|---|
| MDM PolicyManager: Set policy string, Policy: (L_DaysBackToKeeplnVersionHistory), Area: (onent16v2~Policy~L_MicrosoftOfficeOneNote~L_OneNoteOptions~L_VersionsAndRecyleBin), EnrollmentID requesting merge: (EB427D85-802F-46D9-A3E2-D5B414587F63), Current User: (S-1- 12-1-3449773194-1083384580-749570698-1797466236), Strinq: ( ), Enrollment Type: (0x6), Scope: (0x1). |
How to Remove Configured Group
After creating the policy, if you want to remove the specific group that you previously selected, you can easily do that. First, go to Devices > Configuration policies. In the Configuration policy section, search and select the policy name. In the Assignment section, you will find an Edit option and click on it. Then, click the Remove option and Review+ save button.
For detailed information, you can refer to our previous post – Learn How to Delete or Remove App Assignment from Intune using by Step-by-Step Guide.
Delete a Policy
If you want to delete this policy for any reason, you can easily do so. First, search for the policy name in the configuration section. When you find the policy name, you will see a 3-dot menu next to it. Click on the 3 dots, then click the Delete button.
For detailed information, you can refer to our previous post – How to Delete Allow Clipboard History Policy in Intune Step by Step Guide.
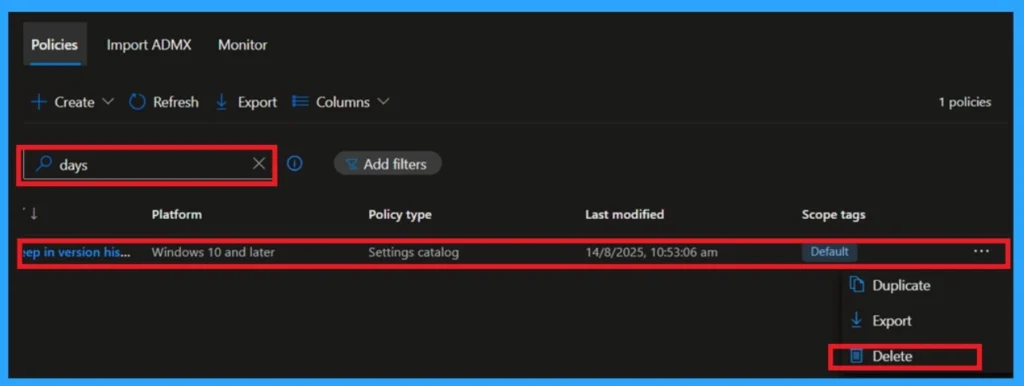
Remove the Policy Assigned Groups
For Remove the Policy Assigned Groups navigating to the Monitoring status page via Devices > Configuration. Search for the policy by name and click on it to open its monitoring details. Scroll down to the Assignments section and click Edit. This will take you back to the policy’s assignment settings.
- From here, you can remove the group you no longer want the policy to apply to.
- Then click Review + Create
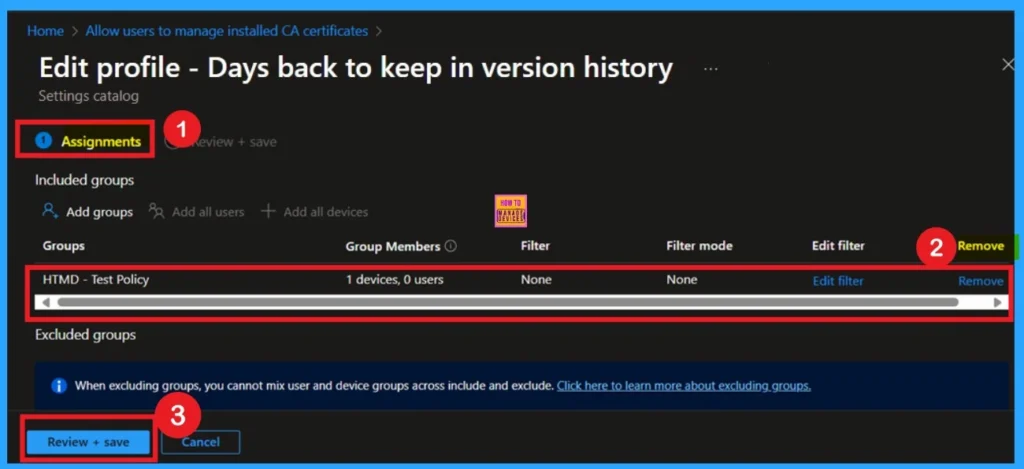
Need Further Assistance or Have Technical Questions?
Join the LinkedIn Page and Telegram group to get the latest step-by-step guides and news updates. Join our Meetup Page to participate in User group meetings. Also, join the WhatsApp Community to get the latest news on Microsoft Technologies. We are there on Reddit as well.
Author
Anoop C Nair has been Microsoft MVP for 10 consecutive years from 2015 onwards. He is a Workplace Solution Architect with more than 22+ years of experience in Workplace technologies. He is a Blogger, Speaker, and Local User Group Community leader. His primary focus is on Device Management technologies like SCCM and Intune. He writes about technologies like Intune, SCCM, Windows, Cloud PC, Windows, Entra, Microsoft Security, Career, etc.

