Today, we are discussing a new topic, Allow Block Third Party Cookies Policy in MS Edge Browser using M365 Admin Center As many of you know, the M365 Admin Center provides a wide range of policy settings to manage Microsoft Edge across your organization.
One of these important settings are the third-party cookies. You know these cookies are set by websites. They are often used for tracking, ads. Sometimes some users access many tools in that cases some third party cookies are to be used for work. Block web page elements that aren’t from the domain that’s in the address bar from setting cookies.
In these cookies have 2 sides of benefits that is sometime we need to use them for accessing some tools or Websites. Also these third party cookies are highly affecting the browsers and organizations security. If you enable this policy, web page elements that are not from the domain that is in the address bar can’t set cookies.
If you disable this policy, web page elements from domains other than in the address bar can set cookies. If you don’t configure this policy, third-party cookies are enabled but users can change this setting. So in this post lets look how this policy to be Enable Block Third Party Cookies Policy in MS Edge.
Table of Contents
What Happens if We Enable the Policy to Block Third-Party Cookies?
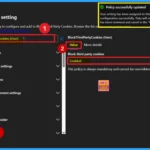
Only the website can set cookies; third-party elements cannot. This helps improve privacy by preventing tracking from other sites. It may also reduce personalized ads. However, some website features that rely on third-party services might not work properly.
How to Block Third Party Cookies in MS Edge Browser using M365 Admin Center
We discussed various aspects of Block Third Party Cookies Policy in MS Edge Browser policy in the Microsoft 365 Admin Center. One important issue we identified is that third-party cookies can sometimes cause security issues. Therefore, in this tutorial, I will show you how to enable the “Block third-party cookies” policy. For that you have to follow the Steps:
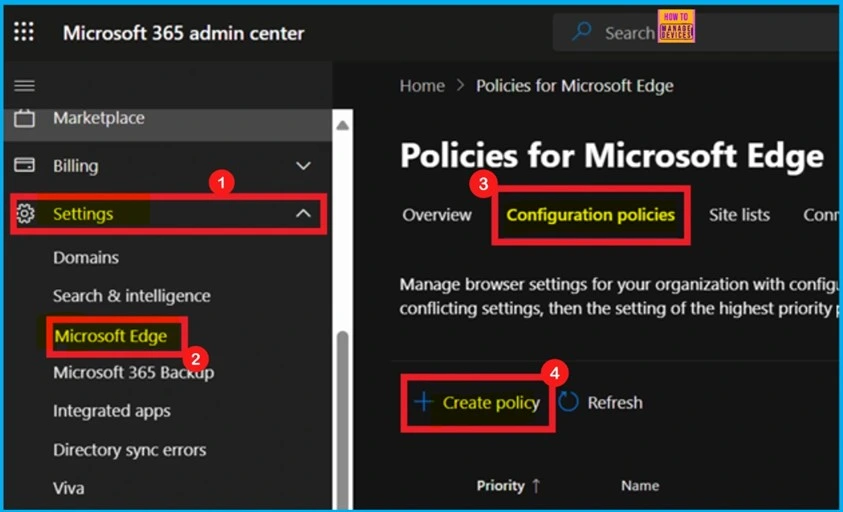
- Sign in to the Microsoft 365 Admin Center.
- Navigate to Settings > Microsoft Edge configuration policies.
- Click on the +Create policy button to start the process.
- Enable or Disable Default Cookies Setting Policy in MS Edge Browser using M365 Admin Center
- Enable or Disable Full Screen Mode Policy in Edge Browser using Microsoft 365 Admin Center Policy
- Enable Autofill for Addresses in MS Edge Browser using Microsoft 365 Admin Center Policy
Basic Details of the Policy
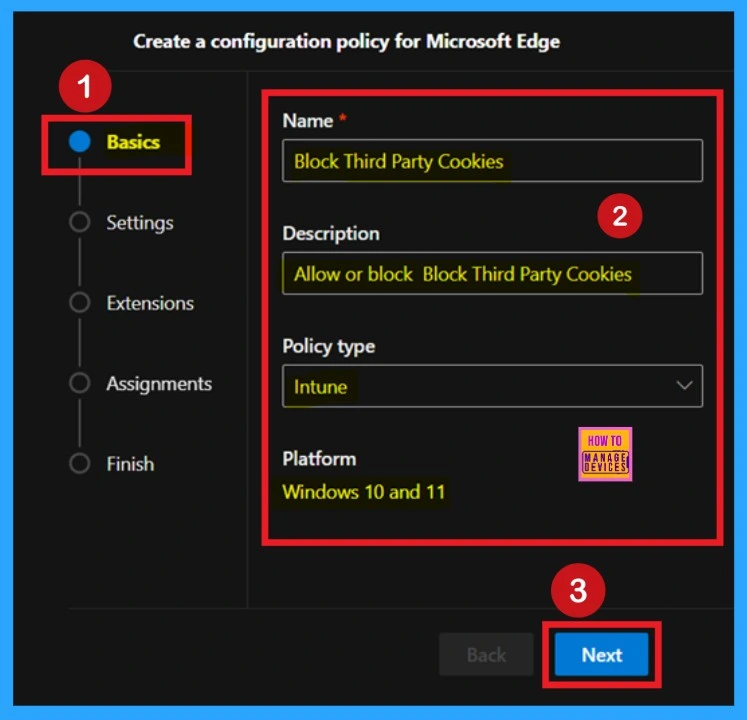
After clicking on the Create policy option, you are now on the Basic tab. I think you all know about the Basic tab’s procedure. This is a very simple procedure where you have to enter the basic details of your policy, such as name, description, and policy type. Here you can assign any name to the policy, and it will help you identify the policy from the policy list.
- In the Policy Type, you will see Intune and Cloud options.
- You have to select the Intune option.
- The platform is already set to Windows 10 and 11.
Configuration Settings
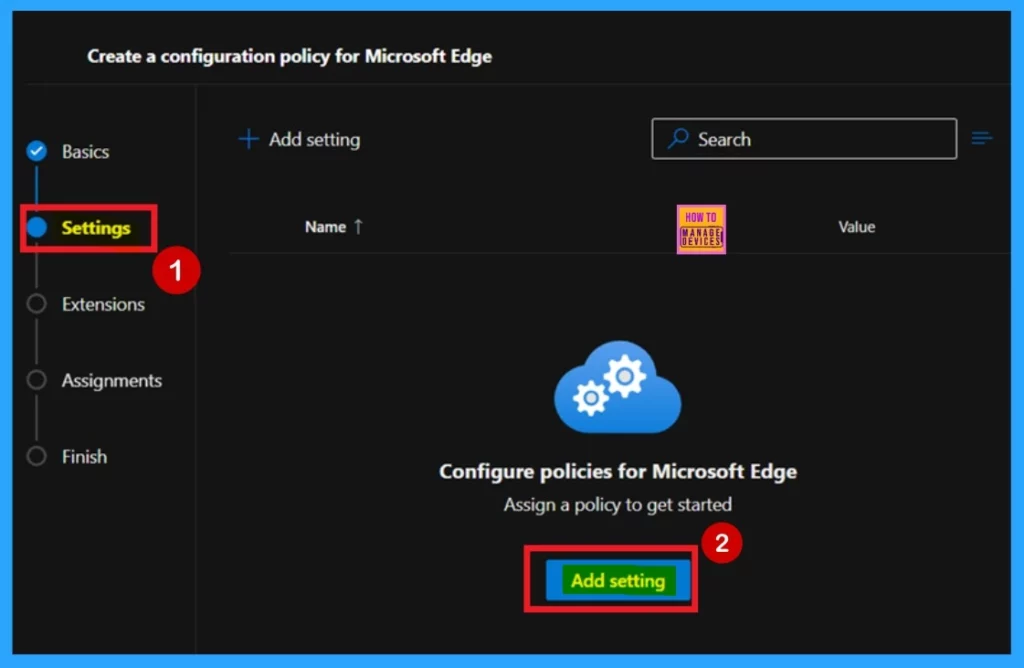
The next step is Configuration settings. In the Settings tab, which you will see after the basic step, you will find an Add settings option in blue color. Click on that, and you can assign a policy to get started. This section allows you to choose from different types of policies.
Know The Value Tab
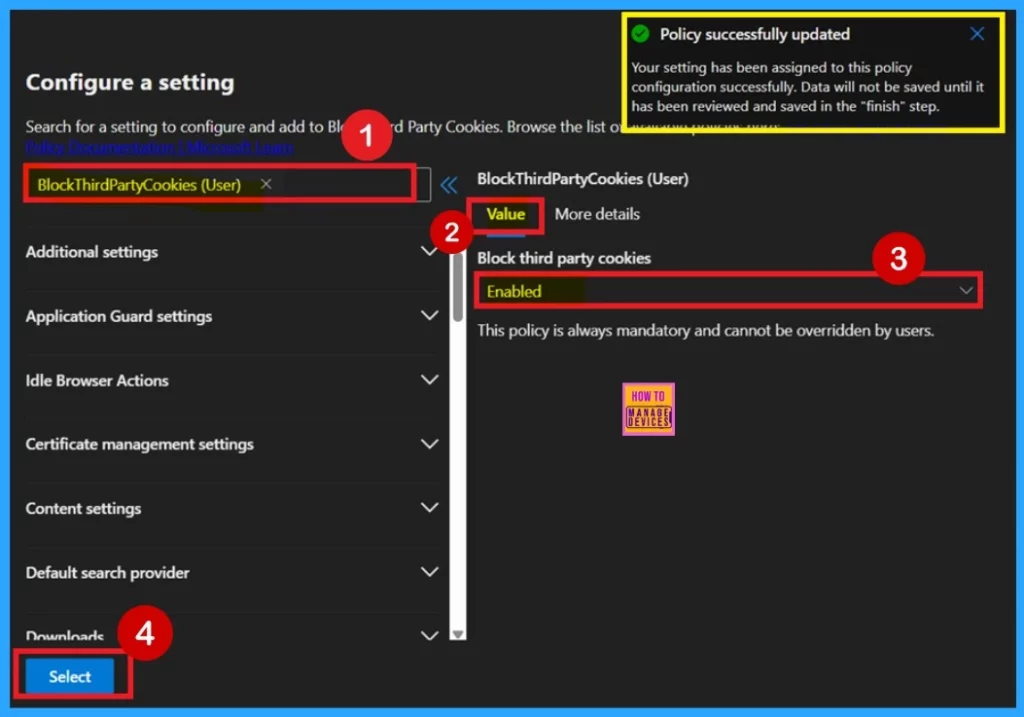
Next, you will learn about the Value tab. After clicking on Settings, you are now on the Configure a setting page. Here, you can see a search bar and different categories of settings. You can search for the policy here or select the policy from the categories.
I searched for the Policy category, and when I searched, I found the policy. In the right pane, you will see an option called the Value tab with more details. The Value tab allows you to Enable or Disable the policy.
- I clicked on the drop-down arrow under the Value tab and selected Enabled.
- Then I clicked on Select, and you will be notified that the policy was successfully updated.
More Details Tab Use
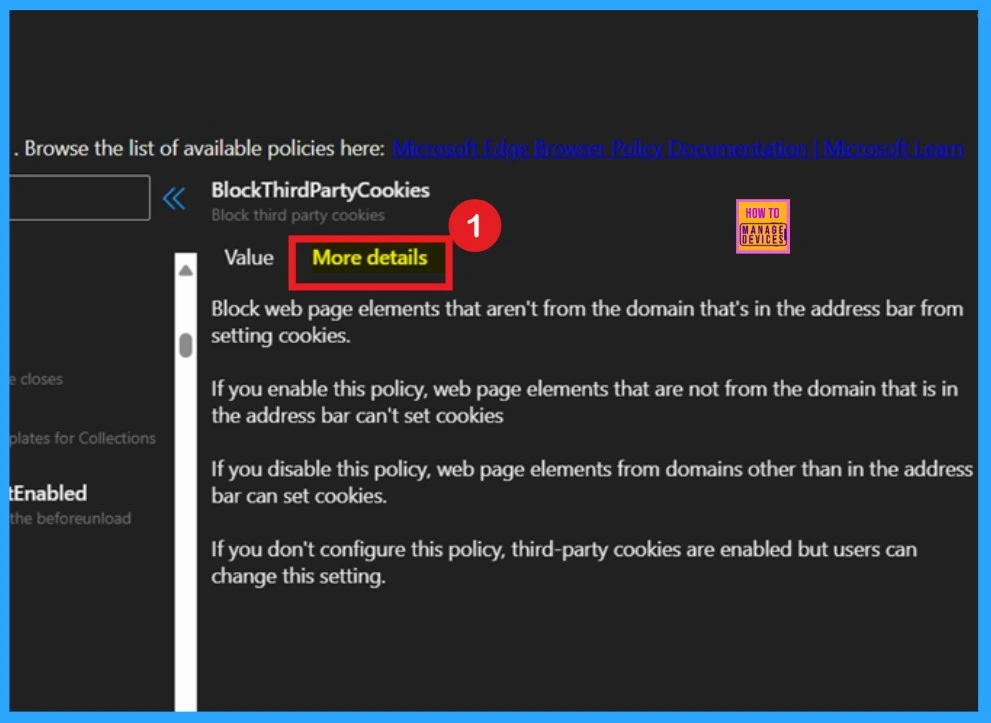
Near the Value tab you can see the More details tab. In this tab, you will find more information about the policy. Here, you can learn what will happen when the policy is enabled, disabled, or not configured. Please read it carefully then close the More details window.
| Enable | Disable | Not Configured |
|---|---|---|
| If you enable this policy, web page elements that are not from the domain that is in the address bar can’t set cookies. | If you disable this policy, web page elements from domains other than in the address bar can set cookies. | If you don’t configure this policy, third-party cookies are enabled but users can change this setting. |
Add Extensions Tab
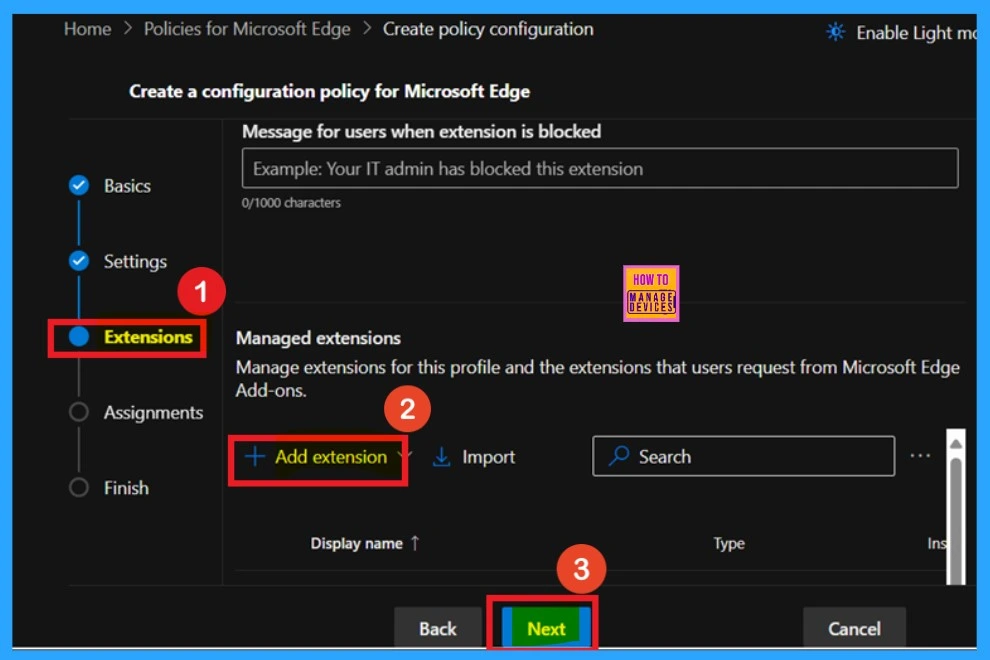
In this section you can add extensions to the policy. If you want to add that you just click on the +Add Extension option. Here in this guide I am skiping this section and click on the Next to continue the Process.
Assignment Tab
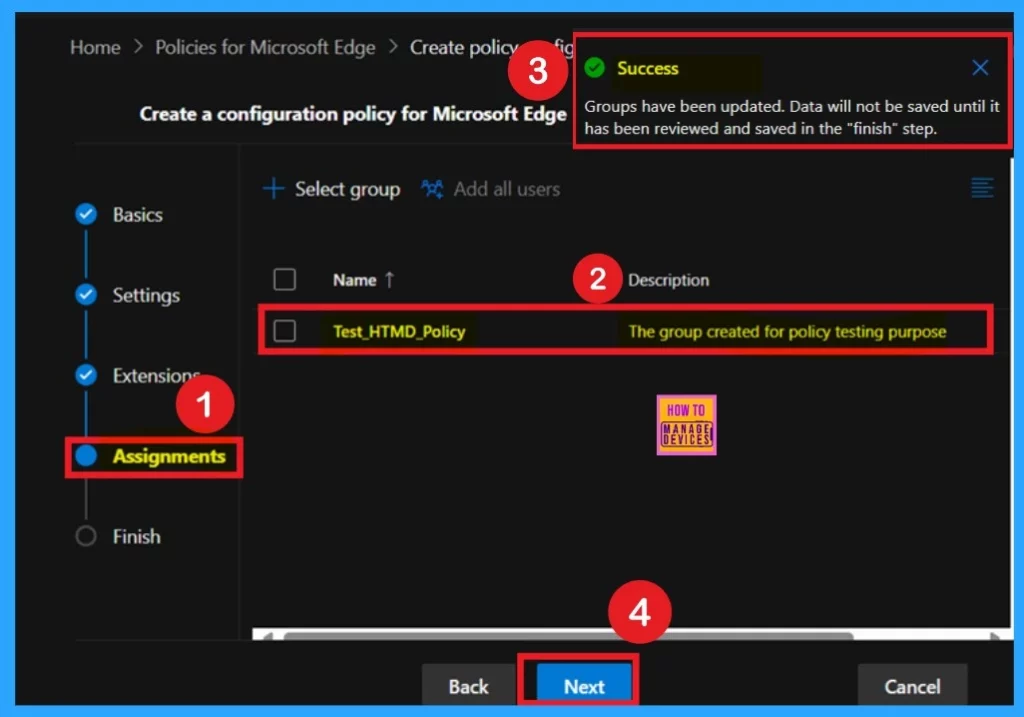
The next step is the Assignments tab. Here, you can assign the policy to specific groups. I selected the Test HTMD Policy group. After that, I received a success message confirming that the policy assignment was completed. Then, click Next to continue.
Final Step- Review and Create
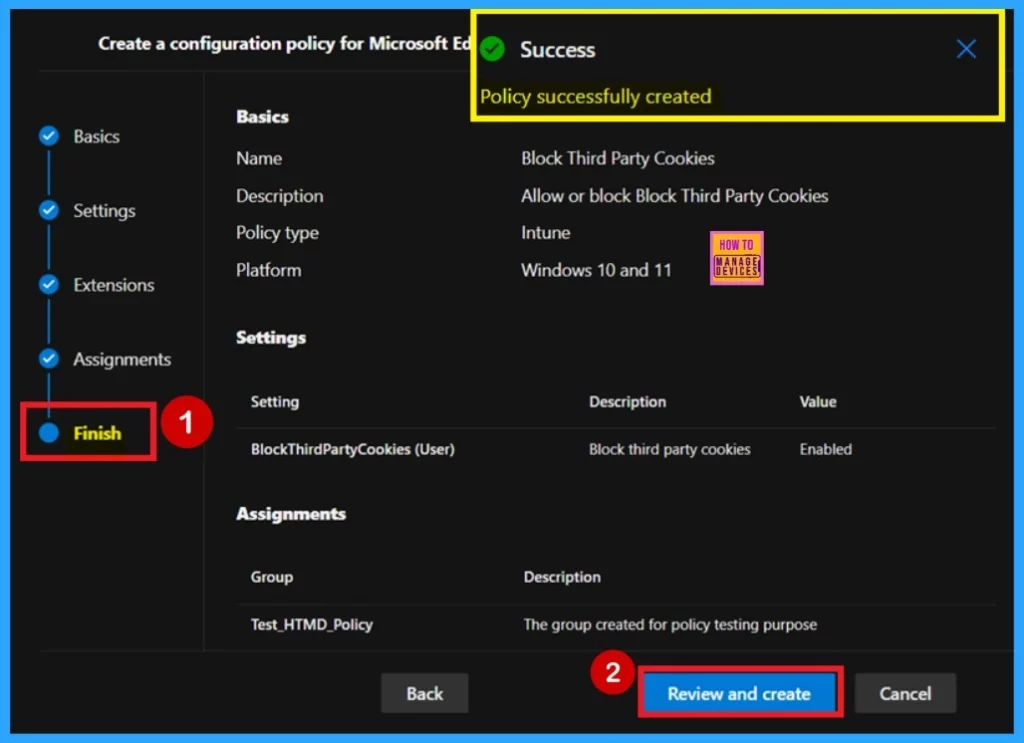
After all the Procedures such as basic settings, extensions, assignments now, you are on the finished tab, right? This tab is act as summary page, and it Allows you to the, details of previous tabs. When you click on the review and create, the policy will be created successfully.
- If you want to make any changes go back to the previous tab and Edit them before clicking on the Review and Create button.
Device and User Check in Status
After creating the policy, your main concern might be whether it was successfully applied. After policy creation there is a waiting period of up to 8 hours for the policy to be deployed. You can reduce this waiting time by syncing the policy from the Company Portal.
- To check if the policy was applied successfully, sign in to the Microsoft Intune Admin Center.
- Navigate through Devices > Configuration
- Under Configuration Policies, select the policy you created.
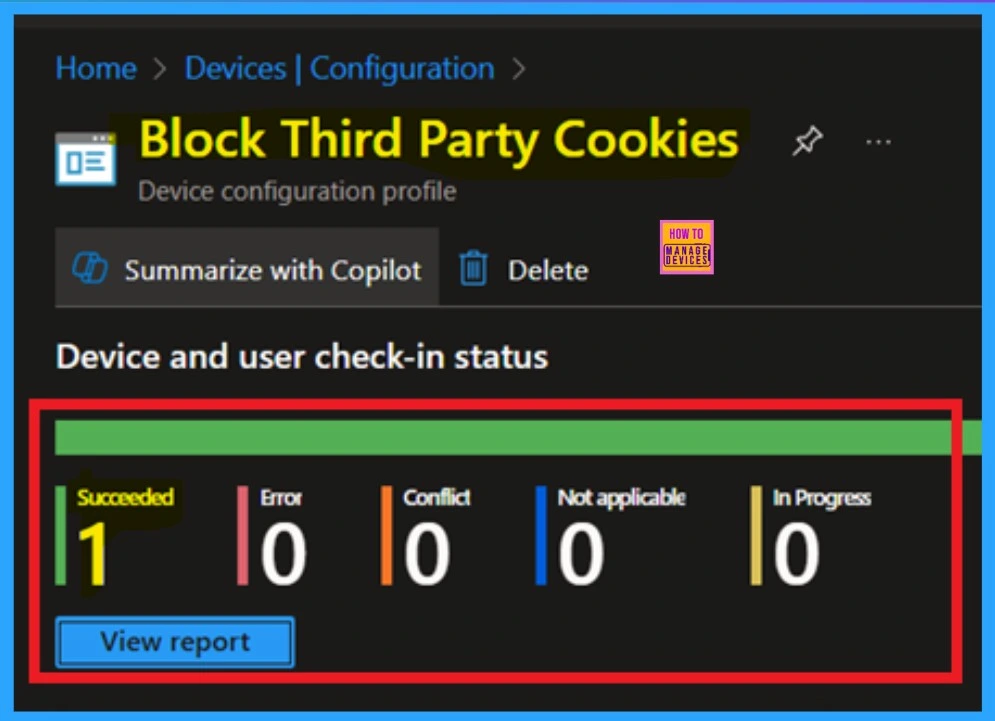
- When you click on the policy name, you can see the deployment status.
- It shows Succeeded, the policy has been applied successfully you can check below screenshot for more clarity.
Client – Side Verification Checking
The Client-side verification helps confirm whether the policy was successfully created or not. You can check client-side verification after the Sync. First Click on the Start Menu, Search Event Viewer, and open it. On the User Account Control window, click on the Yes button.
Then, go to the Event Viewer using the search and go to the Applications and Services Logs > Microsoft > Windows > DeviceManagement- Enterprise-Diagnostics-Provider > Admin.
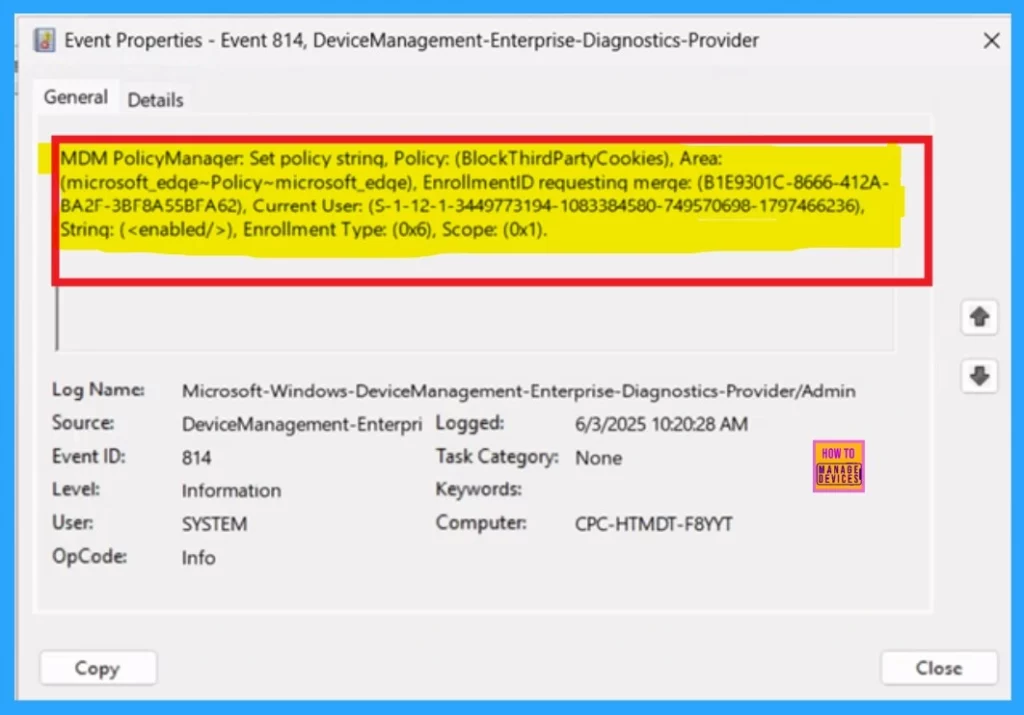
- The success result can be seen on the Event ID 814 or 813
- I get the result from 814.
| Policy Details |
|---|
| MDM PolicyManaqer: Set policy strinq, Policy: (BlockThirdPartyCookies), Area: (microsoft_edqe~Policy~microsoft_edqe), EnrollmentID requestinq merqe: (B1E9301C-8666-412A- BA2F-3BF8A55BFA62), Current User: (S-1-12-1-3449773194-1083384580-749570698-1797466236), Strinq: (), Enrollment Type: (0x6), Scope:(0x1). |
Need Further Assistance or Have Technical Questions?
Join the LinkedIn Page and Telegram group to get the latest step-by-step guides and news updates. Join our Meetup Page to participate in User group meetings. Also, Join the WhatsApp Community to get the latest news on Microsoft Technologies. We are there on Reddit as well.
Author
Anoop C Nair has been a Microsoft MVP for 10 consecutive years from 2015 onwards. He is a Workplace Solution Architect with more than 22+ years of experience in Workplace technologies. He is a Blogger, Speaker, and Local User Group Community leader. His primary focus is on Device Management technologies like SCCM and Intune. He writes about technologies like Intune, SCCM, Windows, Cloud PC, Windows, Entra, Microsoft Security, Career, etc.

