Let’s discuss How to Use Intune to Control Defender’s Scan Direction for Server Efficiency. Real Time Scan Direction within the Microsoft Defender Antivirus policy category helps to control direction of file activity like incoming, outgoing, or both (bi-directional).
This setting is designed to allow organizations to fine-tune the performance of real-time monitoring, particularly on servers with high file throughput, without completely sacrificing security. Organizations adjust the Real Time Scan Direction primarily to strike a balance between security and performance, especially on high-traffic server roles.
For this policy you can choose any of 3 options. They are Monitor incoming files, Monitor all files (bi-directional), Monitor outgoing files. Scanning incoming files is vital to detect and block malware downloaded from the internet, transferred from removable media, or copied from a network share before it can execute or reside on the system.
By optimizing scan direction, the risk of Defender scans causing significant, noticeable slowdowns during peak business hours is reduced, leading to a better overall user experience. Allows the organization to maintain a strong security standard (Real-Time Monitoring is still on) while making calculated performance adjustments.
Table of Contents
How to Use Intune to Control Defender’s Scan Direction for Server Efficiency
An organization operates a central file share (a Server Message Block or SMB share) where thousands of users frequently access and save files. This server experiences massive bi-directional file I/O.
- How to Configure Check for Signatures before Running Scan Policy using Intune
- How to Allow or Block Email Scanning using Intune Policy
- Allow or Disallow Scanning of Archives using Intune Policy
Steps to Configure Enterprise Network Domain Names
You can start the policy creation of the Control Defender’s Scan Direction Policy in Intune. Using simple steps, you can easily complete the policy creation. Open the Intune admin center. Go to Devices > Configuration > Policies> + Create > + New policy.
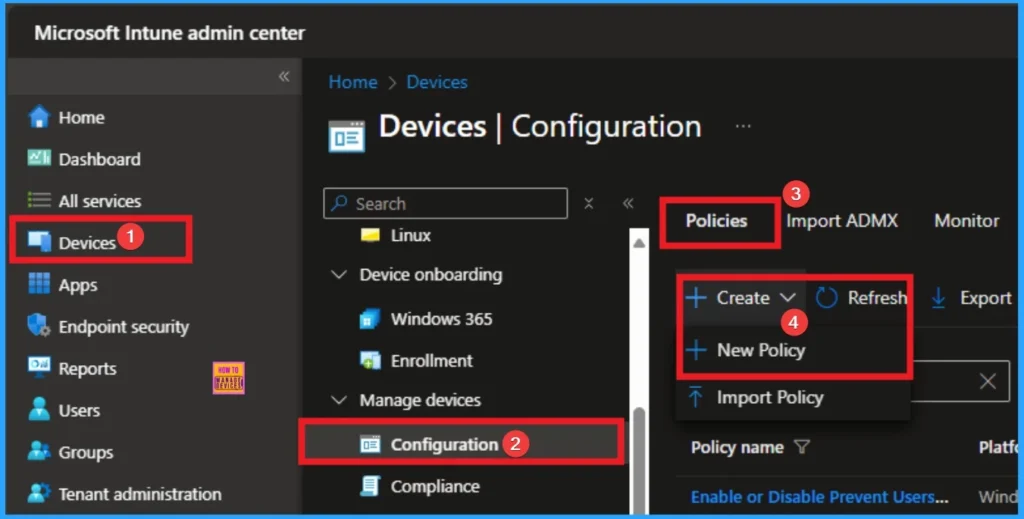
Profile Creation
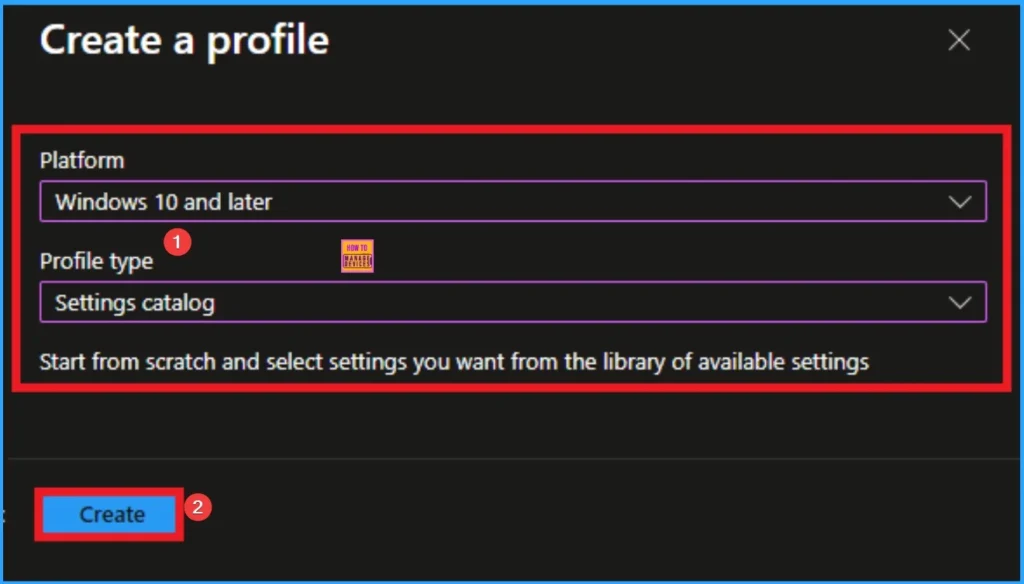
After that, you will get a profile window to select the platform and profile type. First of all, you select the platform, then you can select the profile type. Select Windows 10 and later as the platform, and select settings catalog as the profile type. Click on the create button.
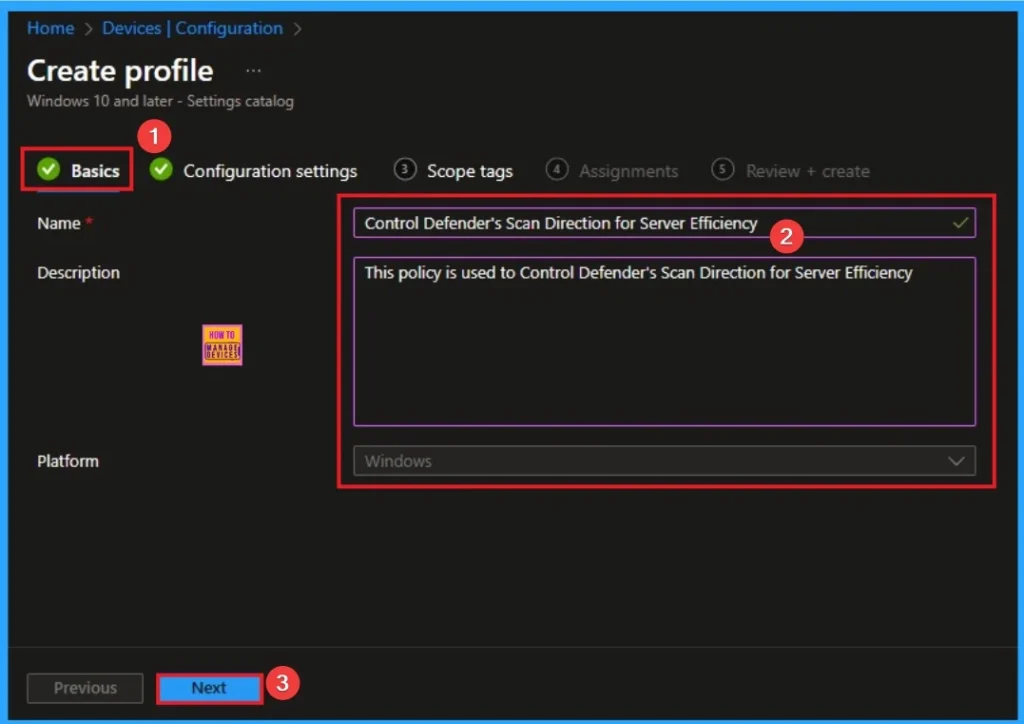
Basic Tab for Adding Name and Description
The basic tab is starting step of policy creation. On this tab, you have to give a name for the policy that you want to create. The name field is mandatory. Without giving a name, you can’t create a policy on the basic tab. You can also describe the policy, which description is not compulsory. Click on the next button.
Configuration Settings
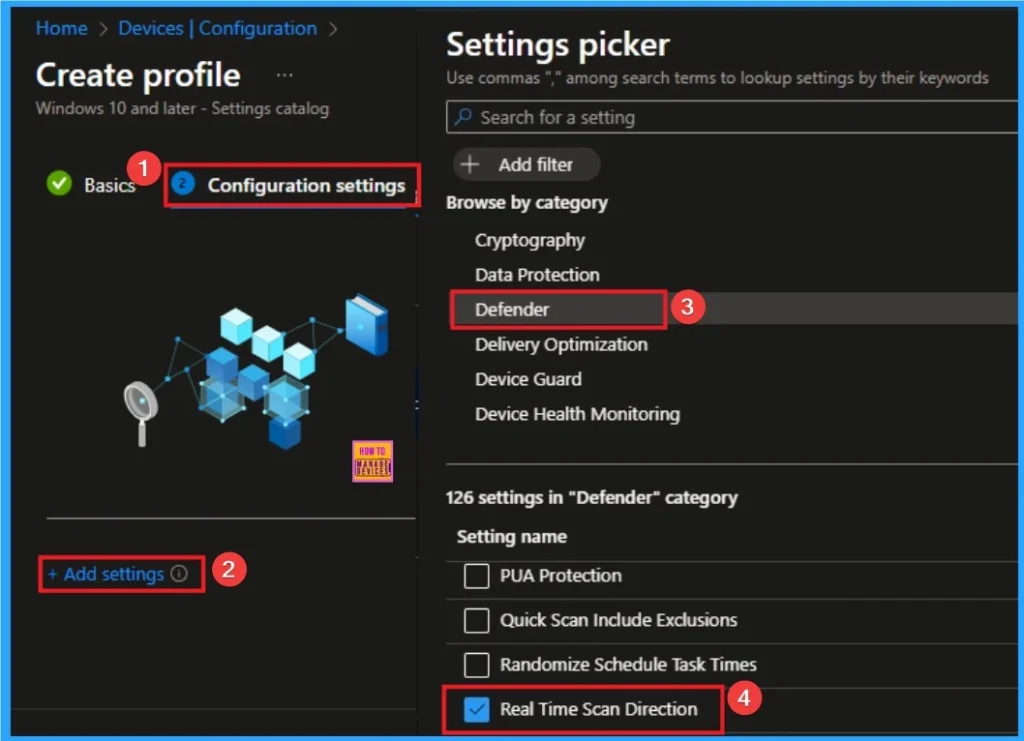
The configuration tab allows you to select specific policy settings to manage your organisation’s devices. On this page, we click on the + Add Settings hyperlink. Then you will get a settings picker that will show different types of categories to select specific settings. Here, I choose to Defender category and select the Real Time Scan Direction settings
Add Value
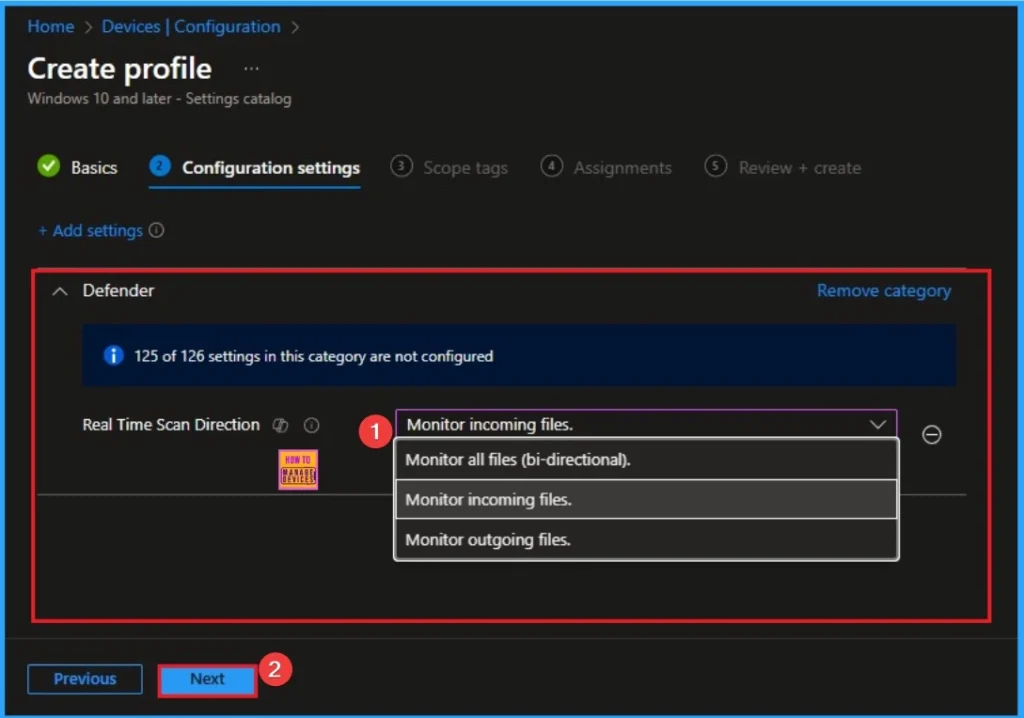
For this olicy 3 values are available. The values are Monitor incoming files. Monitor all files (bi-directional).Monitor outgoing files. Here I would like to select monitor incominf files values. Other values and its usage are shown on the below table.
| Value | Policy Setting | Description | Primary Use Case |
| 0 | Scan incoming and outgoing files (Default) | Bi-directional monitoring. Microsoft Defender scans files in both directions: when a process reads/accesses a file (incoming) and when a process writes/saves a file (outgoing). | Recommended Default: Used for all standard endpoints (laptops, desktops) and most servers where comprehensive, full-spectrum protection is required. Provides the highest security posture. |
| 1 | Scan incoming files only | Read monitoring only. Microsoft Defender scans files only when a process attempts to read/access them (e.g., executing a file, opening a document, transferring a file to the machine). It skips scanning when a process writes/saves a file. | Performance Optimization (High Read/Write): Used on high-transaction servers (like specific database engines or file servers) where the performance overhead of scanning every write operation is too high, and the primary security concern is blocking threats from entering the system. |
| 2 | Scan outgoing files only | Write monitoring only. Microsoft Defender scans files only when a process attempts to write/save/modify them (e.g., saving a document, encrypting a file, creating a new executable). It skips scanning when a process reads/accesses a file. | Performance Optimization (High Read/Static Content): Used on specialized servers that host largely static, pre-vetted content (e.g., content distribution points). The priority is ensuring the integrity of the content leaving the system or detecting ransomware-like activity, while sacrificing the scan on the initial file access for performance. |
Scope Tags
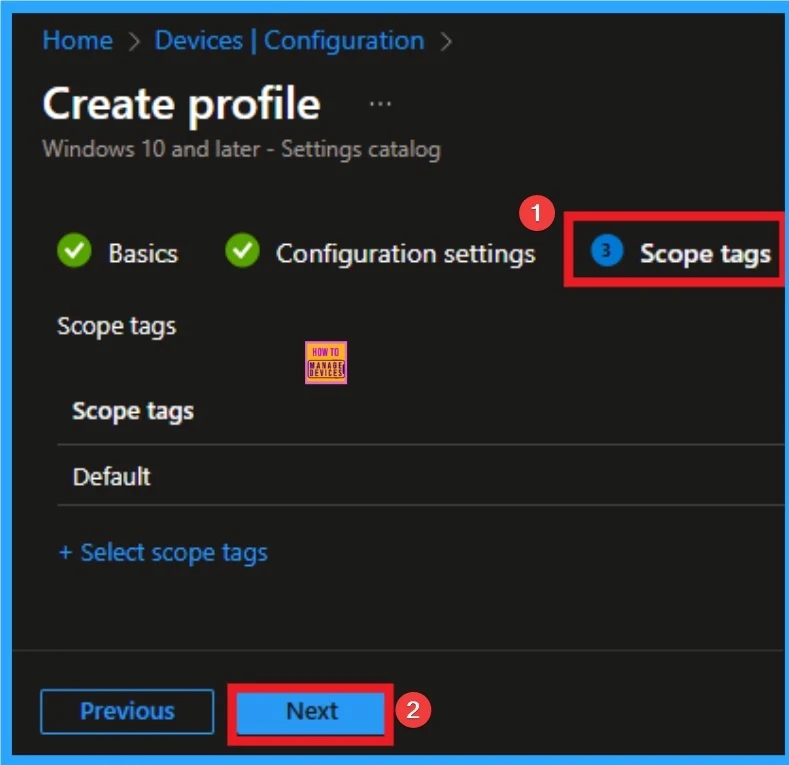
The next section is the Scope tag and which is not a compulsory step. It helps to assign this policy to a defined group of users or devices. Here, I skip the section and click on the next button.
Assignments Tab
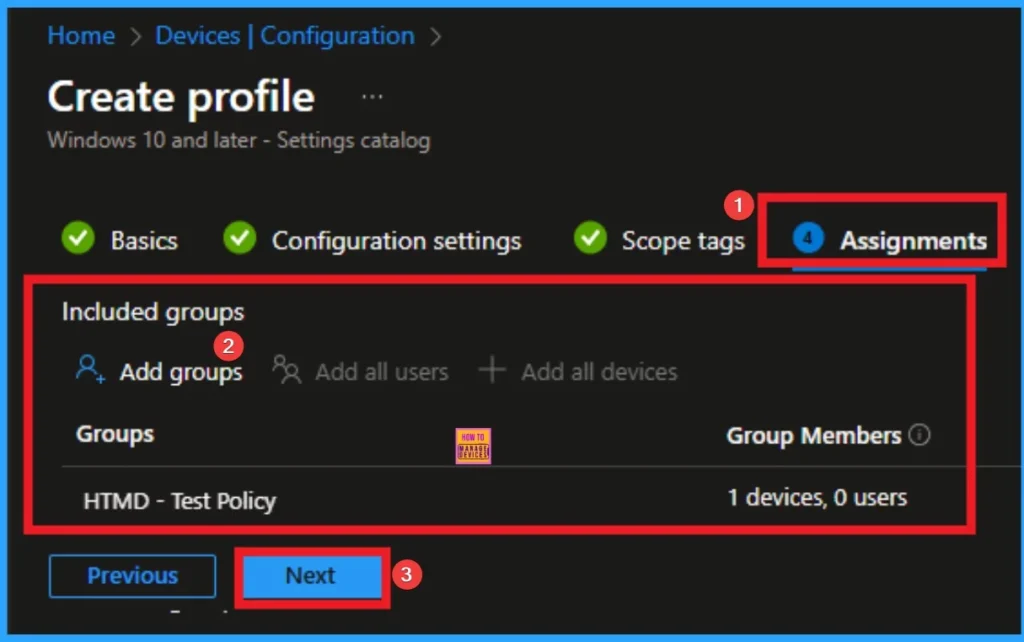
The assignments tab is the crucial step that determines which groups can be selected to assign the policy. Click on the +Add groups option under included groups. Select the group from the list of groups on your tenant.
Click on the Select button. And you can see the selected group on the Assignments tab. Click on the Next button in the window below.
Review + Create
The Review + Create tab is the last step of policy creation. On this tab, you can verify every detail of the policy which are added in the previous steps (basic configuration settings, scope tag assignments s etc). If you want to make any changes, click on the previous button; otherwise, you can click on the Create button.
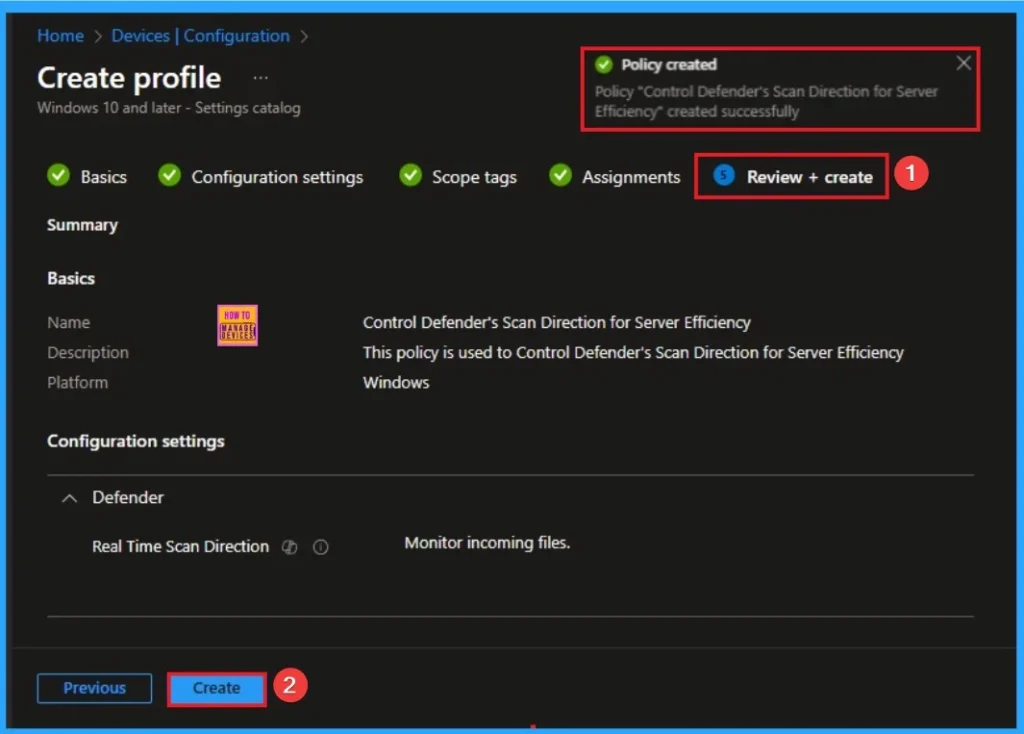
Monitoring Status
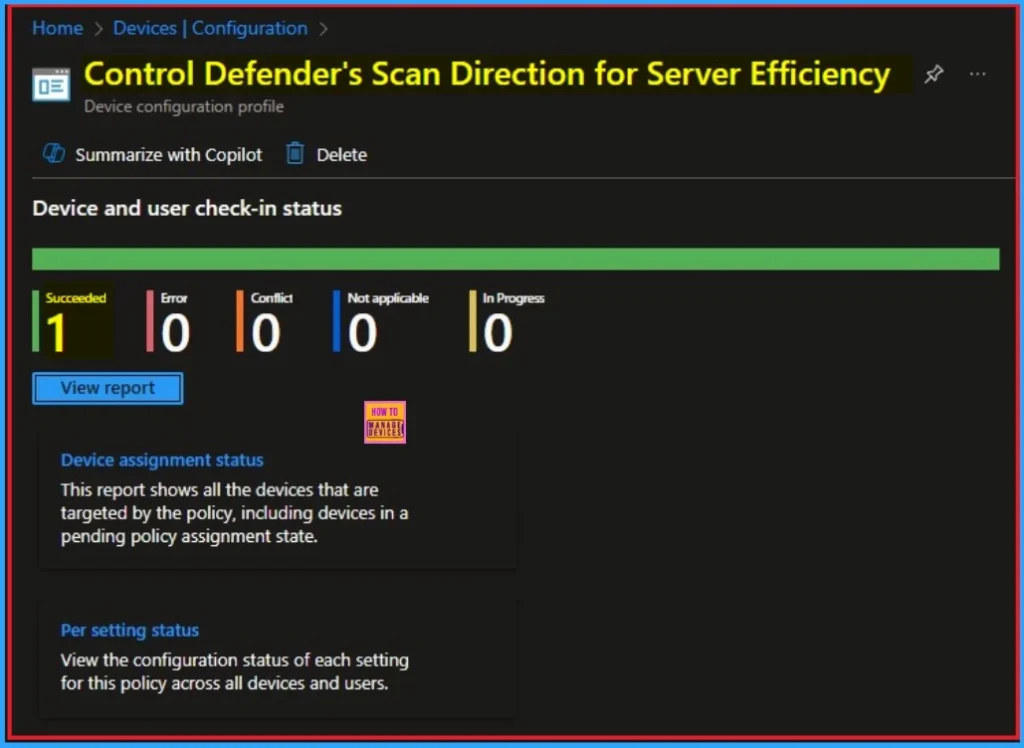
When the Policy is created successfully, you can sync the device on the Company portal for faster deployment. After syncing is completed, you can check the status on the Intune Portal. Go to Devices > Configuration and search for the policy.
Event Viewer
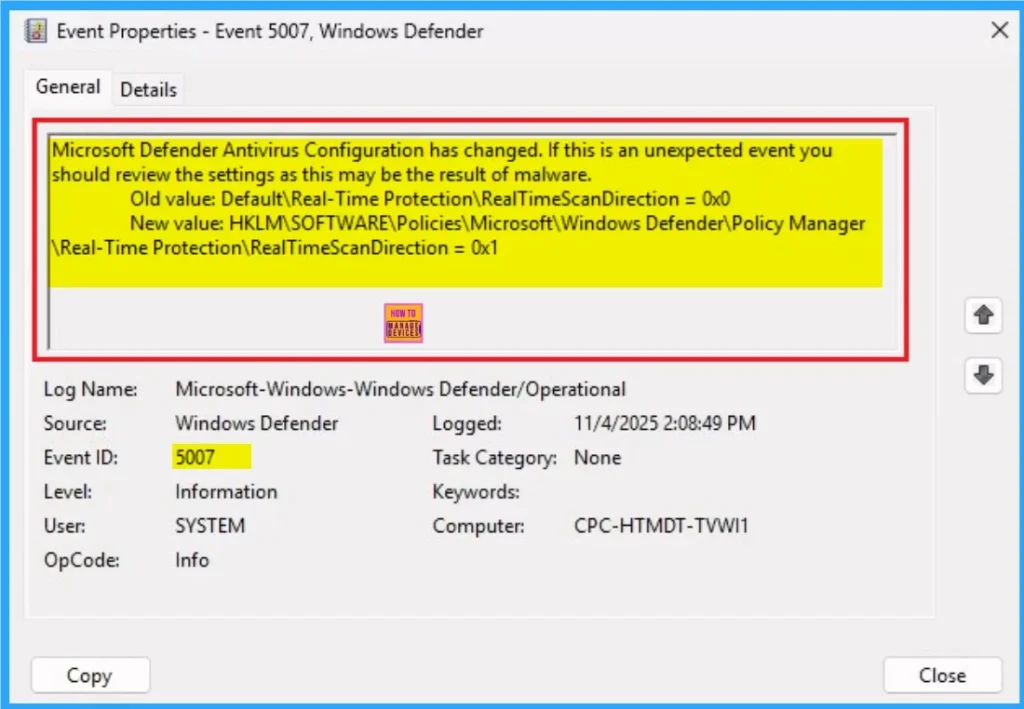
It helps you check the client side and verify the policy status. Open the Client device and open the Event Viewer. Go to Start > Event Viewer. Navigate to Logs: In the left pane, go to Application and Services Logs > Microsoft > Windows > Windows Defender > Operational.
- You can see the success result on 5007
Microsoft Defender Antivirus Configuration has changed. If this is an unexpected event you
should review the settings as this may be the result of malware.
Old value: Default\Real-Time Protection\RealTimeScanDirection = 0x0
New value: HKLM\SOFTWARE\Policies\Microsoft\Windows Defender\Policy Manager
\Real-Time Protection\RealTimeScanDirection =0x1
Removing the Assigned Group from Defender Device Control Policy Settings
If you want to remove the Assigned group from the policy, it is possible from the Intune Portal. To do this, open the Policy on Intune Portal and edit the Assignments tab and the Remove Policy.
To get more detailed information, you can refer to our previous post – Learn How to Delete or Remove App Assignment from Intune using by Step-by-Step Guide.

How to Delete Defender Device Control Policy
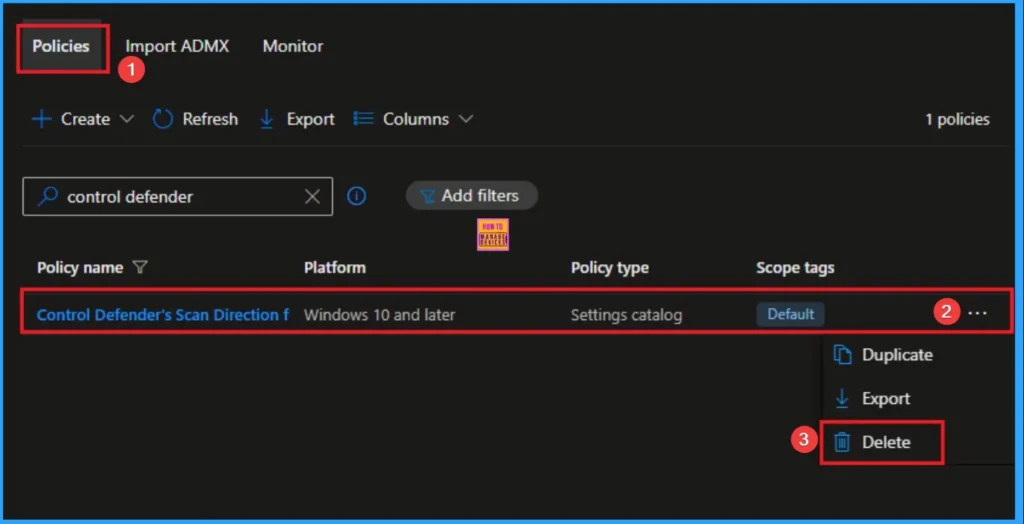
You can easily delete the Policy from the Intune Portal. From the Configuration section, you can delete the policy. It will completely remove it from the client devices.
For detailed information, you can refer to our previous post – How to Delete Allow Clipboard History Policy in Intune Step by Step Guide.
CSP Details
This policy setting allows you to configure monitoring for incoming and outgoing files, without having to turn off monitoring entirely. It’s recommended for use on servers where there is a lot of incoming and outgoing file activity but for performance reasons need to have scanning disabled for a particular scan direction. The appropriate configuration should be evaluated based on the server role.
| Name | Value |
|---|---|
| Name | RealtimeProtection_RealtimeScanDirection |
| Friendly Name | Configure monitoring for incoming and outgoing file and program activity |
| Element Name | Configure monitoring for incoming and outgoing file and program activity. |
| Location | Computer Configuration |
| Path | Windows Components > Microsoft Defender Antivirus > Real-time Protection |
| Registry Key Name | Software\Policies\Microsoft\Windows Defender\Real-Time Protection |
| ADMX File Name | WindowsDefender.admx |

Need Further Assistance or Have Technical Questions?
Join the LinkedIn Page and Telegram group to get the step-by-step guides and news updates. Join our Meetup Page to participate in User group meetings. Also, Join the WhatsApp Community to get the latest news on Microsoft Technologies. We are there on Reddit as well.
Author
Anoop C Nair has been Microsoft MVP for 10 consecutive years from 2015 onwards. He is a Workplace Solution Architect with more than 22+ years of experience in Workplace technologies. He is a Blogger, Speaker, and Local User Group Community leader. His primary focus is on Device Management technologies like SCCM and Intune. He writes about technologies like Intune, SCCM, Windows, Cloud PC, Windows, Entra, Microsoft Security, Career, etc

