Let’s discuss enable or disable Restrict App to System Volume Policy using Microsoft Intune. The system volume is the main drive where the computer’s operating system lives and starts up. It holds the important files for the computer to work.
Restrict App To System Volume is a setting that stops applications from saving their data or installing it on the system drive. This helps protect the system from harmful apps and can also save space on the main drive. They can also control if apps can be installed on other storage locations like secondary drives, USBs, or SD cards.
When this setting is enabled, Windows apps are limited to the system volume for both installation and relocation. With this setting disabled or not configured, users can move or install Windows apps on volumes that are not the system volume.
This blog post offers step-by-step instructions on using Microsoft Intune to manage the Restrict App To System Volume policy, including how to enable or disable it, monitor its status, and understand client-side verification.
Table of Contents
What are the Advantages of Restrict App to System Volume Policy?
Restricting apps to the system volume offers several advantages. Restricting app installations and data to the system volume enhances security by isolating potential threats.
This setting optimizes space on the primary drive by preventing clutter from app data. Moreover, it simplifies system management and recovery processes.
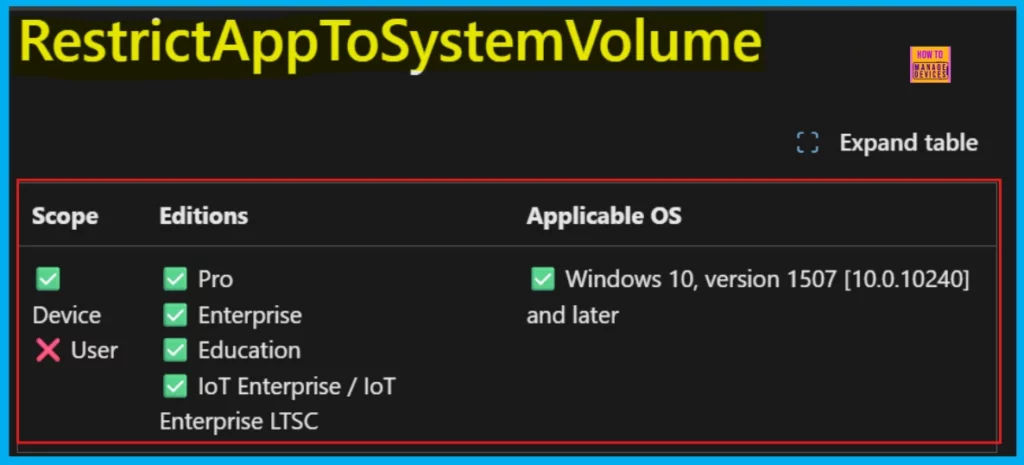
Windows CSP Policy – Application Management
The Policy configuration service provider (CSP) is the tool that businesses use to set up and manage policies on their Windows 10 and Windows 11 devices. The Policy CSP provides details about each policy, including what it does (Description Framework Properties), the options available (Allowed Values), and how it relates to traditional Group Policy settings (Group Policy Mapping details). You will find this information organized in the following sections.
Description Framework Properties
Description Framework Properties as a detailed label for each setting in the Policy CSP. For every setting, it lists a property name and a property value. These labels explain what the setting does, the type of information it requires (like a number or text), and often the setting’s default value. This helps IT administrators clearly understand and configure each policy correctly.
| Property Name | Property Value |
|---|---|
| Format | int |
| Access Type | Add, Delete, Get, Replace |
| Default Value | 0 |
Allowed Values
To keep things stable and prevent errors, Intune specifies exactly which values you can use for each setting. For example, the table below shows the acceptable choices for the Restrict App To System Volume setting, which you can find under Application Management in the Intune Settings Catalog.
| Value | Description |
|---|---|
| 0 (Default) | Not restricted. |
| 1 | Restricted. |
Group Policy Mapping
When companies move to new computer management tools (like Intune), Group Policy Mapping acts as a straightforward guide. It shows how the familiar settings from the old system correspond to the new settings, making the transition and setup process much simpler. It is all about creating an easy connection between the old and the new ways of managing things.
| Name | Value |
|---|---|
| Name | DisableDeploymentToNonSystemVolumes |
| Friendly Name | Disable installing Windows apps on non-system volumes |
| Location | Computer Configuration |
| Path | Windows Components > App Package Deployment |
| Registry Key Name | Software\Policies\Microsoft\Windows\Appx |
| Registry Value Name | RestrictAppToSystemVolume |
| ADMX File Name | AppxPackageManager.admx |
./Device/Vendor/MSFT/Policy/Config/ApplicationManagement/RestrictAppToSystemVolume
- Enable Or Disable Storage Locations In File Explorer Using Intune Policy
- Best Guide To Deploy And Update Visual Studio Code Using Intune
- Enable Or Disable Web Sign-in Policy For Windows Using Intune
Steps to Enable Restrict App To System Volume Policy using Intune
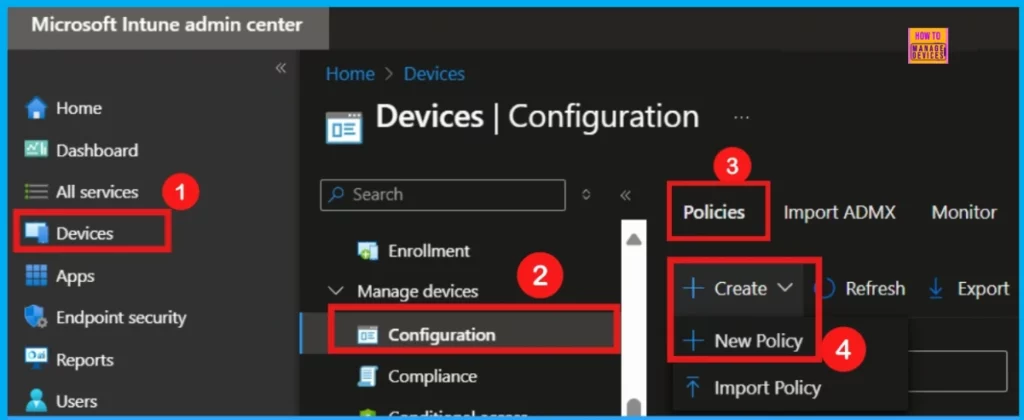
To enable the Restrict App To System Volume policy in Microsoft Intune, start by logging into the Microsoft Intune Admin Center using your administrator account. Next, navigate through the following steps:
- Devices > Windows > Configuration > + Create > + New policy.
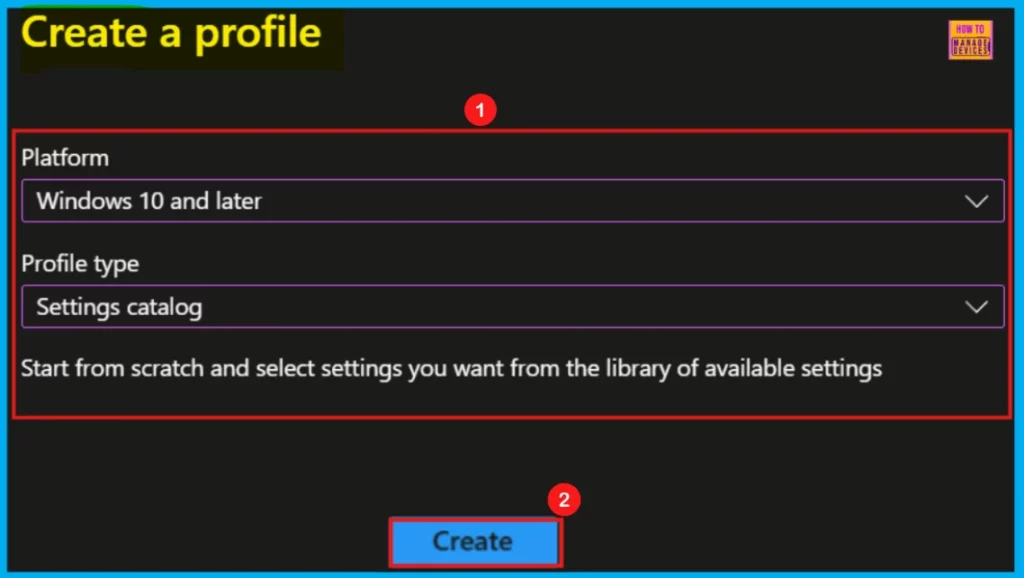
When prompted to configure the new policy, select Windows 10 and later as the platform and Settings catalog as the profile type. Finally, click Create to proceed.
Basics
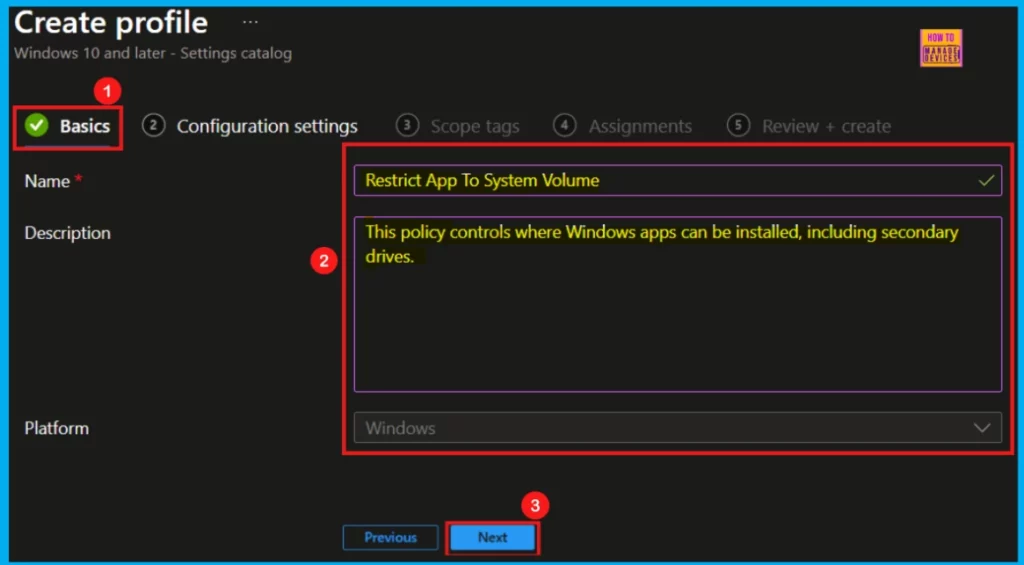
When you start creating a policy in Intune, the first section you’ll see is Basics. This is where you give your policy a name and can add a Description. The description is useful for remembering what this specific policy is for in the future.
- Policy Name: Restrict App To System Volume
- Description: This policy controls where Windows apps can be installed, including secondary drives.
Configuration settings
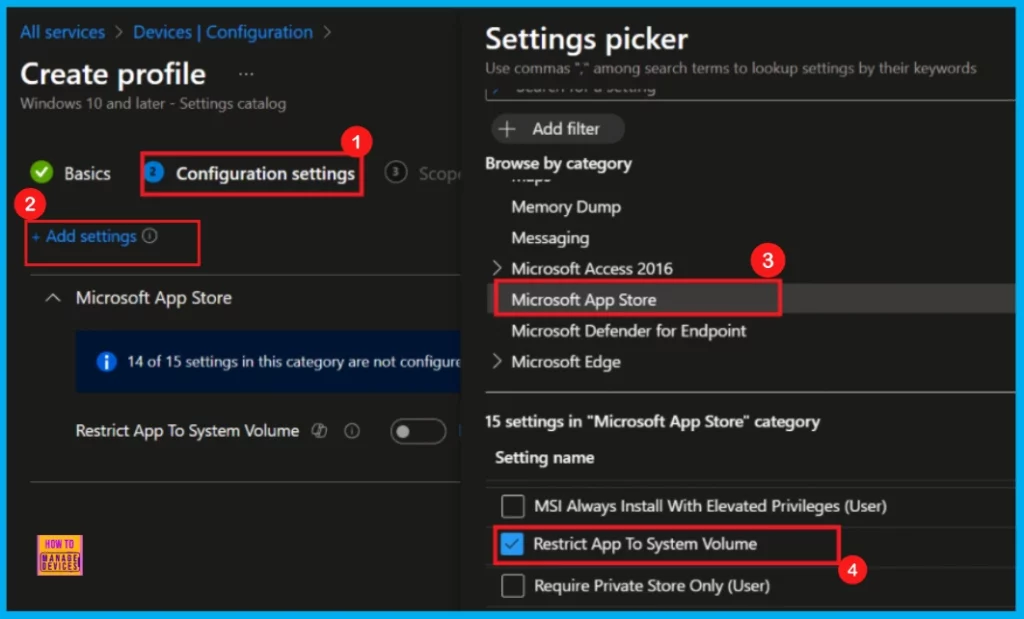
The next step is Configuration settings. Here, you will click Add settings to open the Settings picker window. In this window, you can either search for specific settings or browse through categories.
- In this example, I selected Microsoft Apps Store as a category
- Then, choose the Restrict App To System Volume setting to configure
Enable or Disable Restrict App to System Volume Policy
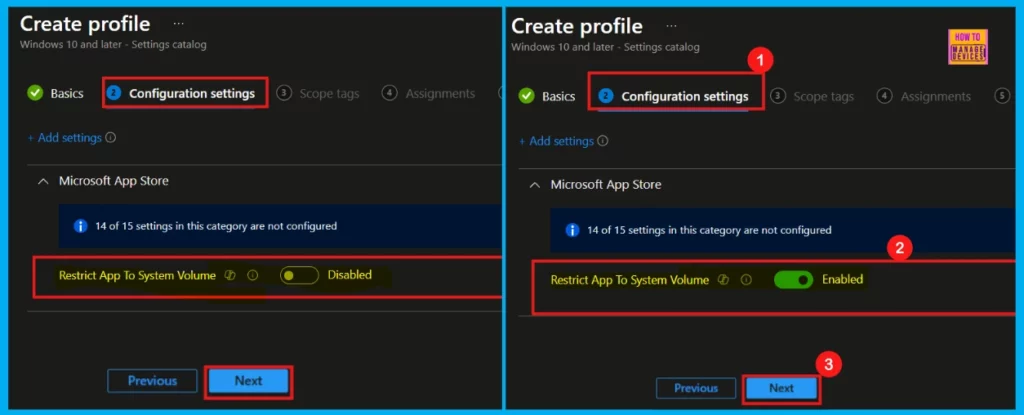
By default, the Restrict App To System Volume setting is disabled (set to 0), which means it’s not active (Not restricted). Therefore, if you don’t change this, users will be able to move or install Windows applications on any available drive. Enabling (1) this setting restricts the installation or movement of Windows apps to only the primary system drive.
- In this case, I enable this setting by toggling it to the right side.
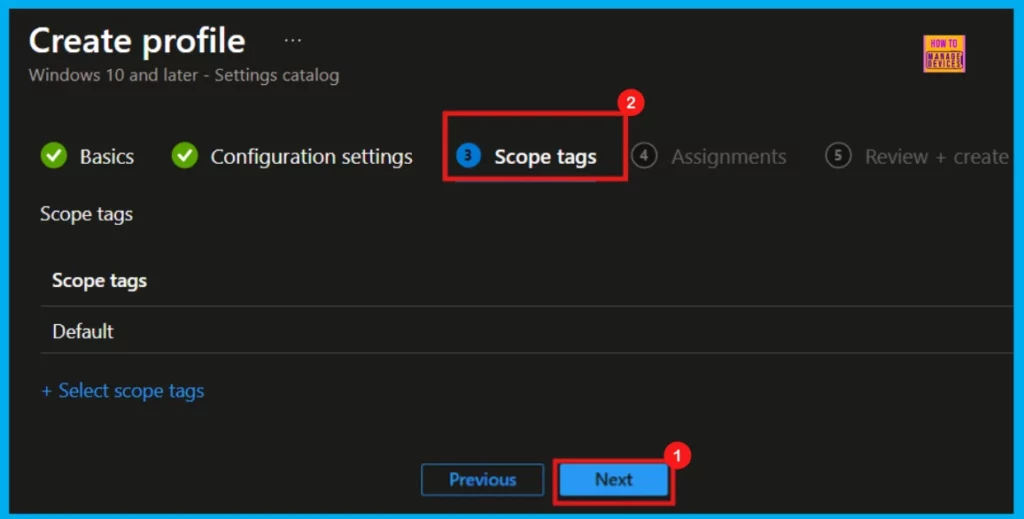
Scope Tags
Scope tags in Intune help organize and manage who can access settings, apps, and policies. They help IT organize and control who can see and use them, often by department. If your tenant has custom scope tags, select them based on your policy needs.
- Click Next to proceed.
Assignments
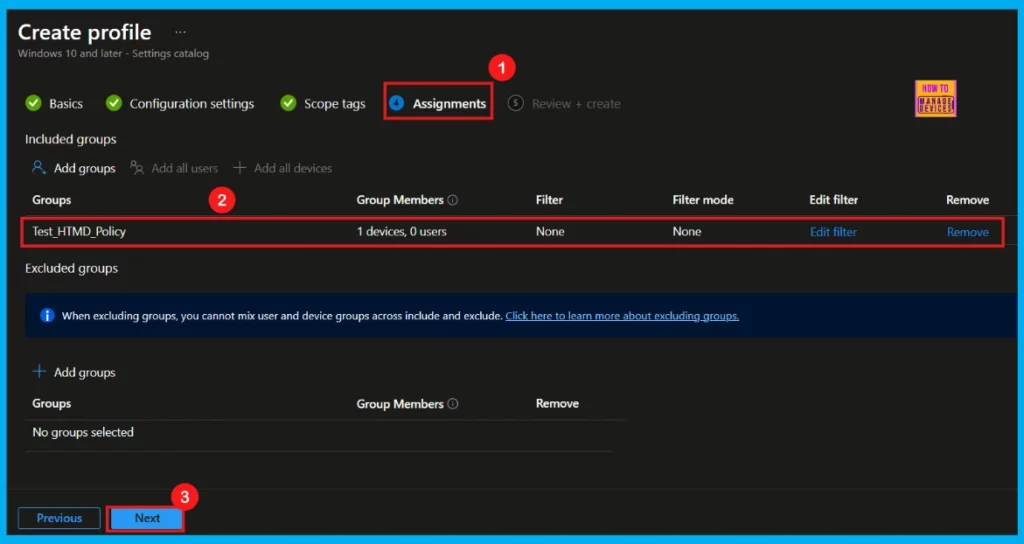
Next is the Assignments section. Click Add Groups under the Included groups section to apply this configuration policy to specific device groups. Then, select the device group you want to include. This step is crucial for ensuring the policy is applied correctly.
- For this particular policy, I’m selecting the Test_HTMD_Policy device group.
- Click Next to move on.
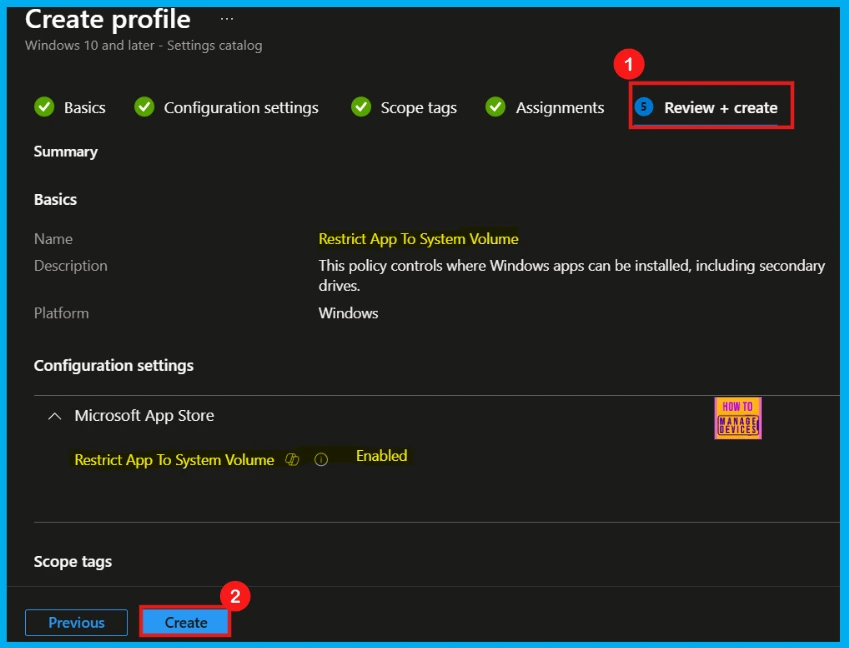
Once you have assigned the policy to the right device group, you will see the Review + Create page. Here, you should check all your settings to make sure everything is as you intended. If you need to make any adjustments, click Previous to go back and edit. When you are satisfied with the configuration, click Create to finalize and deploy the policy.
Device and User Check-in Status
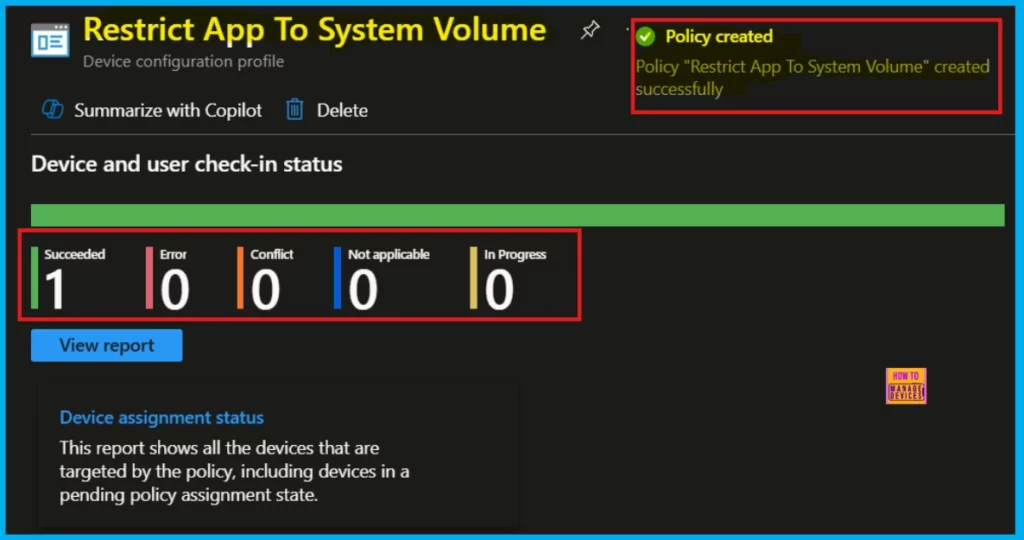
After you create the policy, you will get a notification confirming that the Restrict App To System Volume Policy was successfully created. To see if the policy has been applied to your devices, first go to the Configuration section and open the policy you just created.
Before checking, make sure to manually sync your device with the Company Portal app to help the policy apply faster. Once the sync is done, you should see a successful status on the Device configuration profile page.
- You can also check the deployment status by going to Devices > Windows > Configuration and searching for your policy.
- The status of the policy deployment will be shown under the Device and user check-in status.
Client Side Verification
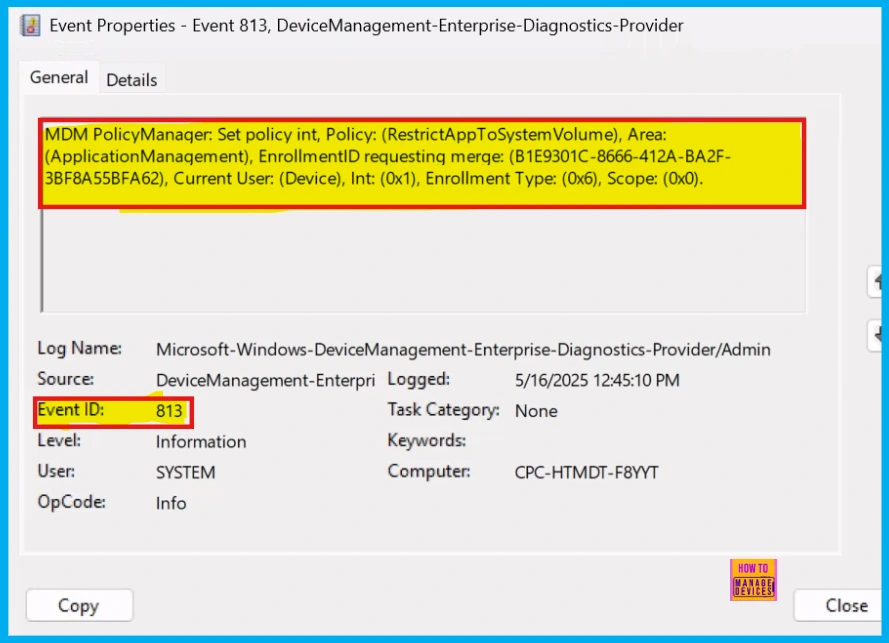
The MDM PolicyManager is applying the Restrict App To System Volume policy within the Application Management settings. To verify that this was successful by looking at the event logs, go to Application and Service Logs > Microsoft > Windows > Device Management Enterprise Diagnostics Provider.
- For the Restrict App To System Volume policy, a successful application is indicated by Event ID 813.
Remove the Assigned Group of Restrict App to System Volume Policy
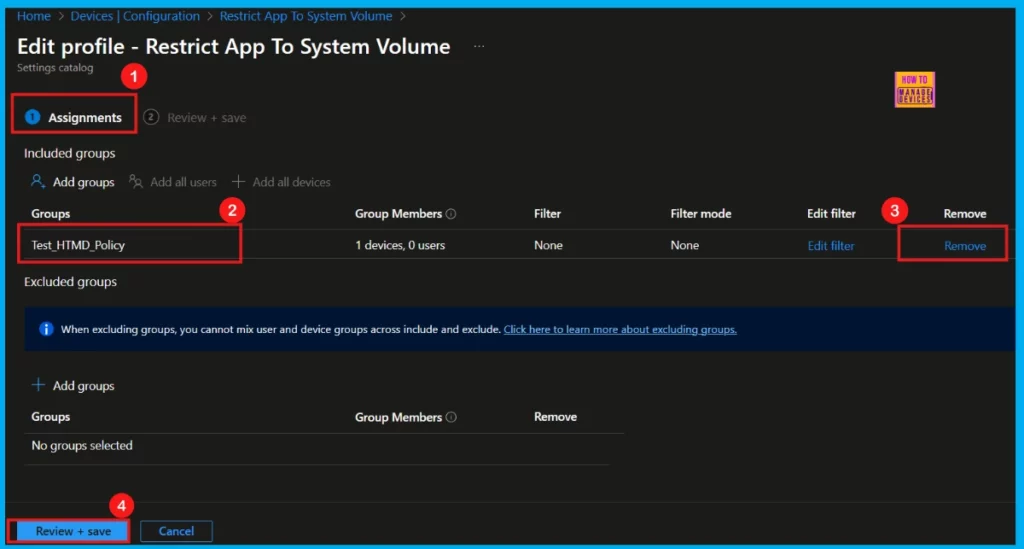
Removing a policy in Intune is straightforward. Navigate to the Configuration tab, select the specific policy you wish to remove, and then click Edit under the Assignment tab. Finally, click the Remove button to remove the policy from its current assignments.
For detailed information, you can refer to our previous post – Learn How to Delete or Remove App Assignment from Intune using by Step-by-Step Guide.
How to Delete Restrict App to System Volume Policy
To delete the Restrict App to System Volume Policy in Intune, navigate to Devices > Configurations. Then, in the Policy section, use the search bar to find Restrict App to System Volume Policy. Once located, click the three-dot menu next to the policy and select Delete.
After you select Delete, Intune will remove the Restrict App to System Volume Policy from your tenant and display a confirmation message.
For more information, you can refer to our post – How to Delete Allow Clipboard History Policy in Intune Step by Step Guide.

Need Further Assistance or Have Technical Questions?
Join the LinkedIn Page and Telegram group to get the latest step-by-step guides and news updates. Join our Meetup Page to participate in User group meetings. Also, Join the WhatsApp Community to get the latest news on Microsoft Technologies. We are there on Reddit as well.
Author
Anoop C Nair has been Microsoft MVP from 2015 onwards for 10 consecutive years! He is a Workplace Solution Architect with more than 22+ years of experience in Workplace technologies. He is also a Blogger, Speaker, and leader of the Local User Group Community. His primary focus is on Device Management technologies like SCCM and Intune. He writes about technologies like Intune, SCCM, Windows, Cloud PC, Windows, Entra, Microsoft Security, Career, etc.

