Let’s discuss how Intune helps you to Monitor Logical Drives on Windows Devices. The LogicalDrive section helps you to provide detailed information about the logical drives available on a Windows system. A logical drive is a partition created on a physical hard disk that the operating system recognizes and manages as a separate storage unit.
Each logical drive is usually assigned a drive letter such as C:, D:, or E:, making it easy for users and applications to access and store data. This structure helps system administrators clearly understand how the overall disk space is allocated and used within the device.
A disk drive refers to the physical hardware used for data storage in a computer. It can be a Hard Disk Drive (HDD) or a Solid-State Drive (SSD). A logical drive is a virtual storage unit created by dividing a physical disk drive into segments or partitions.
Tracking logical drives through Intune gives admins visibility into how storage is structured and used across managed devices. This not only supports performance and capacity planning but also strengthens your device health and compliance posture.
Table of Contents
How Intune Inventory Helps to Monitor Logical Drives on Windows Devices
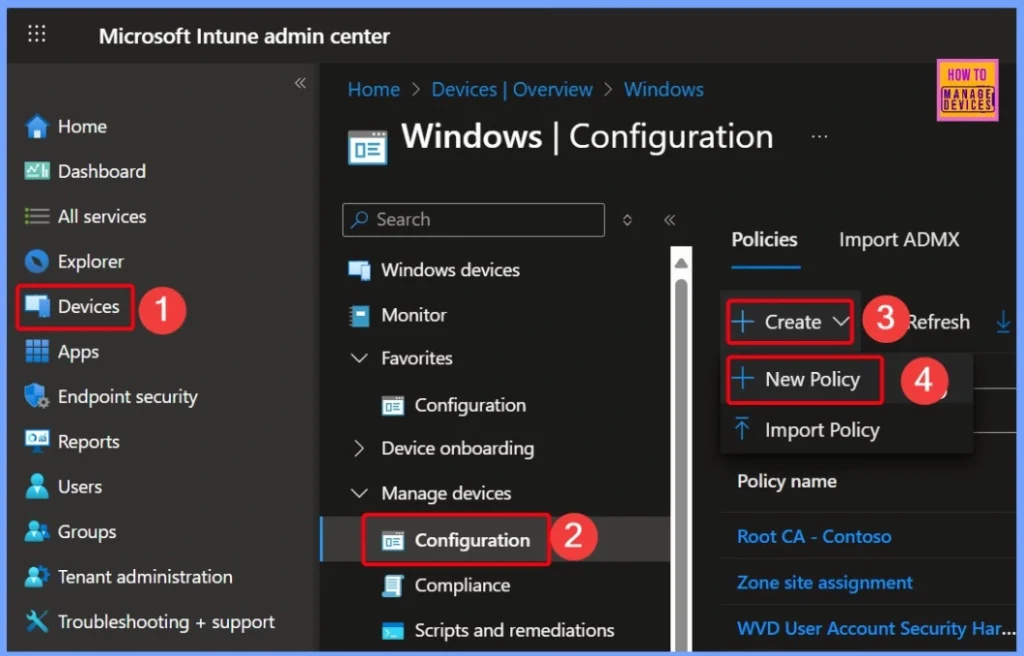
You can easily Track Logical Drive using Intune. First, go to the Microsoft Intune admin center and sign in with your account. Once you are in, look at the left-hand menu and click Devices, then pick Manage devices and select Configuration. After that, press Create, choose New Policy, and you will be ready to start setting up your profile.
- How to Track Device Battery Information using Intune Property Catalog
- How to Collect Physical and Virtual Memory Information using Intune Properties Catalog
- Intune Managing OneDrive File Downloads for Low Disk Space
Platform and Properties Catalog
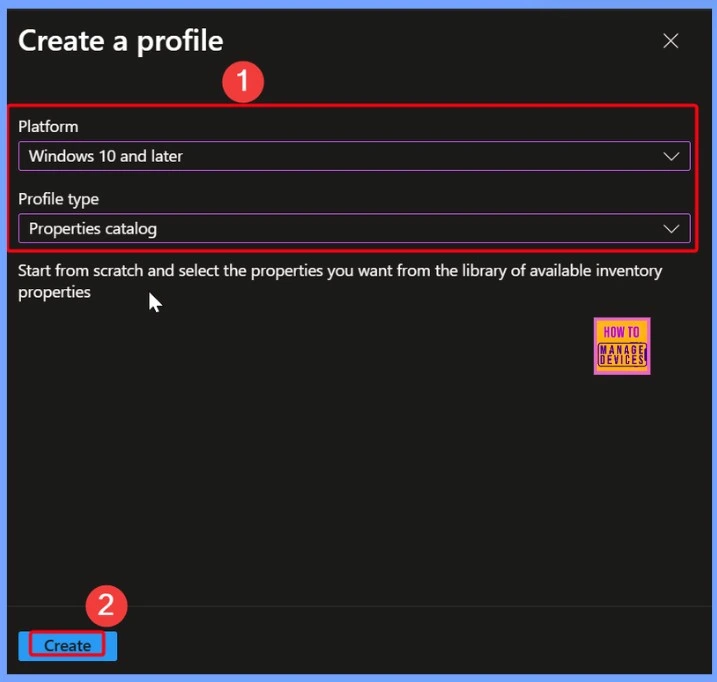
In the window below, you can choose Windows 10 and later as the platform for your policy. Then, from the list of profile types, pick the Properties catalog. This option lets you easily browse and select the exact settings you want to configure on your Windows devices.
Basics Settings Page
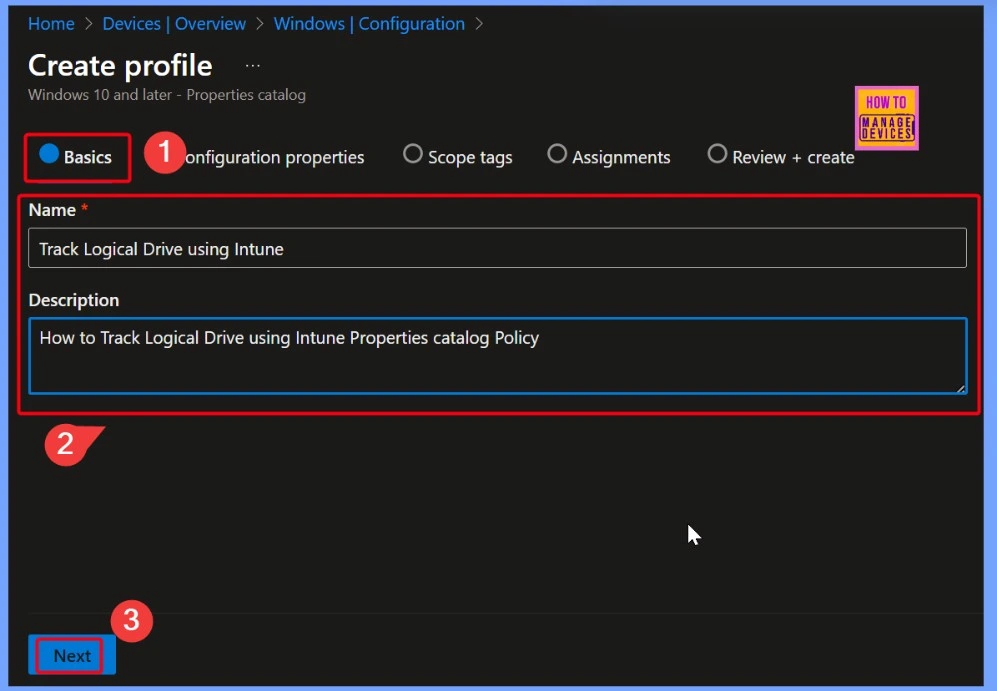
On the Basics settings page, you need to fill in the basic details for your policy. In the Name field, enter: Track Logical Drive using Intune. For the Description, type: How to Track Logical Drive using Intune Properties catalog Policy. These details will help you identify and understand the purpose of the policy later.
Add Properties to Search
Select the properties you want from the entire inventory property library. Click ‘Add properties to search‘ and then choose the inventory properties you wish to collect. Select the + Add properties hyperlink from the window below.
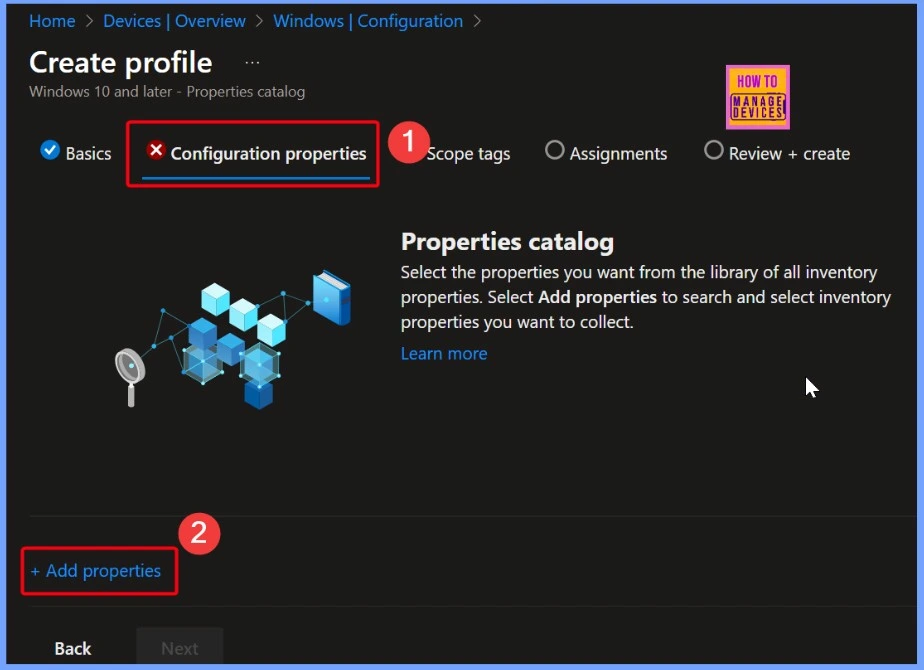
+ Add Properties Link
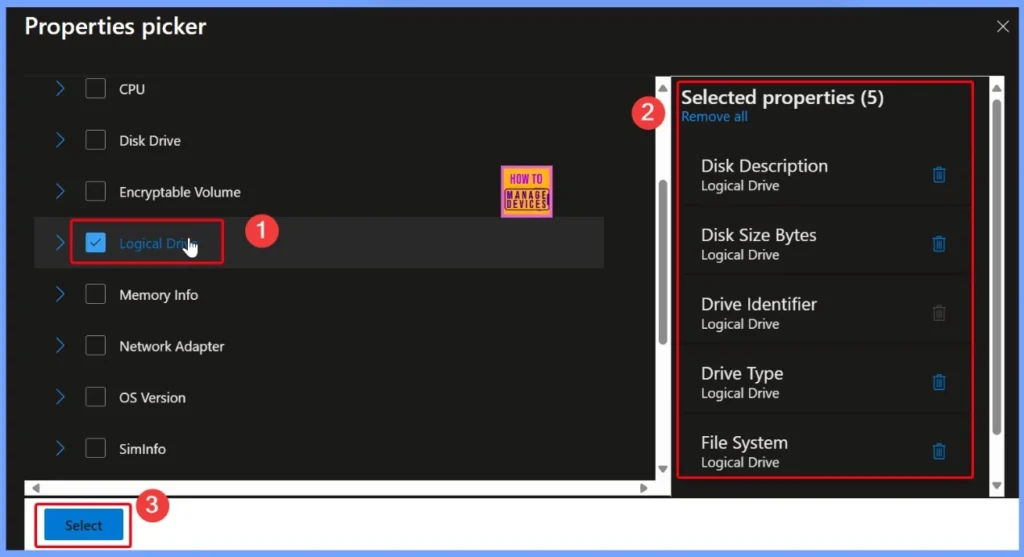
After clicking the + Add properties link, you’ll be taken to the Properties picker window. This window displays a list of inventory categories like CPU, Disk Drive, Encryptable Volume, and more. From this list, select Logical Drive. Once selected, you’ll see that it includes five properties, which are listed in the table below.
- Disk Description
- Disk Size Bytes
- Drive Identifier
- Drive Type
- File System
Configuration Properties Section
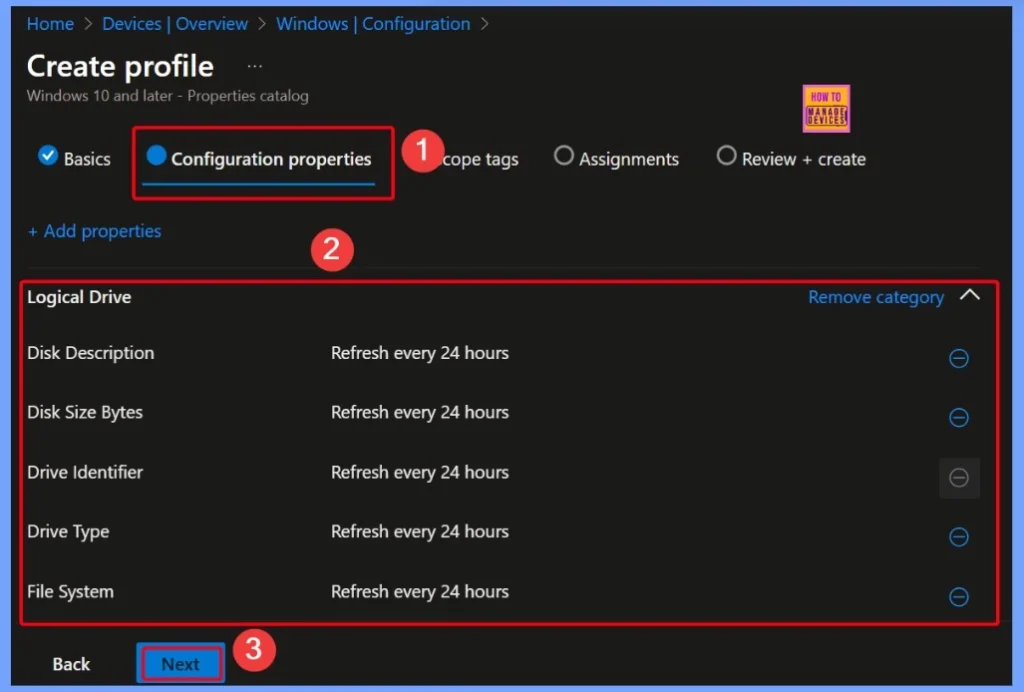
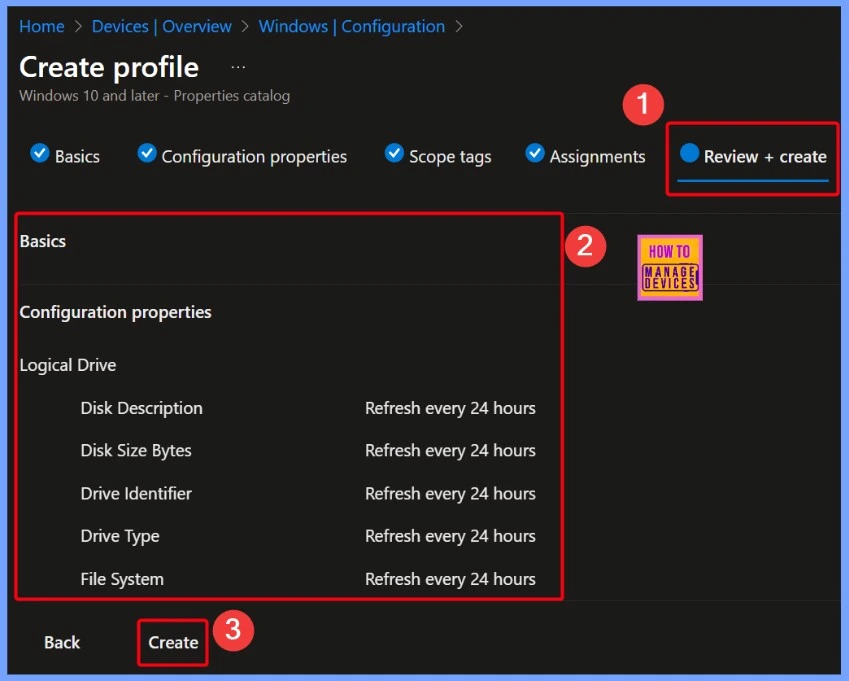
In the Configuration properties section, you will now see the selected Logical Drive category. It includes the following five properties: Disk Description, Disk Size Bytes, Drive Identifier, Drive Type, File System etc.
Each of these properties is set to refresh every 24 hours, which means Intune will update this information once a day. This helps you keep track of any changes to the logical drives over time. Once everything looks good, click Next to continue.
Scope Tag
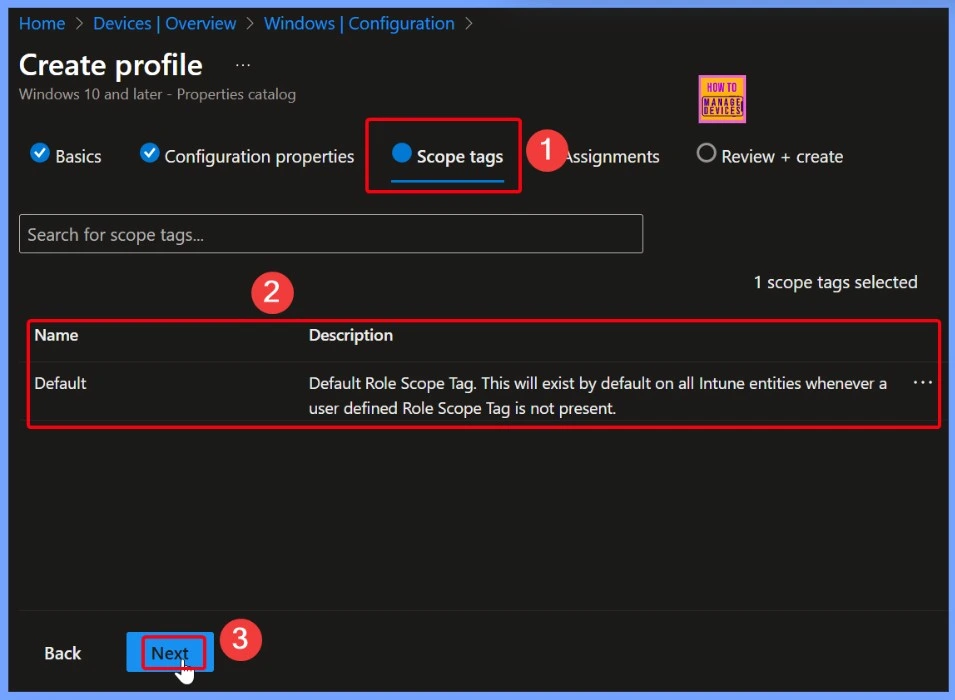
In Microsoft Intune, a Scope Tag is a tag that helps limit who can see or manage certain resources. It is a way for organisations to control access based on user roles or job functions.
Assignment in Intune
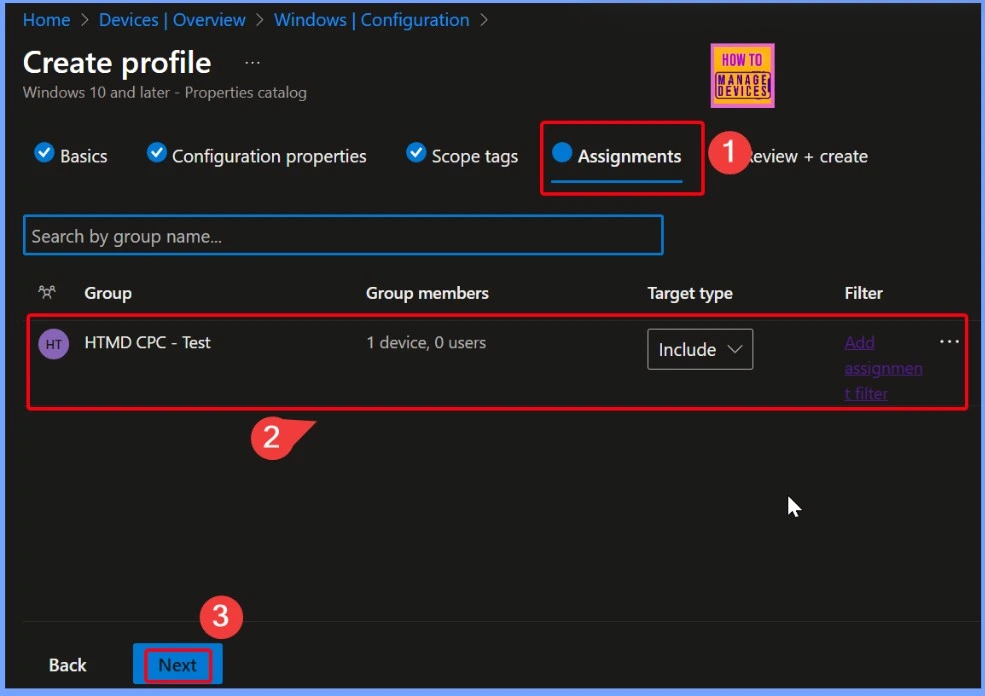
When you create some policy in Intune, you need to assign it to the right audience. Without an assignment, the setting won’t take effect on any device or user. Here i select the assignment group as HTMD CPC – Test after selection click the Ok button.
Review + Create
Review + Create is the last step when setting up policy in Intune. It shows a summary of all the options and settings you chose. This lets you quickly check everything one more time to make sure it is correct before you click Create to apply the changes.
Monitoring Status
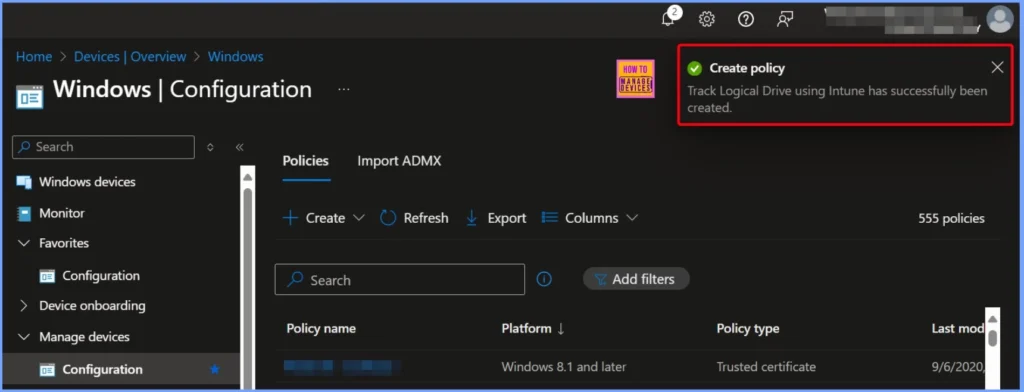
After you finish creating the policy, you will receive a notification confirming that the policy was successfully created. This message lets you know that all your selected settings and configurations have been saved. The below screenshot shows more details.
End Result
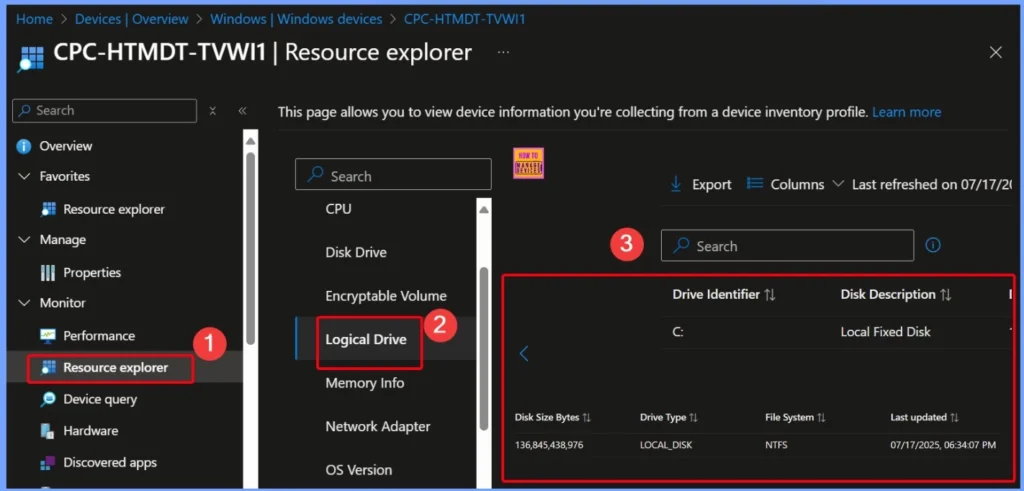
The system has identified the C: drive as a Local Fixed Disk, which means it is a permanent storage drive. The total size of the disk is 136,845,438,976 bytes (around 127.5 GB). The Drive Type is listed as LOCAL_DISK, and the File System used is NTFS, which is common for Windows drives. This information was last updated on July 17, 2025, at 06:34:07 PM.
Starting with Intune’s September 2509 release, the Resource explorer pane will be renamed to Device inventory. This is a UI update only no changes will be made to functionality or data. The new name will appear under Devices > select a platform > select a device > Monitor, and will be visible if you have at least one corporate-owned or Windows device targeted by a properties catalog policy.
| Drive Identifier | Disk Description | Disk Size Bytes | Drive Type | File System | Last updated |
|---|---|---|---|---|---|
| C: | Local Fixed Disk | 136,845,438,976 | LOCAL_DISK | NTFS | 07/17/2025, 06:34:07 PM |
Need Further Assistance or Have Technical Questions?
Join the LinkedIn Page and Telegram group to get the latest step-by-step guides and news updates. Join our Meetup Page to participate in User group meetings. Also, join the WhatsApp Community to get the latest news on Microsoft Technologies. We are there on Reddit as well.
Author
Anoop C Nair has been Microsoft MVP for 10 consecutive years from 2015 onwards. He is a Workplace Solution Architect with more than 22+ years of experience in Workplace technologies. He is a Blogger, Speaker, and Local User Group Community leader. His primary focus is on Device Management technologies like SCCM and Intune. He writes about technologies like Intune, SCCM, Windows, Cloud PC, Windows, Entra, Microsoft Security, Career, etc.

