Let’s discuss Hide Frequently Used Apps from Start Menu using Intune Policy. Today, I am going to introduce one of the policies available in the Microsoft Intune Portal to manage the Start Menu. Have you seen Frequently Used Apps on the Start Menu of Windows Devices?
If you are not familiar with Frequently Used Apps, I will help you learn about them. Frequently Used Apps in the Start Menu refers to a curated list of programs that Windows identifies as most often launched by the user. This curated collection is dynamic, and it changes according to preferences.
Windows shows the most frequently launched ones at the top of the Start Menu, labelled as “Most used”. But sometimes, Frequently Used Apps on the Start Menu are unnecessary for users. With the Microsoft Intune Settings Catalog policy, you can easily hide these apps.
By hiding the App List, you will get many benefits. If you’re used to managed Devices Implementing this Policy is very helpful. This policy is especially helpful for organisations. This blog post will provide step-by-step guidance of this policy.

Table of Contents
Hide Frequently Used Apps from Start Menu Using Intune Policy
As mentioned, the Frequently Used Apps will not give a good look for your Windows PC. While you are accessing the Start Menu, Frequently used apps will show. It affects your privancy and Appearance.
In an organization, Windows devices are shared and it is not good to show fequently used Apps. With this policy, you cangive a clean look for the Start Menu.
- How to Clear the Start Menu Recommended Section in Windows 11
- How to Show or Hide Recent Jumplists on Windows Start Menu and Taskbar using Intune Policy
- New Redesigned Start Menu in Windows 11 with Four Core Design Principles
Benefits of Hide Frequently Used Apps Policy
By configuring this policy, You can prevents users from relying only on frequently used apps; encourages them to use the tools provided by IT. Your organizations device will looks the same. The below table shows the Benefits.
| Admin | User | Organization |
|---|---|---|
| Troubleshooting will be easier | Users get more privacy | Security will be improved |
| Policy Control | Distractions will fewer | It gives Professional Appearance |
CSP Details of Hide Frequently Used Apps Policy
The CSP Details will give a clear understanding about the policy. This policy is applicable for Windows 10, version 1703 [10.0.15063] and later. Before configuring this policy, you should consider some important details. To validate this policy, do the following steps.
- Enable the option to show most used apps in the Settings app.
- Use some apps to get them into the most used group in Start.
- Enable this policy.
- Restart the explorer.exe process, or restart the computer.
- Check that the Show most used apps Settings toggle is grayed out.
- Check that most used apps don’t appear in Start.
Note: This policy requires a reboot to take effect.
Group Policy Mapping
To automate network drivers to specific users and computers you can use Group Policy Mapping. The following table shows the Group Policy Mapping details of this policy.
| Name | Value |
|---|---|
| Name | NoFrequentUsedPrograms |
| Friendly Name | Remove frequent programs list from the Start Menu |
| Location | Computer and User Configuration |
| Path | Start Menu and Taskbar |
| Registry Key Name | Software\Microsoft\Windows\CurrentVersion\Policies\Explorer |
| Registry Value Name | NoStartMenuMFUprogramsList |
| ADMX File Name | StartMenu.admx |

Steps to Configure Hide Frequently Used Apps Policy
To start the Policy creation, you can choose Settings Catalog. You can deploy this policy to huge number of devices. To do this, Open the Microsoft Intune Portal. Go to Devices > Configuration > +Create > + New Policy.
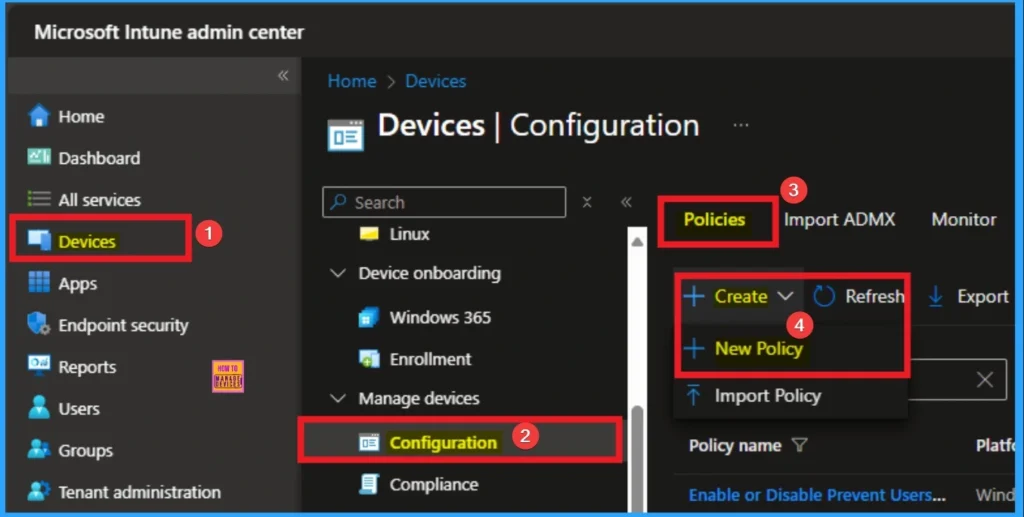
Policy Profile Creation
After that you can start creating a profile to configure the settings. In this stage we have to select Platfrom and profile. Here I choose Windows 10 and Later as Platfrom and Settings Catalog as Profile Type. Then click on the Next Create Button.
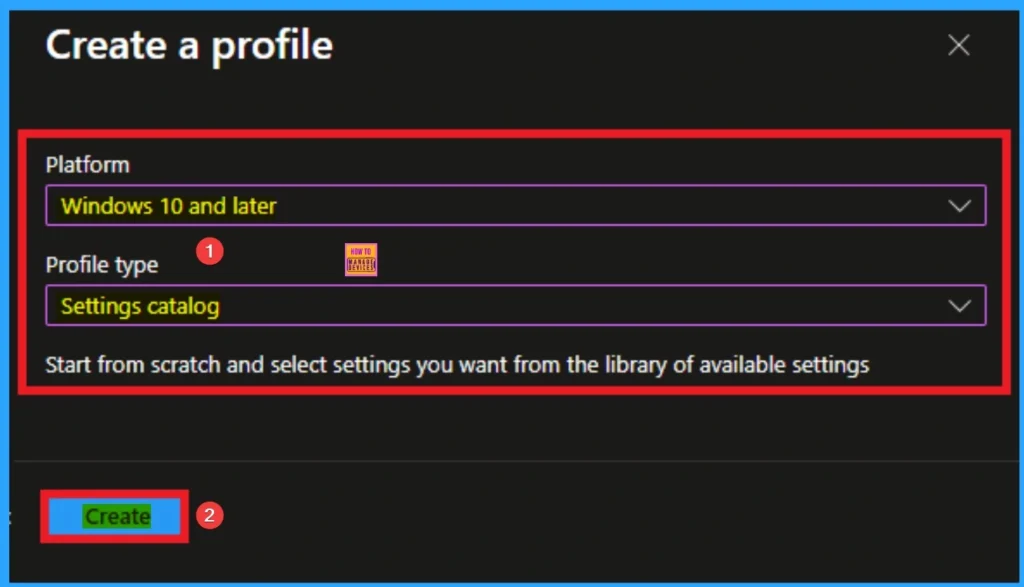
Biggining Stage of Policy
After creating the profile, you can Name the policy and give description. It helps to identify the policy later. The Name is the Mandatory field and Description is optional. Click on the Next button.
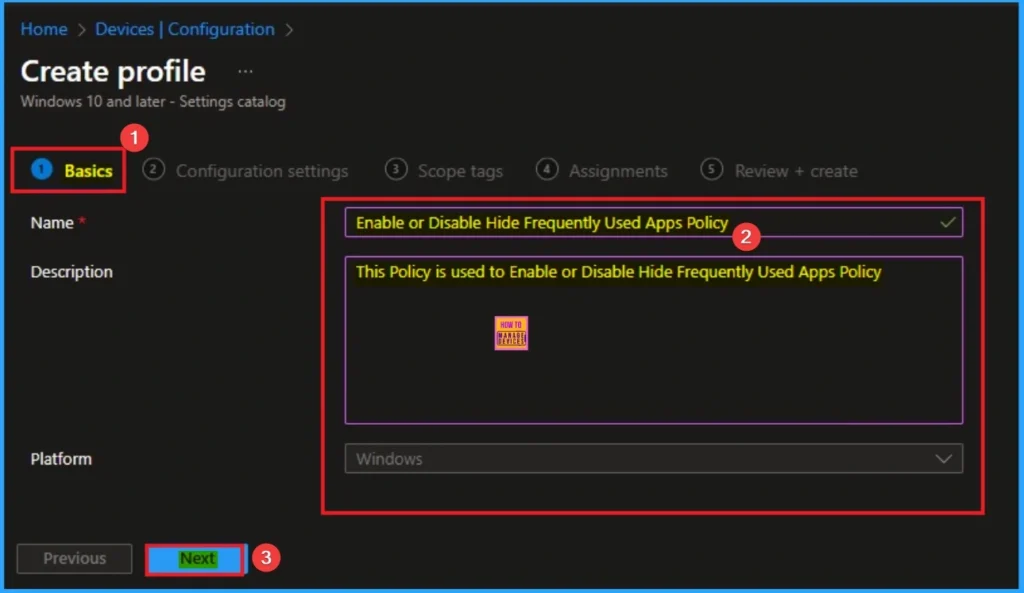
Configuration Settings of Hide Frequently Used Apps
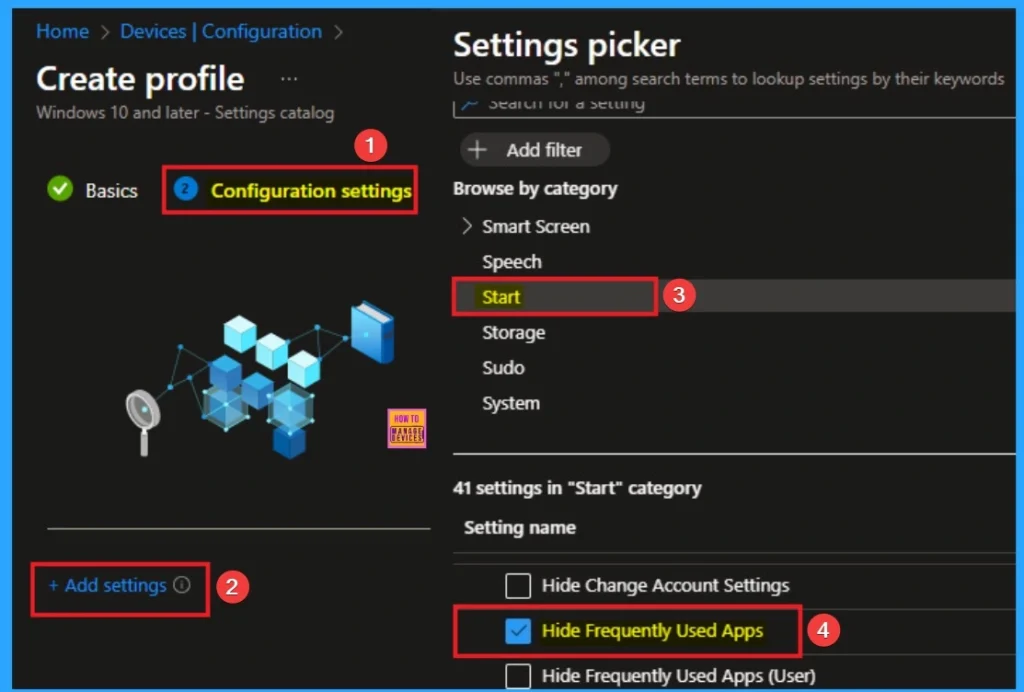
To get the settings to creating policy Configuration Settings will help you. Click on the +Add settings hyperlink. Then you will get the Settings Picker to choose the settings. Here I choose Start Category and select Hide Frequently Used Apps settings and you can close the settings Picker.
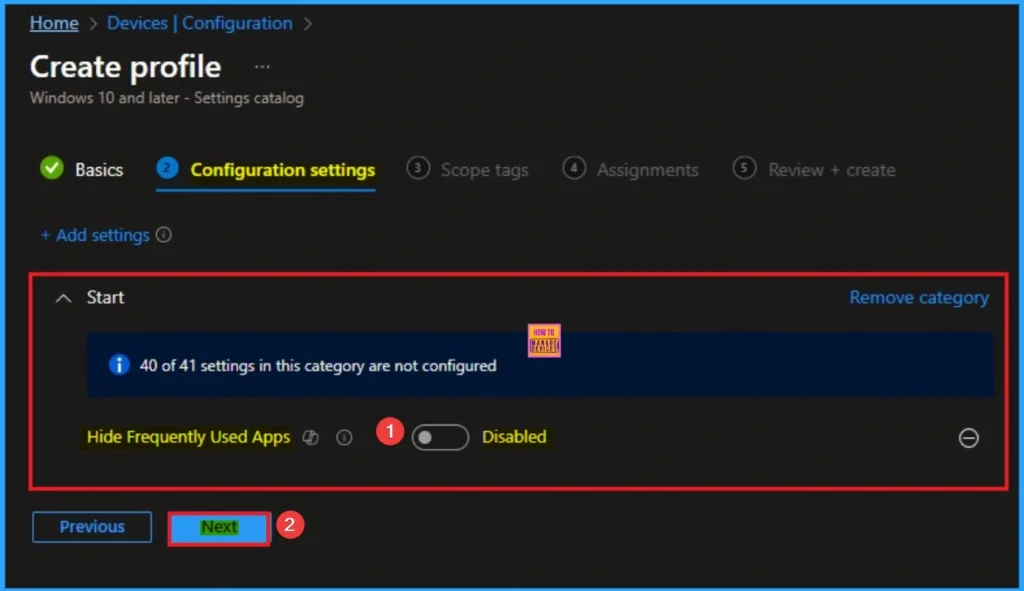
Disable Hide Frequently Used Apps (Default)
By default, Hide Frequently Used Apps is disabled. That means you cannot hide Frequently Used Apps. If you are configuring this policy with the default value (Disable), Click on the Next button.
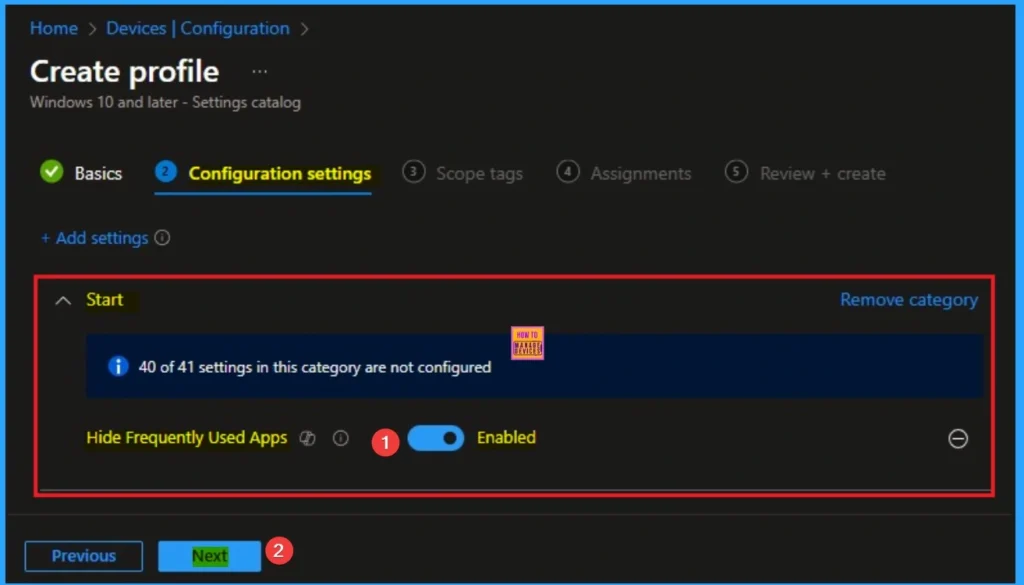
Enable Hide Frequently Used Apps
If you are choosing Enable option, you can hide the Frequently Used Apps from Start Menu. By hiding this option Admin will get complete control over this. Here I chosse Enable value for this Settings. Click on the Next button to continue.
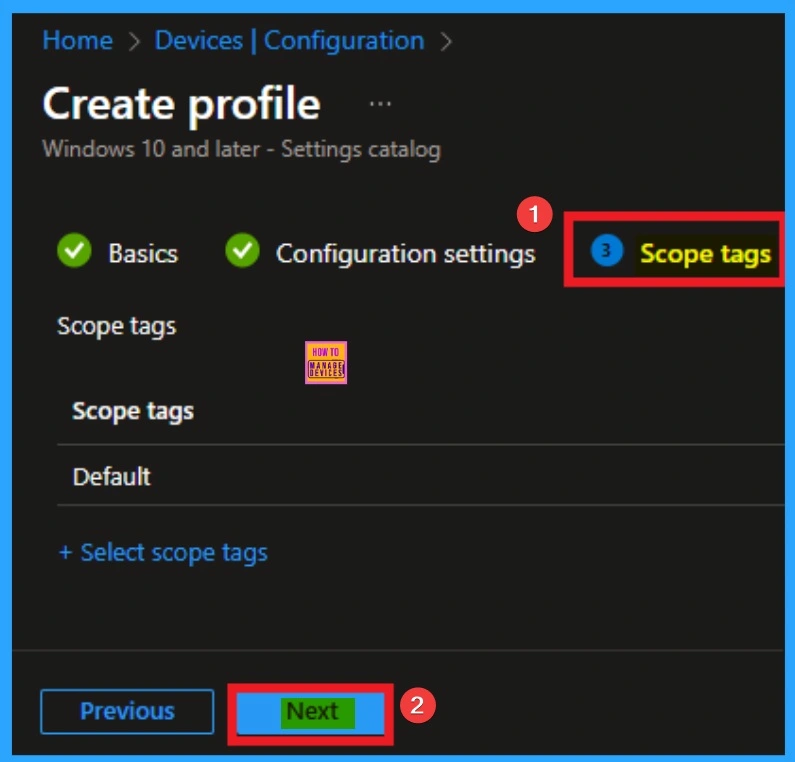
Scope Tags
By using scope tags you can give control to which admin can see and manage specific settings. This is not a mandatory settings, so you can Skip this. Here I skip this settings and Click on the Next button to continue.
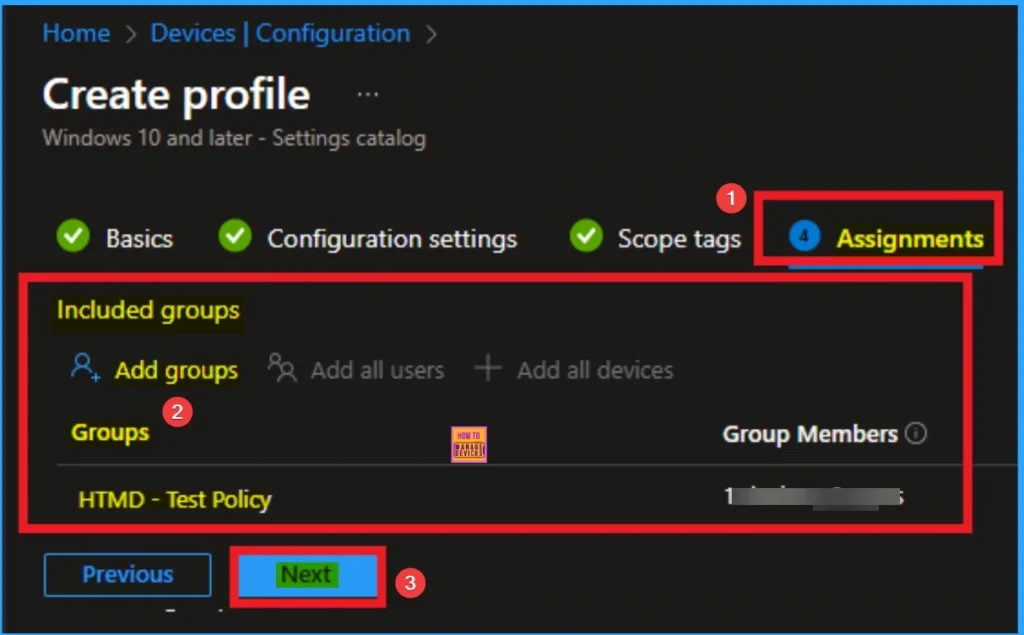
Assignment
The Assignments tab allows you to assign the Hide Frequently Used Apps policy to specific groups in your tenant. For this click on the +Add groups option under Included groups. Then select the groups and click on the Select button. Then click on the Next button.
Review and Create the Policy
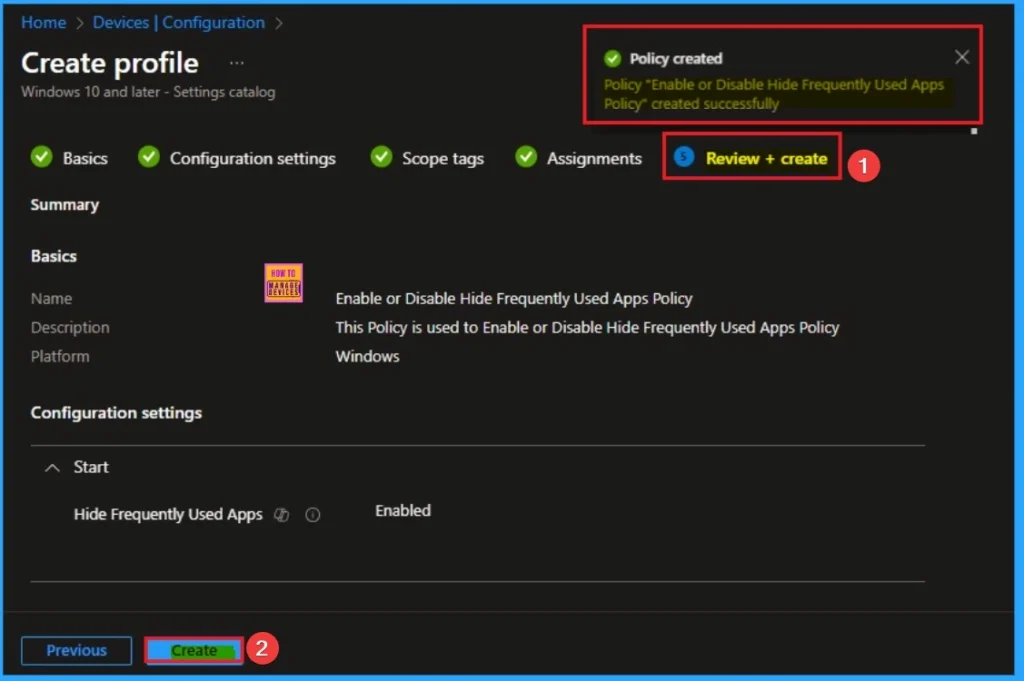
To create this policy successfully, you can review all the details of the policy before creating. After reviewing all details, click on the Next button and you will get a success Notification. Then you can sync the Device on the Company Portal.
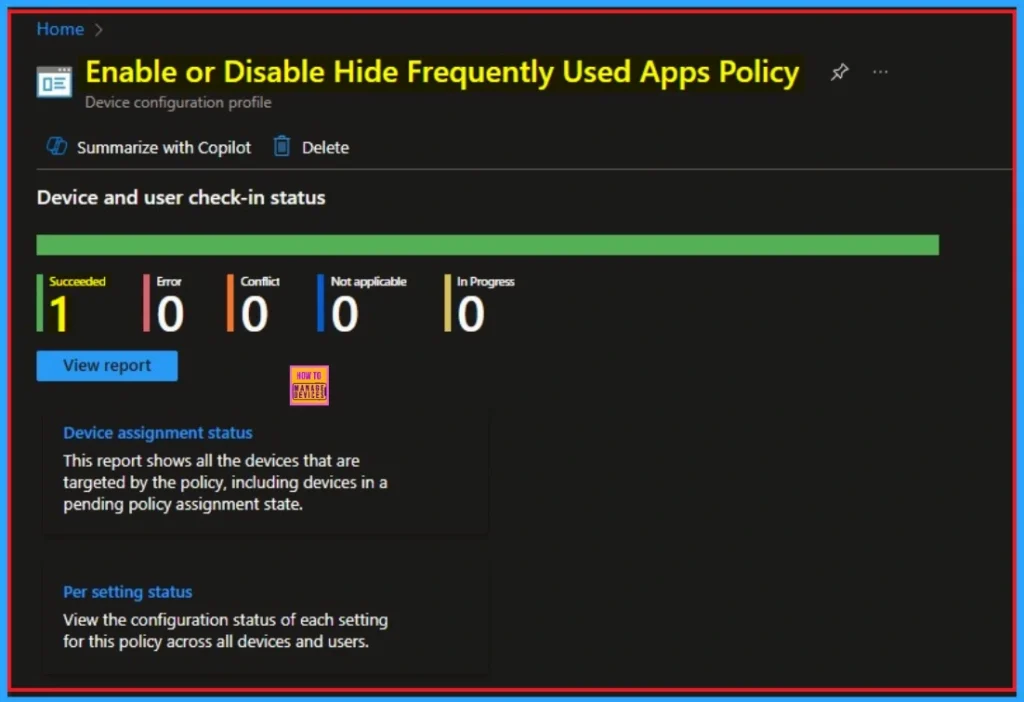
Device Check-in Status
The Device Check-in status means checking the policy is succeeded or not using Intune Portal. Go to Devices > Configuration and Search Specific Policy. Here, the Policy is succeeded as 1. Look at the below screenshot.
Event Viewer Details
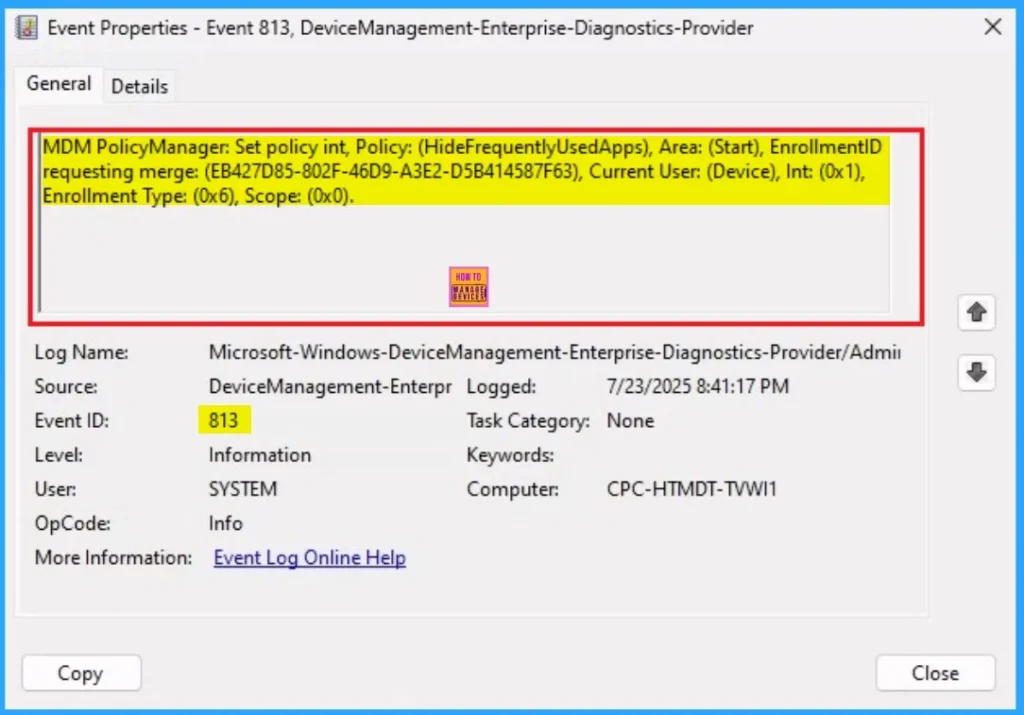
With Event Viewer, you will get verification, the policy has succeeded on the Client Device. To Access Event Viewer, open the Client Device and go to Event Viewer > Applications and Services Logs > Microsoft > Windows > Device Management > Enterprise Diagnostic Provider > Admin.
- Here, the Success ID is shown on 813
Remove Assignment Groups
If you want to remove a group from a policy assignment for security updates. The following image shows the process of unassigning a group. Click Review + Save after making the change.
For detailed information, you can refer to our previous post – Learn How to Delete or Remove App Assignment from Intune using by Step-by-Step Guide

Delete Hide Frequently Used Apps Policy
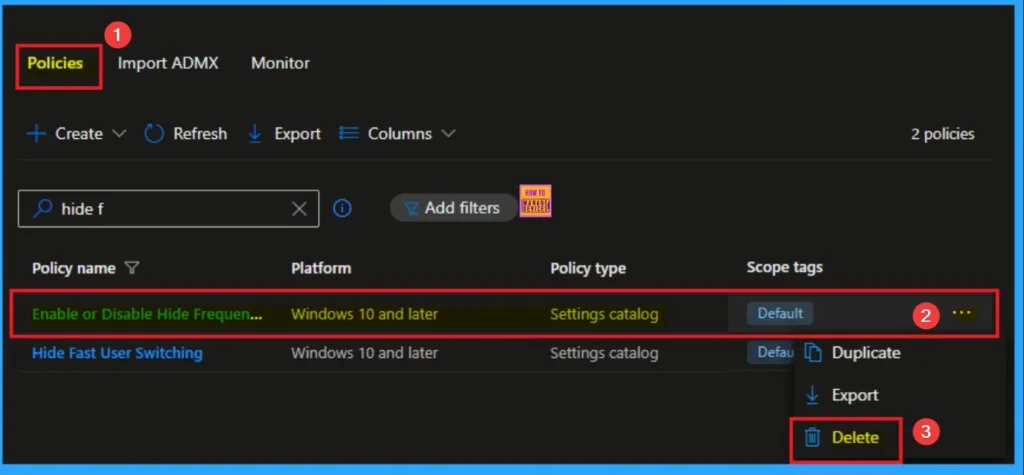
You can easily delete an Intune policy for security or operational reasons. It is simple to do it. I will demonstrate how to delete an Intune policy through the Hide Frequently Used Apps policy.
For detailed information, you can refer to our previous post – How to Delete Allow Clipboard History Policy in Intune Step by Step Guide.
Need Further Assistance or Have Technical Questions?
Join the LinkedIn Page and Telegram group to get the step-by-step guides and news updates. Join our Meetup Page to participate in User group meetings. Also, Join the WhatsApp Community to get the latest news on Microsoft Technologies. We are there on Reddit as well.
Author
Anoop C Nair has been Microsoft MVP for 10 consecutive years from 2015 onwards. He is a Workplace Solution Architect with more than 22+ years of experience in Workplace technologies. He is a Blogger, Speaker, and Local User Group Community leader. His primary focus is on Device Management technologies like SCCM and Intune. He writes about technologies like Intune, SCCM, Windows, Cloud PC, Windows, Entra, Microsoft Security, Career, etc.

