Hey, let’s learn about how to Enable Crash Dump Policy in Windows for Saves Memory Data using Intune. A crash dump policy decides how much information is saved and where it is stored. Setting the right policy ensures the system collects useful data without using too much storage.
For IT admins, crash dump policies are very helpful in troubleshooting. When a device crashes, the dump file can be used to identify the issue, whether it’s a software bug, hardware fault, or driver error. This makes it easier and faster for admins to fix problems without guessing.
Crash dump policies help organisations keep their systems stable. By analysing repeated crashes, patterns can be found and fixed early. This improves the overall performance and reliability of devices in a company. When systems work smoothly, there is less interruption in daily tasks, which saves time and resources.
This balance supports both system security and safe investigations into crashes. So, the crash dump policy is a key tool for both stability and security. In this post, explain how to enable Crash Dump Policy, Monitoring Status, and Client Side Verification.
Table of Contents
What are the Benefits of Enabling Crash Dump Policy using Intune?
Enabling crash dump policy using Intune helps organisations manage and control crash data collection across all devices from one central place. It allows IT admins to quickly detect and fix system problems, reduce downtime, and improve device performance.
1. Helps detect and fix system crashes quickly
2. Allows centralized management of crash settings
3. Saves storage by controlling dump file size and location
4. Improves overall device stability and performance
5. Enhances security by avoiding exposure of sensitive data
6. Applies consistent settings across all devices automatically
Enable Crash Dump Policy in Windows for Saves Memory Data using Intune
This policy decides if crash dump collection is turned on or off in a computer. A crash dump is a file that saves important information about the system when it suddenly stops working. These files help IT teams and developers understand what went wrong, so they can fix the issue and prevent it from happening again.
- How to Collect Physical and Virtual Memory Information using Intune Properties Catalog
- How to Allow Direct Memory Access for Data Protection Through Intune Settings Catalog
- Enable Disable Memory Compression on Windows 11
Create a Profile
First, sign in to the Microsoft Intune admin center. Then, go to Devices > Configuration > Create > New policy. In the next window, select the platform as Windows 10 and later, and choose the profile type as Settings Catalog. Click Create to continue.
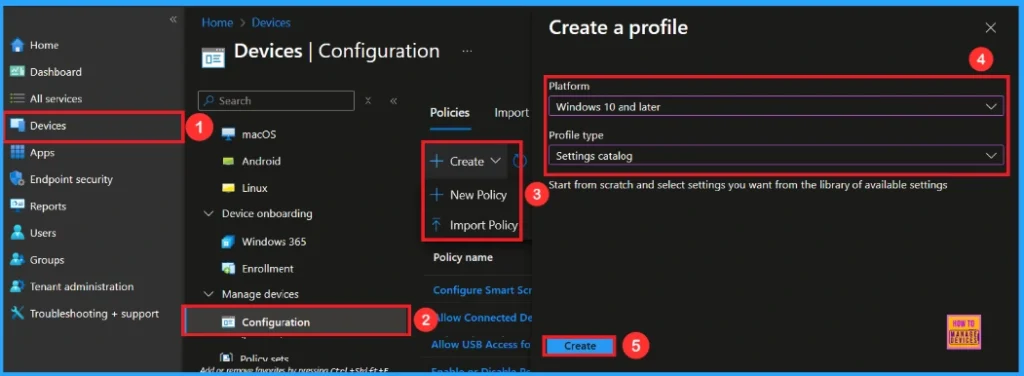
Basic Step for Crash Dump Policy
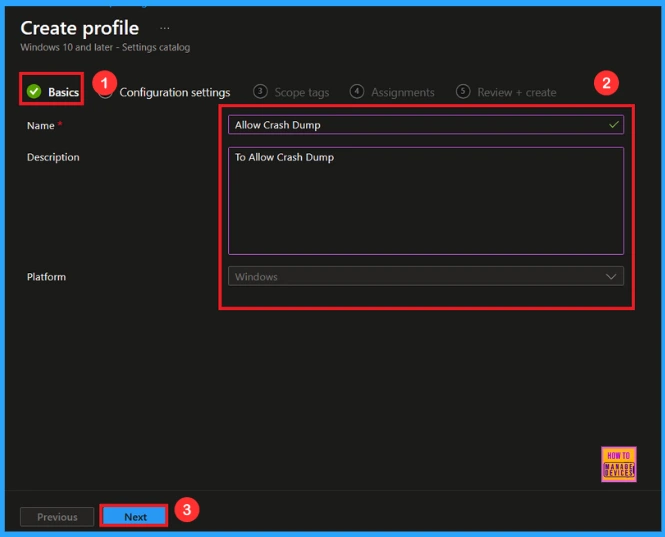
You need to enter some basic details, such as the name and a description. For example, I entered the name as Allow Crash Dump. In the description, I enter To Allow Crash Dump. After filling in the details, click Next to continue.
Configuration – Settings Picker
On this page, we click on the + Add Settings hyperlink. Then you will get a settings picker that will show different types of categories to select specific settings. Here, I choose to Memory Dump the category and select the Allow Crash Dump.
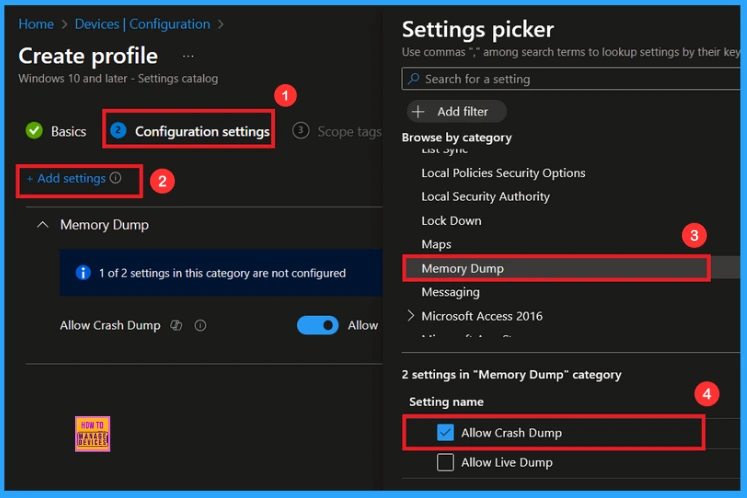
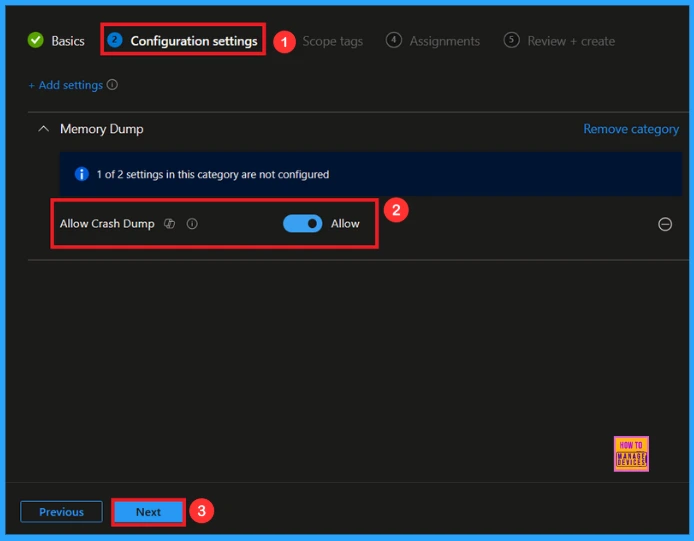
Once you have selected Allow Crash Dump settings and closed the Settings picker. You will see it on the Configuration page. Here we have only two settings: Allow or Block. By default, Allow Crash Dump will be set to Allow. If you want to allow these settings, click on the Next button.
Block Crash Dump Policy
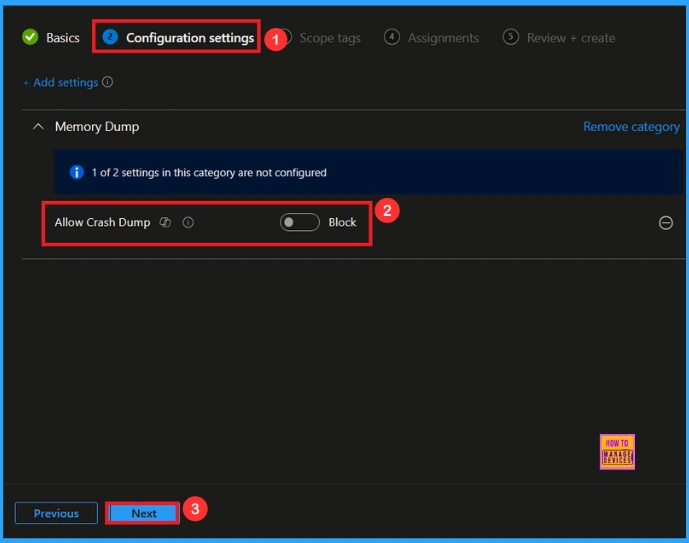
If we block this policy, you can block the Crash Dump bytoggling the switch. After reviewing or adding more settings, you can click the Next button to continue.
Scope Tag
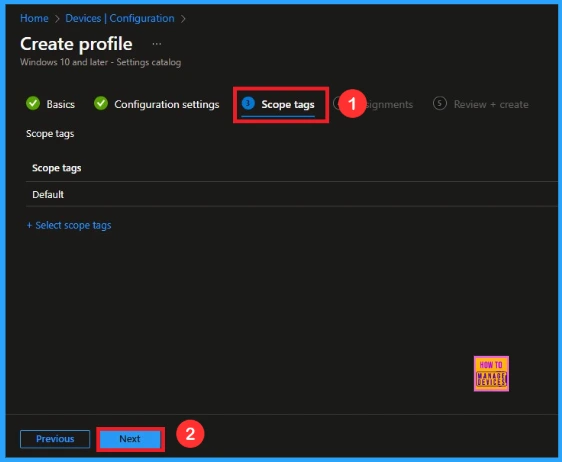
A Scope Tag in Intune is used to control visibility and access to Intune resources based on administrative roles. Scope tags are not mandatory. You can add the scope tag using the Select scope tags button. Click the Next button to proceed.
Assignments
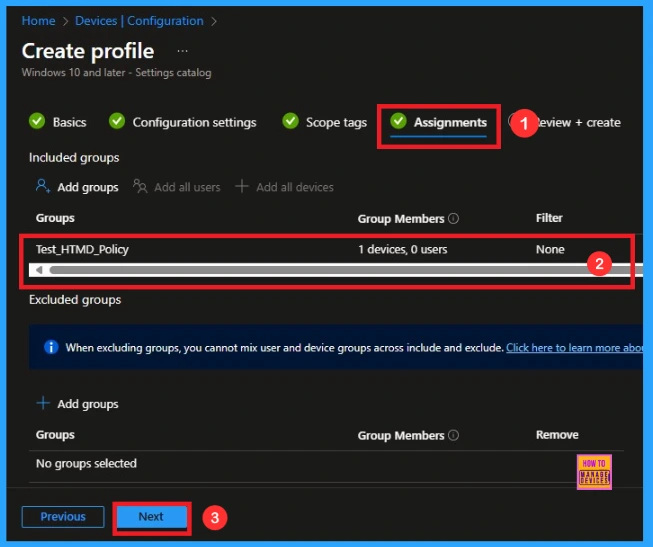
On the Assignments tab, we can select which users or devices get this policy. Under Include Groups, click Add Groups. From the list, select the group that we want to target (e.g., Test_HTMD_Policy). Then click the Next button.
Last Step for Crash Dump Policy
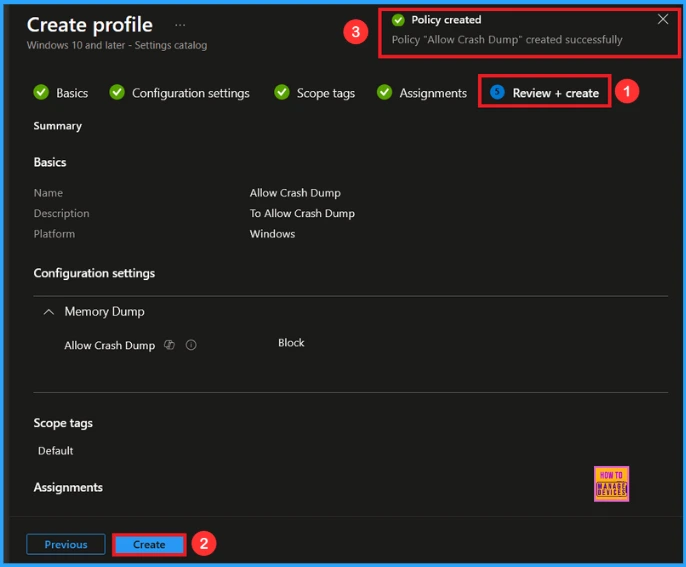
At the final Review + Create step, we see a summary of all configured settings for the new profile; after reviewing the details and making any necessary changes by clicking Previous. We click Create to finish, and a notification confirms that the Allow Crash Dump was created successfully.
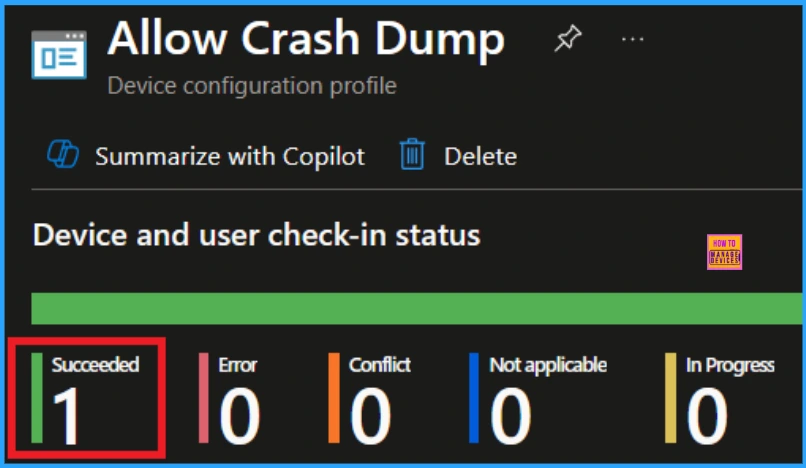
Device and User Check-in Status
We can check a policy’s status in the Intune Portal. Generally, it takes about 8 hours for policies to be created. Use the manual sync option to reduce the configuration delay in the Company Portal app on the device, then check the status again. Navigate to Devices> Configuration. Click on the specific policy (e.g Allow Crash Dump)
Client Side Verification
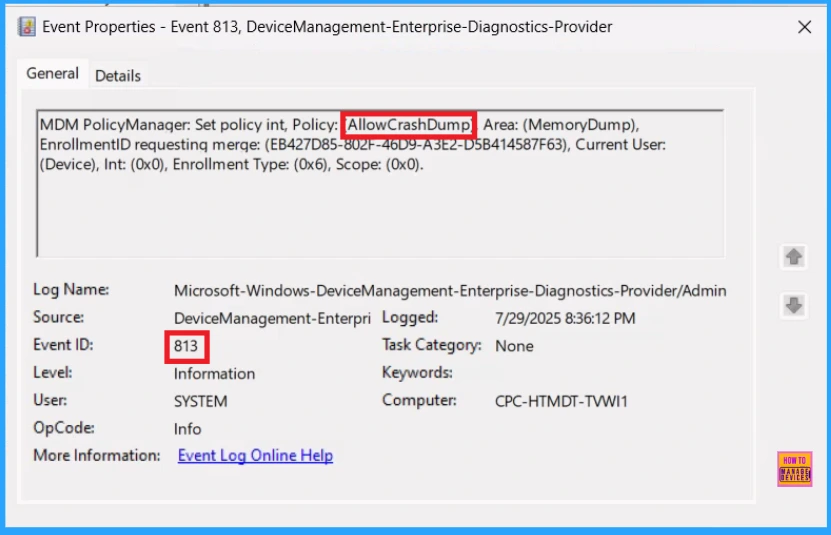
To verify the success of the policy, you can employ the Event Viewer. Initially, launch Event Viewer and proceed to Applications and Services Logs > Microsoft > Windows > Device Management > Enterprise Diagnostic Provider > Admin. Then, utilise Filter Current Log and search for Event ID 813.
MDM PolicyManager: Set policy int, Policy:(AllowCrashDum)Area: (MemoryDump),
EnrollmentID requestinq merqe: (EB427D85-802F-46D9-A3E2-D5B414587F63), Current User:
(Device), Int: (0x0), Enrollment Type: (0x6), Scope: (0x0).
How to Remove a Group from Crash Dump Policy
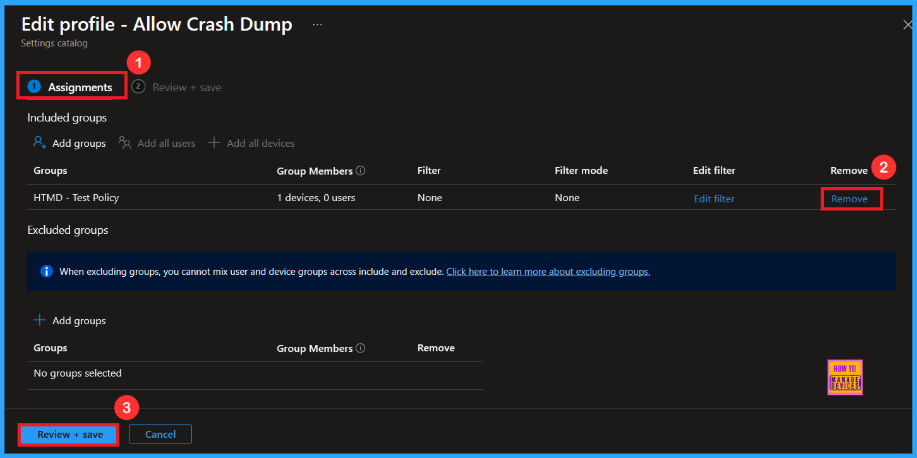
Sometimes, we need to remove a group from a policy assignment for security updates. Open the policy from the Configuration tab and click on the Edit button on the Assignment tab. Click on the Remove button on this section to remove the policy. Click Review + Save after making the change.
For detailed information, you can refer to our previous post – Learn How to Delete or Remove App Assignment from Intune using by Step-by-Step Guide.
How to Delete Crash Dump Policy from Intune
To delete an Intune policy for security or operational reasons. It is simple to do. I will demonstrate how to delete an Intune policy through the Allow Crash Dump Policy. Click the three dots, then click the Delete option.
For detailed information, you can refer to our previous post – How to Delete Allow Clipboard History Policy in Intune Step by Step Guide.

Need Further Assistance or Have Technical Questions?
Join the LinkedIn Page and Telegram group to get the latest step-by-step guides and news updates. Join our Meetup Page to participate in User group meetings. Also, Join the WhatsApp Community to get the latest news on Microsoft Technologies. We are there on Reddit as well.
Author
Anoop C Nair has been Microsoft MVP from 2015 onwards for 10 consecutive years! He is a Workplace Solution Architect with more than 22+ years of experience in Workplace technologies. He is also a Blogger, Speaker, and Local User Group Community leader. His primary focus is on Device Management technologies like SCCM and Intune. He writes about technologies like Intune, SCCM, Windows, Cloud PC, Windows, Entra, Microsoft Security, Career, etc.

