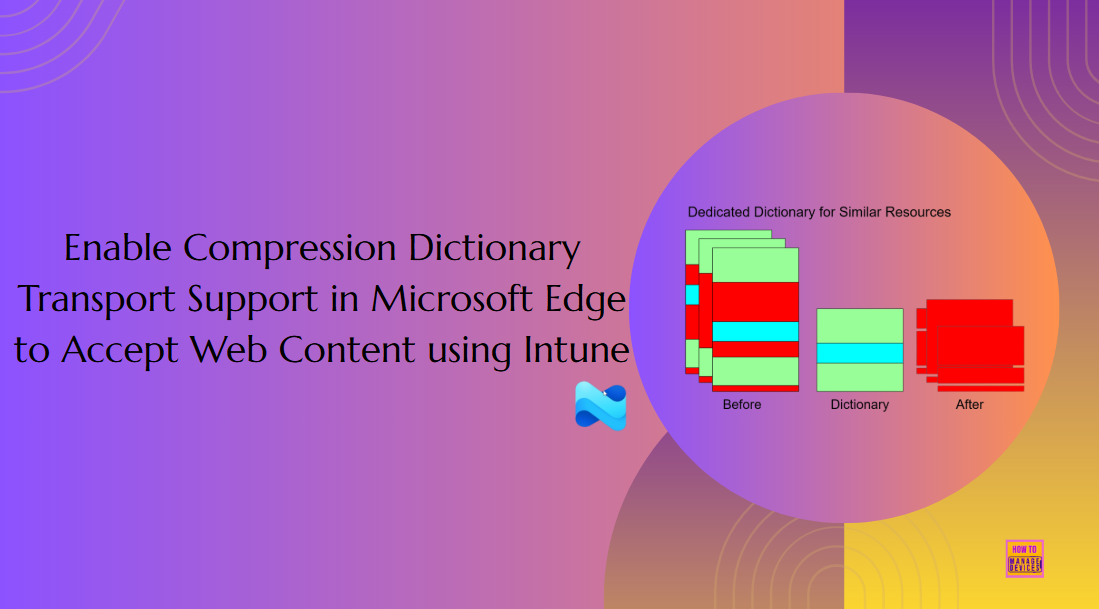
Hey, let’s learn how to Enable Compression Dictionary Transport Support in Microsoft Edge to Accept Web Content using Intune. This policy is all about making your internet browsing faster. It lets Microsoft Edge and the websites you visit use a kind of shared “dictionary” for compressing information. Think of it like a secret code they both know. Instead of sending a full sentence, they can just send a code word.
This makes the website files much smaller, so they get from the web server to your browser a lot faster. For you, the user, this means less waiting. Web pages load more quickly, which is especially great if you’re on a slow connection or using your phone’s data. It helps save both time and money.
For the organizations that run these websites, it means they don’t have to use as much bandwidth to send data, which can save them money. Plus, their websites will feel faster and more responsive, which is better for their visitors.
It’s a good thing because it uses a controlled and safe method for compression. This helps make sure the data you’re receiving is exactly what the website sent, without any unwanted changes or vulnerabilities. In this post, i will explain how to enable this Policy, Monitoring Status, Client Side Verification.
Table of Contents
What are the Advantages of enabling Compression Dictionary Transport Support using Intune?
Enabling this policy offers benefits for both users and organizations by making data transfer more efficient. For users, the primary advantage is a significant boost in browsing speed, which conserves bandwidth and improves the overall experience, especially on slower connections.
1. Improved User Experience
2. Reduced Data Usage
3. Lower Operational Costs
4. Enhanced Security
Enable Compression Dictionary Transport Support in Microsoft Edge to Accept Web Content using Intune
Before enabling the policy: Microsoft Edge does not use the compression dictionary transport feature. Web contents are transferred without using dictionary-specific encodings, which may result in slightly larger data transfer sizes and slower performance.
After enabling the policy: Microsoft Edge allows the use of dictionary-specific content encodings (like sbr and zst-d) when available. This helps improve web performance by reducing the size of transferred data, leading to faster page loading and more efficient bandwidth usage.
- Allow or Block Developer Tools Policy using Intune
- Easy way to Enable Windows Backup using Microsoft Intune Configuration
- Enable Spellcheck in MS Edge Browser using M365 Admin Center Configuration Policy
Create a Profile
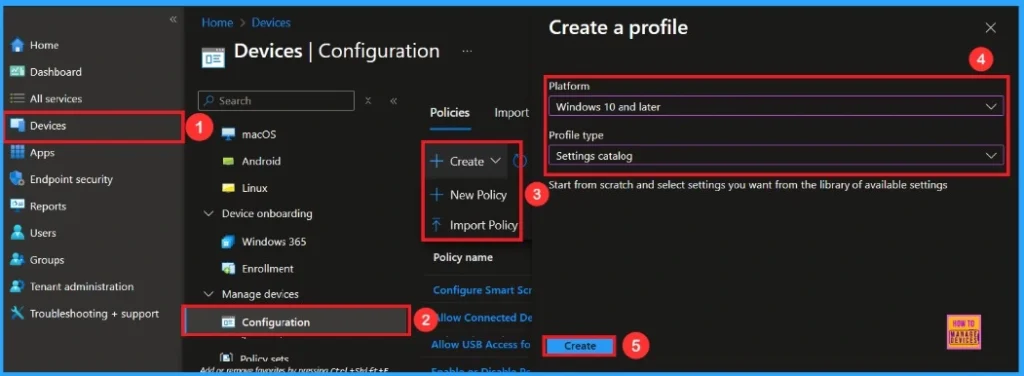
To start deploying a policy in Intune, sign in to the Microsoft Intune Admin Center. Then, go to Devices > Configuration profiles > Create New Policy. In the Create a Profile window, select Platform Windows 10 and later, Profile type is Settings catalog. Then click the Create button to continue.
Basic Step
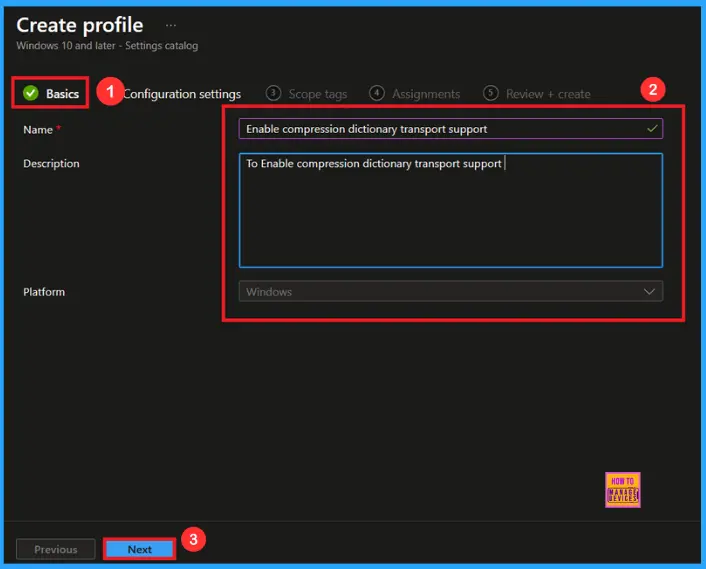
Here, we can add the name (e.g Enable Compression Dictionary Transport Support in Microsoft Edge to Accept Web Content using Intune) of the policy and give a brief description (e.g To Enable Compression Dictionary Transport Support in Microsoft Edge to Accept Web Content using Intune). Then click the Next button.
Configuration Settings
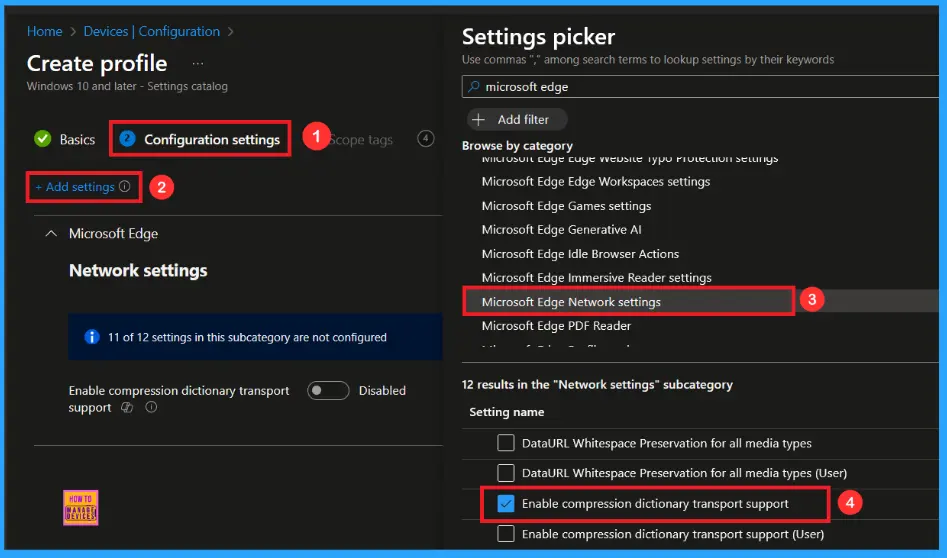
Now, for Configuration Settings, we can define this policy’s exact function. Click Add Settings to open the Settings Picker.
- In the search bar, type Microsoft Edge Network Settings as a category
- Select to Enable Compression Dictionary Transport Support.
- Close the Settings Picker window.
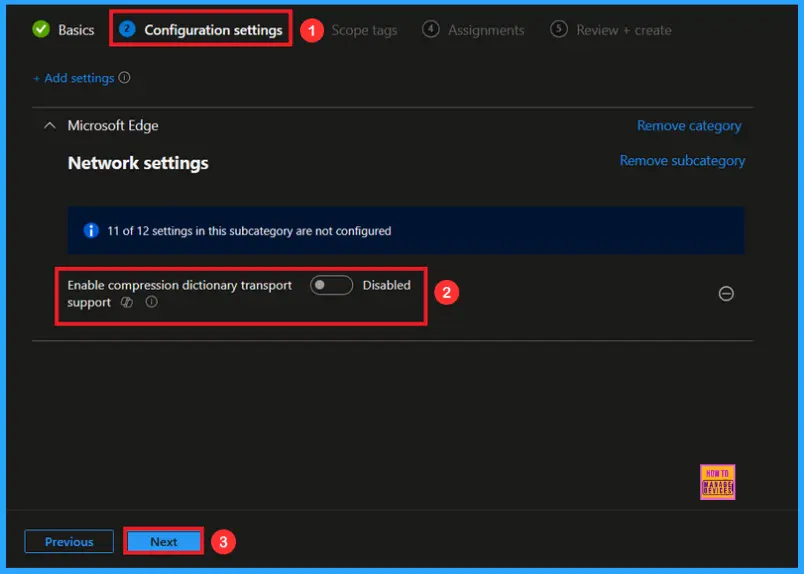
Once you have selected Compression Dictionary Transport Support Policy and closed the Settings picker. You will see it on the Configuration page. Here we have only two settings: Enable or Disable. By default it will be set to Disable. If you want to Disable these settings, click on the Next button.
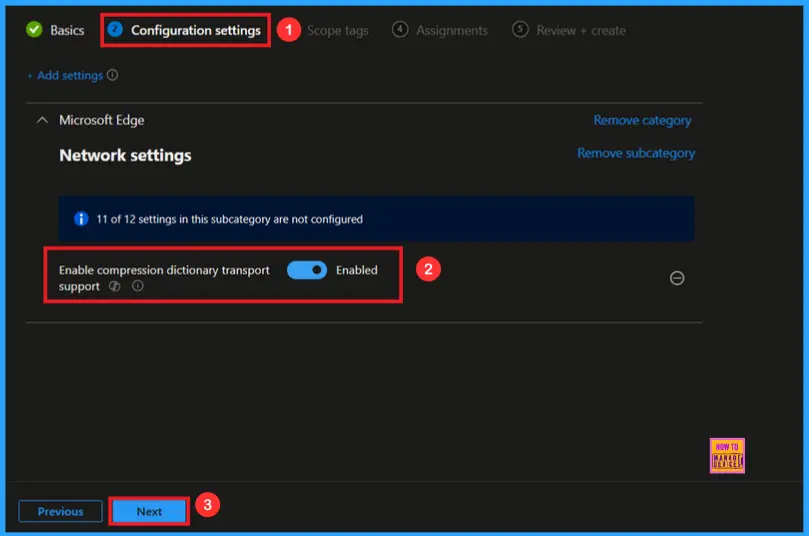
Enable Compression Dictionary Transport Support Policy
If we Enable or configure this policy, you can Enable the Compression Dictionary Transport Support Policy by toggling the switch. After reviewing or adding more settings, you can click the Next button to proceed.
Scope Tags
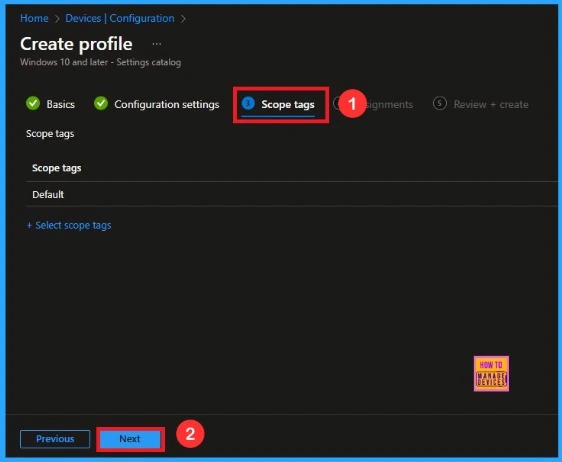
The scope tag is not mandatory, so you can skip this section. It functions as a tool for organisation and access management, but assigning it is optional. Click Next if they’re not required for your setup.
Assignments
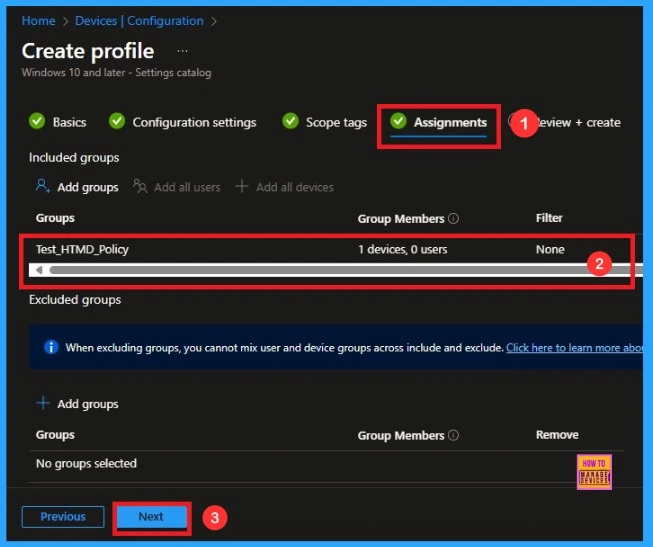
In the Assignments tab, you choose the users or devices that will receive the policy by clicking Add Group under Include Group, select the group that you want to target(e.g Test_HTMD_Policy) and then click Next to continue.
Final Step
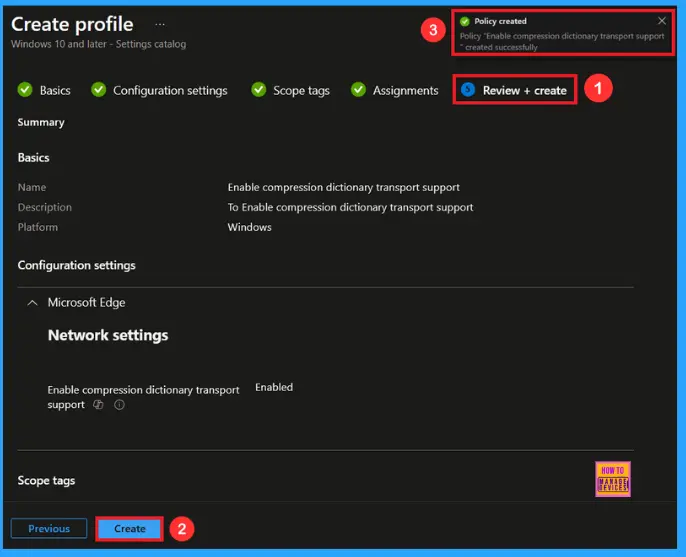
In this section, you will find a summary encompassing all the information you provided in the preceding steps, including basic details, configuration settings, assignment details. We click Create to finish, and a notification confirms that the “Enable Compression Dictionary Transport Support created sucessfully”.
Device and User Check-in Status
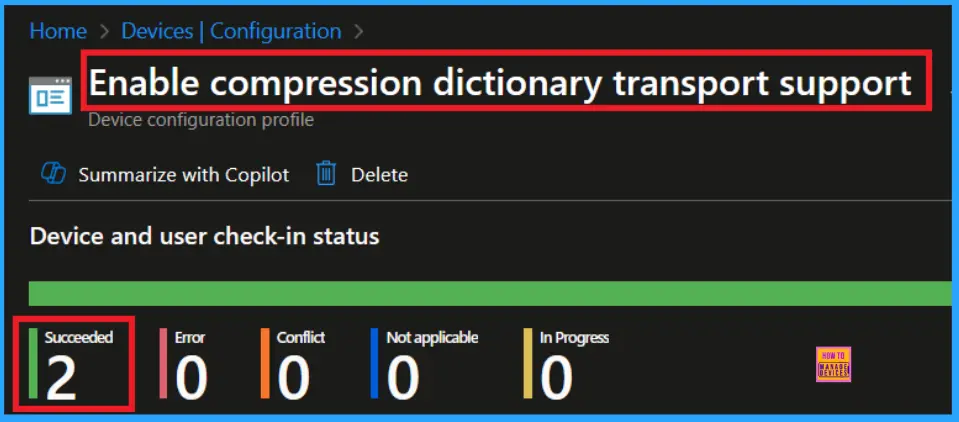
To view a policy’s status, go to Devices > Configuration in the Intune portal, select the policy (Enable Compression Dictionary Transport Support), and check that the status shows Succeeded (1). Use manual sync in the Company Portal to speed up the process.
Client Side Verification
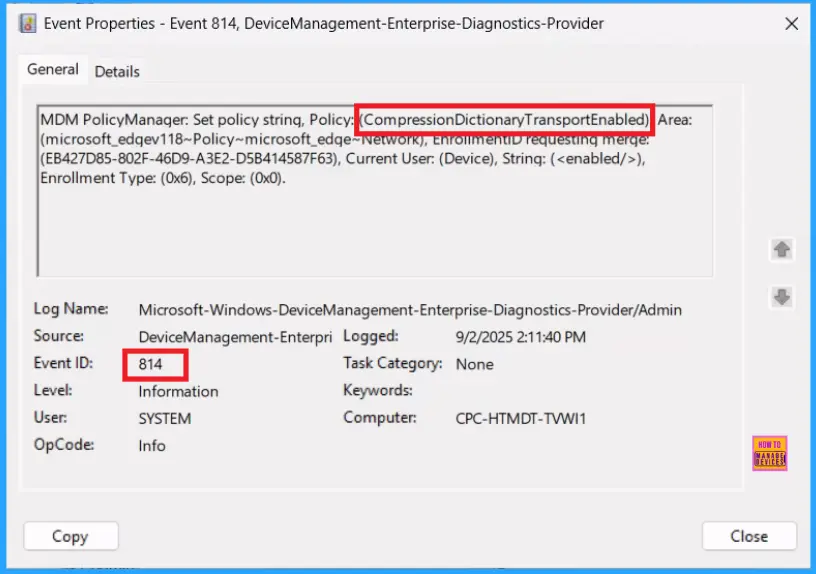
To confirm if a policy has been applied, use the Event Viewer on the client device. Go to Applications and Services Logs > Microsoft > Windows > Device Management > Enterprise Diagnostic Provider > Admin. From the list of policies, use the Filter Current Log option and search for Intune event 814.
MDM PolicyManager: Set policy string, Policy: (CompressionDictionaryTransportEnabled) Area:
(microsoft_edqev118~Policy~microsoft_edqe~Network), EnrolmentiD requesting merqe:
(EB427D85-802F-46D9-A3E2-D5B414587F63), Current User: (Device), Strinq: (),
Enrollment Type: (0x6), Scope: (0x0).
How to Remove a Group from Compression Dictionary Transport Support Policy
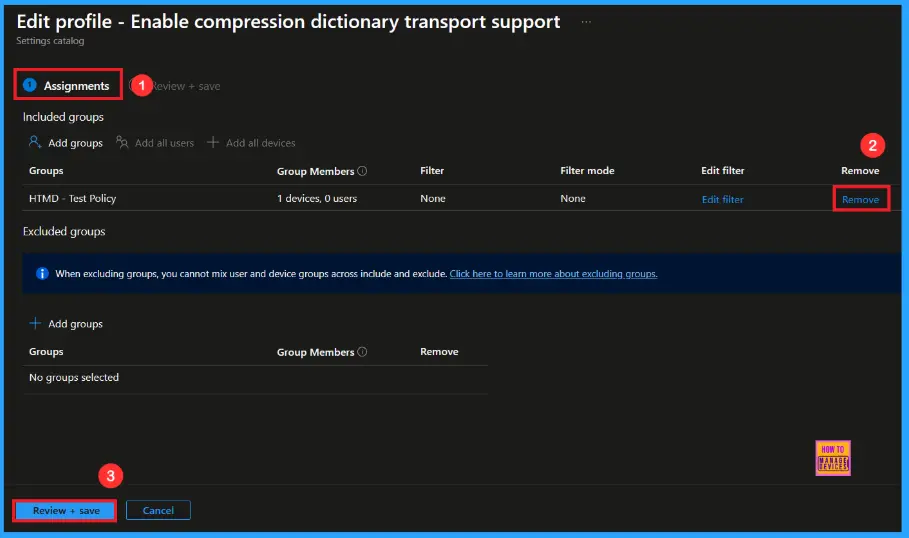
If you want to remove the specific group that you previously selected, you can easily do that. First, go to Devices > Configuration policies. In the Configuration policy section, search and select the policy. In the Assignment section, you will find an Edit option and click Remove option. Then, click the Review+ Save option.
For detailed information, you can refer to our previous post – Learn How to Delete or Remove App Assignment from Intune using by Step-by-Step Guide.
How to Delete Compression Dictionary Transport Support Policy
First, search for the policy name(Compression Dictionary Transport Support) in the configuration section. When you find the policy name, you will see a 3-dot menu next to it. Click on the 3 dots, then click the Delete button.
For detailed information, you can refer to our previous post – How to Delete Allow Clipboard History Policy in Intune Step by Step Guide.

Need Further Assistance or Have Technical Questions?
Join the LinkedIn Page and Telegram group to get the latest step-by-step guides and news updates. Join our Meetup Page to participate in User group meetings. Also, Join the WhatsApp Community to get the latest news on Microsoft Technologies. We are there on Reddit as well.
Author
Anoop C Nair has been Microsoft MVP from 2015 onwards for 10 consecutive years! He is a Workplace Solution Architect with more than 22+ years of experience in Workplace technologies. He is also a Blogger, Speaker, and Local User Group Community leader. His primary focus is on Device Management technologies like SCCM and Intune. He writes about technologies like Intune, SCCM, Windows, Cloud PC, Windows, Entra, Microsoft Security, Career, etc.

