Let’s discuss Enable Security State Policy to Prevent Data Leakage in MS Edge Browser using Intune. Enhance the security state in Microsoft Edge is a powerful settings available on Microsoft Intune to enhance the security easily.
This policy lets you enhance the security state in Microsoft Edge. If you set this policy to ‘StandardMode’, the enhanced mode will be turned off and Microsoft Edge will fallback to its standard security mode. If you set this policy to ‘BalancedMode’, the security state will be in balanced mode.
If you set this policy to ‘StrictMode‘, the security state will be in strict mode. If you set this policy to ‘BasicMode’, the security state will be in basic mode. By enabling this policy, admins can proactively reduce the organization’s attack surface. It addresses common attack vectors like JIT JavaScript vulnerabilities and memory-related exploits before they can be leveraged by attackers.
This policy is designed to enhance the overall security of your organization with Microsoft Edge. By mitigating browser-based attacks, the policy helps protect against sensitive data leakage and theft. By enabling this policy, Admins can deploy advanced security to a large number of devices.
Table of Contents
Enable Security State Policy to Prevent Data Leakage in MS Edge Browser using Intune
Tis policy is really helps for different real world scenarios. For Example, If you are an IT Admin on a Marketing company and used Microsoft Edge is the default browser. After enabling this policy on Balanced mode, balance between security and user experience.
It Provides protection against common threats from malicious, less-frequently-visited websites without disrupting the performance or functionality of the everyday sites that employees rely on for their work (e.g., Microsoft 365, internal portals, and social media platforms).
- Enable AI Enhanced Search in History Policy in Microsoft Edge to Controls Data Privacy using Intune
- Intune Security Policy to Set Up Smart Screen Enhanced Phishing Protection
- Enable Additional Search Box in MS Edge for Better Search Experience using Intune
Steps to Start Policy Creation
By signing in Microsoft Intune admin center, you can start configuring Tab Lifecycles Policy Policy. Open the Microsoft Intune Admin center. Go to Devices > Configuration > +Create >+ New Policy.
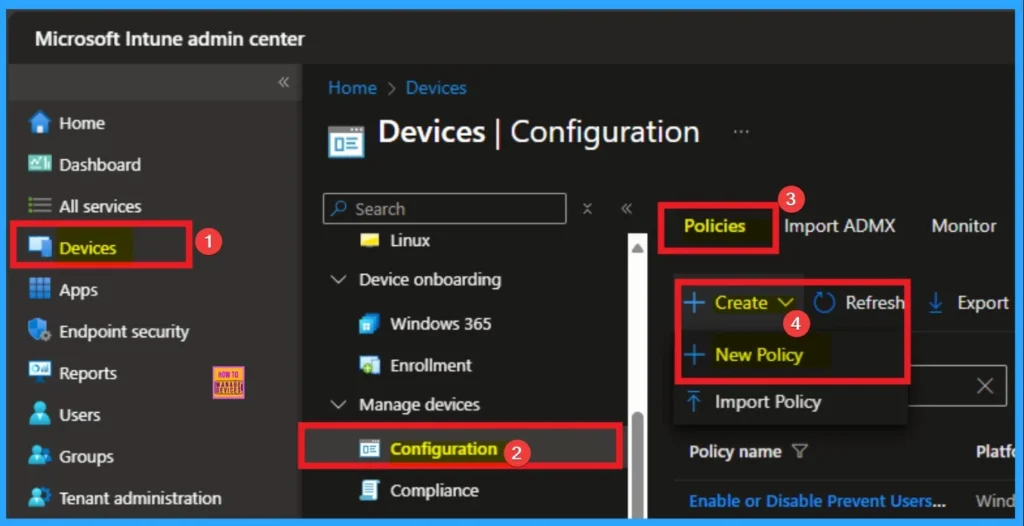
Profile Craetion
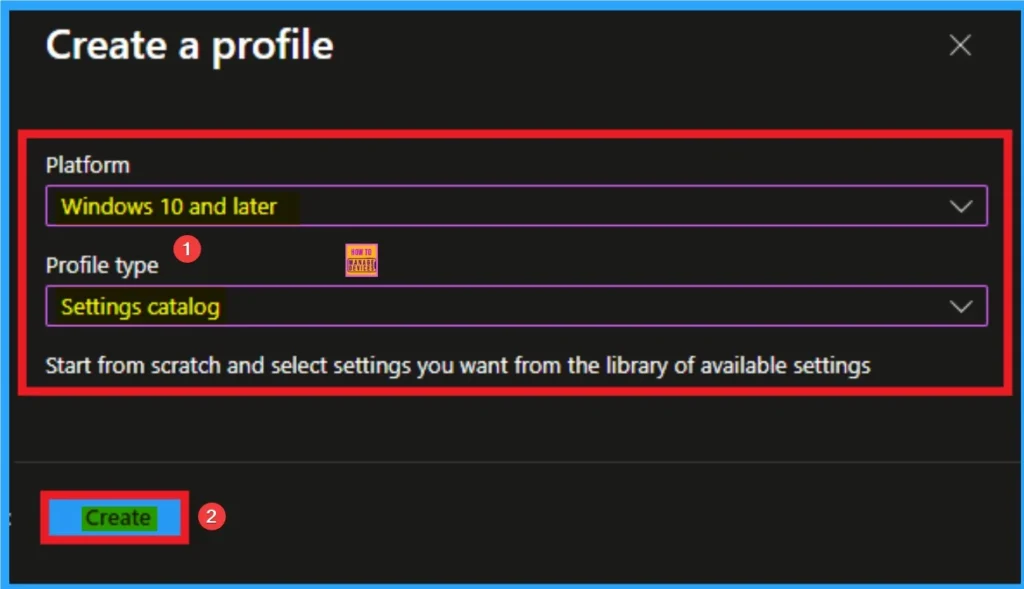
After that, you have to select platform and profile. It is important to select the platform and profile before configuring the policy. Here, I selected Windows 10 and later as the Platform and Settings catalog as the profile type. Then click on the Create button. Then you will get the basic tab.
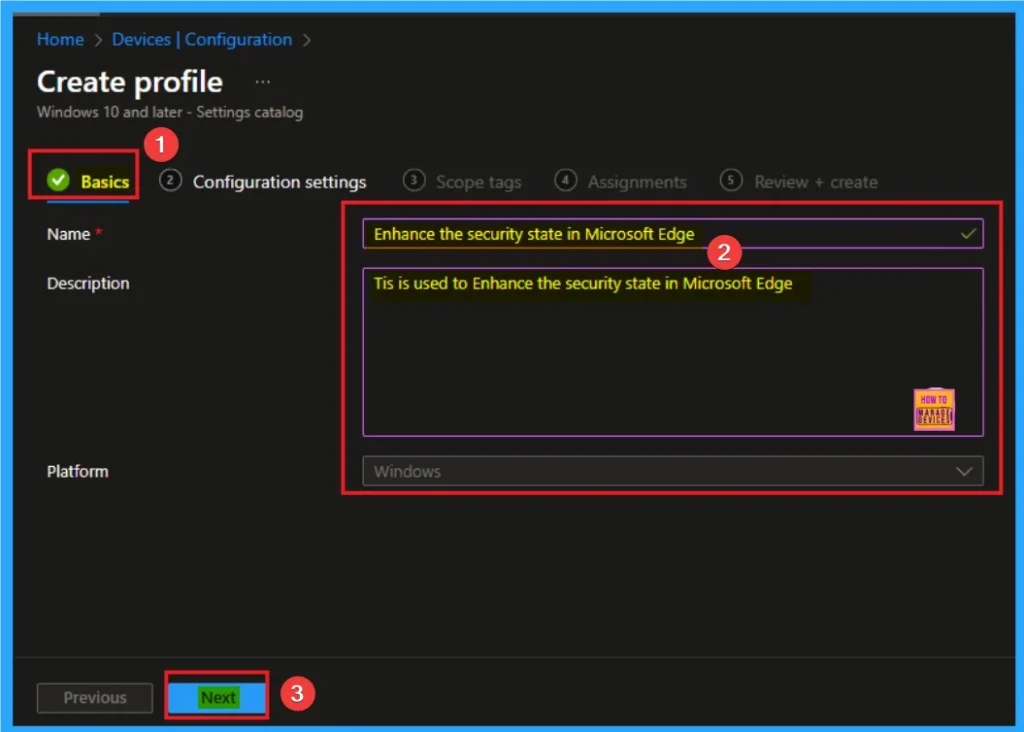
Filling Basic Tab
Basic details is necessary and important in policy creation. It gives an identify for the settings you will select to create the policy. Policy name and description is useful for identifying the policy purpose. After adding this, click on the Next button.
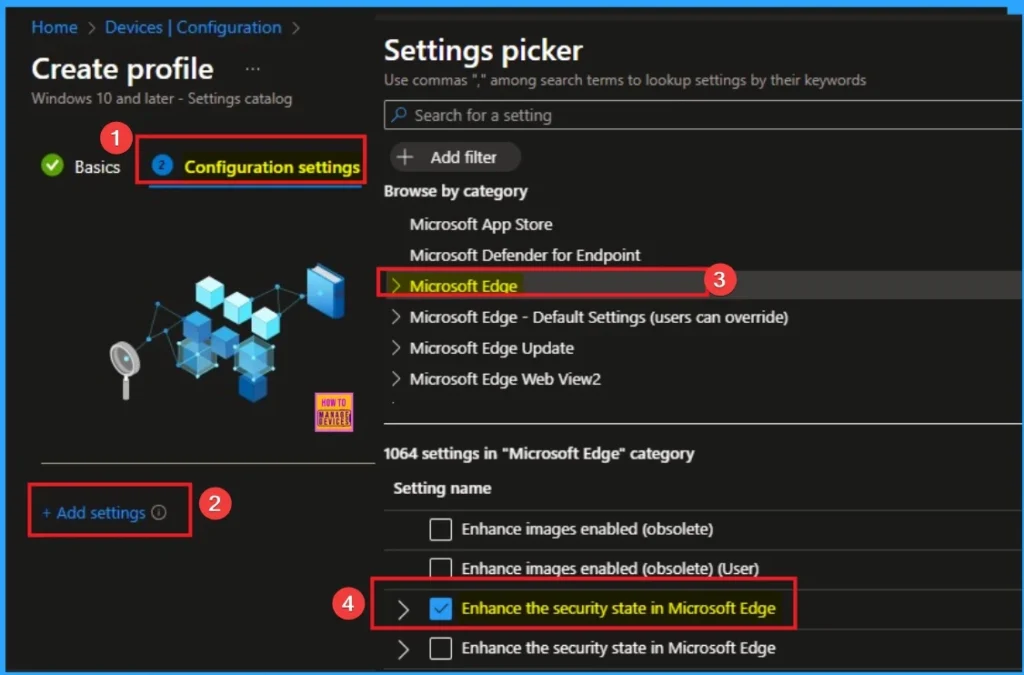
Configure the settings from Settings Picker
Using configuration settings tab, you can access the specific settings. For this you have to click on the +Add settings hyperlink to get the settings picker. From the Settings Picker I choose Microsoft Edge category and select the Enhance the security state in Microsoft Edge. Then you can close settings picker.
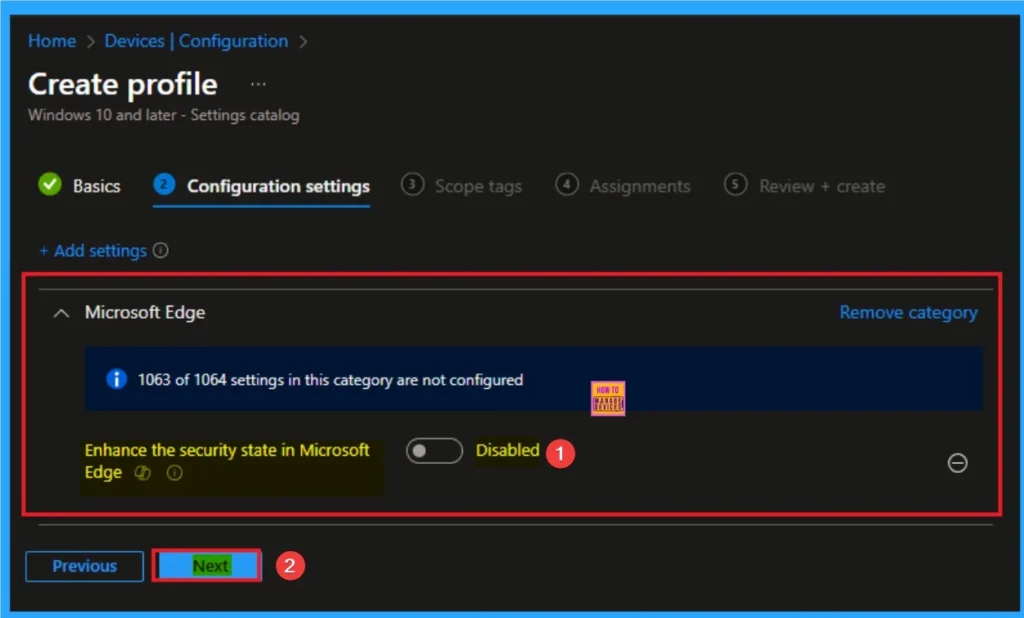
Disable Enhance the Security State in Microsoft Edge
Disabling the policy ensures that legacy or business-critical web applications rely on technologies that may function properly. Te disable is the default value of this policy. If you want to go with this value, click on the Next button.
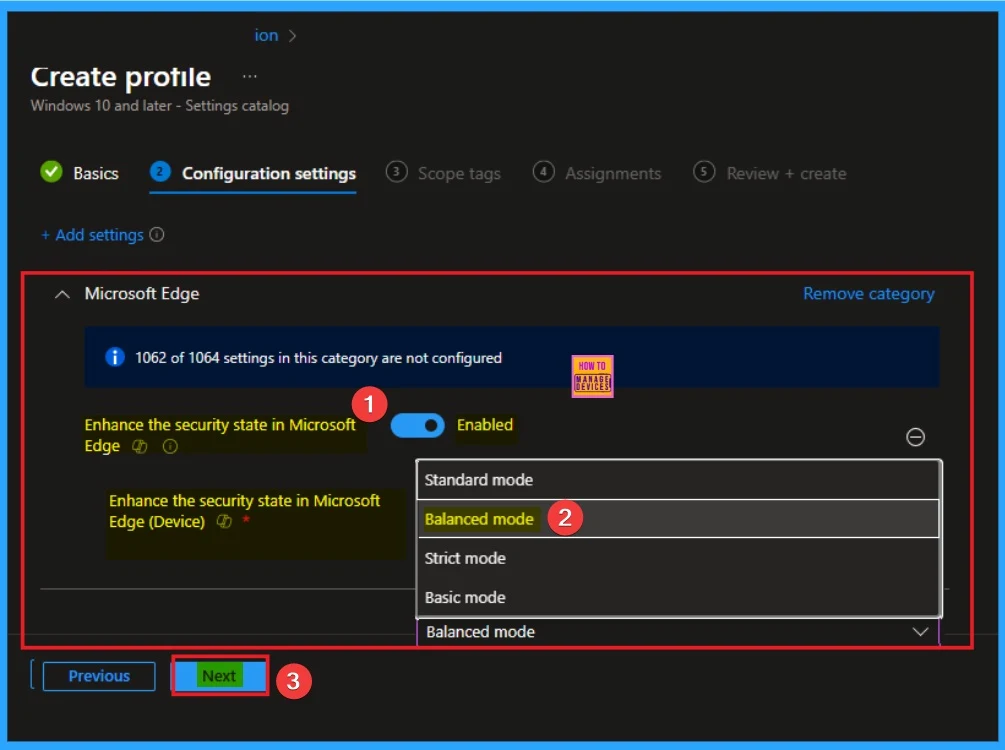
Enable Enhance the Security State in Microsoft Edge
ESM enables additional operating system protections like Arbitrary Code Guard (ACG) and Hardware-enforced Stack Protection. You can enable this policy on 4 modes, like Balanced mode, Strict mode and Basic mode. You can choose any this value according to the preferences.
| Values | Details |
|---|---|
| Standard Mode (0) | When this mode is selected, Microsoft Edge falls back to its default, standard security settings. This mode is used when an organization needs to ensure maximum compatibility with all websites, especially legacy web applications or sites that rely heavily on JIT compilation for performance. |
| Balanced Mode (1) | The purpose of Balanced Mode is to provide a practical balance between security and compatibility. This is the most suitable mode for most enterprise environments. |
| Basic Mode (3) | The purpose of Basic Mode was to offer a baseline of enhanced security, but it has since been deprecated. As of Microsoft Edge version 113, Basic Mode is treated the same as “Balanced Mode.” |
| Strict Mode (2) | The purpose of Strict Mode is to provide the highest level of security for browsing, regardless of website compatibility. This mode is used in highly sensitive or secure environments, such as government agencies, financial institutions, or research organizations that handle classified or extremely valuable data. |
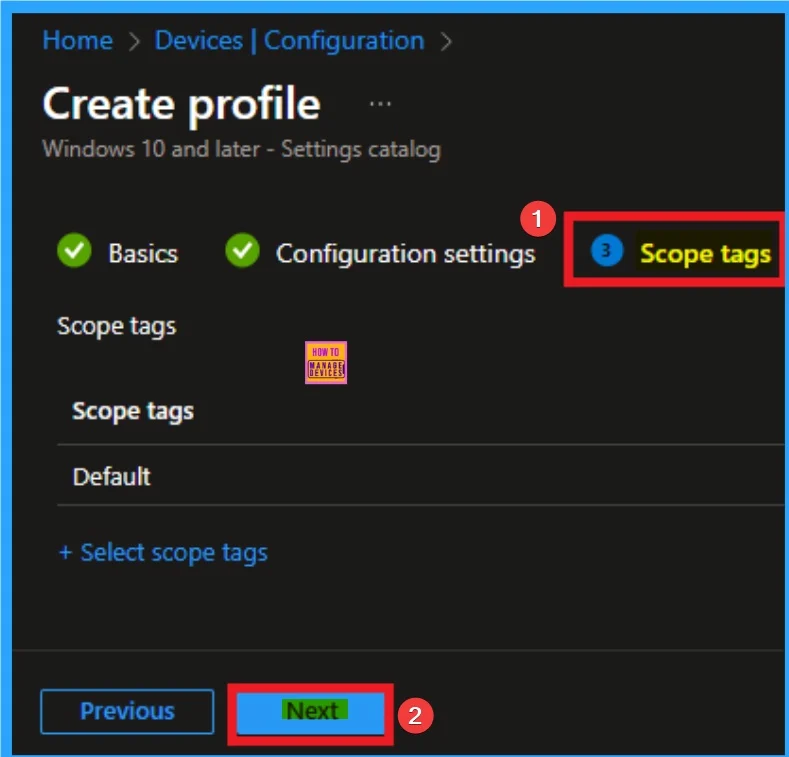
Scope Tags for Policy
With scope tags, you create a restriction to the visibility of the Enhance the Security State in Microsoft Edges. It also helps to organise resources. Here, I would like to skip this section, because it is not mandatory. Click on the Next button.
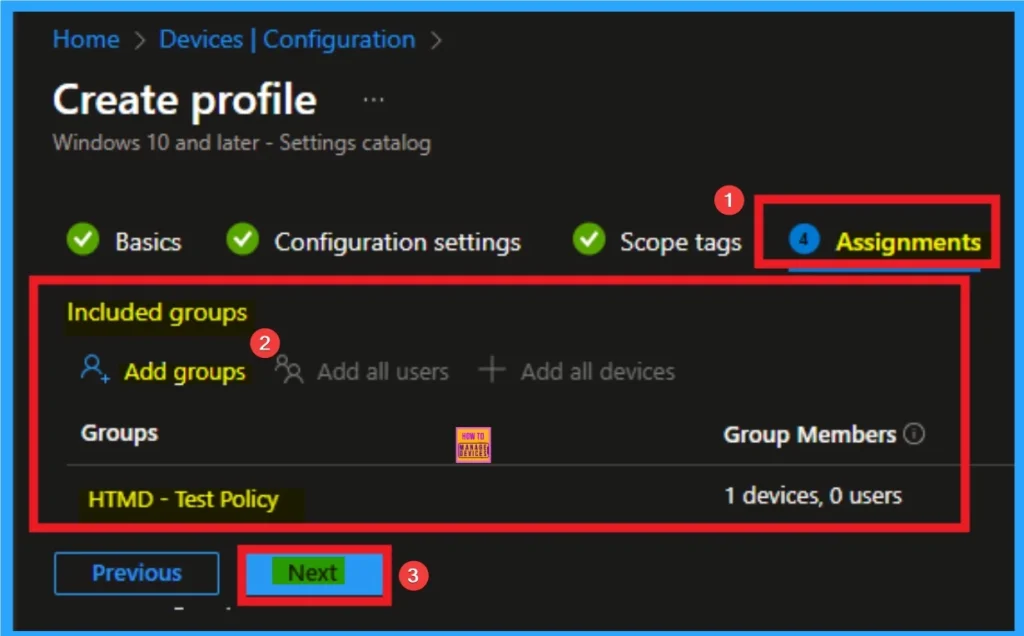
Assigning Specific Groups
To assign the policy to specific groups, you can use the Assignment Tab. Here I click, +Add groups option under Included groups. I choose a group from the list of groups and click on the Select button. Again, I click on the Select button to continue.
Review + Create Tab for Policy Creation
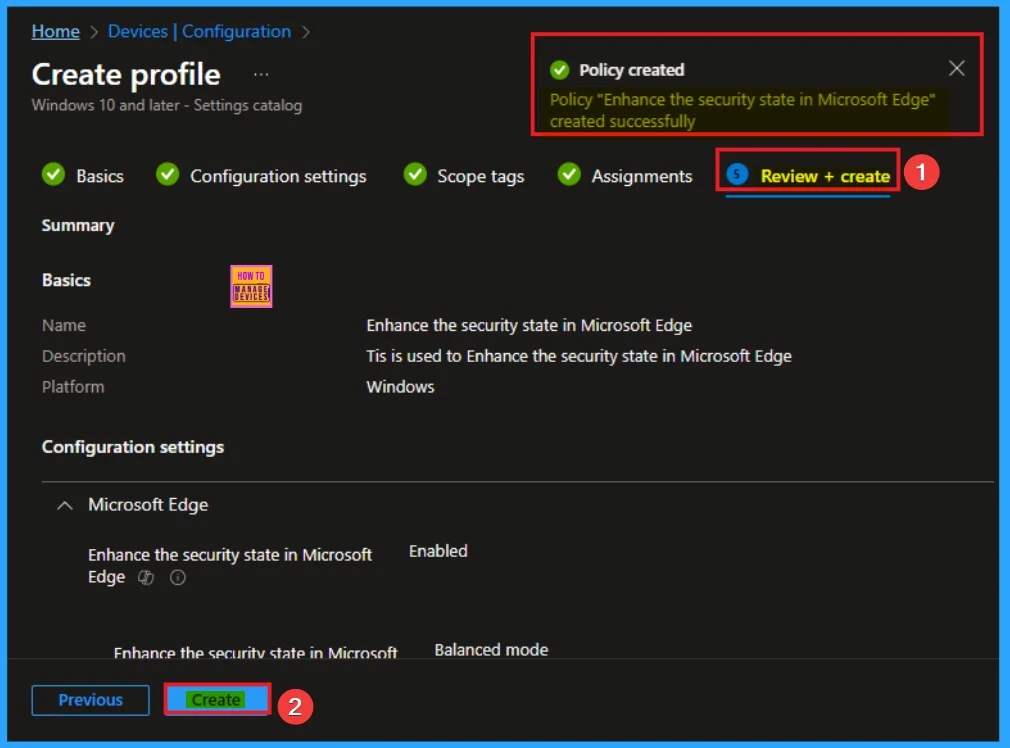
Review + Create Tab helps you recheck all the details of the policy you entered on all the tabs. After verifying all the details, click on the Create Button. After creating the policy, you will get a success message.
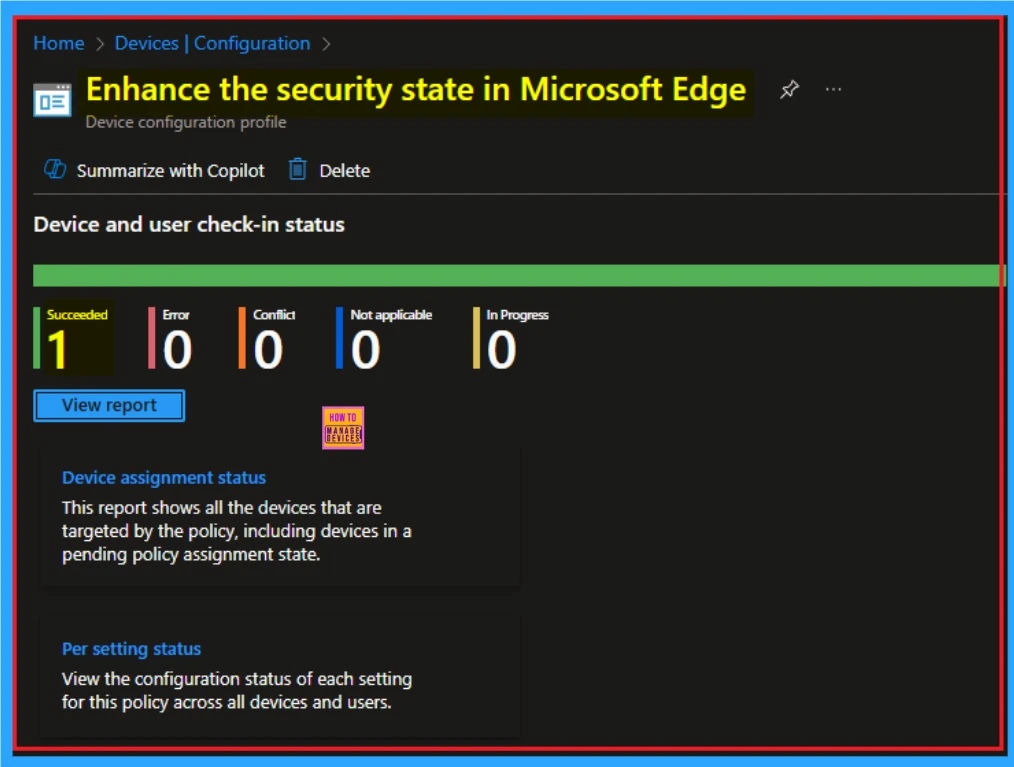
Device Check-in Status
After the policy created you can check the status on the Intune Portal. It helps you to know if the policy suceeded or not. Open the Intune Portal. Go to Devices > Configuration > Search for the Policy. Here, the policy shows as successful.
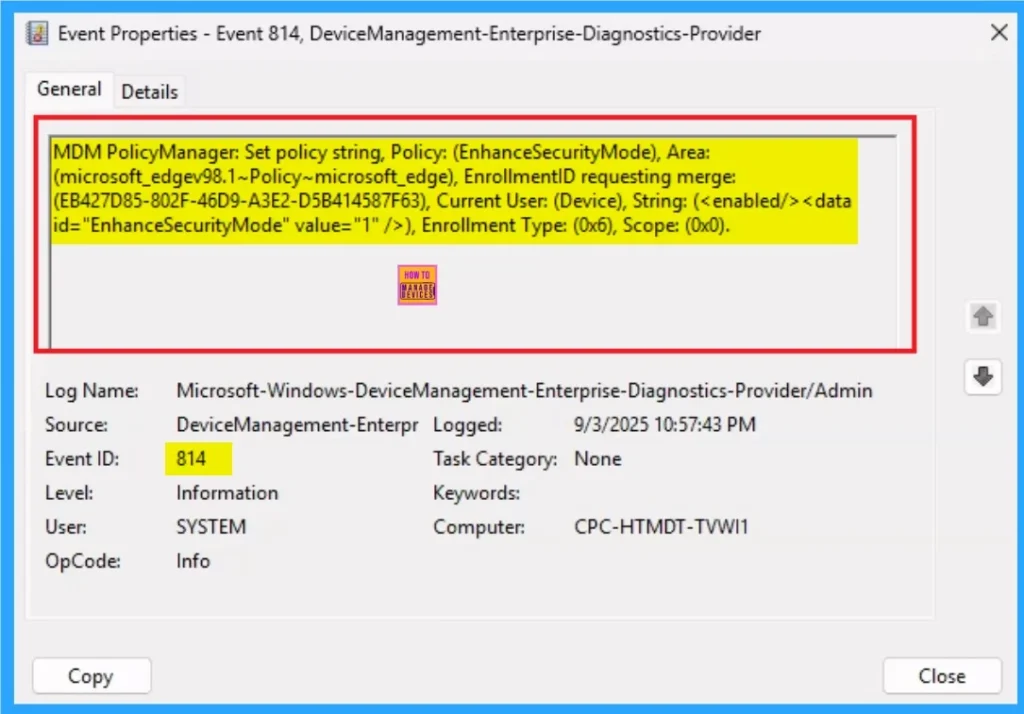
Event Viewer Details
Event Viewer helps you check the client side and verify the policy status. Open the Client device and open the Event Viewer. Go to Start > Event Viewer. Navigate to Logs: In the left pane, go to Application and Services Logs > Microsoft > Windows > DeviceManagement-Enterprise-Diagnostics-Provider > Admin
- Filter for Event ID 814: This will help you quickly find the relevant logs.
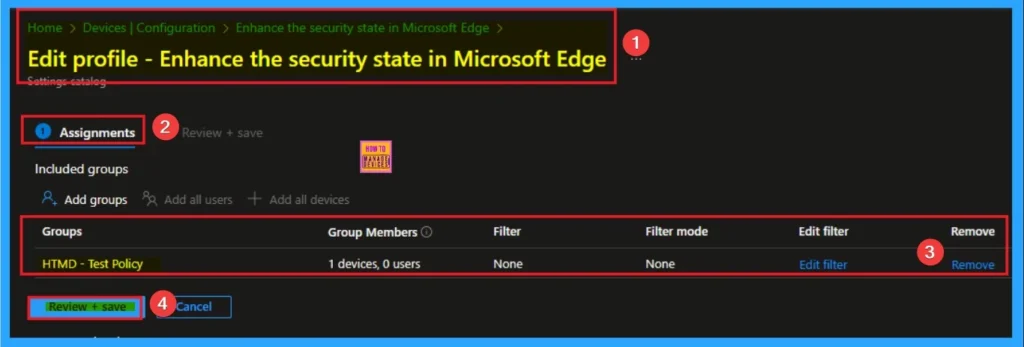
Removing the Assigned Group from these Settings
If you want to remove the Assigned group from the policy, it is possible from the Intune Portal. Some times admins forced to remove assigned group. To do this, open the Policy on Intune Portal and edit the Assignments tab and the Remove Policy.
To get more detailed information, you can refer to our previous post – Learn How to Delete or Remove App Assignment from Intune using by Step-by-Step Guide.
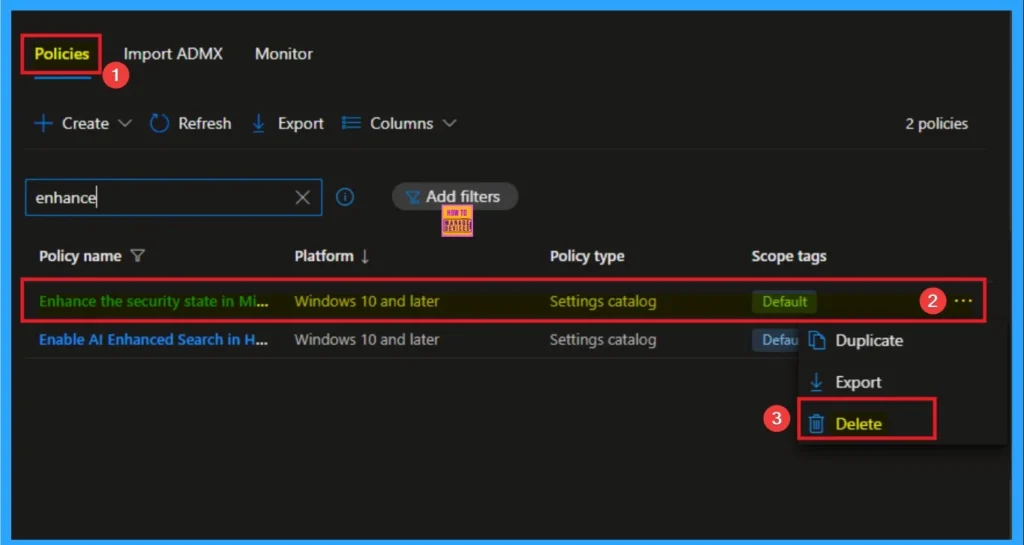
How to Delete Security State Policy
You can easily delete the Policy using the Intune Portal. From the Configuration section, you can delete the policy. It will completely remove it from the client devices. You can check the below screenshot for more clarity.
For detailed information, you can refer to our previous post – How to Delete Allow Clipboard History Policy in Intune Step by Step Guide.
Need Further Assistance or Have Technical Questions?
Join the LinkedIn Page and Telegram group to get the step-by-step guides and news updates. Join our Meetup Page to participate in User group meetings. Also, Join the WhatsApp Community to get the latest news on Microsoft Technologies. We are there on Reddit as well.
Author
Anoop C Nair has been Microsoft MVP for 10 consecutive years from 2015 onwards. He is a Workplace Solution Architect with more than 22+ years of experience in Workplace technologies. He is a Blogger, Speaker, and Local User Group Community leader. His primary focus is on Device Management technologies like SCCM and Intune. He writes about technologies like Intune, SCCM, Windows, Cloud PC, Windows, Entra, Microsoft Security, Career, etc.
