Today we are discussing onRestrict Users from Viewing Additional Results in Windows Search using Intune Policy. It controls whether the “See more results” or “Search Everywhere” link appears when a user searches in the Start menu search box. This policy helps organizations manage how search results are displayed to users and whether they can extend their search beyond the local device.
In the Settings Catalog, this policy can be found under the Start Menu and Taskbar category. The Settings Catalog in Intune is a helpful tool that allows administrators to easily search for, configure, and apply different Windows settings across devices.
It simplifies the process of managing multiple settings in one place, including search, taskbar, and start menu configurations. When you enable this policy, users will not see the “See more results” or “Search Everywhere” link when they search for something in the Start menu. This means their search results will be limited to what appears directly in the Start menu and won’t offer an option to expand or explore further.
If you disable or do not configure the policy, the See more results link will appear. This allows users to click on it and view a wider range of results, helping them find files, settings, or apps that may not show up immediately. It gives them more flexibility in exploring search results on their device.
Table of Contents
How this Policy Helpful to the Organization?
This policy is useful for organizations that want to maintain a controlled search experience for users. For example, some organizations may want to limit search to local files and applications only to prevent unnecessary distractions.
Restrict Users from Viewing Additional Results in Windows Search using Intune Policy
In real-world use, educational institutions or workplaces often enable this setting to simplify the search interface for students or employees. This policy allows administrators to enforce a consistent and secure behavior across all devices. For start policy creation sign in to Microsoft Intune admin center.
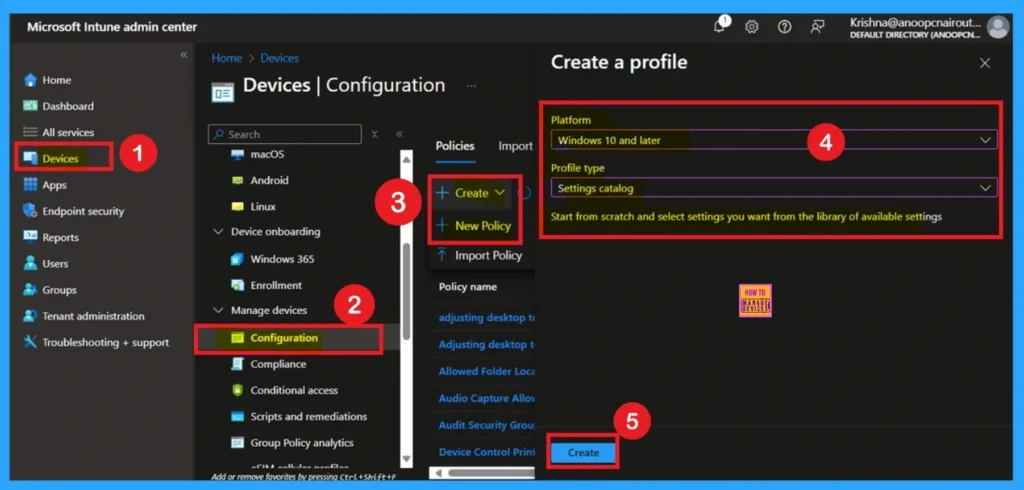
Then go to Devices > Configuration > +Create >+ New Policy. Choosing Platform and Profile is the next step after selecting New policy. It is very necessary step to effectively configure the policy to appropriate platform.
- Easy way to Enable Energy Saver Battery Threshold On Battery in Intune Settings Catalog
- How to Clear the Start Menu Recommended Section in Windows 11
- How to Show or Hide Recent Jumplists on Windows Start Menu and Taskbar using Intune Policy
What are Basics
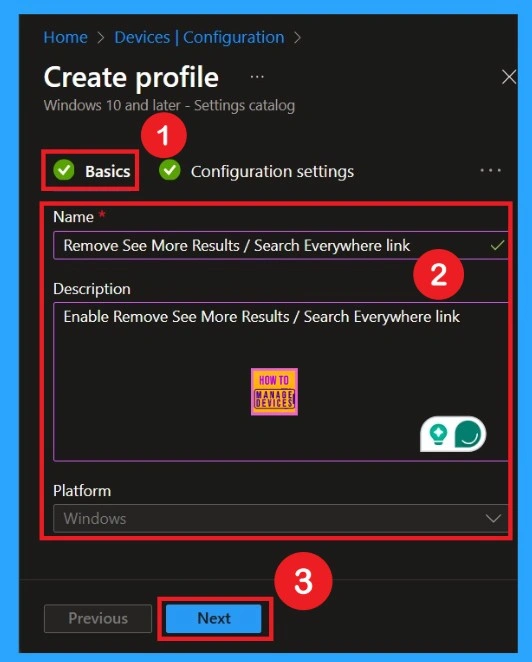
The Basics tab is the quickest step. Here, you need to enter the basic details such as the Name, Description, and Platform information. Since the platform is already set as Windows and you only need to provide a specific name and description for the policy, then click Next.
Configuration Settings
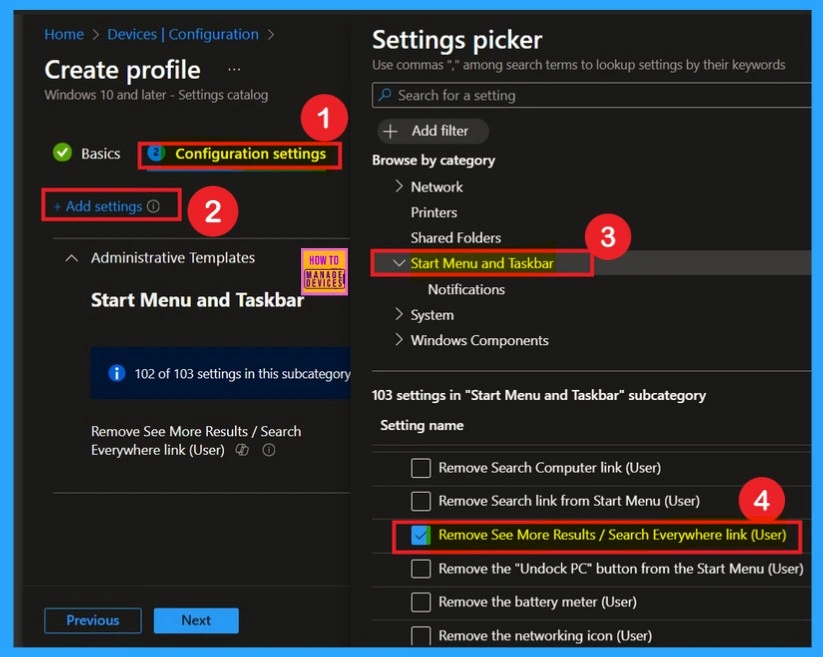
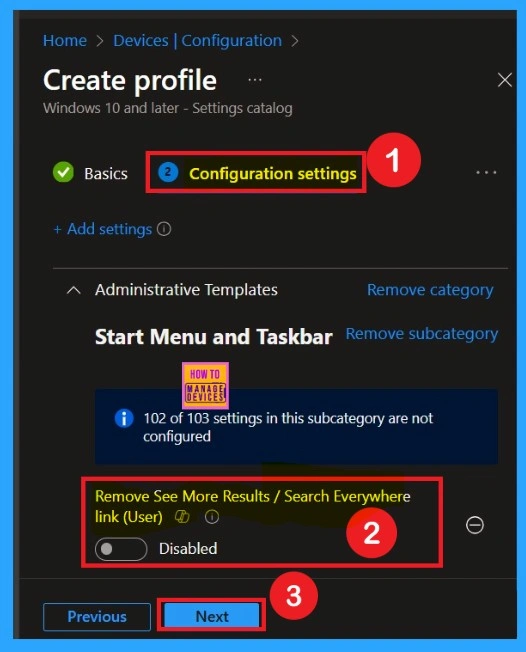
The next step is the configuration settings an important step in configurations. Here you can see the + Add settings click on that and now you will get all the policies categories in the settings picker then select the Administrative Templates then click on the Start menu and taskbar. Now select the policy Remove See More Results / Search Everywhere link (User).
Disabled Policy Mode
After selecting the policy, you can now close the Settings Picker window. You will return to the Configuration Settings page, where you can see that the policy is currently set to Disabled by default. If you want to proceed without making any changes, simply click Next to continue.
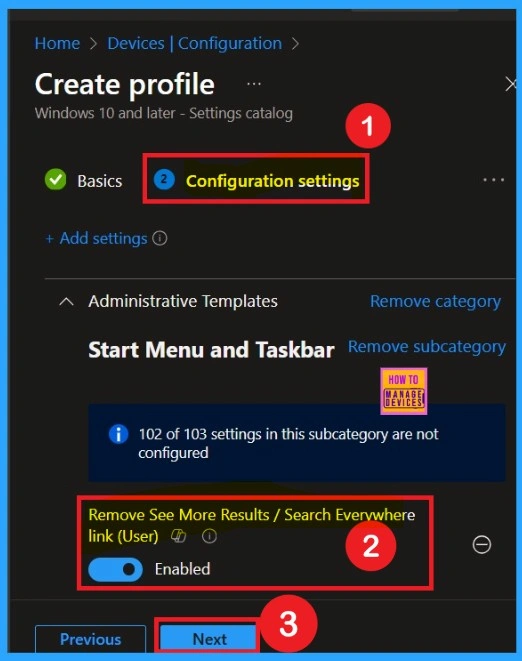
Enable the Policy
You can also enable a policy that is disabled by default. To do this, toggle the switch from left to right. Once enabled, the switch will turn blue and display the label Enabled.
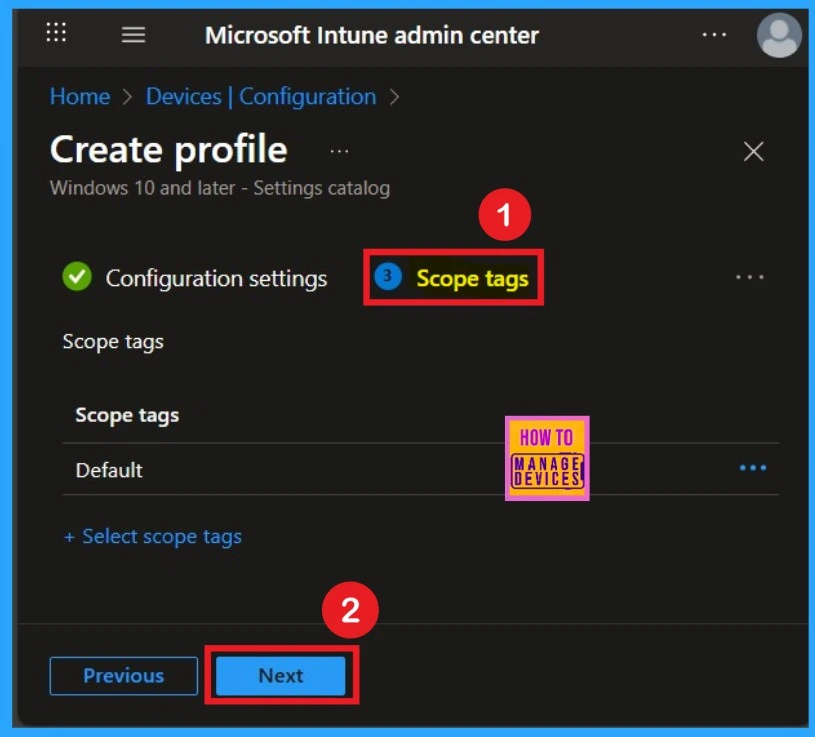
Scope Tags
Now you are on the Scope tags section. Scope tags are used to assign policies to specific admin groups for better management and filtering. If needed, you can add a scope tag here. However, for this policy, I chose to skip this section.
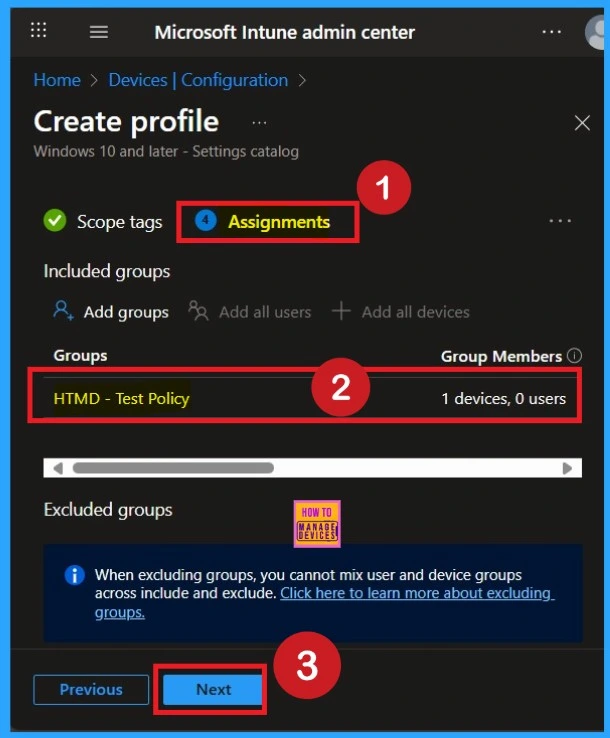
Selecting Group from the Assignment Tab
To assign the policy to specific groups, you can use the Assignment Tab. Here I click, +Add groups option under Included groups. I choose a group from the list of groups and click on the Select button. Again, I click on the Select button to continue.
Review + Create Tab
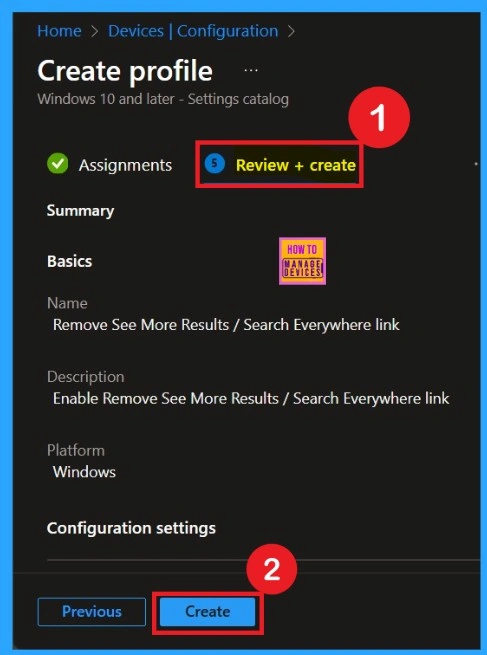
Finally, in the Review + Create tab of the Restrict Users from Viewing Additional Search Results using Intune Policy. You can go through all the details you’ve entered and like the policy name, settings, scope tags, and assignments. If everything looks correct, click on Create to finish the setup. Once created, the policy will be deployed to the assigned devices, and the Add New Programs button will be removed automatically.
Monitoring Status
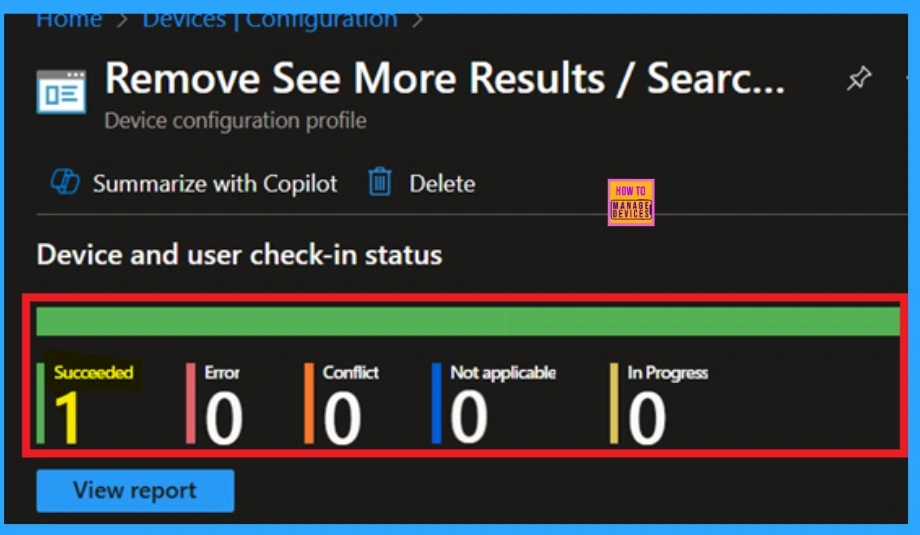
After the policy is created, the main concern is whether it has been successfully deployed. Typically, it can take up to 8 hours for the policy to apply. This is the minimum waiting period. However, you can manually sync the policy through the Company Portal, which helps to apply the policy more quickly. To check if the policy has been successfully deployed.
- Click on the policy to view its deployment status and detail
- Sign into the Microsoft Intune Admin Center.
- Navigate to Devices > Configuration Policies.
- In the Configuration Policies list, look for the policy you created.
Event Viewer Results
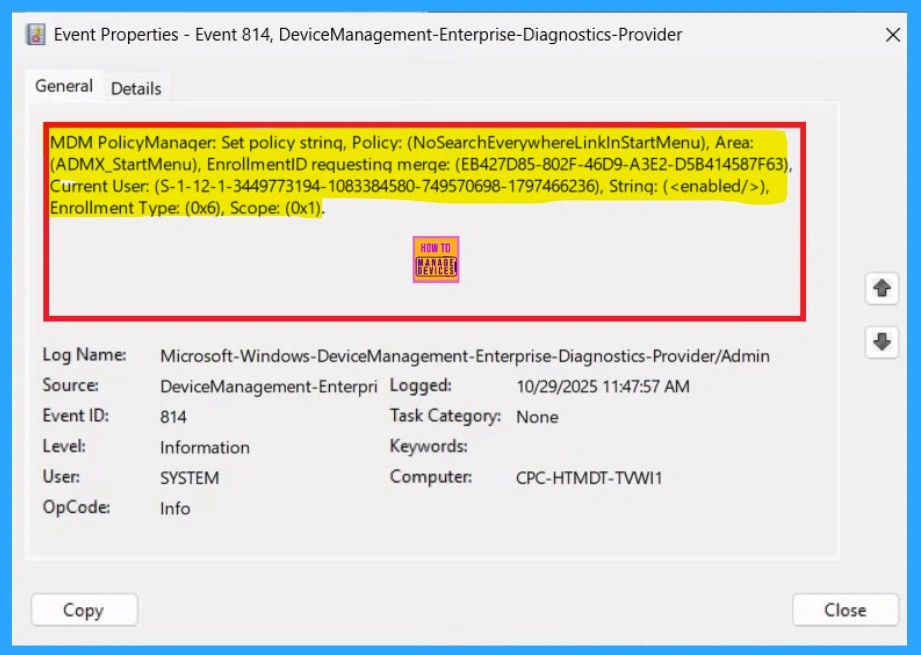
To get the client-side verification, open the Event Viewer and navigate to Applications and Services Logs > Microsoft > Windows > Device Management > Enterprise Diagnostic Provider > Admin. Once there, you can search for specific policy results by using the Filter Current Log feature located in the right pane. This helps quickly get the relevant results within the log.
| Policy Details |
|---|
| MDM PolicyManager: Set policy string, Policy: (NoSearchEverywhereLinkInStartMenu), Area: (ADMX_StartMenu), EnrollmentID requesting merqe: (EB427D85-802F-46D9-A3E2-D5B414587F63), Current User: (S-1-12-1-3449773194-1083384580-749570698-1797466236), Strinq: (), Enrollment Type: (0x6), Scope: (0x1). |
How to Remove Policy Group
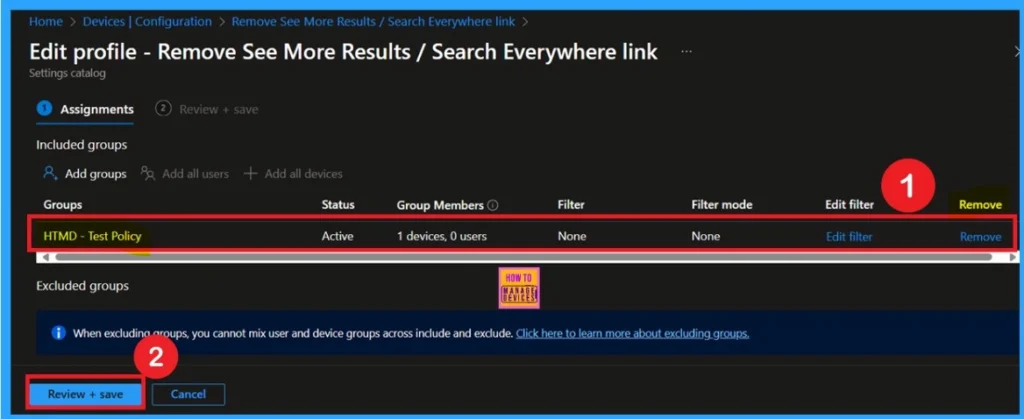
Start by navigating to the Monitoring status page via Devices > Configuration. Search for the policy by name and click on it to open its monitoring details. Scroll down to the Assignments section and click Edit. This will take you back to the policy’s assignment settings.
- From here, you can remove the group you no longer want the policy to apply to.
Delete the Policy
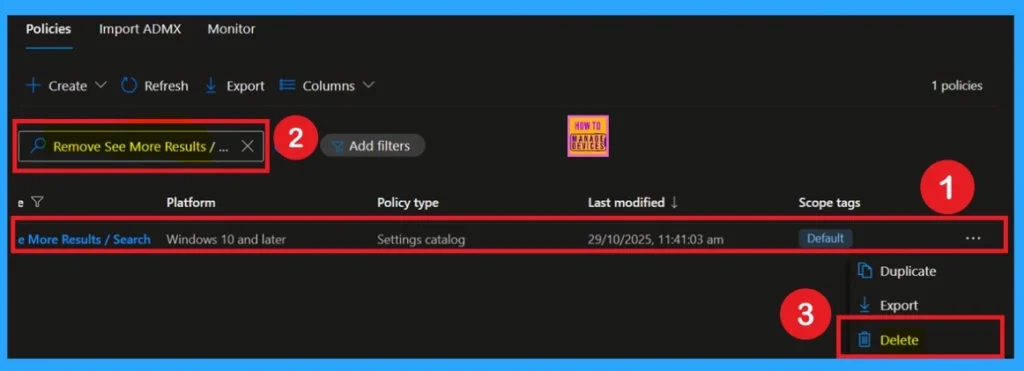
To delete a policy in Microsoft Intune, first sign in to the Microsoft Intune Admin Center. Navigate to Devices and then select Configuration. Locate and select the specific policy you want to remove. Once you’re on the policy details page, click the 3 -dot menu in the top right corner and choose Delete from the available options.
Need Further Assistance or Have Technical Questions?
Join the LinkedIn Page and Telegram group to get the latest step-by-step guides and news updates. Join our Meetup Page to participate in User group meetings. Also, Join the WhatsApp Community to get the latest news on Microsoft Technologies. We are there on Reddit as well
Author
Anoop C Nair has been Microsoft MVP from 2015 onwards for 10 consecutive years! He is a Workplace Solution Architect with more than 22+ years of experience in Workplace technologies. He is also a Blogger, Speaker, and Local User Group Community leader. His primary focus is on Device Management technologies like SCCM and Intune. He writes about technologies like Intune, SCCM, Windows, Cloud PC, Windows, Entra, Microsoft Security, Career, etc

