
Key Takeaways
- Microsoft has introduced auto-deprovisioning for Windows 365 Reserve Cloud PCs in Public Preview.
- The new setting helps organizations manage their 10-day Reserve Cloud PC entitlement more effectively.
- Administrators can automatically deprovision inactive Reserve Cloud PCs based on a configured number of days.
- Auto-deprovisioning is disabled by default and must be enabled through Microsoft Intune.
In this post we are discussing Enable Auto-Deprovisioning for Windows 365 Reserve Cloud PCs using Microsoft Intune. Microsoft has introduced a new auto-deprovisioning feature for Windows 365 Reserve Cloud PCs, which is now available in Public Preview. This optional setting helps organizations make better use of the 10-day entitlement provided for a Reserve Cloud PC. It does this by automatically managing Cloud PCs that have been provisioned but are not being used. With this feature, administrators can set a specific number of days after which an inactive Reserve Cloud PC will be automatically deprovisioned.
Table of Contents
Table of Contents
Enable Auto-Deprovisioning for Windows 365 Reserve Cloud PCs using Microsoft Intune
This means that if a Cloud PC is provisioned but the user does not connect to it within the configured period, it will be deprovisioned automatically. This helps organizations avoid keeping unused Cloud PCs provisioned and reduces the need for administrators to check them manually.
- Guide to Prepare Windows 365 Cloud Apps using file paths of Any Application
- What is New Windows Autopilot Device Association AKA Autopilot v2?
- Provision Windows 365 Newly Introduced 32 vCPU Cloud PC using Intune
How to Configure Auto-Deprovisioning for Windows 365 Reserve Cloud PCs in Intune
Administrators can manage this feature through the Cloud PC configuration settings for Windows 365 in the Intune admin center. They can turn on auto-deprovisioning, choose the number of inactive days. his gives IT administrators better control over which users will receive this setting and how inactive Reserve Cloud PCs are managed. First, sign in to the Microsoft Intune admin center. From the left navigation pane, select Devices. Under Manage Windows 365 Cloud PCs, select Cloud PCs settings to access the available Cloud PC configuration options.
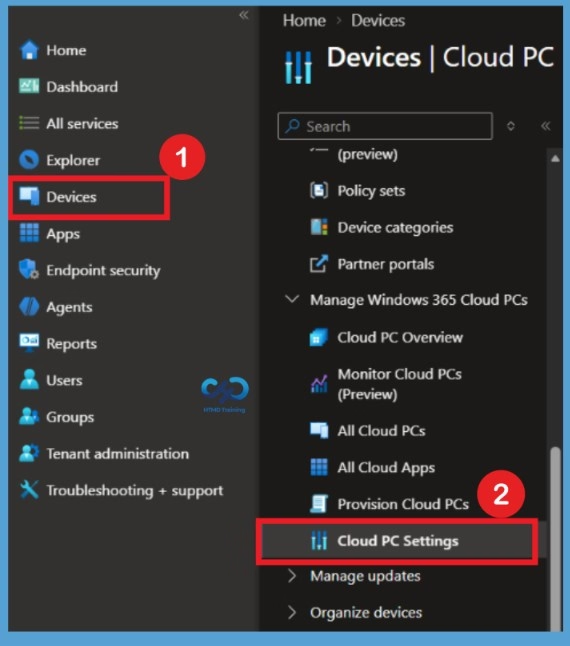
Create Cloud PC Configuration Settings
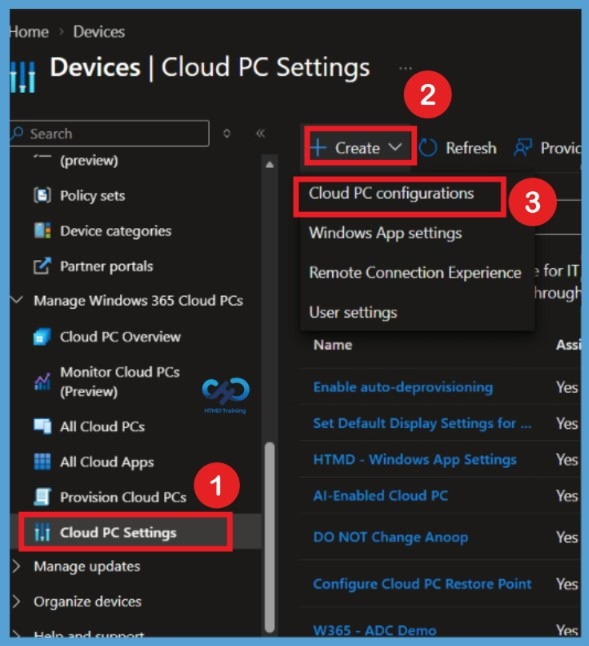
After selecting Cloud PCs settings from the left navigation menu, you will see the + Create option. Click + Create to view the available configuration options. From the list, select Cloud PC configurations to proceed with creating a new Cloud PC configuration.

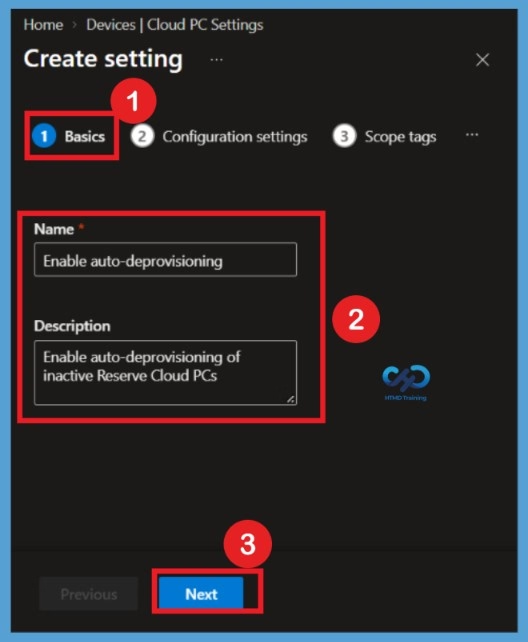
Basic Tab
After selecting Cloud PC configurations, you will be directed to the Basics tab, where you need to enter the configuration name and description. Here, I entered the name as Enable Auto Reprovisioning and the description as Enable auto reprovisioning of inactive reserved Cloud PCs. After entering the required details, click Next to proceed to the Configuration settings tab.
Configuration settings
After completing the Basics tab you will be directed to the Configuration settings page. Here, you can find different configuration settings, such as AI-enabled features and Enable Local Admin. You can also find the Auto deprovision reserved Cloud PCs setting, which is set to Not configured by default. This setting allows administrators to configure automatic deprovisioning for inactive reserved Cloud PCs. By changing this setting, you can define the inactivity threshold that determines when a reserved Cloud PC becomes eligible for automatic deprovisioning.
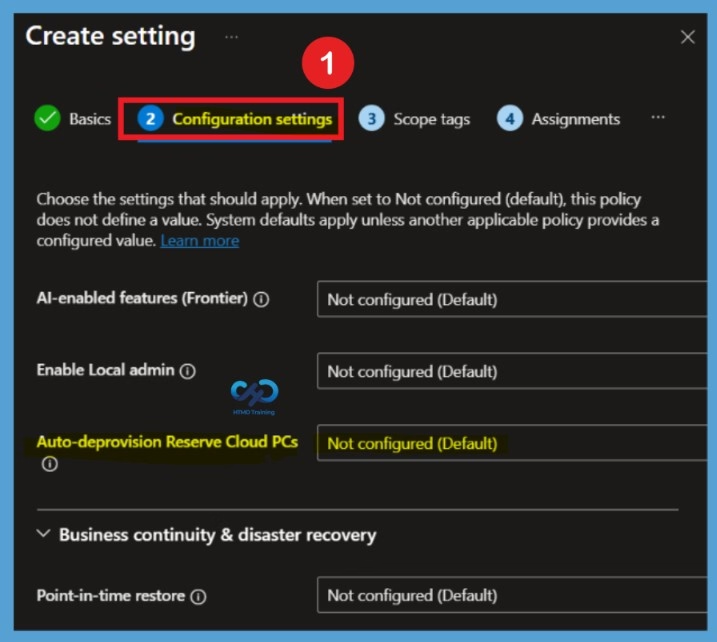
Enable Auto-Deprovisioning
Now, we need to enable auto deprovisioning for reserved Cloud PCs. To do this, click the drop-down arrow under the Auto deprovision reserved Cloud PCs setting and select Enabled. Once enabled, you will see a message explaining that “reserved Cloud PCs exceeding the configured deprovisioning threshold will be automatically deprovisioned and will require reprovisioning before they can be used again. The remaining reserved Cloud PC access days will be preserved for use after reprovisioning”.
- You will also find an option to specify the number of days for which Cloud PCs can remain provisioned without an active connection.
- Here, I entered 3 days as an example to configure the inactivity threshold.
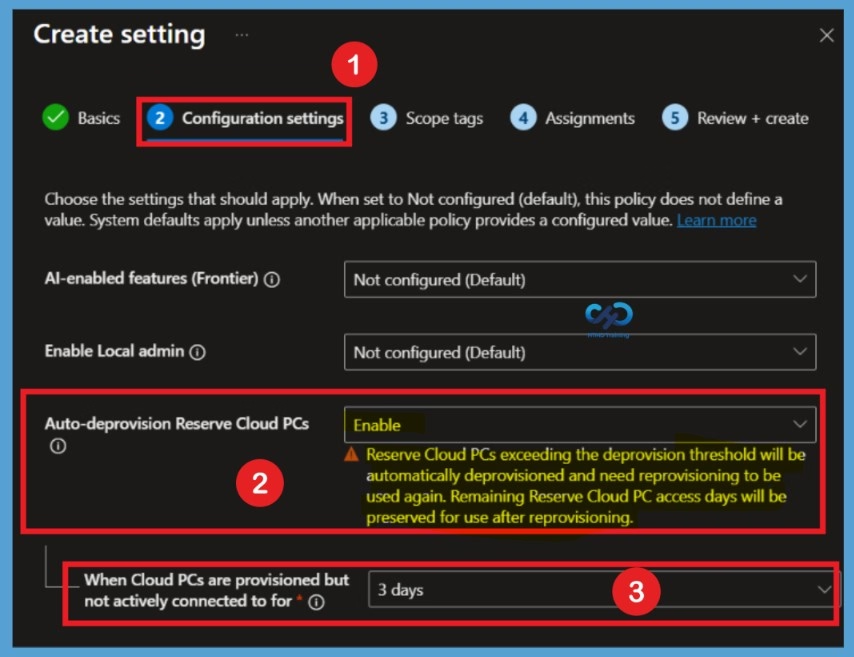
Scope Tags
In the next step, you will be directed to the Scope tags page, where the Default scope tag is already selected. If required, you can add another scope tag to control to this configuration. For this example, I selected London as the scope tag and clicked Next to proceed with the next step.
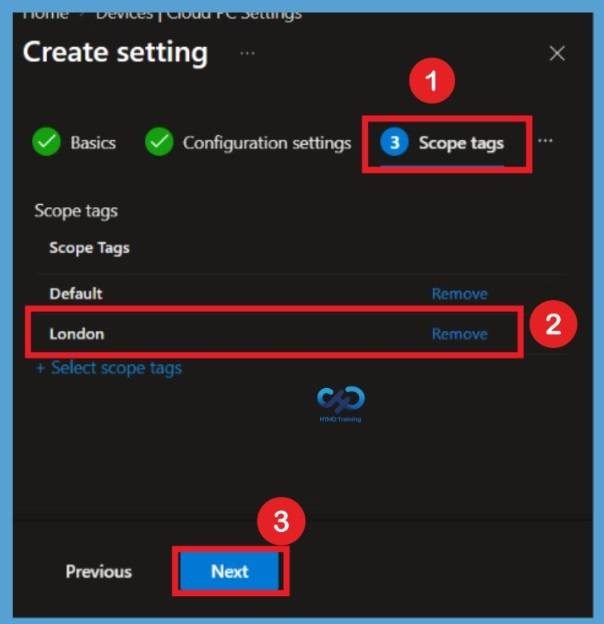
Assignments
In the next step, you will be in to the Assignments page, where you can assign the configuration to specific Microsoft Entra ID user groups. Here, I selected the HTMD CPC Test group as an example. After selecting the required group click Next to proceed with the other configuration steps.
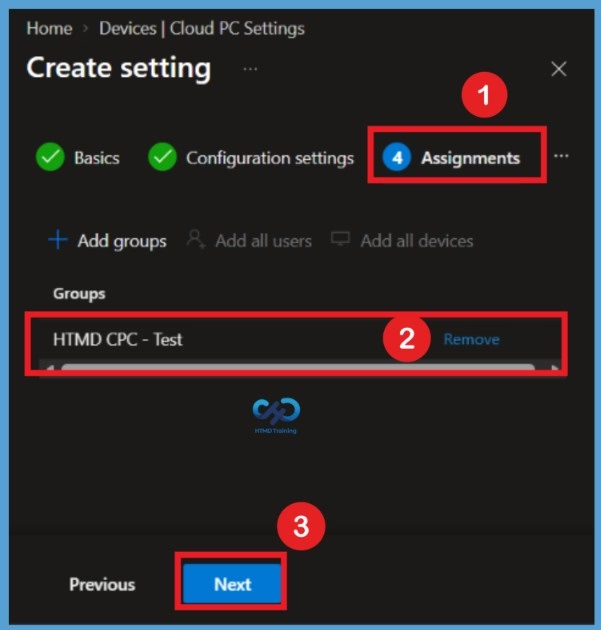
Review + Create
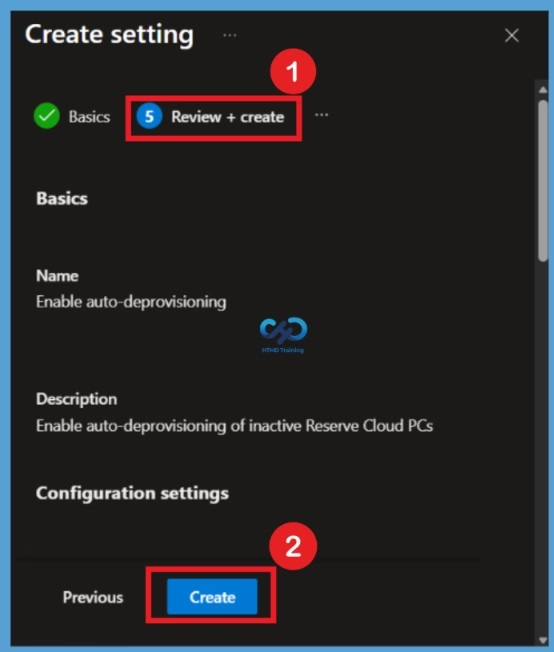
The next step is the Review + Create tab which displays a summary of all the configuration details, including Basics, Configuration settings, Scope tags, and Assignments. Review the information carefully to ensure that all the selected settings are correct. If you want to make any changes, you can go back to the previous sections and edit the details. Otherwise, click Create to complete the Cloud PC configuration.
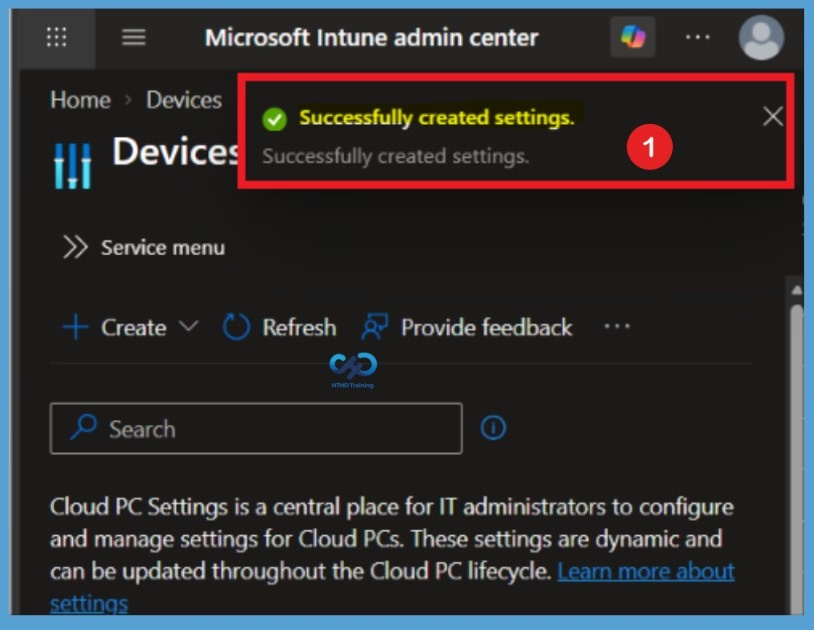
After clicking Create, you will receive a notification confirming whether the Cloud PC configuration was successfully created. If the configuration fails, the notification will also show the failure. Once you have reviewed the notification, you can close it and return to the Cloud PC configurations page.
Verify the Cloud PC Configuration
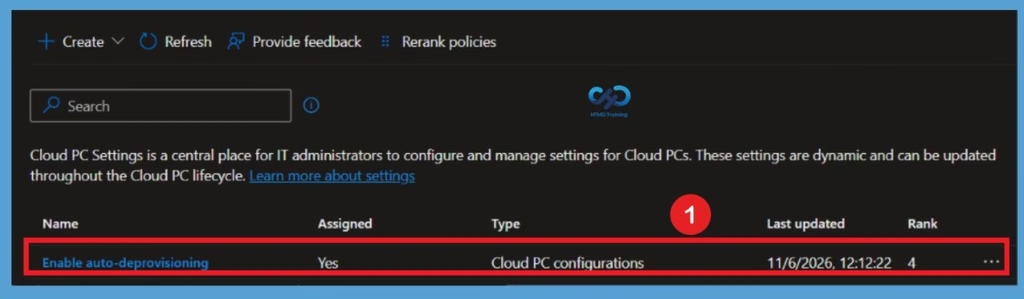
To verify the configuration, navigate back to the Cloud PCs settings page in the Intune admin center. Here, you can see that the Enable Auto Reprovisioning configuration has been successfully created and assigned to the selected group. The newly created configuration should appear in the Cloud PC settings list along with its assignment details.
Manually Return a Windows 365 Reserve Cloud PC
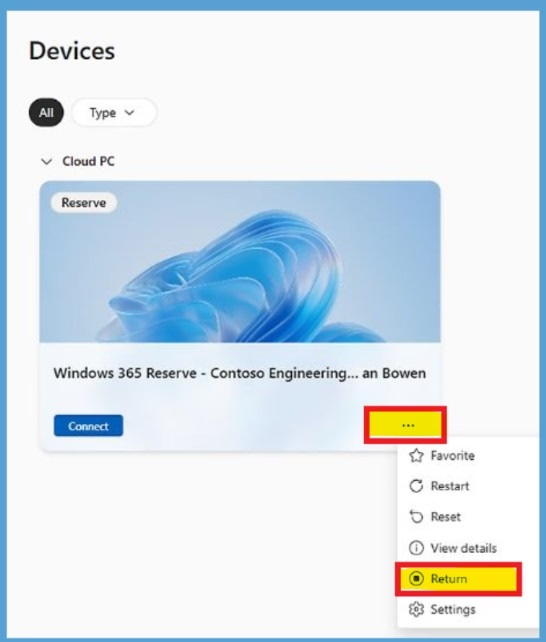
Users can manually return their Windows 365 Reserve Cloud PCs through the Windows 365 user portal. To do this, go to the Devices section and find your assigned Reserve Cloud PC. Click the 3-dot menu (…) next to the Cloud PC and select Return.
After selecting Return, users need to confirm the action through a second consent prompt. Once confirmed, the Cloud PC will be deprovisioned, and the remaining access days will be preserved for later use. The Cloud PC and all data that has not been backed up will be deleted. An administrator must provision the Cloud PC again before it can be used.
Need Further Assistance or Have Technical Questions?
Join the LinkedIn Page and Telegram group to get the latest step-by-step guides and news updates. Join our Meetup Page to participate in User group meetings. Also, join the WhatsApp Community and the Whatsapp channel to get the latest news on Microsoft Technologies. We are there on Reddit as well.
Author
Anoop C Nair is Workplace Technology solution architect with 25+ years of experience in global enterprise organizations such as JP Morgan, Capgemini, etc. He is Microsoft Certified Trainer. Microsoft MVP from 2015 onwards for consecutive 11 years! He also conducts Intune and modern workplace tech training for enterprise organizations. He is Blogger, Speaker, and Founder of HTMD Community and HTMD Conference. His focus is on Device Management technologies such as Intune, Windows, Cloud PC. He writes about technologies like Intune, SCCM, Windows, Cloud PC, Windows, Entra, Microsoft Security.