
Key Takeaways
- Ensures a uniform user experience across corporate devices, including, Windows 11, and Cloud PCs.
- Reduces unnecessary personalization changes in enterprise environments.
- Prevents unauthorized theme changes, helping maintain organizational branding and desktop standards.
- Reduces unnecessary support requests caused by user customization of Windows themes.
Hey let’s discuss on Prevent Users from Changing Windows Themes to Maintain a Consistent Desktop Experience using Intune. Did you know the Prevent Changing Theme policy helps you keep a consistent Windows desktop experience across your organization? Instead of allowing users to change or save Windows themes, this policy lets administrators control theme customization using Microsoft Intune.
Table of Contents
Table of Contents
Prevent Users from Changing Windows Themes to Maintain a Consistent Desktop Experience using Intune
By restricting theme changes, organizations can maintain a standard desktop appearance, support corporate branding, and reduce unnecessary personalization on managed Windows devices. This makes the policy especially useful for businesses, schools, shared devices, and Windows 365 Cloud PCs. In this guide, you’ll learn how to configure and deploy the Prevent Changing Theme policy using the Intune Settings Catalog. We’ll explain each configuration step in a simple way, from creating the policy to assigning it to users and monitoring its deployment.
- Prohibit Access to Control Panel and PC Settings to Prevent Users from Modifying System Settings using Intune Policy
- Configure Windows Drive Access Restrictions using Intune Policy
- Intune Security Baseline Microsoft Defender Policy Troubleshooting Tips
- Troubleshoot Microsoft Edge Security Policy Deployment Issues
Start Creating a Profile
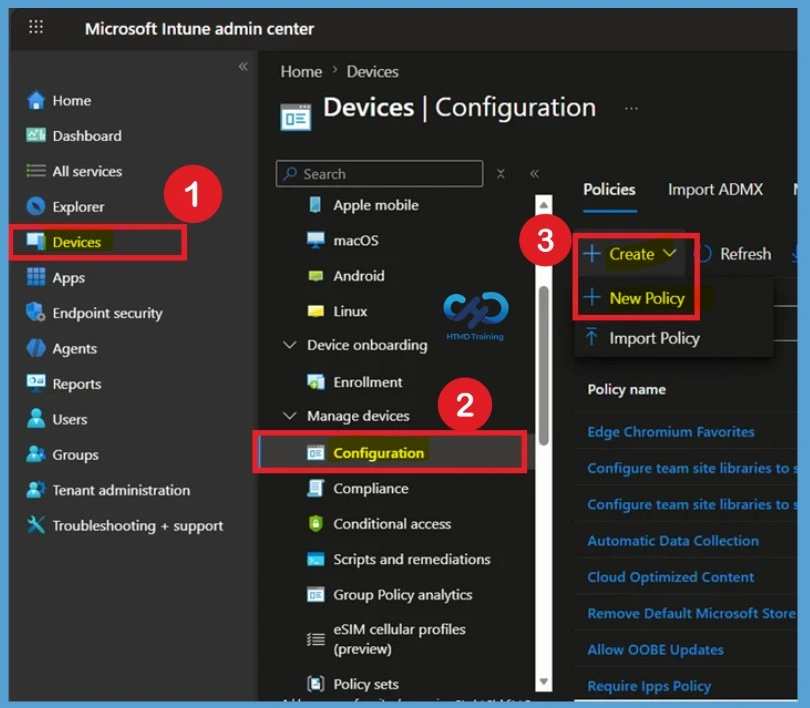
Sign in to the Microsoft Intune admin center and navigate to Devices > Configuration > Policies. Click + Create and select New policy to start creating a new configuration profile. This page allows you to create and deploy configuration settings that help manage Windows devices across your organization.
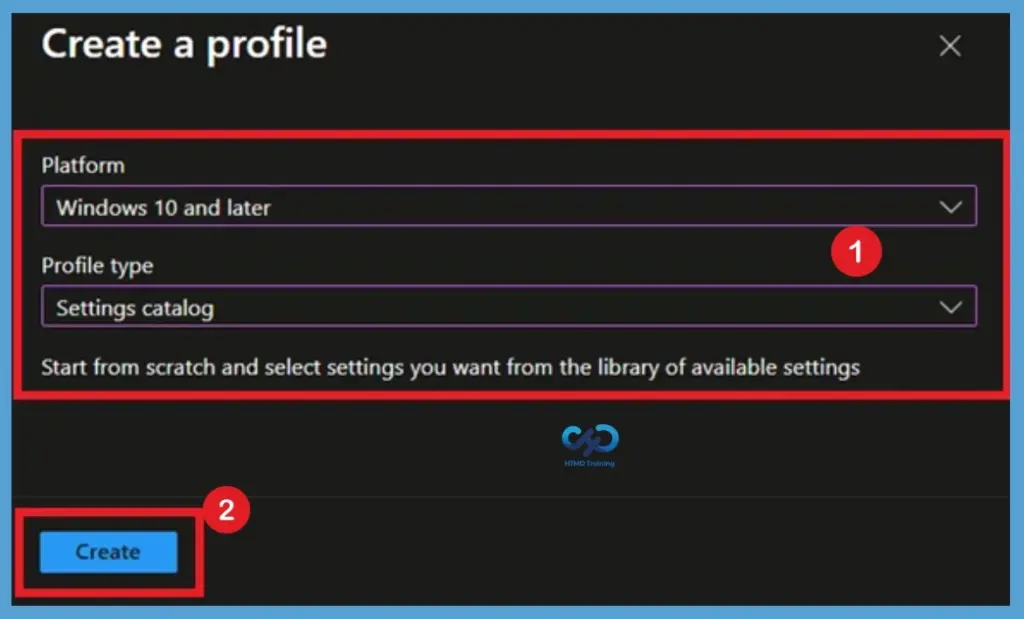
On the Create a profile page, select Windows 10 and later as the Platform. For Profile type, choose Settings catalog, which provides access to a wide range of Windows configuration settings, including Administrative Templates. Click Create to begin configuring the Prevent Changing Theme policy.

Basic Tab
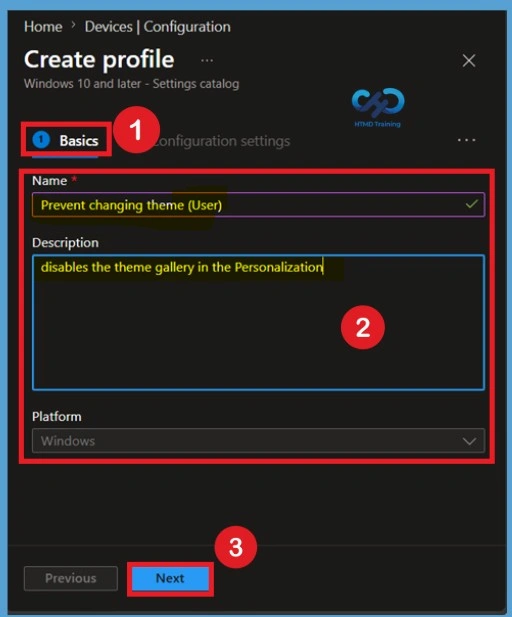
The Basics page is where you provide the identity of the policy. In the Name field, enter a meaningful name such as Prevent Changing Theme Policy. In the Description field, add a brief explanation about the policy, for example, that disables the theme gallery in the Personalization.
- Name for the Policy I given – Prevent changing theme (User)
- Description for the Policy – Disables the theme gallery in the Personalization
- Click on the Next.
Configuration Settings for Prevent Changing Theme (User)
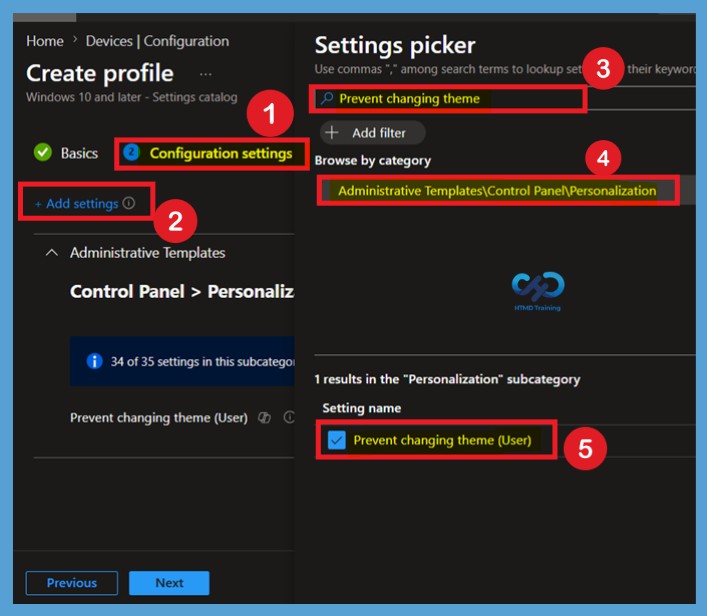
On the Configuration settings page, click Add settings to open the Settings picker. In the search box, type Prevent Changing Theme to quickly locate the required setting. From the search results, expand Administrative Templates, then navigate to Control Panel > Personalization, and select Prevent Changing Theme.
After selecting the policy, close the Settings picker to return to the configuration page. The selected setting is now added to your policy, allowing you to configure whether users can change Windows themes.
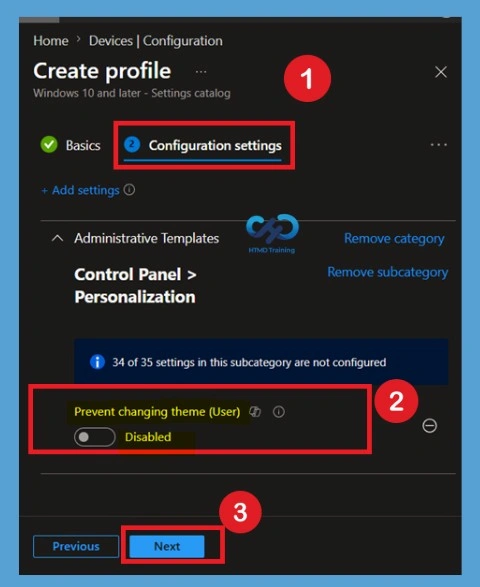
Defaulted State of the Policy
When you add the Prevent Changing Theme policy, it is set to Not Configured (Disabled) by default. In this state, Intune doesn’t enforce any restrictions, and Windows continues using its default behavior for theme customization. If you leave the policy unconfigured or choose Disabled, users can continue changing, saving, and customizing Windows themes without any restrictions. No changes are made to the existing Windows personalization experience.
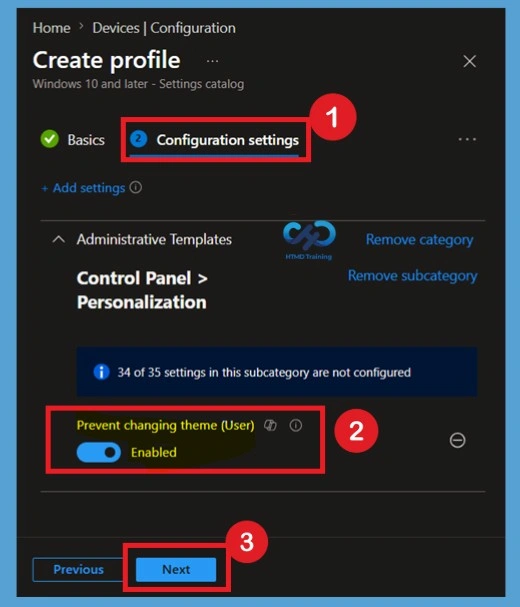
Enable the Prevent Changing Theme Policy
To prevent users from changing Windows themes, change the policy setting from Not Configured to Enabled. Selecting Enabled instructs Windows to block users from changing or saving themes through the Personalization settings. After enabling the policy, click Next to continue. Once the policy is deployed and applied, users can still access the Themes page, but they won’t be able to modify or save Windows themes, helping maintain a consistent desktop appearance across managed devices.
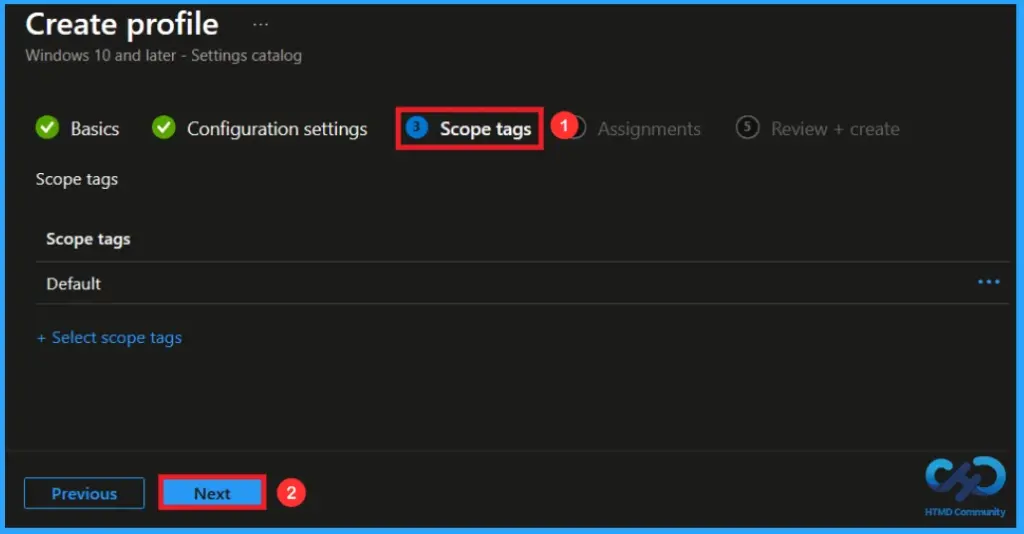
Scope Tag for Prevent Changing Theme
If your organization already uses scope tags, select the appropriate tag from the available list. Otherwise, you can leave the default scope tag unchanged (Skipped) and click Next to proceed to the assignment stage.
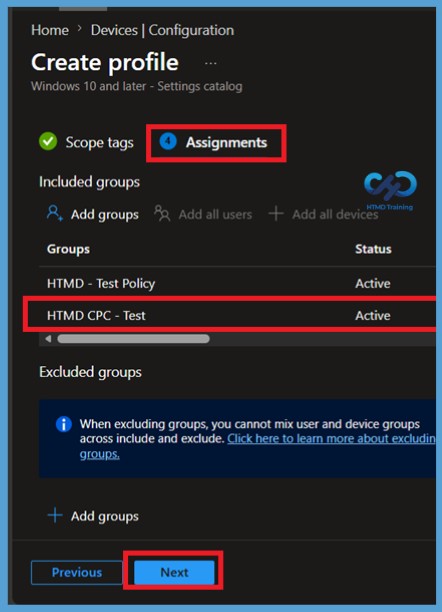
Assignment for the Prevent Changing Theme Policy
Select Add groups, browse or search for the required Microsoft Entra groups, and then add them to the policy. Before deploying the policy organization-wide, consider assigning it to a small pilot group first to validate the configuration and ensure it works as expected. Here I Selected 2 organizational groups such as HTMD Test Policy and click on the Next.
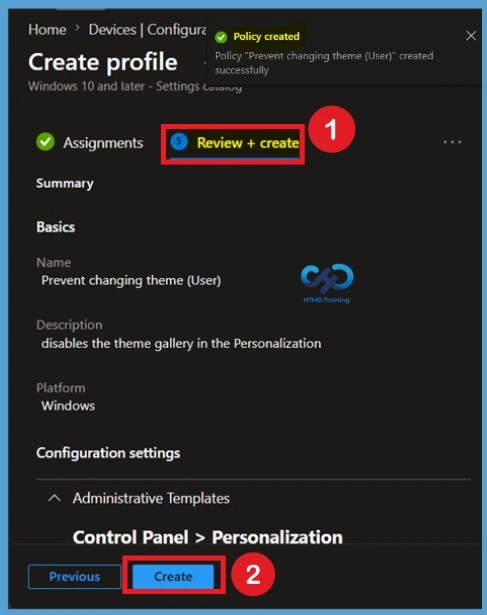
Review + Create Policy for Prevent Changing Theme
The Review + Create page displays a summary of all the configuration options you’ve selected, including the platform, profile type, configured settings, scope tags, and assignments. Carefully review each section to ensure everything is configured correctly before deployment. If you need to make any changes, use the Previous button to return to the relevant page. Once you’ve confirmed that all settings are correct, click Create to save and deploy the Prevent Changing Theme policy.
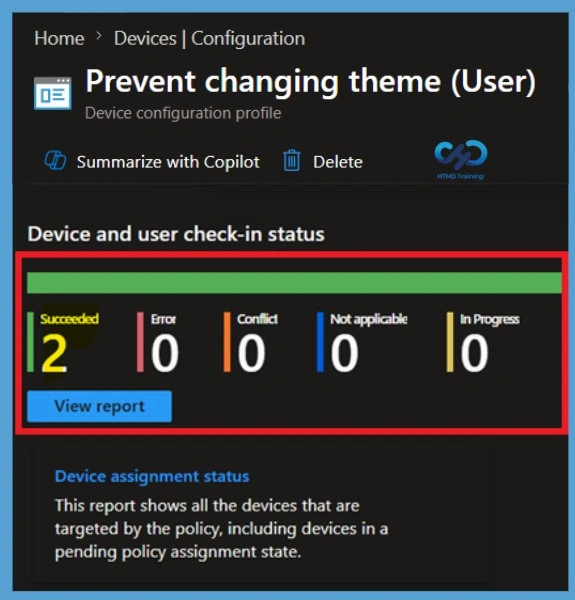
Monitor the status of Prevent Changing Theme
After creating the policy, Intune begins deploying it to the assigned users during their next device check-in. To monitor the deployment, open the Prevent Changing Theme policy from the Configuration > Policies page in the Intune admin center. Select Device and user check-in status to view the deployment results. This page shows whether the policy has been successfully applied.
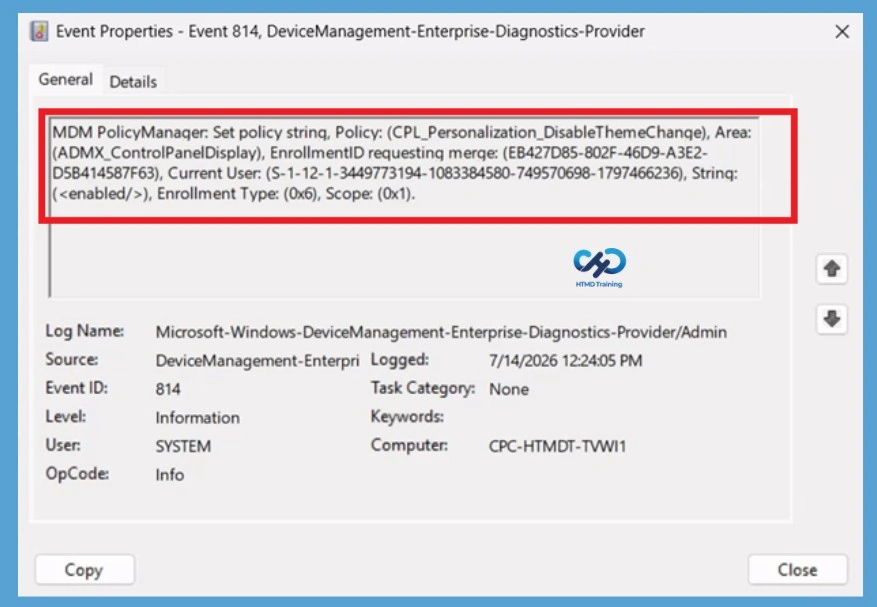
Client Side Verification
To confirm if a policy has been applied, use the Event Viewer on the client device. Go to Applications and Services Logs > Microsoft > Windows > Device Management > Enterprise Diagnostic Provider > Admin. Use the Filter Current Log option and search for Intune event 814.
| Policy Details |
|---|
| MDM PolicyManager: Set policy strinq, Policy: (CPL_Personalization_DisableThemeChange), Area: (ADMX_ControlPanelDisplay), EnrollmentID requesting merge: (EB427D85-802F-46D9-A3E2- D5B414587F63), Current User: (S-1-12-1-3449773194-1083384580-749570698-1797466236), Strinq: (), Enrollment Type: (0x6), Scope: (0x1). |
Remove Assigned Groups from Prevent Changing Theme
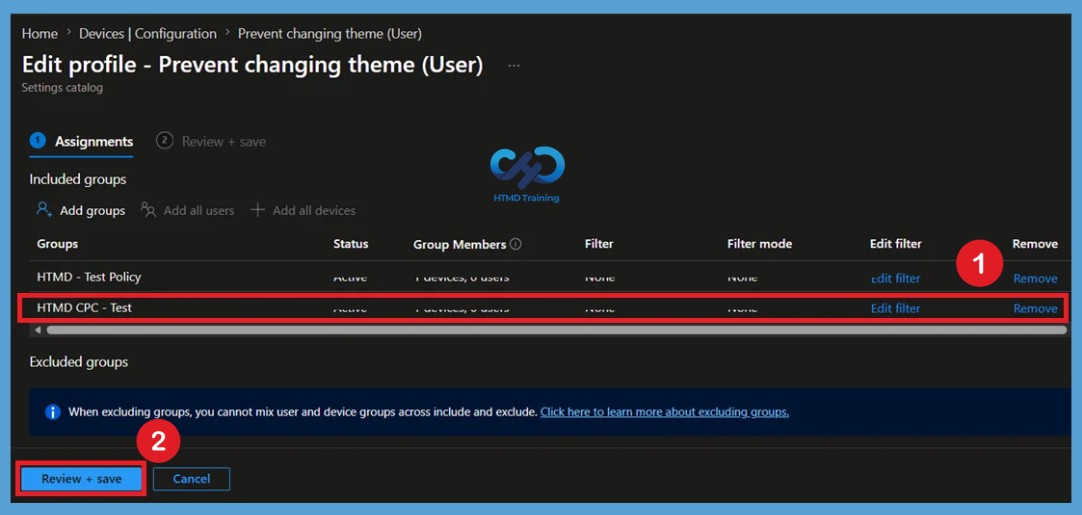
If you no longer want the Prevent Changing Theme policy to apply to certain users, open the policy and navigate to the Assignments page. Review the currently assigned Microsoft Entra user groups and identify the groups you want to remove. Remove the required groups and save the changes.
- Go to the device properties> click on the Edit option near the Assignments
- In the Assignment page Remove the Group that you want.
- During the next policy sync, Intune stops targeting those users, and the policy will no longer apply to their accounts.
For detailed information, you can refer to our previous post – Learn How to Delete or Remove App Assignment from Intune using by Step-by-Step Guide.
Delete Prevent Changing Theme Policy
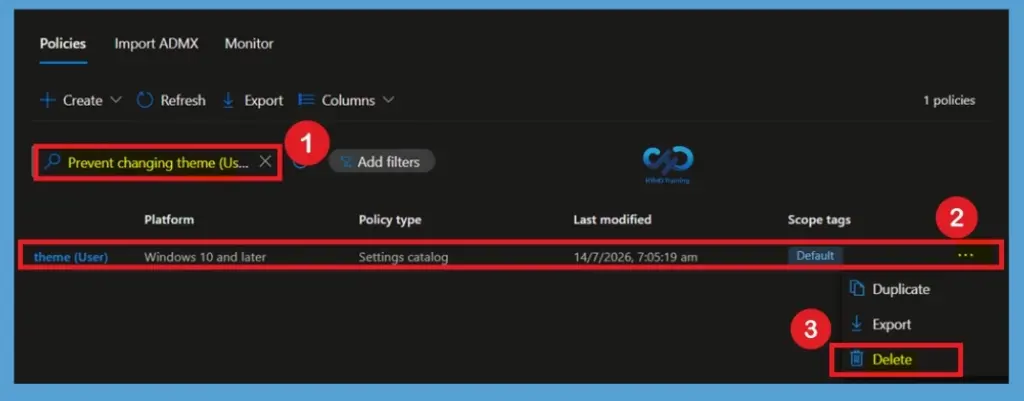
When the Prevent Changing Theme policy is no longer required, it’s recommended to remove all user group assignments before deleting the configuration profile. This helps prevent unintended policy changes while the profile is being deleted. So, you have to search the policy name Prevent Changing Theme. After confirming that the policy is no longer assigned to any users, click the 3 -dot menu (…) or delete. The policy is permanently removed from your Intune environment and will no longer be available for future deployments.
For detailed information, you can refer to our previous post – How to Delete Allow Clipboard History Policy in Intune Step by Step Guide.
End User Result
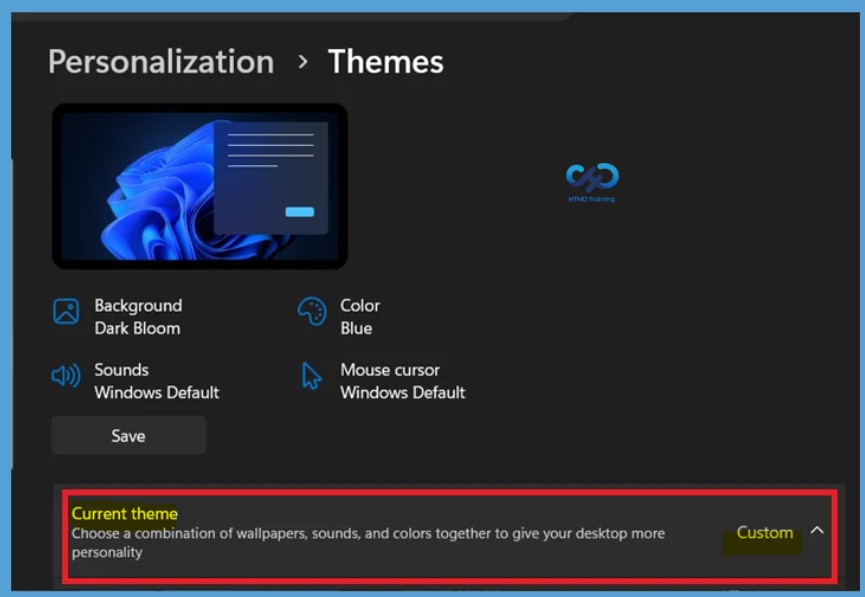
After the Prevent Changing Theme policy is applied, users can navigate to Settings > Personalization > Themes to view their current Windows theme. Although the current theme remains visible, users cannot change or save a new theme, as the policy restricts theme customization.
Need Further Assistance or Have Technical Questions?
Join the LinkedIn Page and Telegram group to get the latest step-by-step guides and news updates. Join our Meetup Page to participate in User group meetings. Also, join the WhatsApp Community and the Whatsapp channel to get the latest news on Microsoft Technologies. We are there on Reddit as well.
Author
Anoop C Nair has been Microsoft MVP from 2015 onwards for 10 consecutive years! He is a Workplace Solution Architect with more than 22+ years of experience in Workplace technologies. He is also a Blogger, Speaker, and Local User Group Community leader. His primary focus is on Device Management technologies like SCCM and Intune. He writes about technologies like Intune, SCCM, Windows, Cloud PC, Windows, Entra, Microsoft Security, Career, etc.