Hi, today I would like to explore the topic how to enable or disable Autofill Credit Card Policy in MS Edge Browser using M365 Admin Center. Autofill in Microsoft Edge quickly fills in online forms with your saved information like addresses, payments, and passwords, saving you time.
Autofill Credit Card feature enables Microsoft Edge’s AutoFill for payment methods. It allows users to quickly complete online forms with saved credit or debit card information. This also includes suggesting new payment options like Buy Now Pay Later (BNPL) and Express Checkout during online transactions.
If you enable this policy or leave it unconfigured, users will retain control over the AutoFill feature for payment instruments. Disabling this policy prevents AutoFill from ever suggesting, filling, or recommending new payment methods. It also stops it from saving any payment information users enter while Browse online.
Disabling the Autofill Credit Card policy is recommended for security, as it lowers the risk of credit card information being compromised. When you use AutoFill and sync data in Microsoft Edge, your information is kept secure. It’s encrypted while moving across the internet (HTTPS) and when it’s stored on Microsoft’s servers.
Table of Contents
What are Registry Settings and How are they Used to Configure Microsoft Edge?
Registry settings are like control switches in the Windows Registry (a central database). These settings dictate how Edge and other applications behave, manage user preferences, and control system parameters. You can change these settings using tools like Group Policy or by directly editing the registry.
The Registry settings of Autofill Credit Card Enabled policy is given below:
Mandatory Path : SOFTWARE\Policies\Microsoft\Edge
Recommended Path: SOFTWARE\Policies\Microsoft\Edge\Recommended
Value name: AutofillCreditCardEnabled
Value type: REG_DWORD
Enable Autofill Credit Card Policy in MS Edge Browser
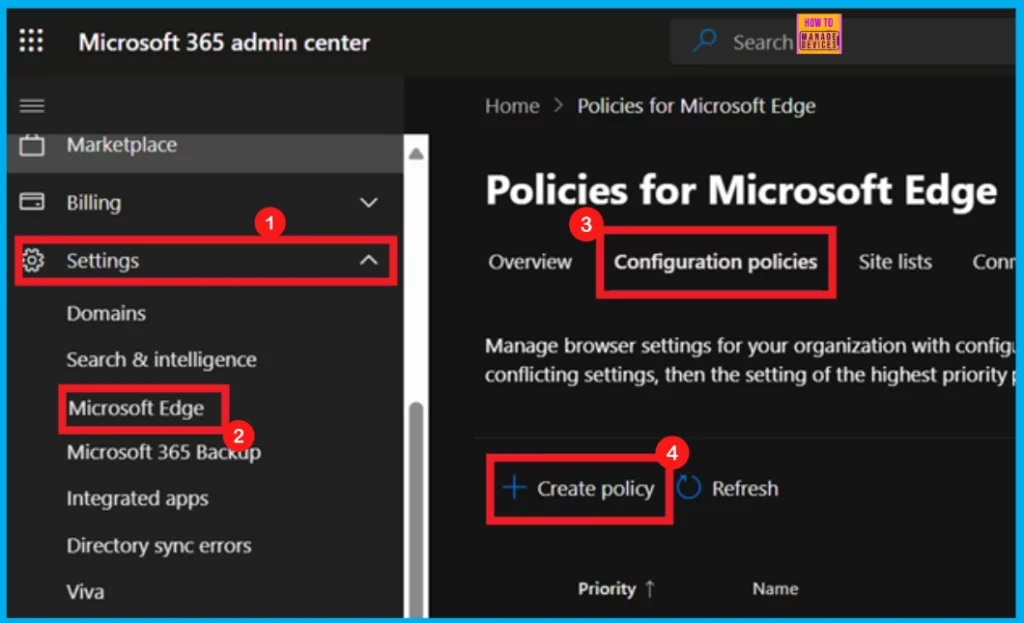
Let’s delve into how to deploy it in Microsoft 365. To begin, log in to the Microsoft 365 Admin Center using your administrative account. Once logged in, navigate to Settings, then choose Microsoft Edge.
- From there, click on Configuration Policies, and finally, select + Create Policy.
- 4 Methods Disable Enable Edge Browser Autofill Inputs
- Enable Disable Web Search Suggestions Policy In MS Edge Browser Using M365 Admin Center
- How to Enable or Disable Address Bar Trending Suggest Policy in MS Edge Browser using M365 Admin Center
Basics
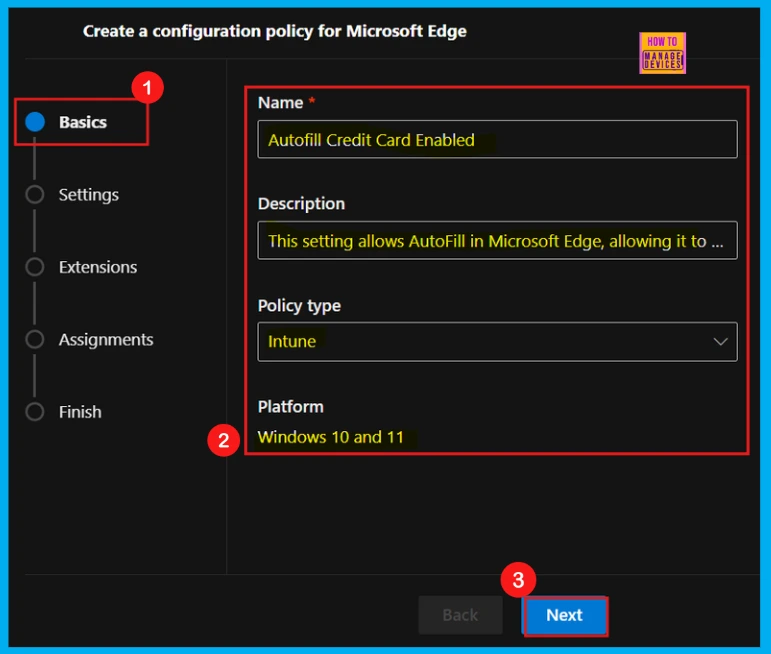
After clicking Create Policy, you will enter the Basics tab. Here, you will need to provide a Name and Description for your policy. Next, set the Policy Type to Intune and the Platform to Windows 10 and Windows 11. Once these selections are made, click Next to move forward.
Settings
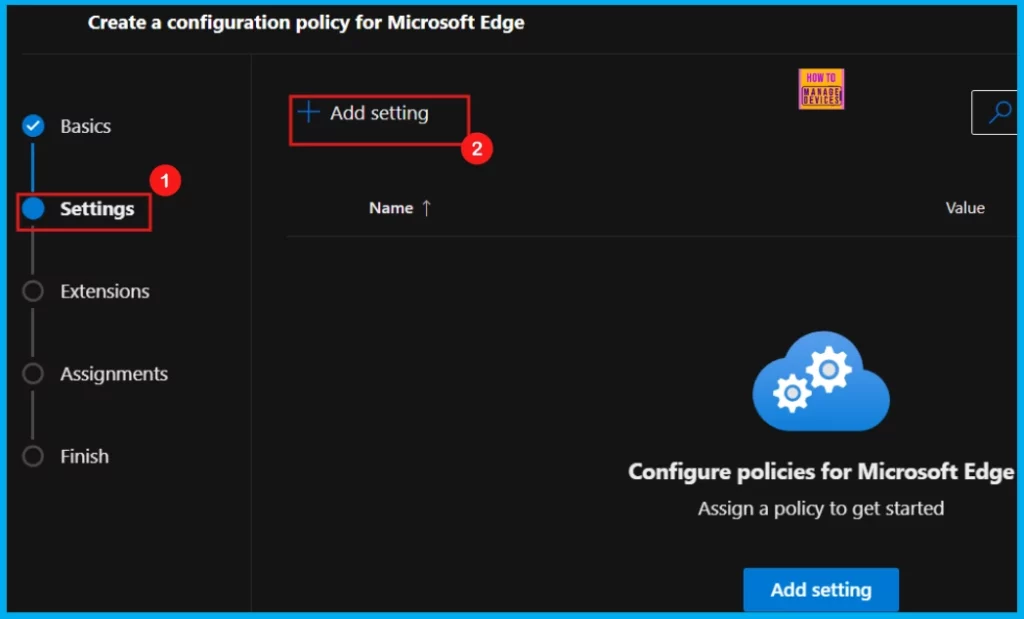
Once you have finished the Basics tab, you will proceed to the Settings tab. Here, you can find an Add Settings button. Clicking this will take you to the configuration page, where you can select the settings you want to deploy.
Configure a Settings
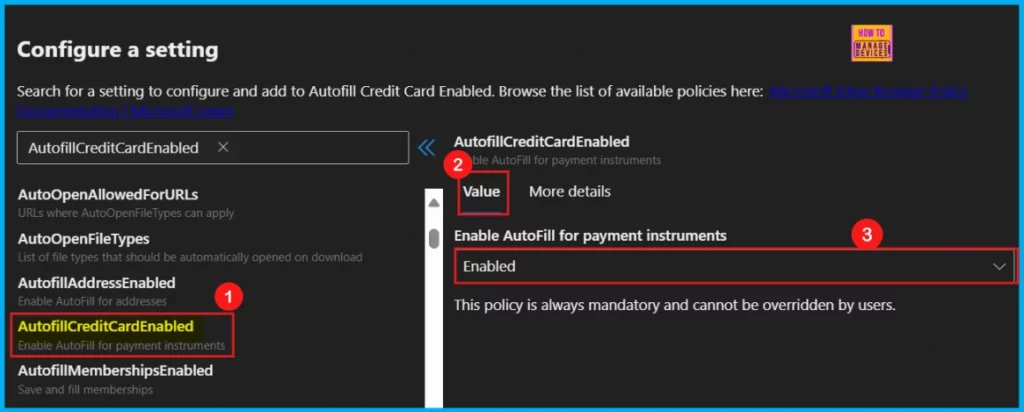
You are now on the Configure a Settings page. Here, you can either search for a specific setting by name or browse through categories like Additional Settings or Application guard settings. When you find a policy, two tabs will appear on the right: Value and More Details.
Within the Value tab, you will find a dropdown menu offering Enable and Disable options. To activate the policy, simply select Enable from this menu. Conversely, choose Disable if you wish to deactivate it.
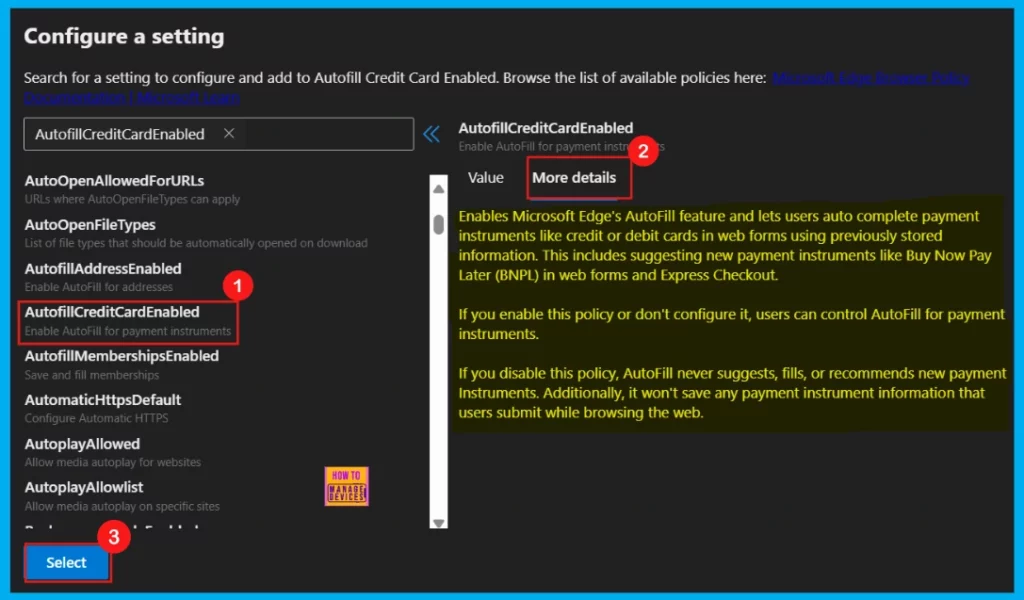
Now you are in the More Details tab. I strongly advise you to review this section thoroughly, as it’s vital for gaining a clear understanding of the policy. It contains all the crucial information and specifics. Therefore, always read the More Details carefully and never skip this section.
- Click Select to proceed.
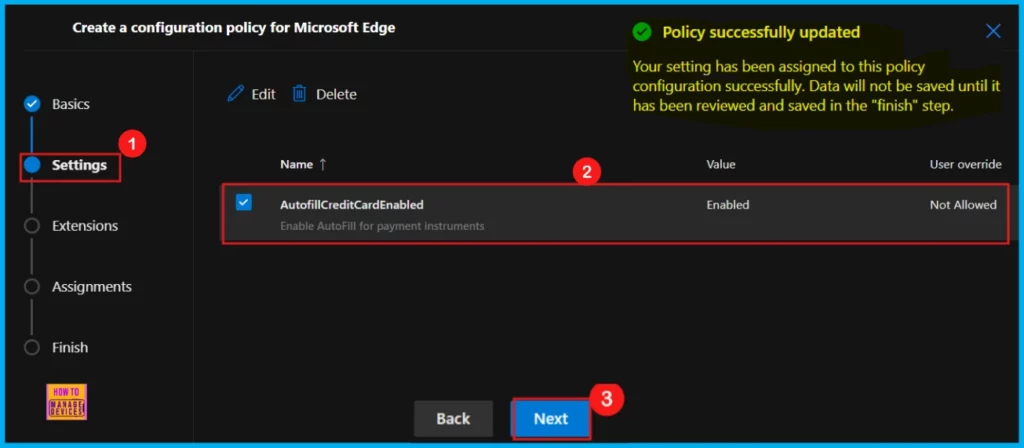
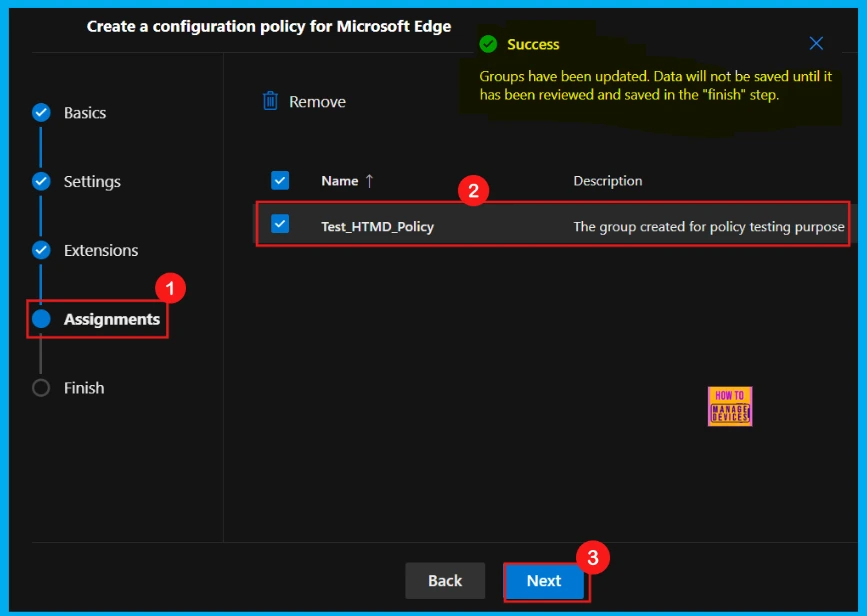
After clicking Select, a notification will appear, confirming the policy has been successfully updated. To enable the policy, simply check the box next to its name in the list. Then, click Next to proceed with the configuration process.
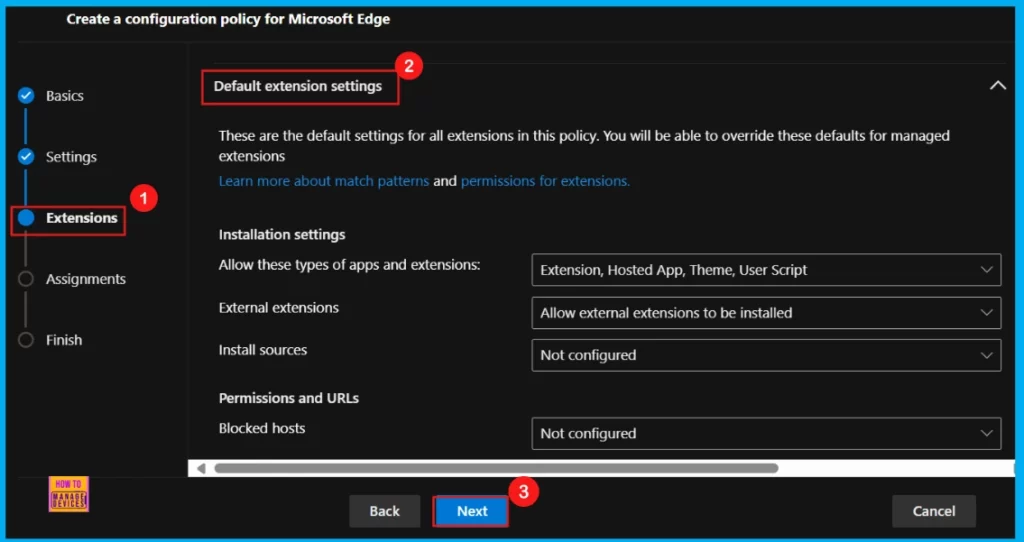
Extensions
If the policy needs extra features, you can add extensions by clicking + Add extension. This lets you customize the policy with settings for installation, permissions, and URLs. If you don’t need extensions, just skip this part.
- Click Next to move on.
Assignments
The Assignments tab is where you control which users receive the policy. By selecting a specific group from the Microsoft Entra Group, you ensure the policy only applies to them. For instance, we assigned the policy to the Test_HTMD_Policy group using these steps:
- Assignments > Select group > Enter the group name (e.g., Test_HTMD_Policy) > Click Select.
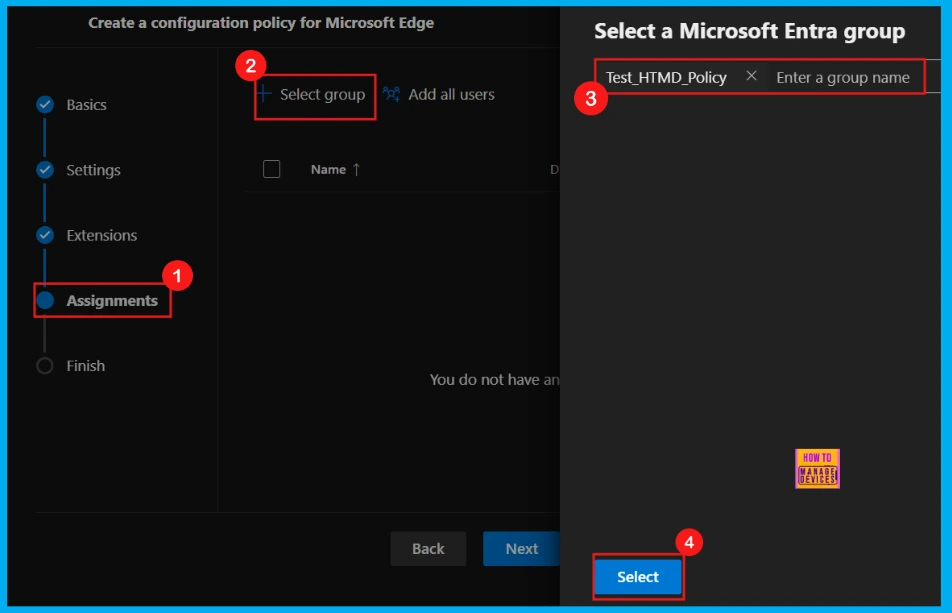
Once you select a group from your Microsoft Entra groups, a notification will pop up confirming the group has been updated. However, remember that these changes aren’t saved permanently until you review and save them in the final Finish step.
Finish
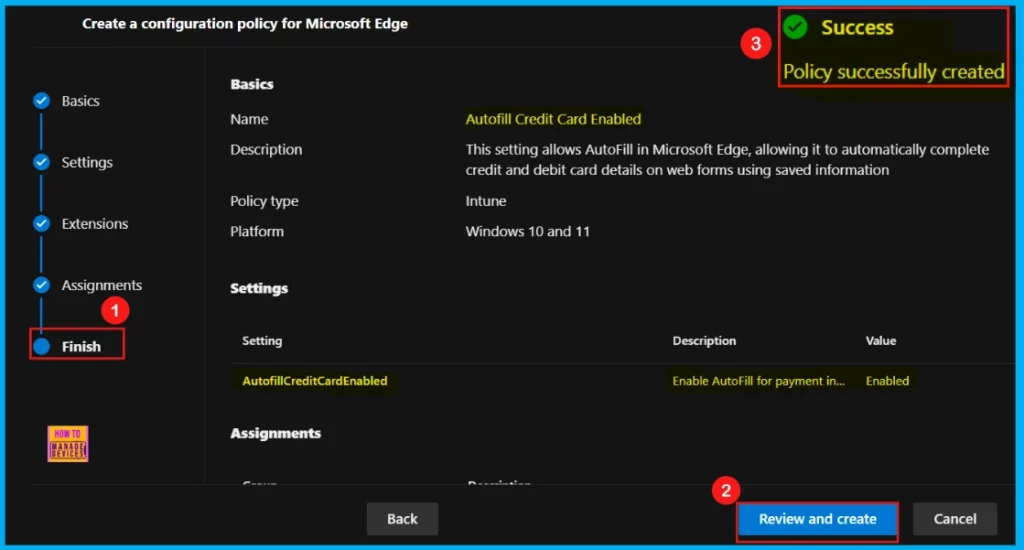
This is the final stage of policy setup. Here, you can review all your configured settings, including assignments, rules, and exceptions, before deployment. Once you have verified all the information, click Review + Create.
- After you click Review and Create, the portal will display a success message confirming the policy’s successful creation.
Device and User Check-in Status
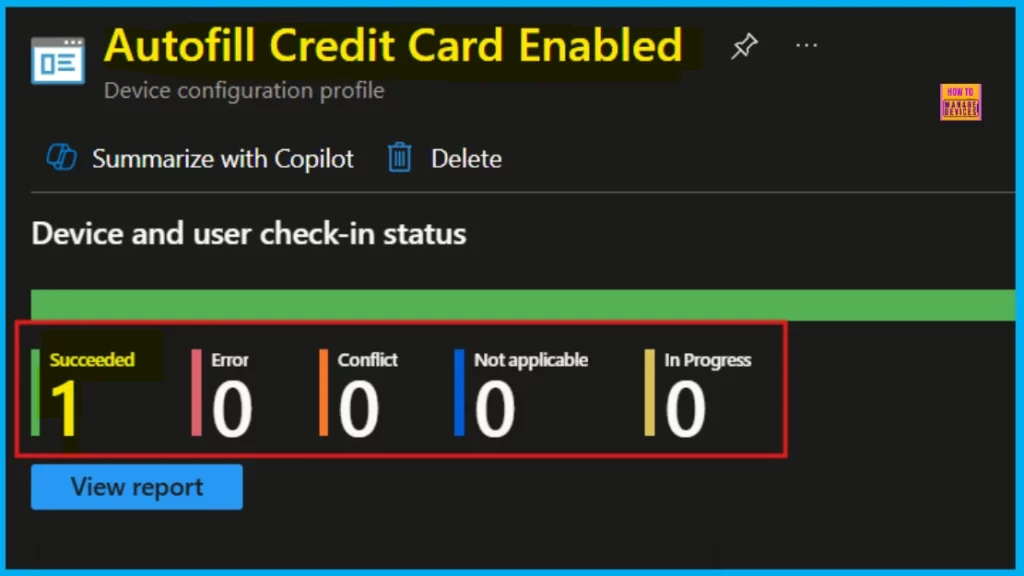
Once the policy is successfully created, you should sync the device via the Company Portal; this will help with deployment. Afterwards, you can check the monitoring status directly on the Intune Portal, as Intune is the platform for these policies.
- Navigate to Devices > Configuration > Policies > Status > 1 succeeded.
Client-Side Verification through Event Viewer
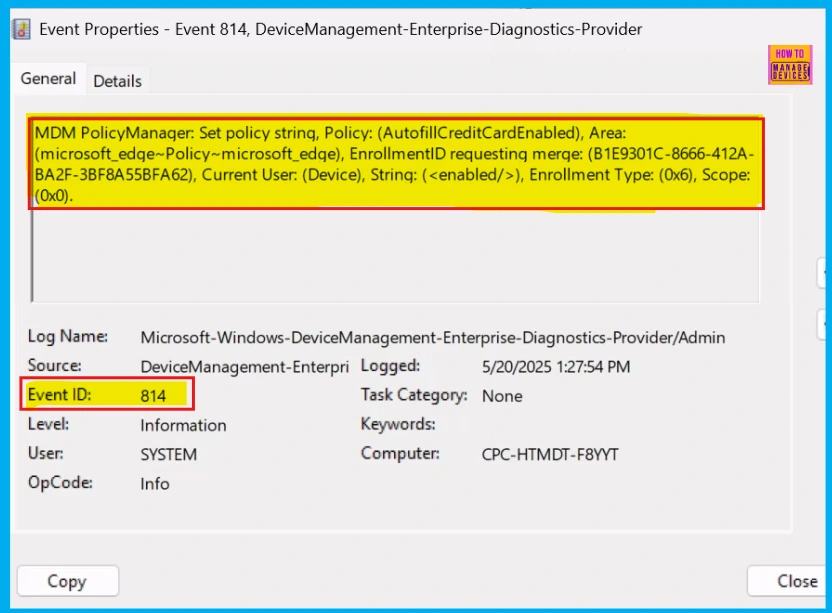
After creating the policy, you’ll need to complete the client-side verification. This offers real-time monitoring of the policy through the Event Viewer. To do this, navigate to Applications and Services Logs > Microsoft > Windows > DeviceManagement-Enterprise-Diagnostics-Provider > Admin and then filter for Event ID 814.
Need Further Assistance or Have Technical Questions?
Join the LinkedIn Page and Telegram group to get the latest step-by-step guides and news updates. Join our Meetup Page to participate in User group meetings. Also, Join the WhatsApp Community to get the latest news on Microsoft Technologies. We are there on Reddit as well.
Author
Anoop C Nair has been Microsoft MVP for 10 consecutive years from 2015 onwards. He is a Workplace Solution Architect with more than 22+ years of experience in Workplace technologies. He is a Blogger, Speaker, and Local User Group Community leader. His primary focus is on Device Management technologies like SCCM and Intune. He writes about technologies like Intune, SCCM, Windows, Cloud PC, Windows, Entra, Microsoft Security, Career, etc.


