Let’s discuss the best ways to Disable Enable Edge Browser Autofill Inputs in the Microsoft Edge browser. Many times you see when you fill up some form, providing your email-id, etc., are already suggested when you click on the desired text box.
This post will describe downloading and installing the Microsoft Dev Channel in Windows 11. Using the DEV channel, you can manually change the autofill input option from the more settings option available in the browser.
Though Microsoft Edge is developed using a Chromium (based) user interface, all the options are by default enabled; if not, you can allow them. According to the user’s requirement, they can change/modify the settings from the menu.
Also, you can use the Registry Editor to manage the autofill inputs options for enabling/disabling the process. There is another option for modifying the autofill inputs option by using Group Policy and Intune settings —both procedures are described below in this post.
- 4 Methods Enable Spellcheck in Microsoft Edge
- How to Deploy Brave Browser Using Intune
- 4 Methods Disable Edge Browser Search Suggestions from Address Bar
What is Disable Enable Edge Browser Autofill Inputs
Microsoft Edge is now based on the Chromium browser by redesigning the interface, which has a great Graphical User Interface (GUI) for the users to operate. Though it’s a chromium browser it has also some advanced features.
Most of the time you noticed that we are visiting many sites as well as filling many text boxes like email-id, phone number, address, etc. The browser stores them in its database, whenever we are facing the relatable text boxes the above information pop-up for the auto-filling text boxes.
Microsoft Edge browser is now featured advanced options for a splendid user interface as well as a great speed accessing the browser with some security features. Microsoft Edge insider channels are categorized into 3 types as listed below for a better preview experience with regular updates:
- BETA Channel – Major update every 4 weeks
- DEV Channel – Updated weekly
- Canary (CAN) Channel – Updated daily

Here I will describe how to download and install the Microsoft Edge Insider DEV Channel and to activate/ deactivate auto-fill, clear the browsing data, etc.
MS Edge DEV Channel Download, Installation, and Usage
To download MS Edge DEV Channel click here, which will navigate you to the download page. Then Click on the download button under DEV Channel to download the setup illustrate below:

By default, the download file is stored in the Download folder on the device, open the folder and double-click the file, or Right-click on the file and click open.

After clicking open it navigates to the Admin pop-up, where the User Account Control needs permission to make changes to the device, click Yes. The Installation process starts now, it will take a few minutes to complete.

And now the Microsoft Edge DEV Channel is successfully installed on your device. Open it, skip the sync process, and use it like a usual browser. MS Edge browser and MS Edge Dev Channel open separately.

How to Disable Enable Edge Browser Autofill Inputs
The Autofill Inputs may be insecure many times, anyone can be able to open somebody’s personal information without his/her consent. To avoid such security breaches we need to make changes in the policy.
The algorithm behind autofill is it collects & stores the information of a user in its database and suggested the need when a text box appears. Few ways to make enable/disable the autofill inputs option.
Manual Method to Disable Enable Edge Browser Autofill Inputs
To avoid the search suggestions in the image above, launch Microsoft Edge and choose the More button represented by the three dots in the upper-right corner. Find Settings from the options and get started.
- Launch Microsoft Edge
- Choose More button (three dots)
- Click on Settings

The settings page opens now. Click on the Profile (which is by default selected) option. The profile option is very useful for users to make changes in the autofill area and set it as per the requirement.
- Settings page
- Click on the Profile
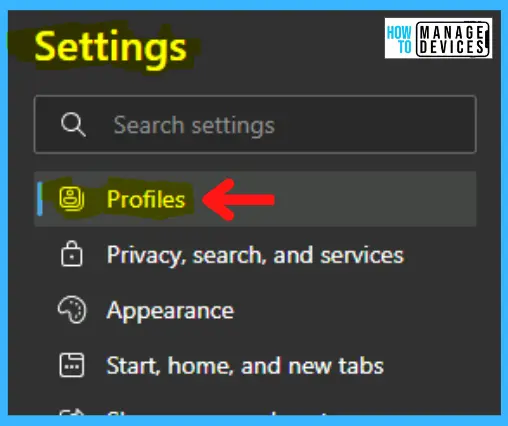
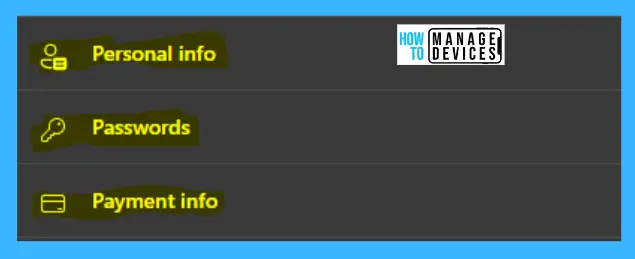
In the left panel, click on Profile, which expands to the right forum. In the right panel, there are some options available find three options from them and click on each option to modify the settings. The three settings are listed below:
- Personal Info
- Passwords
- Payment Info
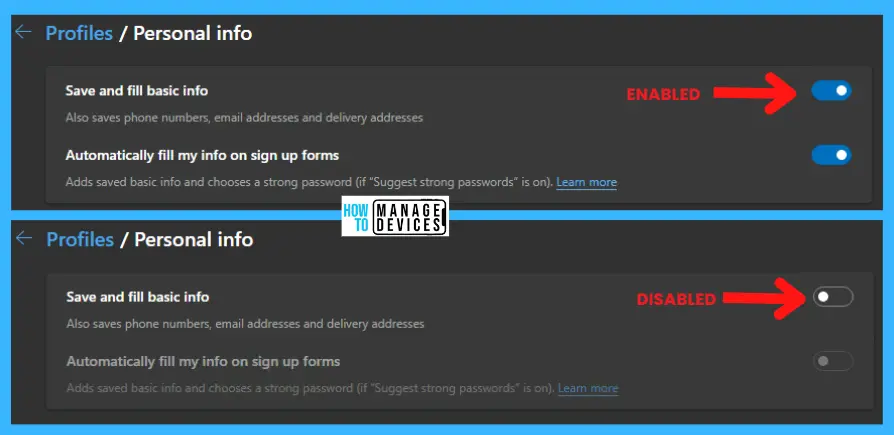
Click on Personal Info under Profile to navigate inside the Personal Info option. Under Personal Info enable/disable the Save and fill basic info toggle the respective slider button on or off. In the default setting all are enabled, toggle off to disable.
Click on Passwords under Profile to navigate inside the passwords option. Under passwords enable/disable the Offer to save passwords and toggle the respective slider button to on or off.
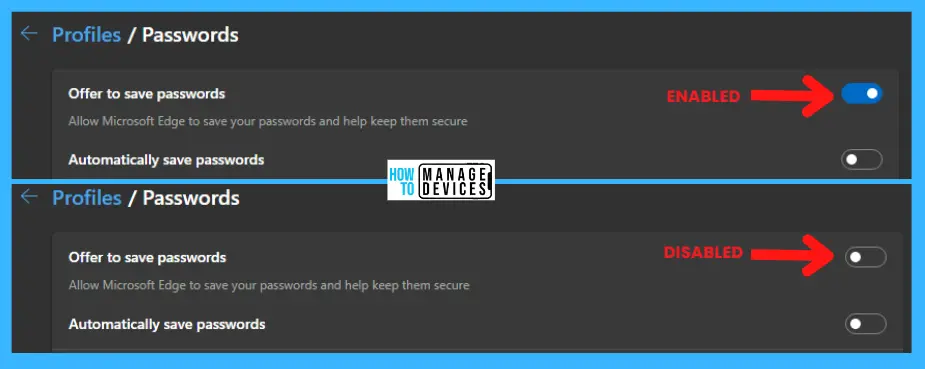
As previously click on Payment Info under Profile to navigate inside the Payment info option. Under Payment info enable/disable the Save and fill payment info and toggle the respective slider button to on or off.

Once you completed the above process, open the browser type Edge://flags in the address bar, and press enter. Scroll down and find out the Show Autofill Predictions and make it enable/disable as per your requirement and restart the browser.

Registry Method to Enable/Disable Edge Browser Autofill Inputs
There is another way to completely enable Autofill Inputs or disable them from the settings in Microsoft Edge. This procedure is done using the Registry Editor. Let’s check how you can enable/disable edge browser Autofill Inputs using Registry Editor.
Note! take Backup – Registry Editor may affect the system if any mistake occurs. It is advisable to take a backup of the Registry before proceeding. For backup, in the Registry Editor, go to File in the left top corner Click on it, then select Export and save the backup.
- Go to File
- Right-click on HKEY_LOCAL_MACHINE
- Click on Export
- Save it
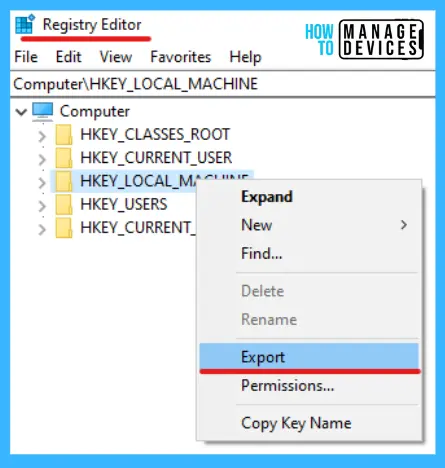
After taking the backup for the HKEY_LOCAL_MACHINE, now you can follow the process listed below to enter into the registry editor to modify changes.
- Window Key + R (To open run command)
- Type ‘regedit‘ and press OK
- Administrator Permission press Yes
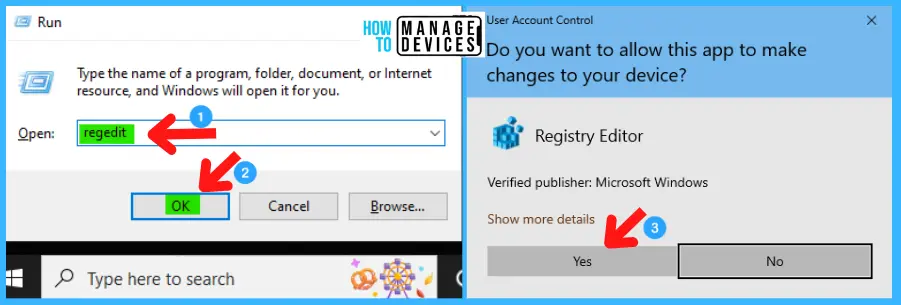
Now, the Registry Editor opens. Find the path ‘HKEY_LOCAL_MACHINE\Software\Policies\Microsoft\Edge.’ Following the trail, you can reach the Edge sub-folder for a further course of action.
Note! If the Edge folder does not exist in the above path, then create a new folder named Edge. Please click on 4 Methods Disable Edge Browser Search Suggestions from Address Bar to know how to create the folder.
Under the Edge folder, create a DWORD keyword and rename it as AutofillAddressEnabled. Follow the process to create a Dword Keyword listed below:
- Right-click on the blank area and click on New
- Then click on DWORD (32-bit) Value
- Set the name to AutofillAddressEnabled
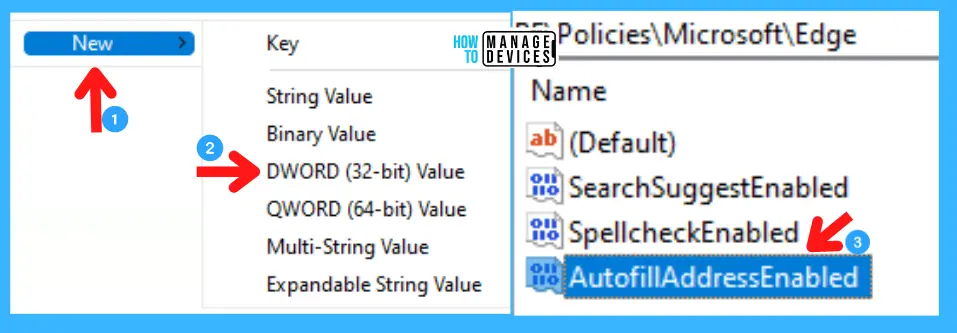
After renaming the DWORD (32-bit) Value as AutofillAddressEnabled, double-click on it to modify or right-click on it and select Modify. The new window opens as edit DWORD.
- Double-click to open or Right-click on AutofillAddressEnabled
- Select Modify

To disable AutofillAddressEnabled, set the value to 0 and enter. To enable AutofillAddressEnabled, set the value to 1 and enter. If you cannot see the changes restart your device to apply the changes.

Again create a DWORD keyword and rename it as AutofillCreditCardEnabled. Follow the process to create a Dword Keyword listed below:
- Right-click on the blank area and click on New
- Then click on DWORD (32-bit) Value
- Set the name to AutofillCreditCardEnabled
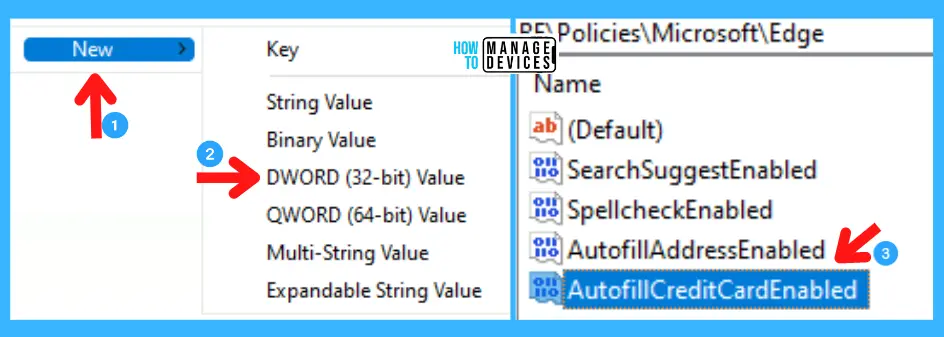
After renaming the DWORD (32-bit) Value as AutofillCreditCardEnabled, double-click on it to modify or right-click on it and select Modify. The new window opens as edit DWORD.
- Double-click to open or Right-click on AutofillCreditCardEnabled
- Select Modify

To disable AutofillCreditCardEnabled, set the value to 0 and enter. To enable AutofillCreditCardEnabled, set the value to 1 and enter. If you cannot see the changes restart your device to apply the changes.

Let’s check the following table to get more clearer picture of the registry options Disable Enable Edge Browser Autofill Inputs.
| Setting Type | Hive | Key | Value | Value Name | Value Data |
|---|---|---|---|---|---|
| Registry | HKEY_LOCAL_MACHINE | Software/Policies/Microsoft/Edge | DWORD (32-bit) | AutofillAddressEnabled | 0 or 1 |
| Registry | HKEY_LOCAL_MACHINE | Software/Policies/Microsoft/Edge | DWORD (32-bit) | AutofillCreditCardEnabled | 0 or 1 |
Group Policy Settings – Enable or Disable Edge Browser Autofill Inputs
You can use Group Policy Settings to Enable or Disable Edge Browser Autofill Inputs. You can use this method for Domain Joined devices to automate the entire process. Follow the process to make the changes.
- GP unique name: ConfigureAutofill
- GP name: Configure Autofill
- GP path (Mandatory): Administrative Templates/Windows Components/Microsoft Edge/
- GP path (Recommended): Administrative Templates/Windows Components/Microsoft Edge – Default Settings (users can override)/
- GP ADMX file name: MSEdge.admx

Intune Policy to Enable Disable Edge browser Autofill Inputs
Let’s have a look at Intune Policy to Enable Disable Edge browser Autofill Inputs. This is the 4th method explained in this blog post.
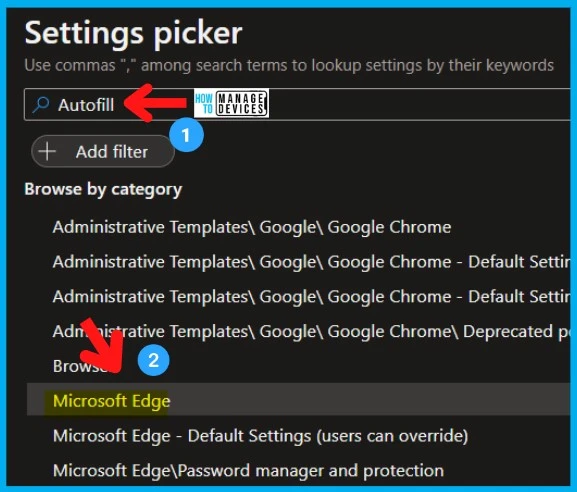
Let’s check the Intune Setting catalog policy options to Enable or Disable Edge browser Autofill Inputs on Windows 11 devices. You can go through Intune Settings Catalog Guide to create the policy in detail. However, for this context, search with the following keyboard – Edge browser Autofill Inputs.
NOTE! – More details on Intune settings catalog guide – Create Intune Settings Catalog Policy.
- Search with “Autofill” in the Settings picker search box.
- Select the Microsoft Edge Category.
- Edge browser Autofill Inputs options from the Settings name section.
- Keep the policy’s settings DISABLED or ENABLE if you want to keep it enabled.
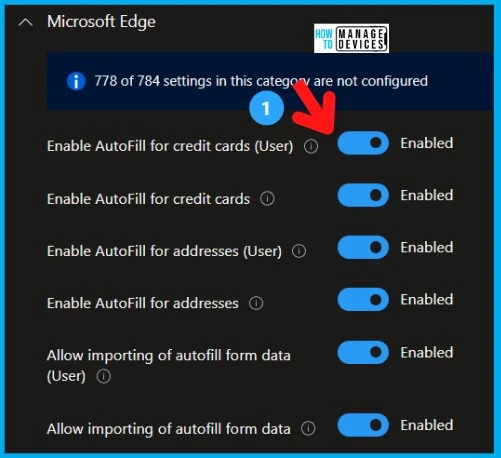
I have listed some of the following policy settings as an example. You can check other settings are available in Intune.
- Enable AutoFill for credit cards (User)
- Enable AutoFill for credit cards
- Enable AutoFill for addresses (User)
- Enable AutoFill for addresses
- Allow importing of autofill form data (User)
- Allow importing of autofill form data
That’s all about Autofill inputs’ procedure to enable or disable it described above. Please follow us @HTMD Community and HTMD Community Forum if you like our content.
Author
Alok is a Master of Computer Applications (MCA) graduate. He loves writing on Windows 11 and related technologies. He likes to share his knowledge, quick tips, and tricks with Windows 11 or Windows 10 with the community.

Hello
Great Information…
Do you know if is possible manage by GPO the Autofill Passwords to config by default “Prompt for the device Password before filling Website password?
Do you know if is possible manage by GPO the Autofill Passwords to config by default “Prompt for the device Password before filling Website password? – Anyone find or know where this setting is?