Let’s discuss how to allow or block Cellular Data Roaming in Connectivity using Intune Policy. Intune policies define rules and settings to manage devices and apps, safeguarding corporate data and enforcing compliance across all devices.
The Cellular Data Roaming setting restricts Mobile Broadband connectivity for clients registered with a roaming network provider. If this policy is enabled, users will be unable to use mobile broadband services on roaming networks until their device connects to the home provider network.
If this policy is not configured or disabled, users will be able to use Mobile Broadband services even when their device is roaming. This allows for uninterrupted data connectivity and access to mobile network services regardless of their geographical location.
You can confirm the roaming policy is active by looking at the data roaming toggle in the device’s settings. If the policy is working, this switch will be disabled or unchangeable. To check on a device, go to Cellular & SIM, tap your SIM (near the signal indicator), choose Properties, and then find the Data roaming options. If the policy is being enforced, you won’t be able to turn data roaming on.
Table of Contents
How Can I Check if the Roaming Policy is Currently Active on a Device?
On the device, navigate to Cellular & SIM. Tap on your SIM card (usually located next to the signal strength indicator). Then, select Properties and look for the Data roaming options. If the roaming policy is active, the ability to enable data roaming will be disabled or greyed out.
Allow or Block Cellular Data Roaming in Connectivity using Intune Policy
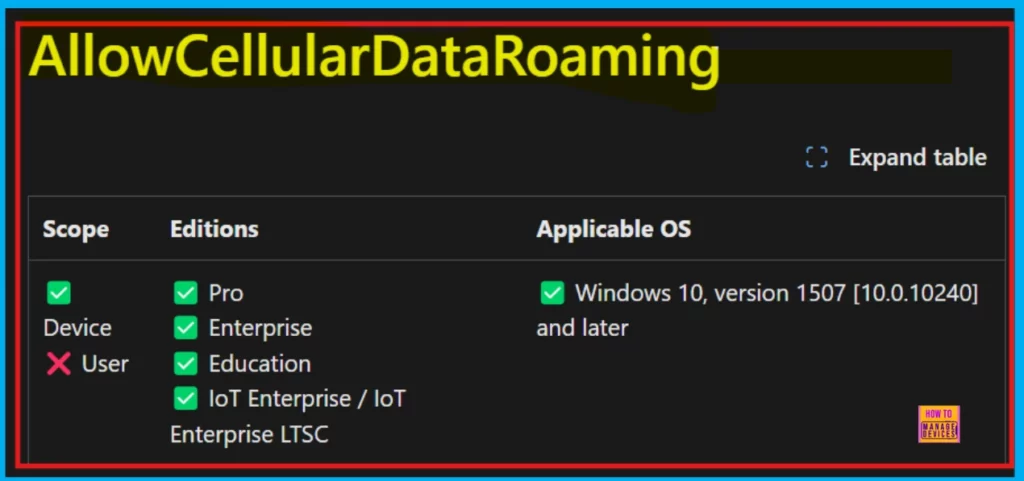
To understand the cellular data roaming policy and its various configurations, we can now proceed to explore the specific details of the Windows Configuration Service Provider (CSP) related to Connectivity settings.
This will involve analyzing the different policies available within this CSP and how they can be used to manage network connections, data usage, and other related properties on Windows devices.
| Property Name | Property Value |
|---|---|
| Format | int |
| Access Type | Add, Delete, Get, Replace |
| Default Value | 1 |
Allowed Values
Allowed values define the directives and sources that control which resources a web page can load. Cellular Data Roaming policy setting defines how cellular data roaming is handled. A value of 0 prevents cellular data roaming entirely, and users cannot enable it. The default setting, 1, allows cellular data roaming. Finally, a value of 2 forces cellular data roaming to be enabled, and users are unable to disable it.
Note: The ‘0’ value is not supported in Windows 10, version 1511
| Value | Description |
|---|---|
| 0 | Do not allow cellular data roaming. Setting this policy to 0 will disable cellular data roaming and user control over it. This value does not apply to Windows 10, version 1511. |
| 1 (Default) | Allow cellular data roaming. |
| 2 | Allow cellular data roaming on. With this configuration, cellular data roaming will be permanently enabled, and the user will not be able to switch it off. |
./Device/Vendor/MSFT/Policy/Config/Connectivity/AllowCellularDataRoaming
- Enable or Disable Hotspot Authentication in Networks using Intune Policy
- Enable or Disable IME Network Access for Text Input using Intune Policy
- Deploy using Intune to Turn Off Notifications Network Usage Policy
How to Create a Profile
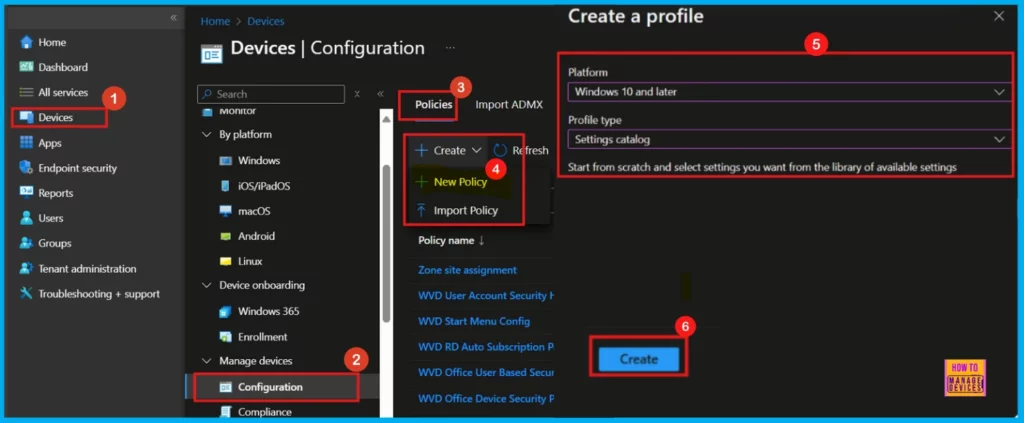
To establish a new policy, the initial step is to access the Intune Admin Center. Once logged in, navigate through the following sequence: select Devices, then Configuration. From the Policies, click the dropdown arrow of Create, and finally choose New policy.
- Select the platform for policy deployment (Windows 10 and later in this case).
- Choose Settings catalog as the profile type.
- Click Create to continue.
Basics
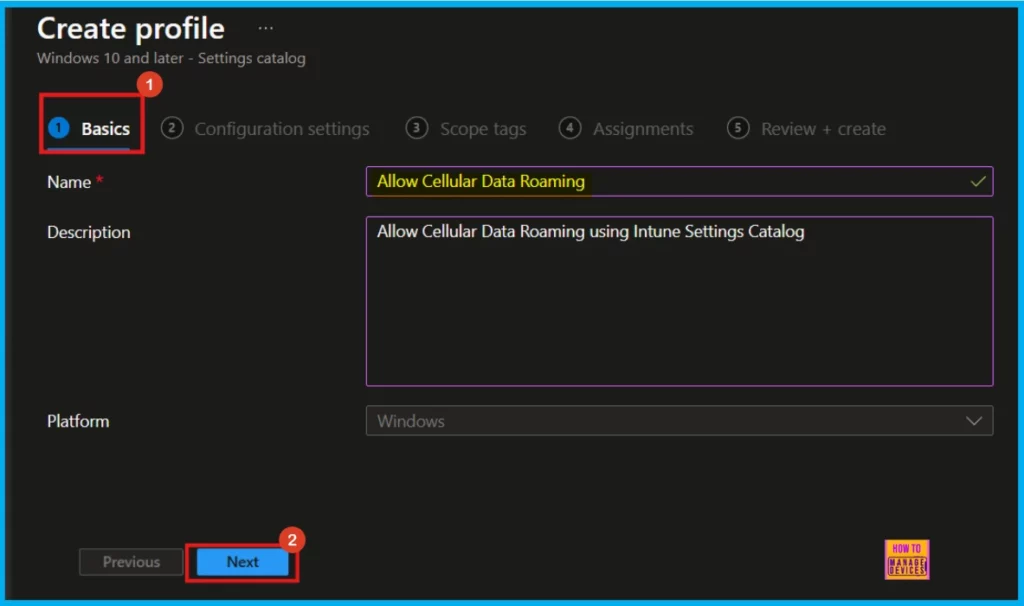
The Basics tab is the initial step in policy creation. Here, you’ll need to specify a Name for the policy (this is required) and can optionally add a Description. The Platform, which was selected earlier, will already be displayed.
- Name of the Policy: Allow Cellular Data Roaming
- Description: Allow Cellular Data Roaming using Intune Setting Catalog
Configuration Settings
The Configuration settings section is crucial for defining the specifics of the policy. To begin adding settings, click on the Add settings option on the configuration page. This action will open the Settings Picker window, where we can browse and select various categories.
- Allow Cellular Data Roaming is found under the Connectivity category.
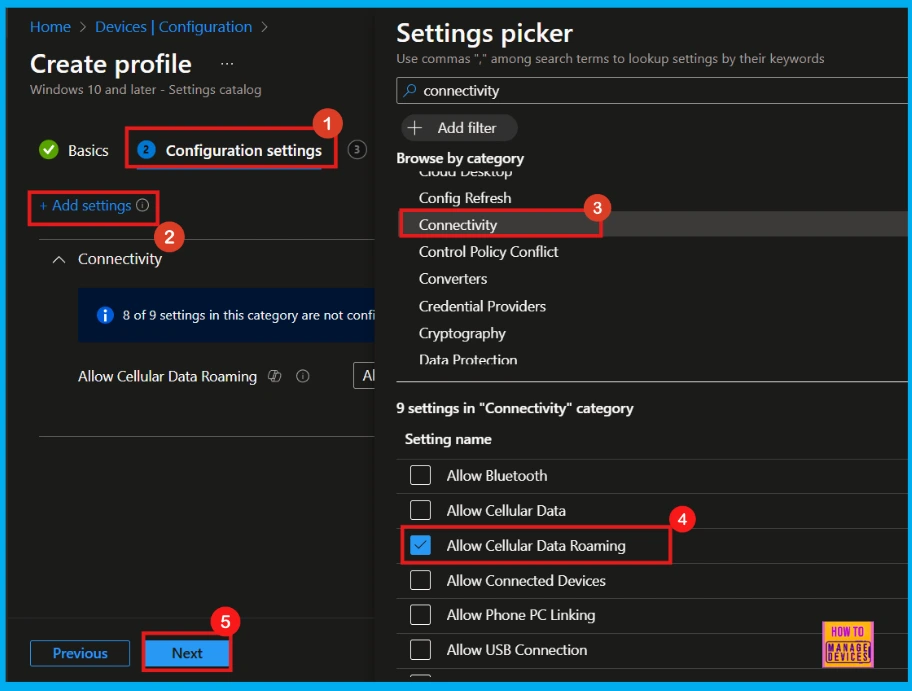
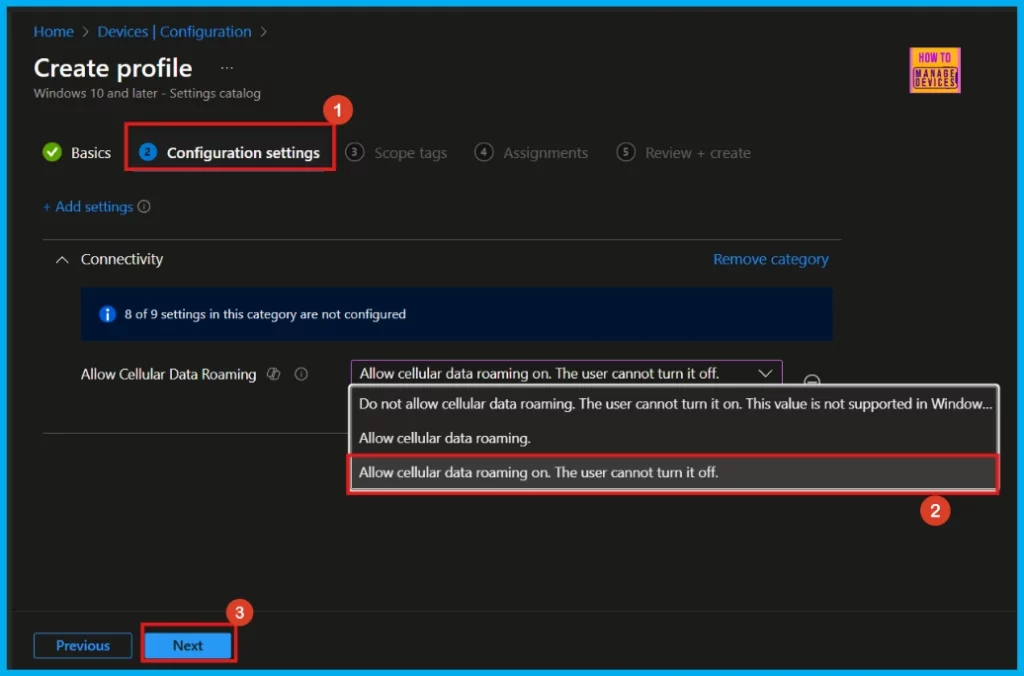
Once made the setting selections in the picker, we can close the window, and we will be returned to the main configuration settings page. Here we can see that the cellular data roaming policy has three settings (for more details, refer Table 2).
- Here, I select Allow Cellular Data Roaming On. The User Cannot turn it off.
(With this configuration, cellular data roaming will be permanently enabled, and the user will not be able to switch it off.)
Scope Tags
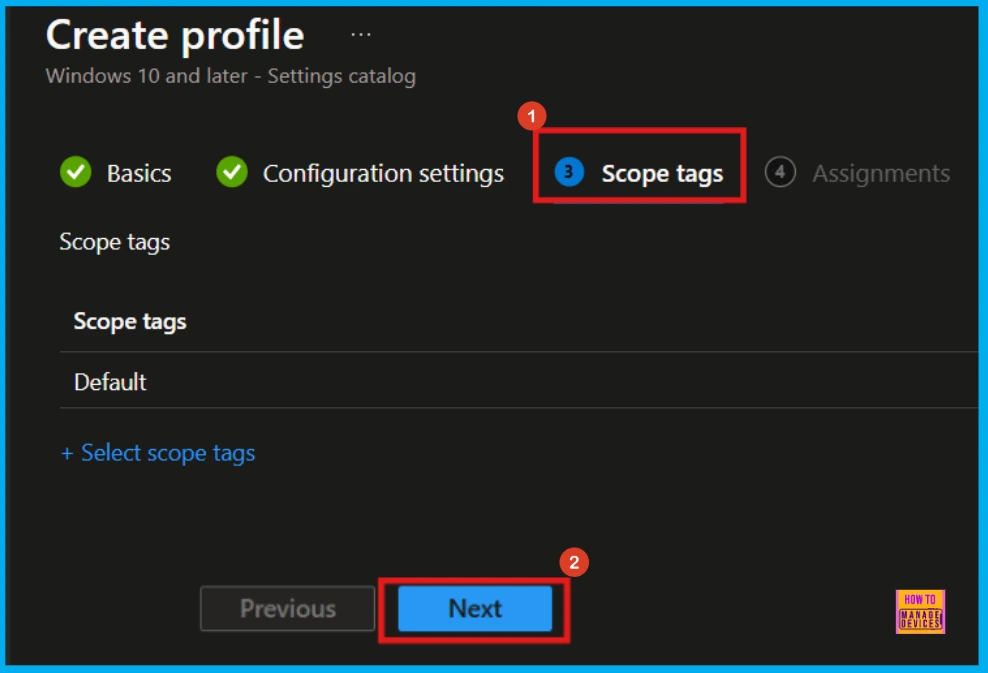
The next step is Scope Tags. This feature, while part of the policy creation workflow, enables you to assign scope tags to the policy. However, for our current policy, this is an optional step, so we will skip it. Proceed by clicking Next.
Assignments
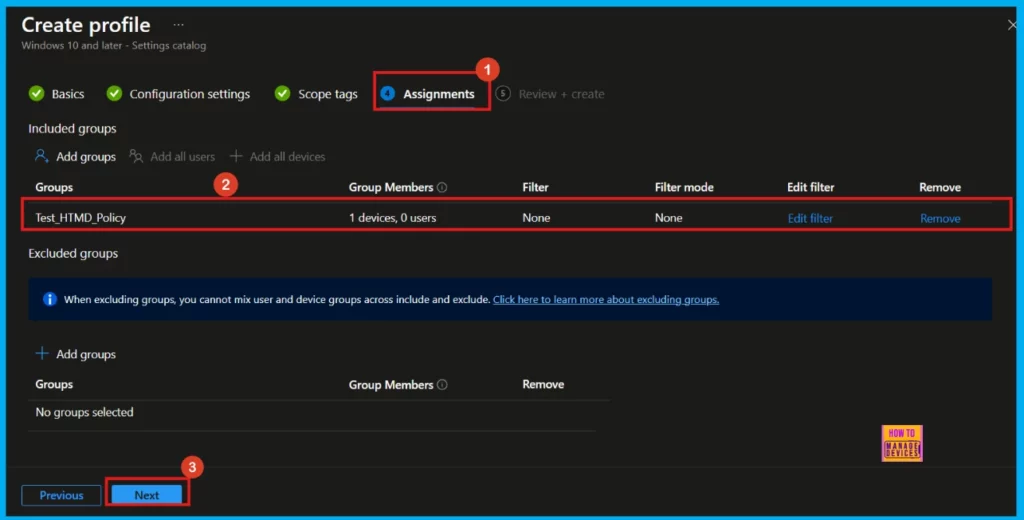
In the Assignments section, it’s necessary to add a group to the Included group. The policy will be applied to this selected group. Skipping this crucial step will result in the policy not being deployed successfully. After selecting the appropriate group, proceed by clicking Next.
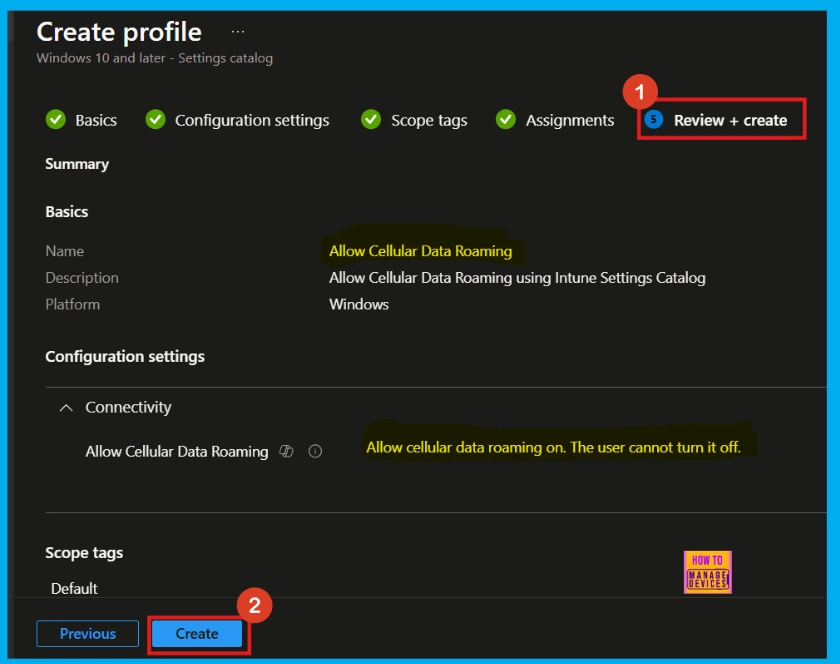
Review + Create
The final stage before deploying your policy is Review + Create. This section presents a summary of the policy that we have configured. It defines key information such as the policy name, any descriptions provided, the target platform, and other relevant details.
Monitoring Status
Once you click the Create button, a notification will appear, confirming that the Allow Cellular Data Roaming policy has been successfully created. You can then verify the newly created policy within the Intune Portal.

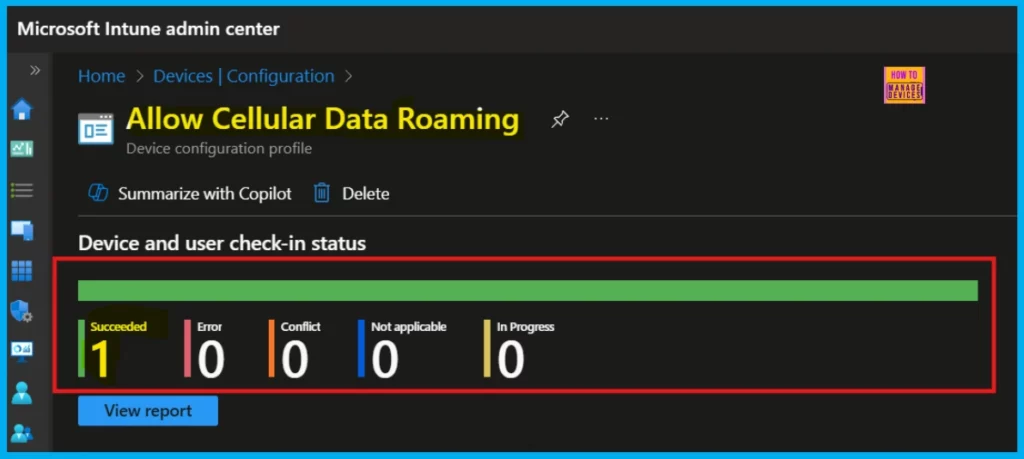
Device and User Check-in Status
After creating a new device policy, it usually takes around 8 hours for it to be automatically applied. To expedite this, we can manually initiate a policy sync. Once synced, we can verify a successful application by checking the policy status within Intune under Device > Configuration. Select the specific policy to view its application status.
Client-Side Verification
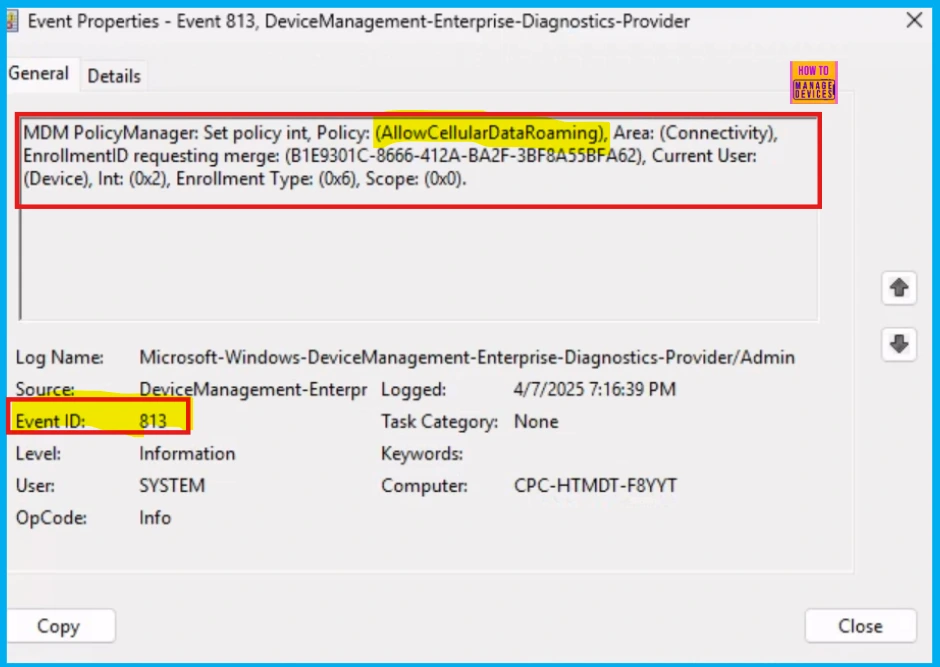
Client-side verification is the process of checking, and it also allows you to see the application status of your policies. Specifically, event IDs 813 or 814 in the Applications and Services Logs > Microsoft > Windows > Devicemanagement-Enterprise-Diagnostics-Provider > Admin path indicate that a string policy has been successfully applied to Windows 11 or 10 devices.
Remove Assigned Group
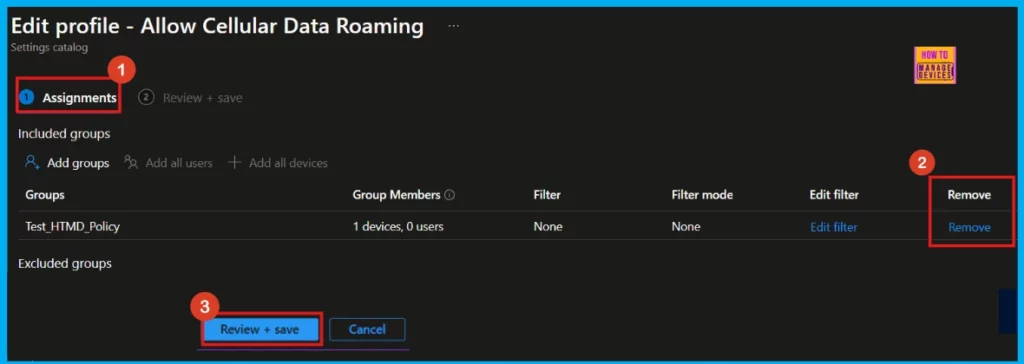
Removing a group assigned to a policy is frequently required for reasons like security updates or improved operational workflows. The following screenshot demonstrates the process of removing an assigned group from the policy. Once the removal is complete, remember to click Review + Save.
For detailed information, you can refer to our previous post – Learn How to Delete or Remove App Assignment from Intune using by Step-by-Step Guide.
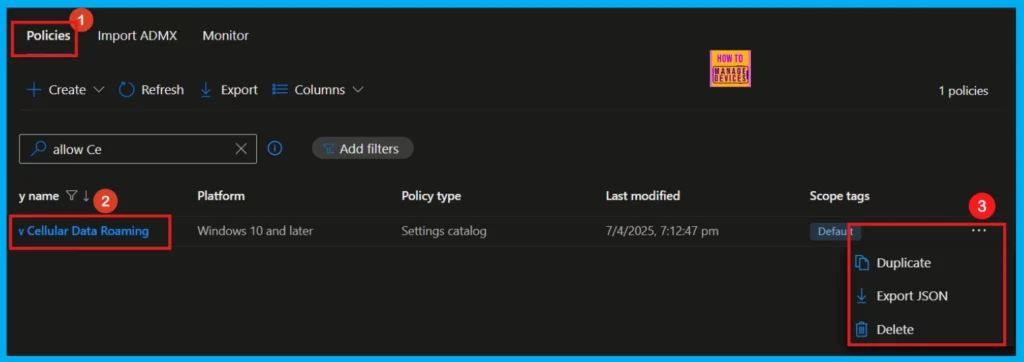
Deleting a Policy From Intune
Deleting a policy in Microsoft Intune may be required for various reasons, including security updates or operational workflows. The following screenshot provides a demonstration of this process.
For detailed information, you can refer to our previous post – How to Delete Allow Clipboard History Policy in Intune Step by Step Guide.
Need Further Assistance or Have Technical Questions?
Join the LinkedIn Page and Telegram group to get the latest step-by-step guides and news updates. Join our Meetup Page to participate in User group meetings. Also, Join the WhatsApp Community to get the latest news on Microsoft Technologies. We are there on Reddit as well.
Author
Anoop C Nair has been Microsoft MVP for 10 consecutive years from 2015 onwards. He is a Workplace Solution Architect with more than 22+ years of experience in Workplace technologies. He is a Blogger, Speaker, and Local User Group Community leader. His primary focus is on Device Management technologies like SCCM and Intune. He writes about technologies like Intune, SCCM, Windows, Cloud PC, Windows, Entra, Microsoft Security, Career, etc.
