Let’s learn how to Change User Account Control Settings in Windows 11. User Account Control (UAC, short for User Account Control) helps prevent malware from damaging your device and helps organisations manage their desktops well.
The User Access Control settings help prevent potentially harmful programs and software from making changes to your device. If you’ve received a message about adjusting these controls on an enrolled work or school device, it means that your organization requires your device to have more protection.
With User Account Control (aka UAC), applications and tasks always run in the security context of a non-admin account until an administrator specifically authorises administrator-level access to the system. UAC helps to block the automatic installation of unauthorised applications to prevent any unexpected changes to the system settings.
It allows users to log on to their computers using a standard user account. UAC helps protect your device by limiting the privileges of applications, preventing them from making unauthorized system changes. New versions of Windows have made UAC more refined and less intrusive; it is the most valuable security feature of Windows.

Process to Change User Account Control Settings
Windows has the unique feature of providing various methods for modifying settings; Windows helps to protect the user by providing many processes. Here, in User Account Control settings, the User can make any changes in behaviour. The methods to change the User Account Control Setting are listed below.
- Change User Account Control Settings Using Control Panel
- Change User Account Control Settings Using Registry File
What is User Account Control?
User Account Control (UAC) is a Windows security feature that protects the operating system from unauthorized changes. When changes to the system require administrator-level permission, UAC notifies the user, giving the opportunity to approve or deny the change.
UAC improves the security of Windows devices by limiting the access malicious code has to execute with administrator privileges. It empowers users to make informed decisions about actions that might affect their devices’ stability and security.
Malicious software is prevented from disabling or interfering with UAC settings unless you disable UAC. UAC is enabled by default, and you can configure it if you have administrative privileges.
Change User Account Control Settings using Control Panel
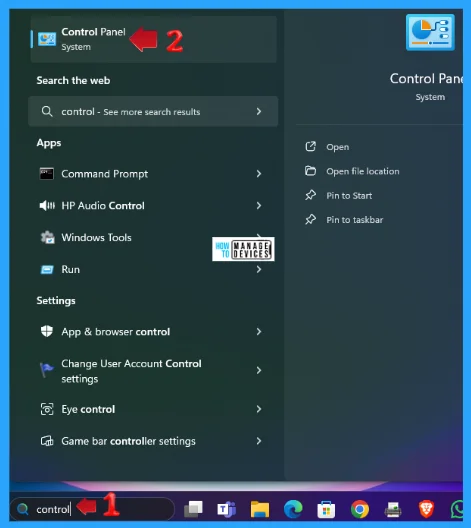
In Windows, the Control Panel is the old way to change the settings before introducing the settings app. To do so, type Control Panel on the Search Box on the Taskbar, and choose the appropriate option as required, as shown in the figure below.
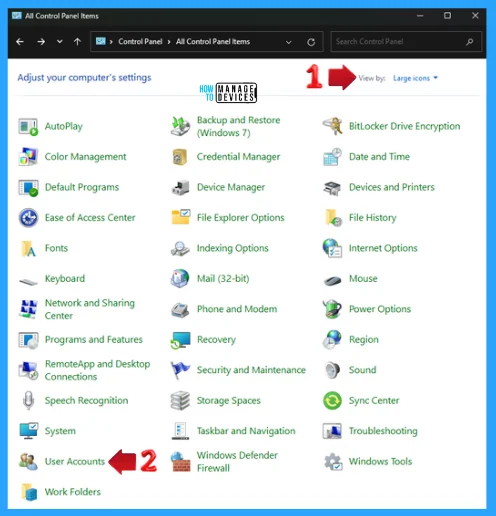
When you click on the control panel window then, it shows all the control panel items. Select the View by options and choose Large or Small icons sub-options; find the User Accounts from the listed options as shown in the image below.
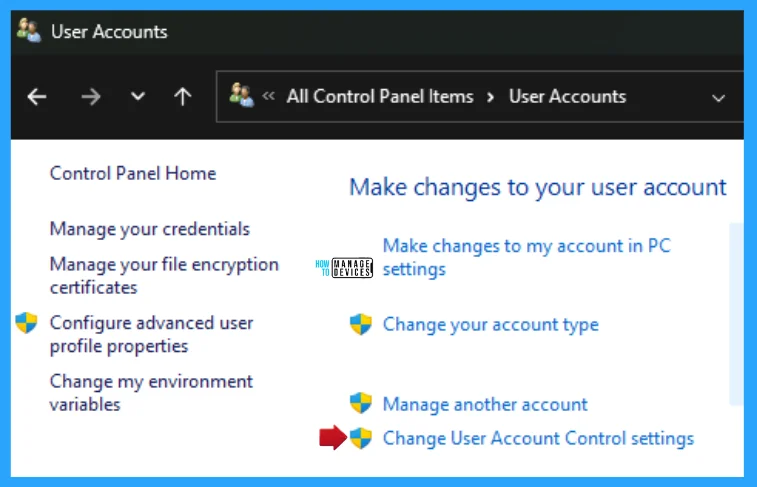
When you enter the User Accounts settings under the Make changes to your user account, which is used to make changes to my account in PC settings, select and click on the Change User Account Control settings.
The User Account Control Settings window opens. You can see the option and choose when to be notified about changes to your computer. User Account Control helps prevent potentially harmful programs from making changes to your computer.
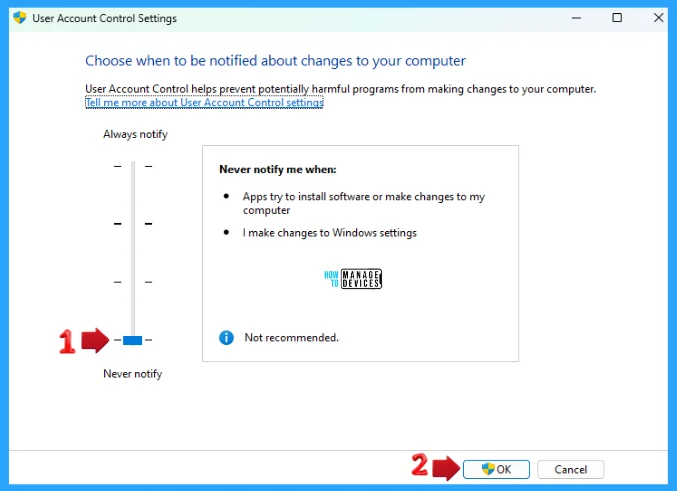
If you choose the Never Notify option, the user is never notified about apps trying to install software, make changes to the computer, or change Windows settings.
This setting is Not Recommended for the users. If you want this setting, then press OK to confirm.
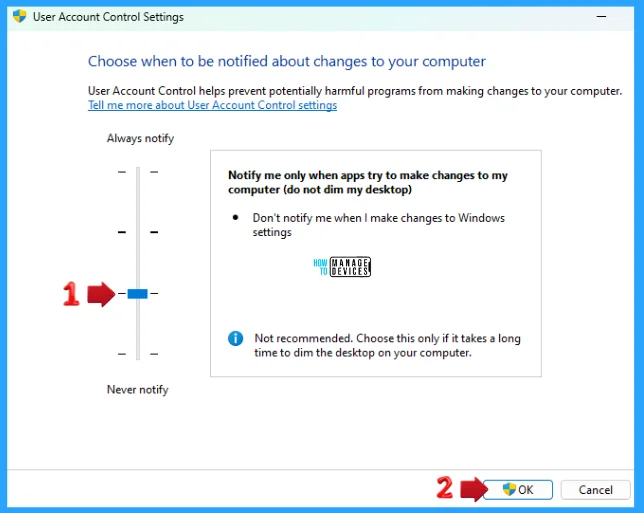
The next option in the User Account Control Settings window is “Notify me only when apps try to make changes to my computer (do not dim my desktop).” Do not notify me when I make changes to Windows settings.
This setting is Not Recommended. Choose this only if it takes a long time to dim the desktop on your computer. If you want this setting, then press OK to confirm.
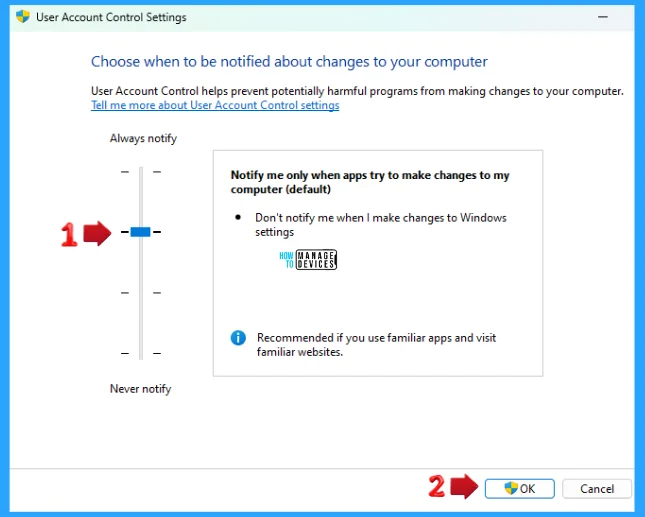
Another option in the User Account Control Settings window is “Notify me only when apps try to make changes to my computer (default).” Do not notify me when I make changes to Windows settings.
This setting is recommended if you use familiar apps and visit familiar websites. If you want this setting, then press OK to confirm.
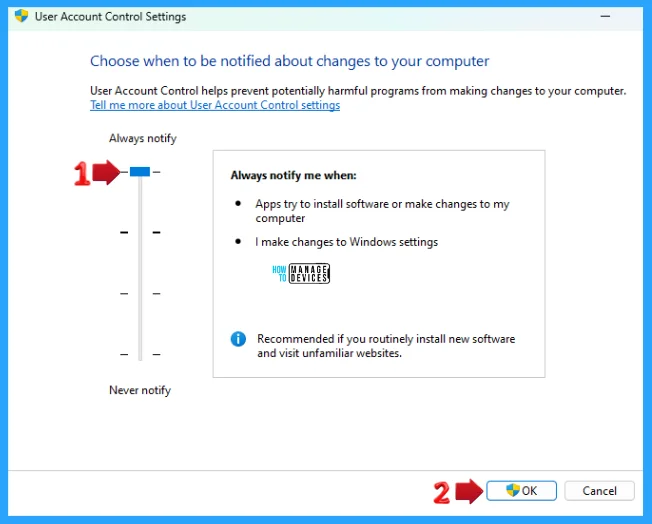
The last setting of the User Account Control Settings window is “Always notify me”. Apps try to install software of make changes to my computer. I make changes to Windows settings.
This setting is Recommended if you routinely install new software and visit unfamiliar websites. If you want this setting, then press OK to confirm.
Change User Account Control Settings using Registry File
First, you can change User Account Control Settings using the .reg file. To create a .reg file, open NotePad, type the following code, and name it NeverNotify. Then, save it on the desktop using the .reg extension.
When the file is saved at your selected location, double-click on it. The User Account Control Window will open; click Yes to continue. Then, the Registry Editor Waring window will open.
Adding information can unintentionally change or delete values and cause components to stop working correctly. If you do not trust the source of this information in the path you created, do not add it to the registry; otherwise, click on Yes to continue.
The next window shows that the key and value you added have been successfully added to the registry editor. Now click on OK and restart your PC to add the applicable test.
Windows Registry Editor Version 5.00

[HKEY_LOCAL_MACHINE\SOFTWARE\Microsoft\Windows\CurrentVersion\Policies\System]
"PromptOnSecureDesktop"=dword:00000000
"EnableLUA"=dword:00000001
"ConsentPromptBehaviorAdmin"=dword:00000000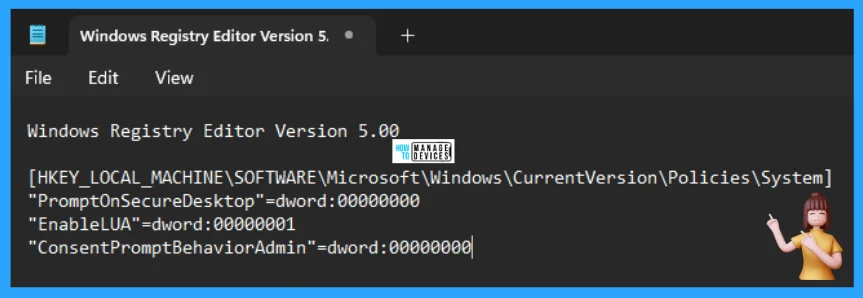
Second, you can also change User Account Control Settings using the .reg file. To create a .reg file, open NotePad, type the following code, and name it DoNotDim. Then, save it on the desktop using the .reg extension.
When the file is saved at your selected location, double-click on it. The User Account Control Window will open; click Yes to continue. Then, the Registry Editor Waring window will open.
Adding information can unintentionally change or delete values and cause components to stop working correctly. If you do not trust the source of this information in the path you created, do not add it to the registry; otherwise, click on Yes to continue.
The next window shows that the key and value you added have been successfully added to the registry editor. Now click on OK and restart your PC to add the applicable test.
Windows Registry Editor Version 5.00

[HKEY_LOCAL_MACHINE\SOFTWARE\Microsoft\Windows\CurrentVersion\Policies\System]
"PromptOnSecureDesktop"=dword:00000000
"EnableLUA"=dword:00000001
"ConsentPromptBehaviorAdmin"=dword:00000005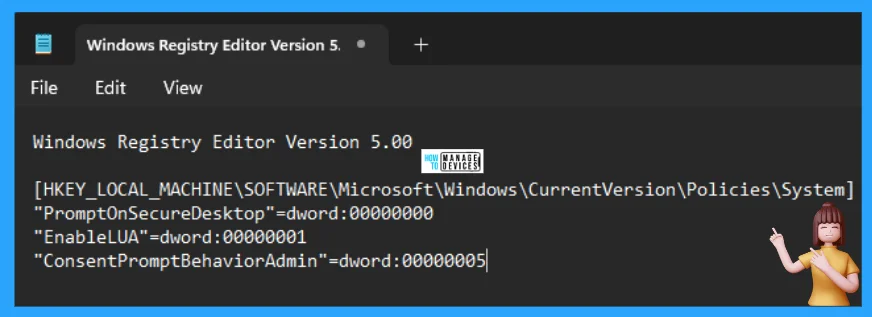
Third, you can change User Account Control Settings using the .reg file. To create a .reg file, open NotePad, type the following code, and name it Default. Then, save it on the desktop using the .reg extension.
When the file is saved at your selected location, double-click on it. The User Account Control Window will open; click Yes to continue. Then, the Registry Editor Waring window will open.
Adding information can unintentionally change or delete values and cause components to stop working correctly. If you do not trust the source of this information in the path you created, do not add it to the registry; otherwise, click on Yes to continue.
The next window shows that the key and value you added have been successfully added to the registry editor. Now click on OK and restart your PC to add the applicable test.
Windows Registry Editor Version 5.00

[HKEY_LOCAL_MACHINE\SOFTWARE\Microsoft\Windows\CurrentVersion\Policies\System]
"PromptOnSecureDesktop"=dword:00000001
"EnableLUA"=dword:00000001
"ConsentPromptBehaviorAdmin"=dword:00000005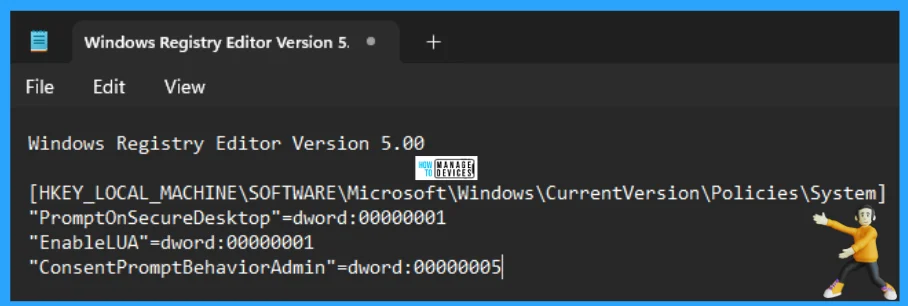
Fourth, you can change User Account Control Settings using the .reg file. To create a .reg file, open NotePad, type the following code, and name it AlwaysNotify. Then, save it on the desktop using the .reg extension.
When the file is saved at your selected location, double-click on it. The User Account Control Window will open; click Yes to continue. Then, the Registry Editor Waring window will open.
Adding information can unintentionally change or delete values and cause components to stop working correctly. If you do not trust the source of this information in the path you created, do not add it to the registry; otherwise, click on Yes to continue.
The next window shows that the key and value you added have been successfully added to the registry editor. Now click on OK and restart your PC to add the applicable test.
Windows Registry Editor Version 5.00

[HKEY_LOCAL_MACHINE\SOFTWARE\Microsoft\Windows\CurrentVersion\Policies\System]
"PromptOnSecureDesktop"=dword:00000001
"EnableLUA"=dword:00000001
"ConsentPromptBehaviorAdmin"=dword:00000002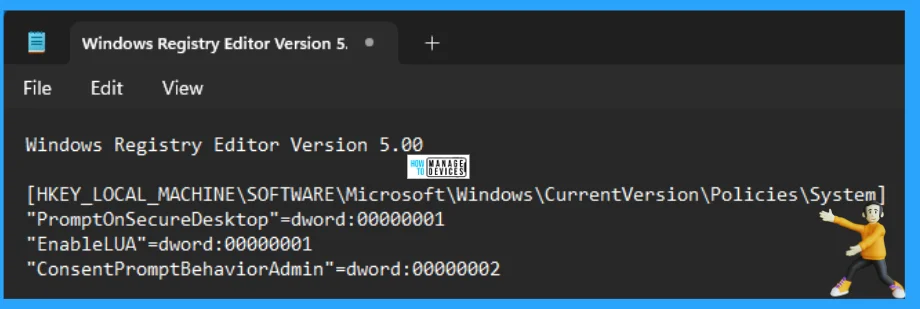
NOTE! Restart your PC after making such changes using Registry File.
The Benefits of User Account Control (UAC) Setting
UAC allows all users to sign in to their devices using a standard user account. Processes launched using a standard user token might perform tasks using access rights granted to a standard user.
For instance, Windows Explorer automatically inherits standard user-level permissions. Applications started using Windows Explorer (for example, by opening a shortcut) also run with the standard set of user permissions. Most applications, including the ones included with the operating system, are designed to work properly this way.
Other applications, such as those not designed with security settings in mind, might require more permissions to run successfully. These applications are referred to as legacy apps. The overview of User Account Control settings – UAC.
When a user tries to perform an action that requires administrative privileges, UAC triggers a consent prompt. The prompt notifies the user that a change is about to occur, asking for their permission to proceed:
- If the user approves the change, the action is performed with the highest available privilege
- If the user doesn’t approve the change, the action is not performed, and the application that requested the change is prevented from running
When an app requires to run with more than standard user rights, UAC allows users to run apps with their administrator token (that is, with administrative rights and permissions) instead of their default, standard user token. Users continue to operate in the standard user security context, while enabling certain apps to run with elevated privileges, if needed.
I hope the information on How to Change User Account Control Settings in Windows 11 is helpful. Please follow us on the HTMD Community and visit our website, HTMD Forum, if you like our content. Suggest improvements, if any, and we’d love to know which topic you want us to explore next.
We are on WhatsApp. To get the latest step-by-step guides and news updates, Join our Channel. Click here – HTMD WhatsApp.
Author
Alok is a Master of Computer Applications (MCA) graduate. He loves writing on Windows 11 and related technologies. He likes to share his knowledge, quick tips, and tricks with Windows 11 or Windows 10 with the community.
