In this blog let’s learn how to fix Windows 365 Cloud PCs Provisioned with warning issue in Microsoft Intune. When a Windows 365 Cloud PC is provisioned with a warning status in Intune, it generally means the provisioning process completed but encountered non-critical issues that could affect the Cloud PC’s performance or configuration.
The first step in troubleshooting is to open the Windows 365 blade in the Intune portal, navigate to the affected Cloud PC, and review the Provisioning details. This section usually provides a description of the warning, such as missing security updates, configuration, failed policy assignments, or connectivity delays during setup.
A frequent reason for the warning status is a degraded Azure Network Connection health. If ANC checks fail due to incorrect DNS resolution, firewall rules blocking required ports, or expired credentials for domain join the provisioning process may complete with a warning. Administrators should run an ANC health check in Intune to confirm all prerequisites are met, including proper routing to domain controllers and internet resources. Additionally, ensure the provisioning policy’s image, language settings, and assigned licenses align with Microsoft’s requirements for Windows 365.
After resolving the underlying issue, you may need to reprovision the Cloud PC from the Intune portal. This will reset the device to a fresh state and apply the corrected configuration, clearing the warning in most cases. In scenarios where the warning does not impact functionality, the Cloud PC can still be used normally, but it’s best practice to address the root cause to prevent recurring provisioning problems. Documenting the resolution steps and updating provisioning policies will help ensure smooth deployments for future Cloud PCs.
Table of Contents
Common Reasons for Windows 365 Cloud PCs Provisioned with Warning Issue
Here’s a clear table you can use to summarize Windows 365 Cloud PCs provisioned with warning issues, their causes, and resolutions.
| Warning Type | Possible Cause | Resolution Steps |
|---|---|---|
| Azure Network Connection (ANC) Health Degraded | DNS misconfiguration, firewall blocking required ports, expired domain join credentials | Run ANC health check in Intune, fix DNS/firewall rules, update credentials, and retry provisioning |
| Policy or App Deployment Delay | Device configuration policies, compliance policies, or app assignments not applied during provisioning window | Review Device status in Intune, force sync, ensure policies and apps are targeted correctly |
| Outdated or Unsupported Image | Provisioning policy uses an outdated custom image or unsupported OS version | Update the provisioning policy to use the latest gallery image or update the custom image |
| Domain Join Warning | Slow or failed domain join due to network latency or incorrect credentials | Check domain join account in ANC, verify connectivity to domain controllers, and retry provisioning |
| Performance Degradation Warning | Resource limits reached in host region during provisioning | Select a different region in provisioning policy or wait for capacity availability |
| Language Pack/Region Setting Warning | Selected language or region pack failed to install during provisioning | Update provisioning policy language settings or install packs post-provisioning via Intune |
| License Mismatch | Assigned license missing Windows 365 entitlement or conflicting with other service plans | Verify user license includes valid Windows 365 SKU, adjust assignments, and reprovision if necessary |
- How to Create a New Windows 365 Provisioning Policy in Intune
- How to Change Two New Display Language Packs for Windows 365 Cloud PCs using Intune
- Windows 365 Reserve Get Up to 10 Days of Cloud PC Access During Laptop Downtime
Identify Windows 365 Cloud PCs Provisioned with Warning in Intune
To identify Windows 365 Cloud PCs that have a Provisioned with warning status, sign in to the Microsoft Intune Admin Center using your administrator credentials.
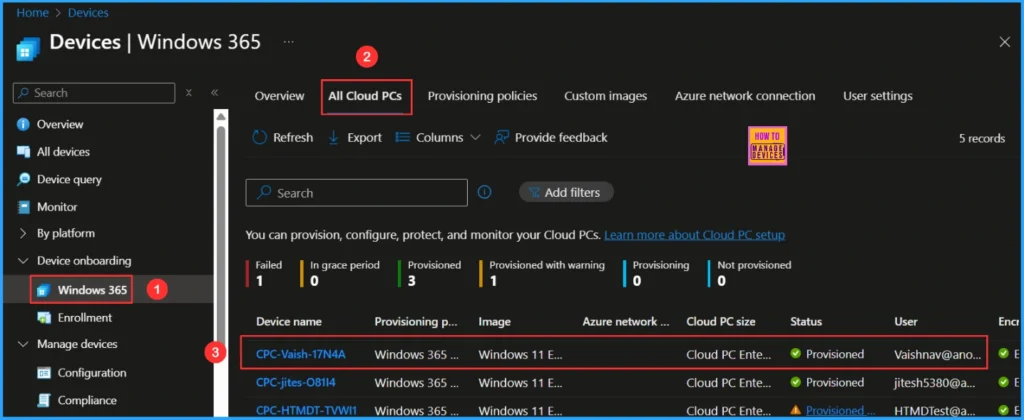
- Navigate to > Devices > Device onboarding > Windows 365
- Select All Cloud PCs tab > Find the Cloud PCs having Provisioned with warning status.
In this example, I am considering a Cloud PC named CPC-Vaish-KLV07, which has a status of Provisioned with a warning.
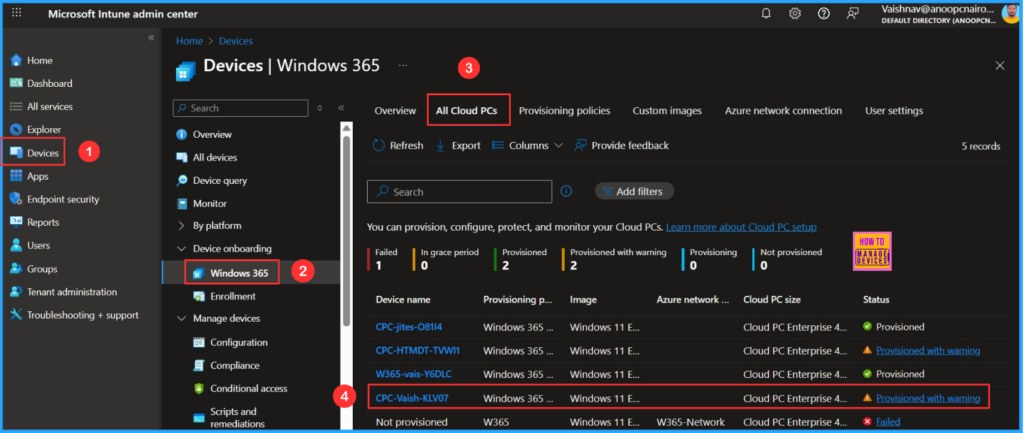
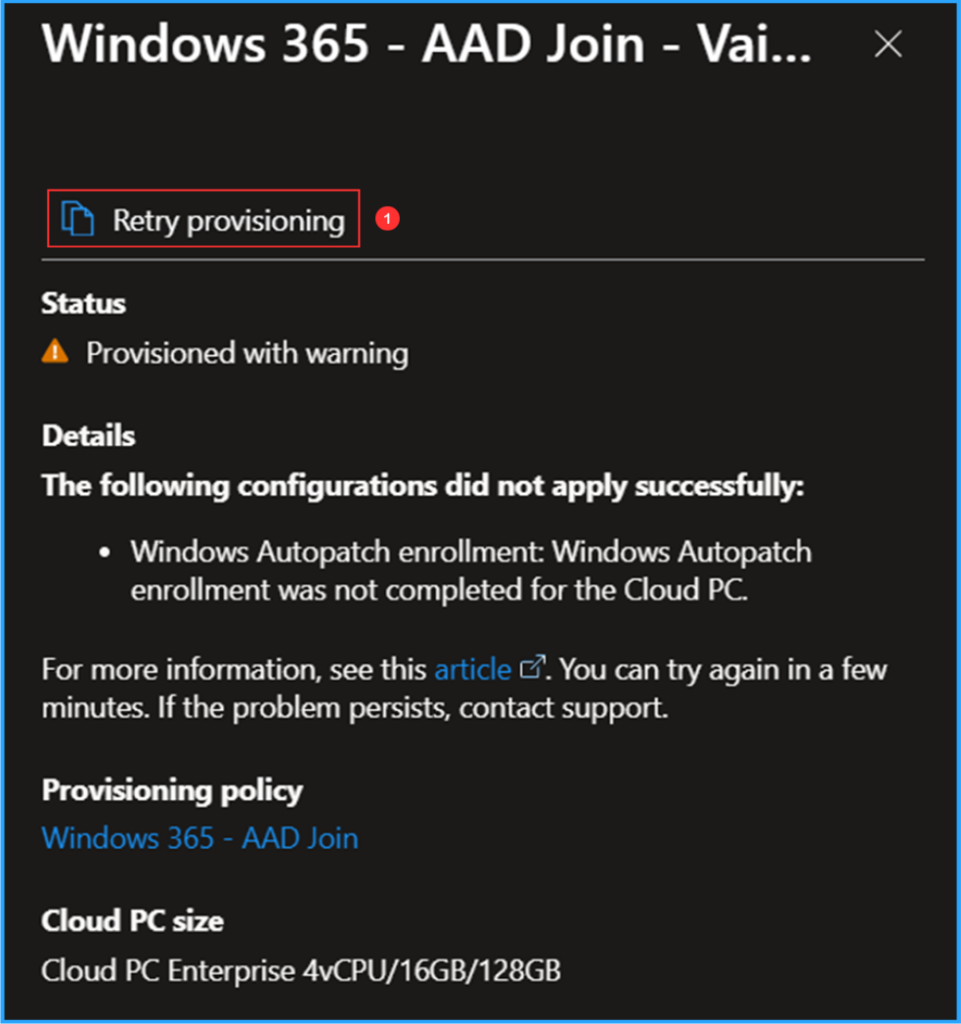
To access the detailed status description pane, click on the Provisioned with warning link. This pane provides information including the current status details, the policy used for the original provisioning, and the size of the Cloud PC. In the status details, you will find the reason for the warnings, which states: Windows Autopatch enrollment: Windows Autopatch enrollment was not completed for the Cloud PC. Next, click on the link for the Windows 365 – AAD Join Provisioning policy.
Note : For more information, see this article. You can try again in a few minutes. If the problem persists, contact support.
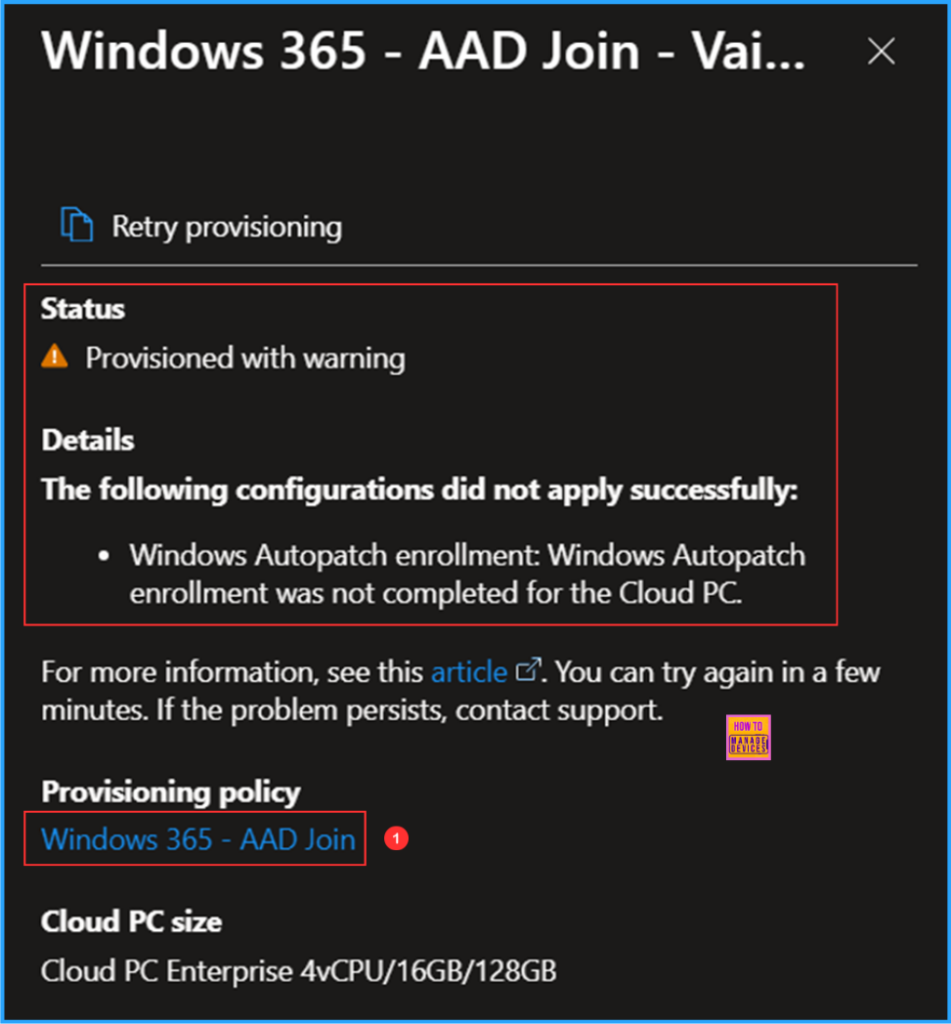
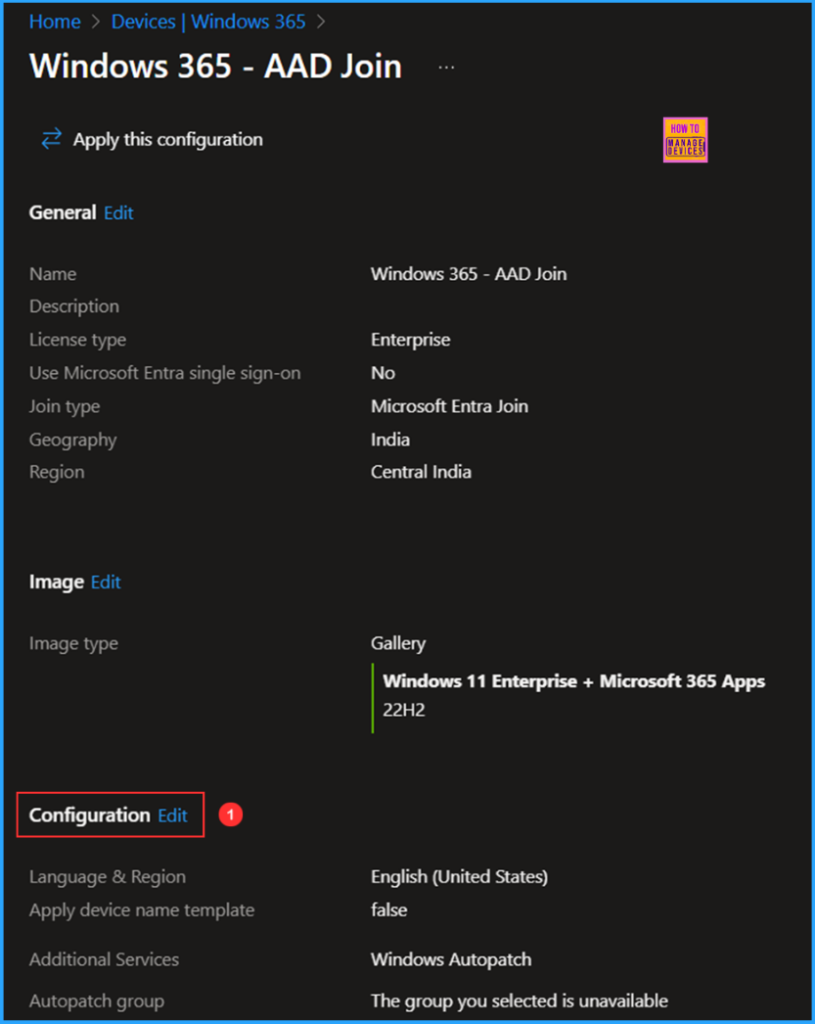
Click on the provisioning policy link to access the Windows 365 – AAD Join provisioning policy pane applied to the Cloud PC. In this pane, you will find details about the issue: “The Autopatch group I selected in this policy is unavailable.” You can either choose a correct Autopatch group or opt out of the Windows Autopatch Additional service in this policy. To make changes, click on the Edit option under the Configuration section.
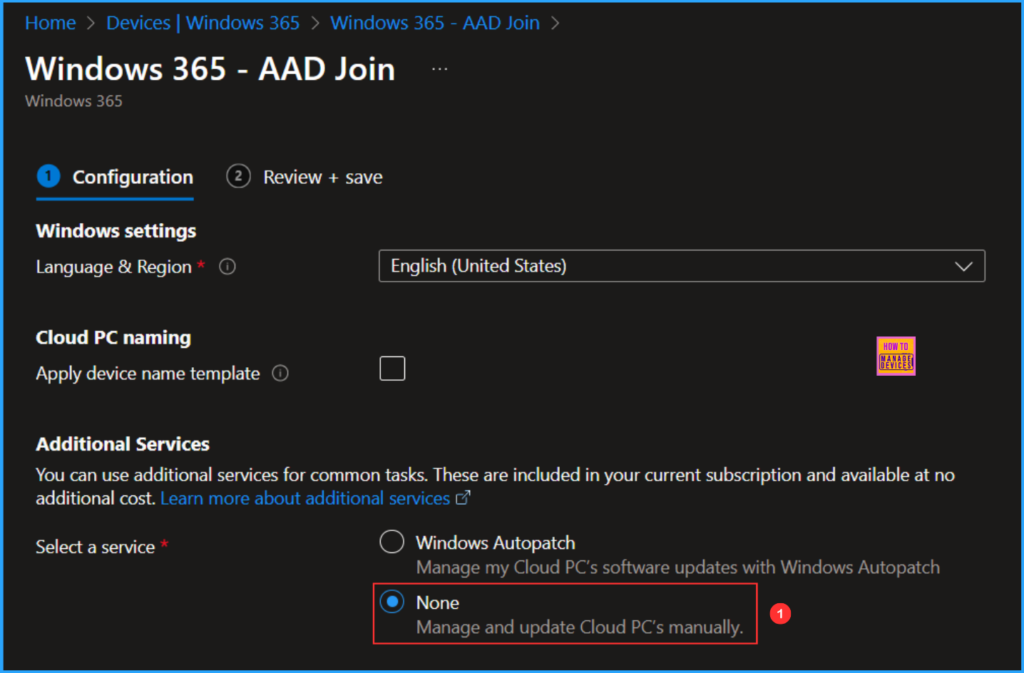
In the Additional Services section, I previously selected the Windows Autopatch service, which manages my Cloud PC’s software updates. However, I have now decided not to use this service. Therefore, I will select None here so that I can manage and update my Cloud PC manually or through Windows Update rings.
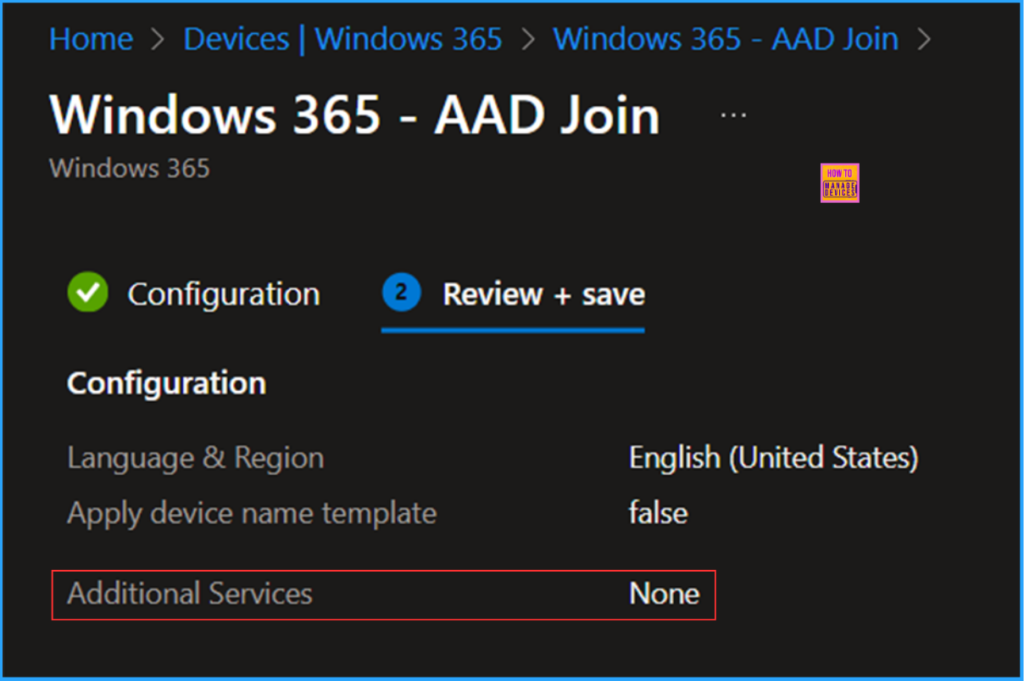
Click on Next. Under the Review + save option, validate the configuration changes once, and click on Update at the bottom of the page.
- How to Deprovision Windows 365 Cloud PC in Intune When they are in Grace Period Status
- How to Configure Windows Quick Machine Recovery Feature using Intune
- How to Create Autopilot Device Preparation Policy for Windows 365 Frontline Devices using Intune
Click on the Device | Windows 365 option at the top of the screen. Then, click on the Provisioned with warning link and select Retry provisioning. The status will change from Provisioned with warning” to Provisioning.
End Result
After a few minutes, we can check the provisioning status of our Windows 365 Cloud PC. Follow the path below in the Intune Admin Center to confirm whether the provisioning has been completed or not.
- Navigate to > Devices > Device onboarding > Windows 365
- Click on All Cloud PCs > Device Name “CPC-Vaish-17N4A” has been provisioned successfully.
The Cloud PC assigned to my user ID was CPC-Vaish-KLV07. After reprovisioning, the last five random letters changed to CPC-Vaish-17N4A.
Need Further Assistance or Have Technical Questions?
Join the LinkedIn Page and Telegram group to get the latest step-by-step guides and news updates. Join our Meetup Page to participate in User group meetings. Also, Join the WhatsApp Community to get the latest news on Microsoft Technologies. We are there on Reddit as well.
Author
Vaishnav K has over 11 years of experience in SCCM, Device Management, and Automation Solutions. Writes and imparts knowledge about Microsoft Intune, Azure, PowerShell scripting, and automation. Check out my profile on LinkedIn.

