Today we are discussing how to configure BranchCache for network files using Intune policies. BranchCache is a Windows feature that helps improve file access speed in branch offices by locally caching content that users download from servers located at the main office.
When another user in the same branch requests the same file, it is retrieved from the local cache instead of downloading again from the WAN, which saves time and reduces network traffic. Configuring BranchCache helps organizations improve efficiency and performance.
It ensures that users in remote or branch locations can access shared files quickly, even when the network connection to the main office is slow or has high latency. This improves the overall user experience and reduces delays in daily work. If the policy is set to Enabled, the BranchCache maximum round-trip latency setting is activated for all client computers under that policy.
On the other hand, if the policy is Disabled, BranchCache client computers revert to the default latency setting of 80 milliseconds. This means caching will begin once latency exceeds 80 ms, unless otherwise configured locally.
Table of Contents
How this Policy Helpful to the organizations?
Configuring BranchCache helps organizations improve efficiency and performance.
It ensures that users in remote or branch locations can access shared files quickly, even when the network connection to the main office is slow or has high latency.
Configure BranchCache for Network Files using Intune Policies
With this Policy it helps employees work without delays and increases productivity, especially in locations with limited internet bandwidth. By using Intune policies, administrators can easily deploy and manage BranchCache settings. They can specify how and when caching begins, set latency values, and ensure consistent configuration across all client computers in the network.
Real Word Example – Corporate Office Environment
The main purpose of this policy is to control when client computers in branch offices begin caching content based on network latency, which refers to the delay that occurs while transferring data between the branch office and the main office.
- A bank with multiple branches uses BranchCache so that employees can quickly access policy documents and reports without constantly downloading from the main data center.
- A retail chain with stores across the country uses BranchCache to speed up access to daily sales reports and inventory updates, improving operational efficiency.
- How to Continue Syncing on Metered Networks on OneDrive using Intune Policy
- Prevent users from Moving their Windows Known Folders to OneDrive
- Allow Manual Start of Microsoft Account Sign In Assistant Using Intune Settings Catalog
Create a Profile First
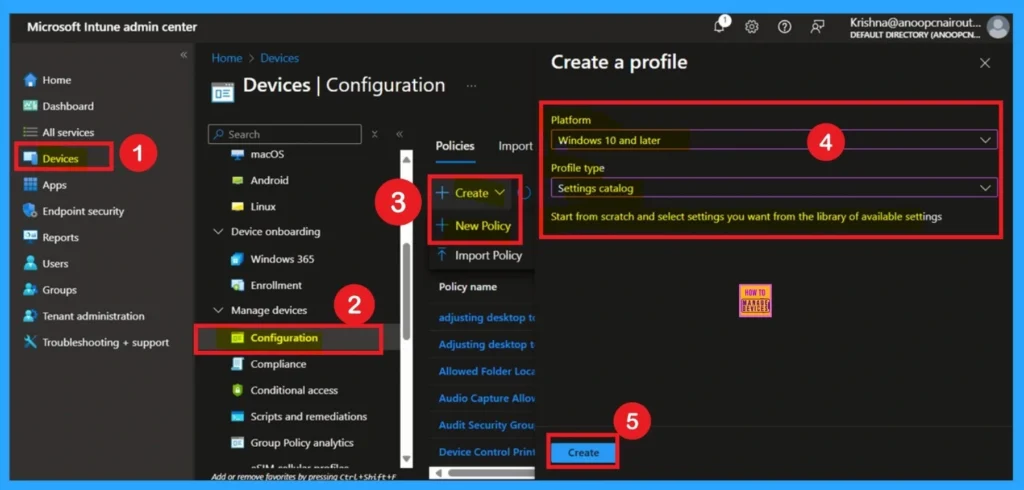
First, you need to configure this policy. Start by signing in to the Microsoft Intune Admin Center. Then, click on Devices. Under the Devices section, go to the Configuration tab, where you will find a + Create option. Click on it, and you will see 2 options, such as the new policy and the Import policy.
- Select New policy, and this will open a new window titled Create a profile.
- Here, you need to enter the Platform and Profile type details.
- After that, click Create.
What is a Basic Tab
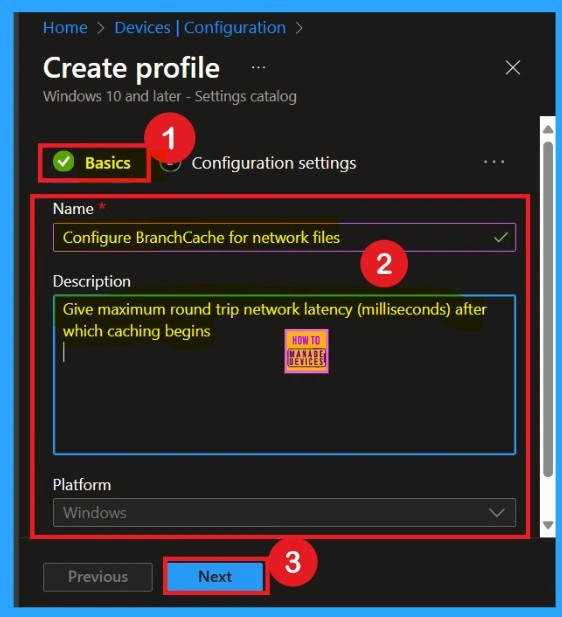
The Basics tab is the quickest step. Here, you need to enter the basic details such as the Name, Description, and Platform information. Since the platform is already set to Windows, you only need to provide a specific name and description for the policy, then click Next.
Know the Settings Picker
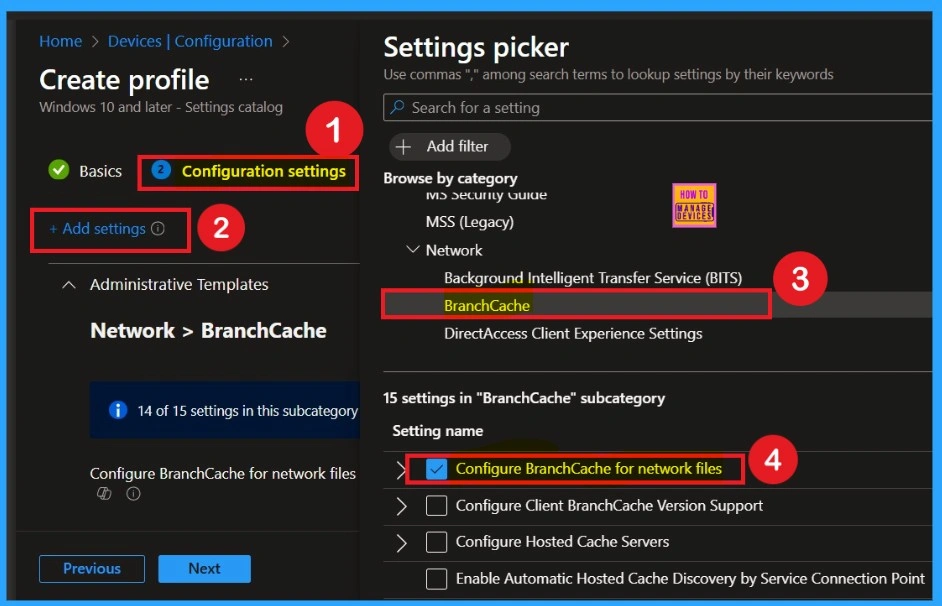
After completing the basic steps, you’ll now on to the Configuration Settings section. Here, click on the Add Setting option and this will open the Settings Picker window. From the administrative templates select Network and then choose BranchCache. Under the BranchCache options, select Configure BranchCache for network files.
Enabled Mode
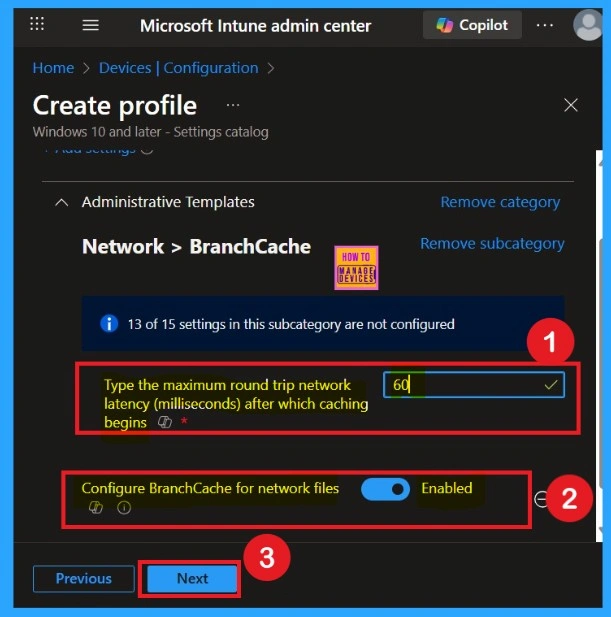
You can also enable a policy that is disabled by default. To do this, toggle the switch from left to right. Once enabled, the switch will turn blue and display the label Enabled. Then you can see another text box called Type the maximum round trip network latency (milliseconds) after which caching begins.
- I added maximum round trip network latency as 60
What is Scope Tags
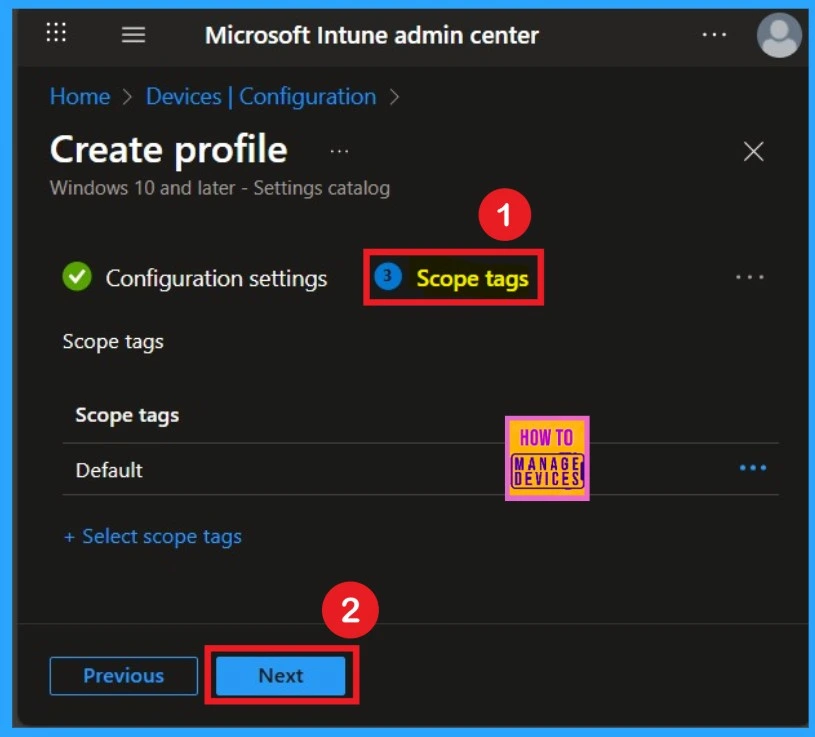
Now your are on the Scope tags section. Scope tags are used to assign policies to specific admin groups for better management and filtering. If needed, you can add a scope tag here. However, for this policy, I chose to skip this section
Assignment Tab for Selecting Group
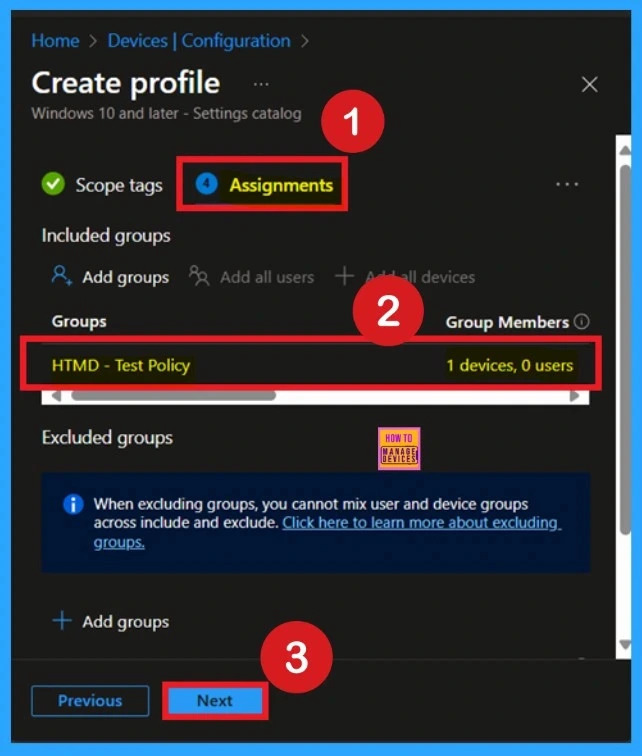
To assign the policy to specific groups, you can use the Assignment Tab. Here I click, +Add groups option under Included groups. I choose a group from the list of groups and click on the Select button. Again, I click on the Select button to continue.
Review + Create Tab
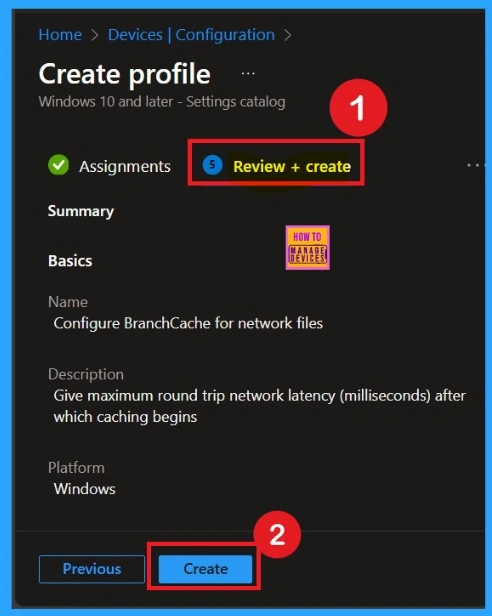
Before completing the policy creation, you can review each tab to avoid misconfiguration or policy failure. After verifying all the details, click on the Create Button. After creating the policy, you will get a success message.
Monitoring Details
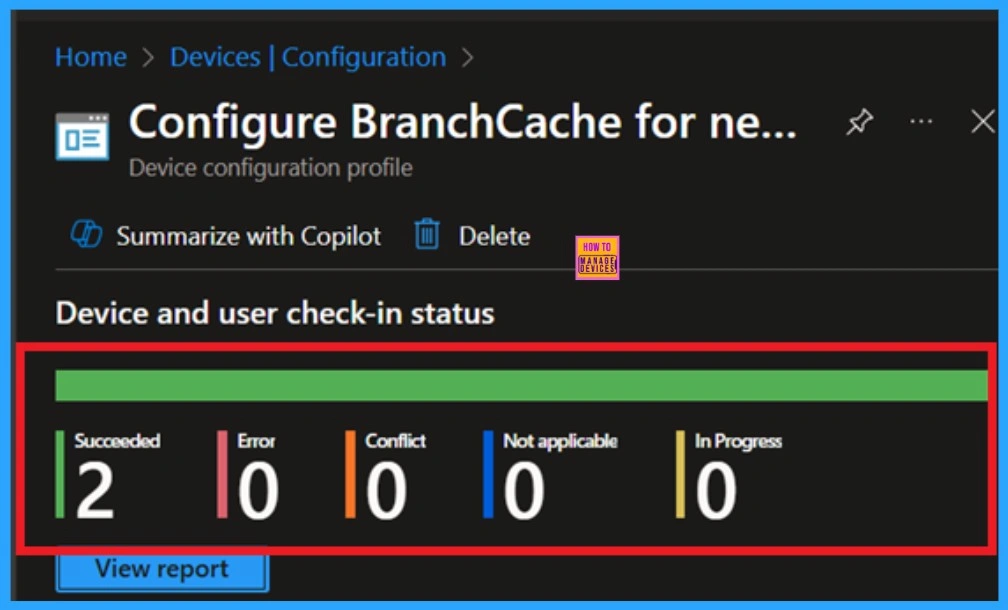
Using this method ensures the policy is applied more quickly and you can confirm the outcome without waiting the full sync time. To check the Monitoring status follow the steps;
- Navigate to Devices > Configuration Policies.
- In the Configuration Policies list, look for the policy you created.
- Click on the policy to view its deployment status and details.
Client Side Verification through Event Viewer
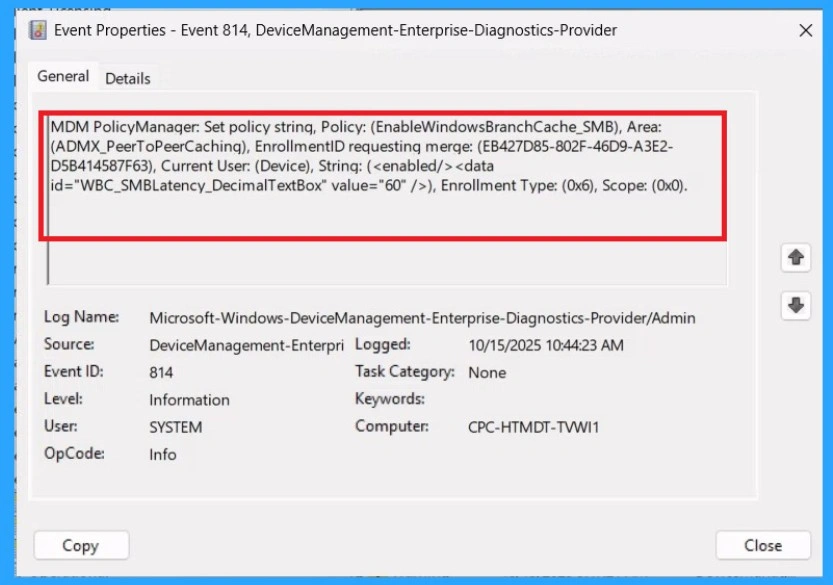
It helps you check the client side and verify the policy status. Open the Client device and open the Event Viewer. Go to Start > Event Viewer. Navigate to Logs: In the left pane, go to Application and Services Logs > Microsoft > Windows > DeviceManagement-Enterprise-Diagnostics-Provider > Admin.
| Policy Details |
|---|
| MDM PolicyManager: Set policy string, Policy: (EnableWindowsBranchCache_SMB), Area: (ADMX_PeerToPeerCaching), EnrollmentID requesting merqe: (EB427D85-802F-46D9-A3E2- D5B414587F63), Current User: (Device), Strinq: (), Enrollment Type: (0x6), Scope: (0x0). |
Remove the Assigned Policy Group
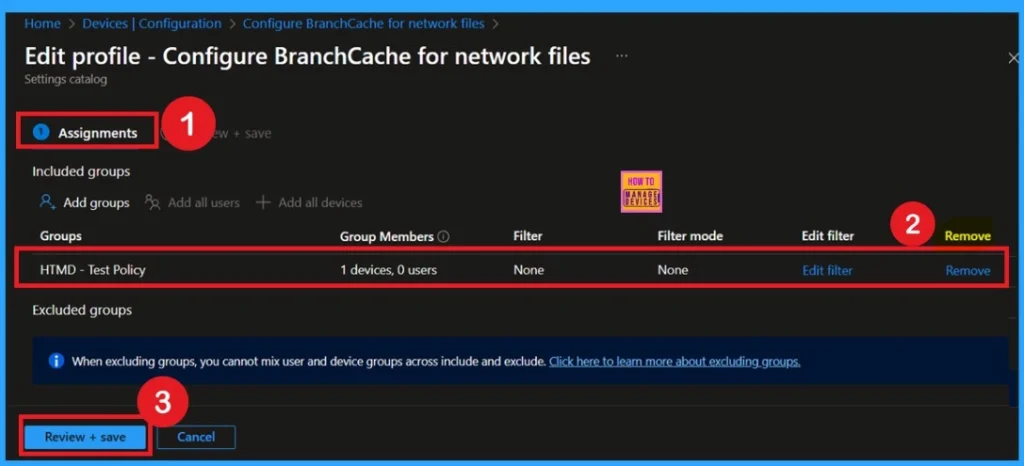
Removing a group from a policy is very simple. First, go to the Monitoring status page and scroll down until you see the Assignments Edit option. Click on it, and you will be taken directly to the Assignments section that you had previously configured. Here, you will find the Remove option.
How to Delete the Policy that you created
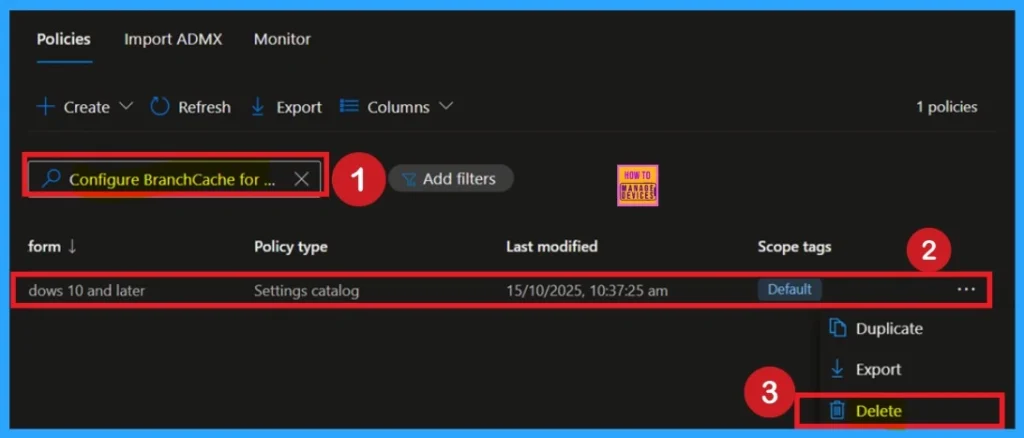
To delete a policy in Microsoft Intune, first sign in to the Microsoft Intune Admin Center. Navigate to Devices and then select Configuration. Locate and select the specific policy you want to remove. Once you’re on the policy details page, click the 3 -dot menu in the top right corner and choose Delete from the available options.
Need Further Assistance or Have Technical Questions?
Join the LinkedIn Page and Telegram group to get the step-by-step guides and news updates. Join our Meetup Page to participate in User group meetings. Also, Join the WhatsApp Community to get the latest news on Microsoft Technologies. We are there on Reddit as well.
Author
Anoop C Nair has been Microsoft MVP for 10 consecutive years from 2015 onwards. He is a Workplace Solution Architect with more than 22+ years of experience in Workplace technologies. He is a Blogger, Speaker, and Local User Group Community leader. His primary focus is on Device Management technologies like SCCM and Intune. He writes about technologies like Intune, SCCM, Windows, Cloud PC, Windows, Entra, Microsoft Security, Career, etc.

