In this blog, let’s learn how to Configure Enrolment Notifications for New Enrolled Android Devices in Intune. In this article, we will discuss why we need Enrolment Notifications, the types of notifications that can be sent to end users, and how we can configure them.
Microsoft introduced Enrolment Notifications to send notifications to users once they enroll the device to Intune. We can send the user the device details used for enrolling in Intune using an enrolment notification.
Enrolment Notification improves User experience, as these can notify users once they complete the device onboard/enrolment. As we can include device details, this would help the user validate the device details. We can include steps to report if the enrolled device is unrecognized/unauthorized.
Intune allows us to include a self-service portal link in the notification. We can also have the tenant branding within the Email Notification. We can use these notifications as Welcome messages once the device is onboarded.
- Enroll Android Devices to Android for Work in Intune
- Detect Potentially Unwanted Applications using Intune
Types of Enrolment Notifications
Intune allows admins to send notifications in two ways, Push Notifications and Email notifications, once the ed users enroll the devices. Admin can configure the Enrolment notification for each OS type. We can configure both Push Notifications and Email Notifications in the same policy/notification.
| Notification type | Supported OS |
|---|---|
| Push Notification | iOS/iPadOS (BYOD Scenarios) Android for Work (BYOD Scenarios) MacOS |
| Email Notification | iOS/iPadOS (BYOD Scenarios) Android for Work (BYOD Scenarios) MacOS Windows 10/11, excluding Hybrid Azure AD joined devices |
When we configure Email Notifications, users will receive an email with the notification configured in their Inbox. While Push Notifications are delivered in the Company portal app. Push notifications are not supported in the company portal app of Windows.
Create Enrolment Notification for Android Devices
As discussed above, we must create Enrolment Notifications for each OS type you want to target. Enrollment notifications can be used for BYOD enrolment scenarios for iOS/iPadOS and Android for Work. Before creating an Enrolment notification, we need to configure the tenant customization as this would be required while configuring.
For Email Notifications, we would be using the Tenant’s name, Logo, and Support information. Let’s see how we can customize our Tenant for notification in the steps below.
- Login to Microsoft Intune Admin Center
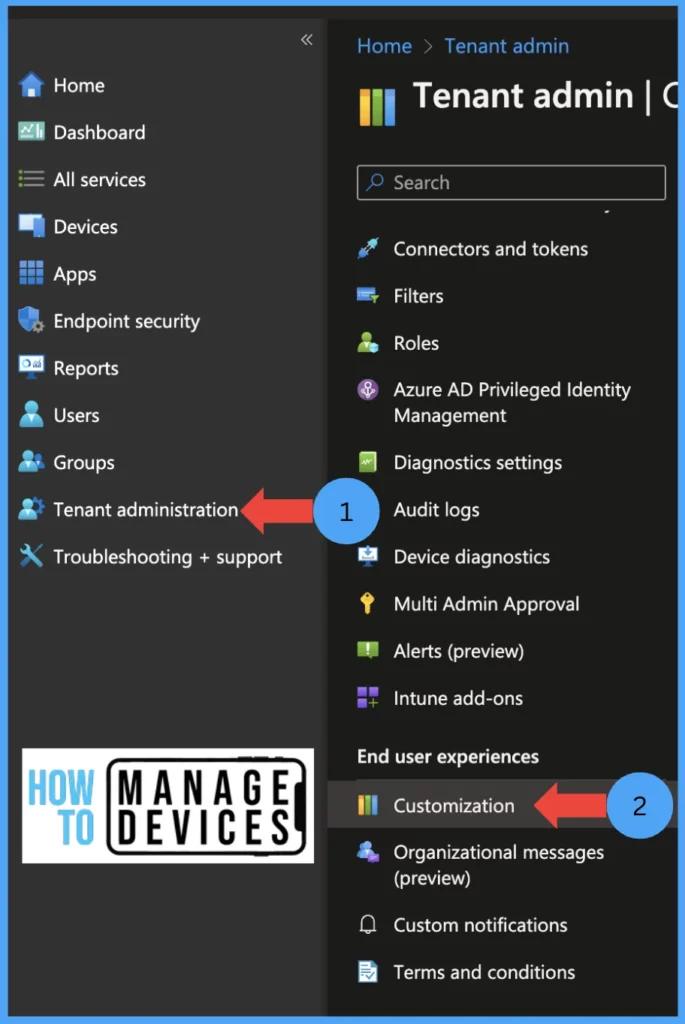
- Click on Tenant Administration
- Under end user experience > Customisation
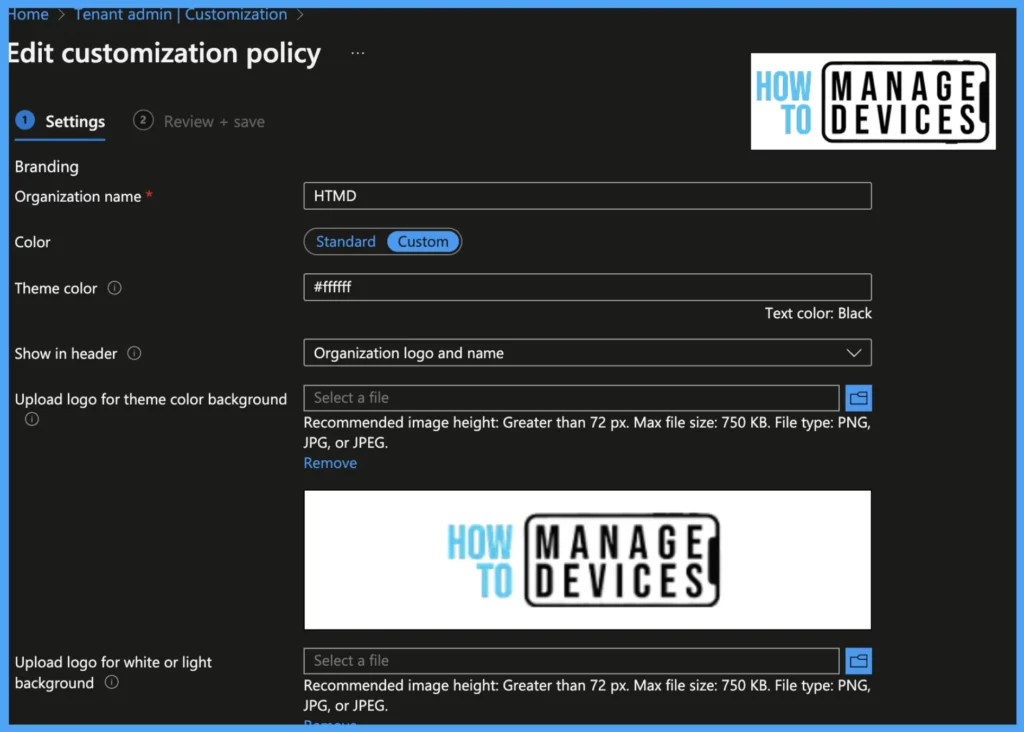
Click on Edit Settings under default Branding, provide the Organisation name (this would be the Tenant name displayed in Email Notification), choose the color for your organization, and upload the Logo for the theme color background and light-themed background.
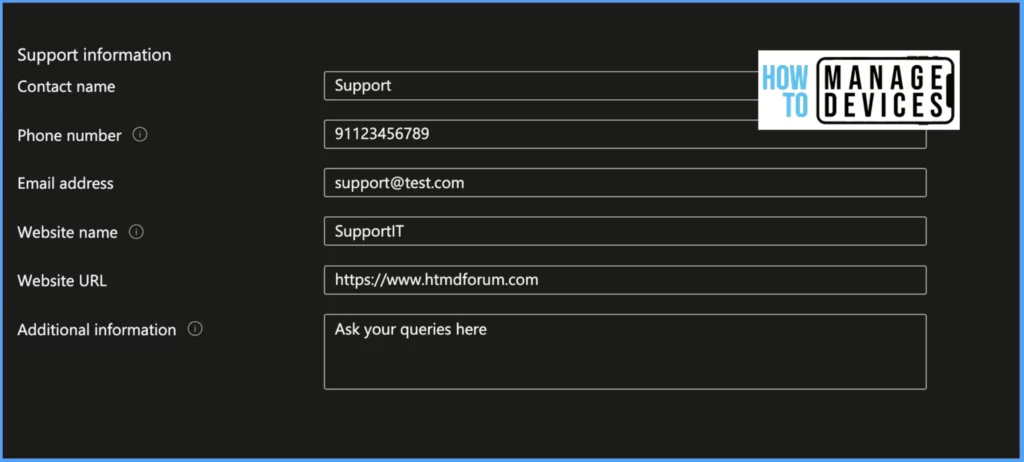
Now under Support information, provide the Contact name and Phone number for Support. Add the Email address of Support. Also, provide the Website name and URL and click Review and Save. Now verify the settings and click on Save the settings.
Now we have successfully created the branding customization for our organization. We can create a new Branding instead of using the default one. Let’s see how we can create an Enrolment Notification.
- Login to Microsoft Intune Admin Center
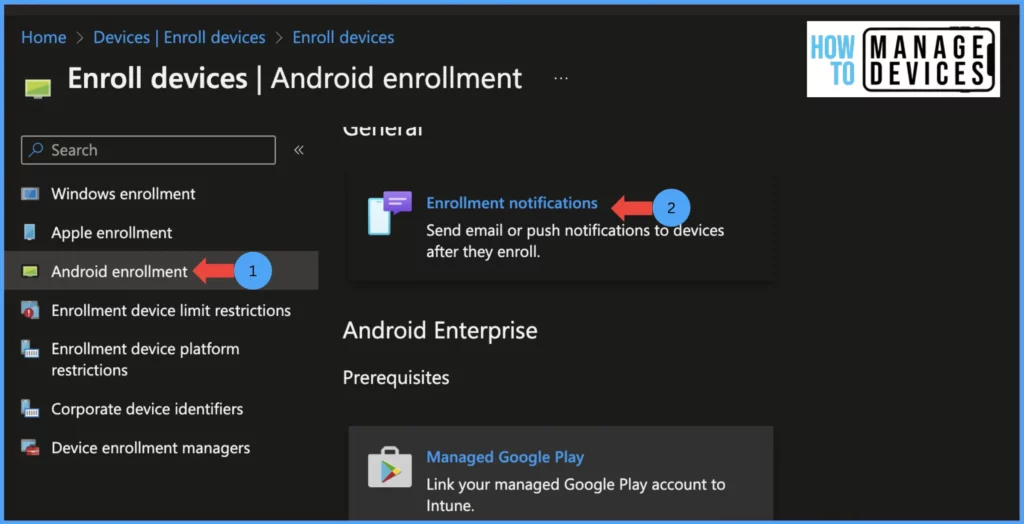
- Click on Devices > Enroll Devices.
- Now select Android Enrolment (We are using Android Enrolment for our discussion)
- Select Enrolment Notification
Now we will have two options one is for Android Enterprise Notification, and the other is for Android Device Admin Notification. As most of the organizations moved from Device admin to Android Enterprise (work profile), in this article, we will be discussing Android Enterprise Notification.
- Under Android Enterprise Notification, Click on Create notifications.
- Provide the Name and Description for the notification and click on Next.
- Now if you want to allow Push Notification click on the toggle to set ON next to send Push Notification
- Now provide the Subject for notification and enter the message you want to send to the end user in the Message text box. The character limit is set to 2000.
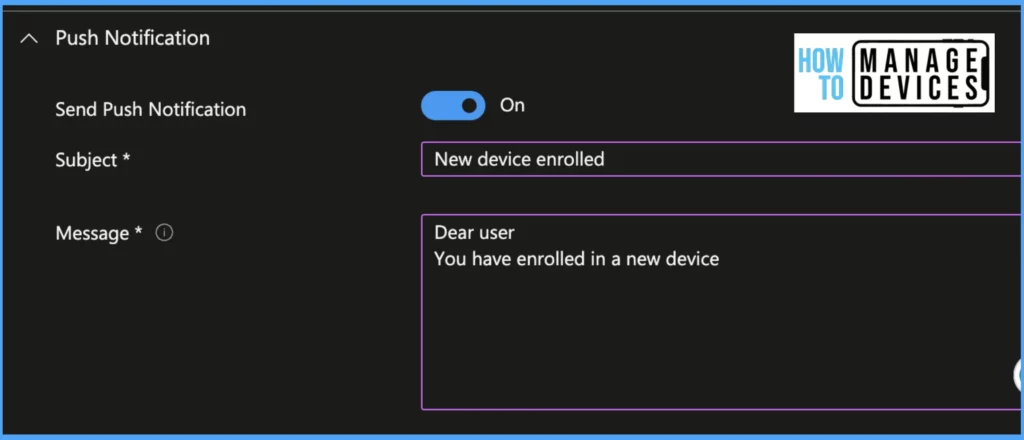
If you need to send an Email notification, Enable Send Email Notification. Enter Subject for Email.
You can use the HTML format for sending emails. By default, the Raw HTML editor is ON, and you can turn it off and send an email in normal text format. Enter the message for the Email in the Message text box. The character limit is set to 2000.
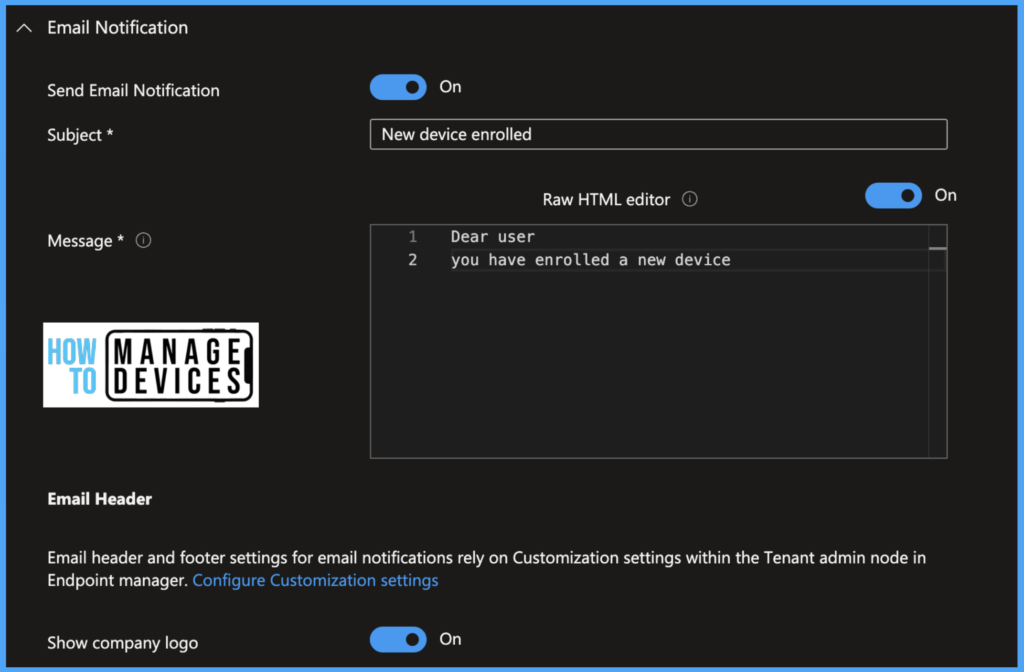
Now in, the Email Header section is used for showing your organization’s branding. Enable the button next to the Show company logo. This will include the company logo in the Email
In the Email Footer section, enable Show device details to add device details to the Email. The device details depend on the details captured by Intune after enrolling the device in Intune. The device details captured are OS Family, OS Version, Model, Serial number, and Device name.
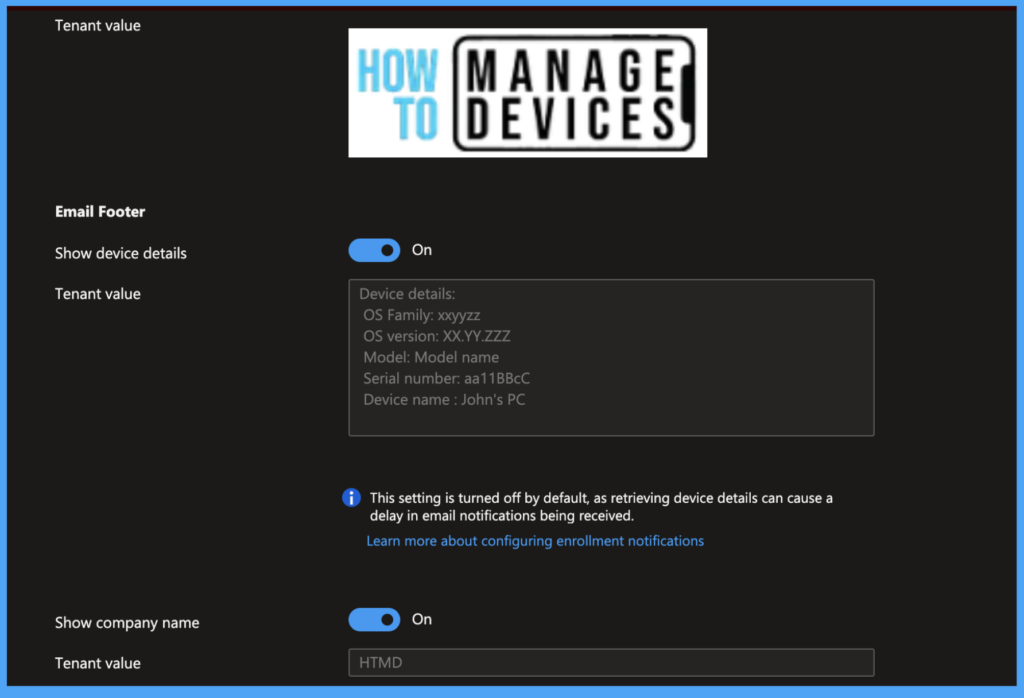
Now enable Show company name, this will show the Tenant name. Enable Show contact information, which will populate support information in the Email. Enable the Show company portal website link this will add a link to Intune self-service portal with the device details. These details are obtained from Tenant customization.
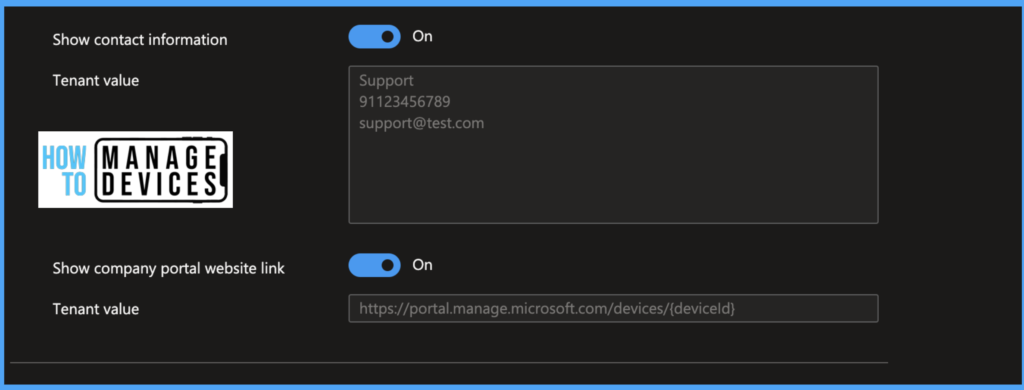
Now click o Next, select scope tags if required, and click Next and Assign the Notification to a specific group or All users. We can create multiple Enrollment notifications as per our requirements.
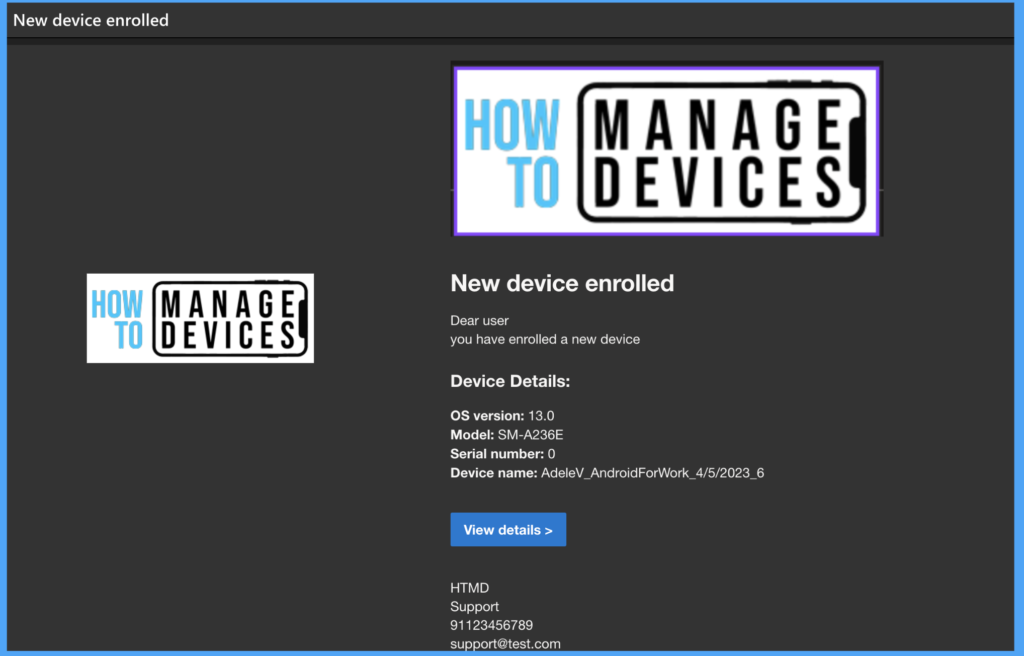
The above screenshot is an Email notification received in the user’s Inbox. The details in the Email Notification entirely depend on the details captured by Intune. In the above Serial number is shown as 0, as Intune doesn’t capture the serial number of the device.
Conclusion
In this post, we learned how to create Ennrolmet Restrictions and how to use them. That’s all folks on this topic. I hope you learned something new today. Let’s catch you all in another post.
Author
About Author – Narendra Kumar Malepati (Naren) has 11+ years of experience in IT, working on different MDM tools. Over the last seven years, Naren has been working on various features of Intune, including migration from different MDMs to Intune. Naren mainly focuses on Android, iOS, and MacOS.
