Let’s discuss Configure Enterprise Domains Policy to Automatically Protect All Work Data using Intune. Enterprise Network Domain Names policy is to define the network boundary for Windows Information Protection (WIP), thereby enabling automated data classification and leakage prevention on Windows devices.
Any data originating from or downloaded from one of these specified domains to a device running Windows Information Protection is automatically classified as “enterprise data” and receives protection. Once data is tagged as enterprise, WIP controls what actions a user can take with it.
Organization get many benefits by data from domains as enterprise. with this policy, , the organization ensures that files and information downloaded from internal file servers, company SharePoint, or SaaS applications are protected from being accidentally copied to personal apps or shared outside the secure perimeter.
The policy is critical for supporting Bring Your Own Device programs. It allows the company to secure corporate data on personal devices without the invasive process of full device management, thus improving employee satisfaction and flexibility.
Table of Contents
Configure Enterprise Domains Policy to Automatically Protect All Work Data using Intune
For example, an Admin can configure this policy for Saves a document from SharePoint. As a result, The file is automatically encrypted and tagged as “Work Data.” Because The domain sharepoint.contoso.com is on the list, so the data is instantly recognized as corporate.
- How to Configure Proxy Settings in Windows 11 and Server 2022
- Intune Firewall Proxy Requirements Modern Windows 10 Windows 11 Deployment
- Intune Firewall Proxy Requirements Modern Windows 10 Windows 11 Deployment
Steps to Configure Enterprise Network Domain Names
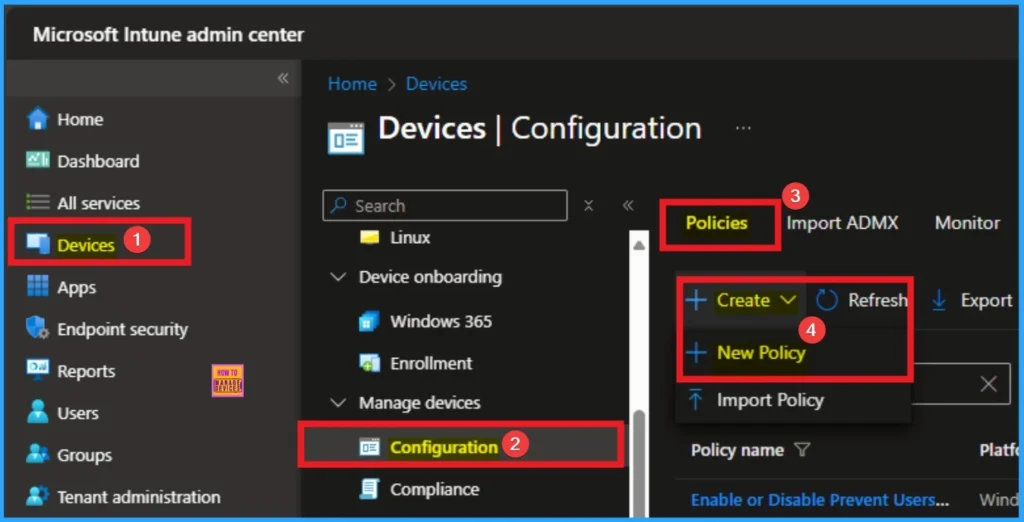
You can start the policy creation of the Enterprise Network Domain Names Policy in Intune. Using simple steps, you can easily complete the policy creation. Open the Intune admin center. Go to Devices > Configuration > Policies> + Create > + New policy.
Profile Creation
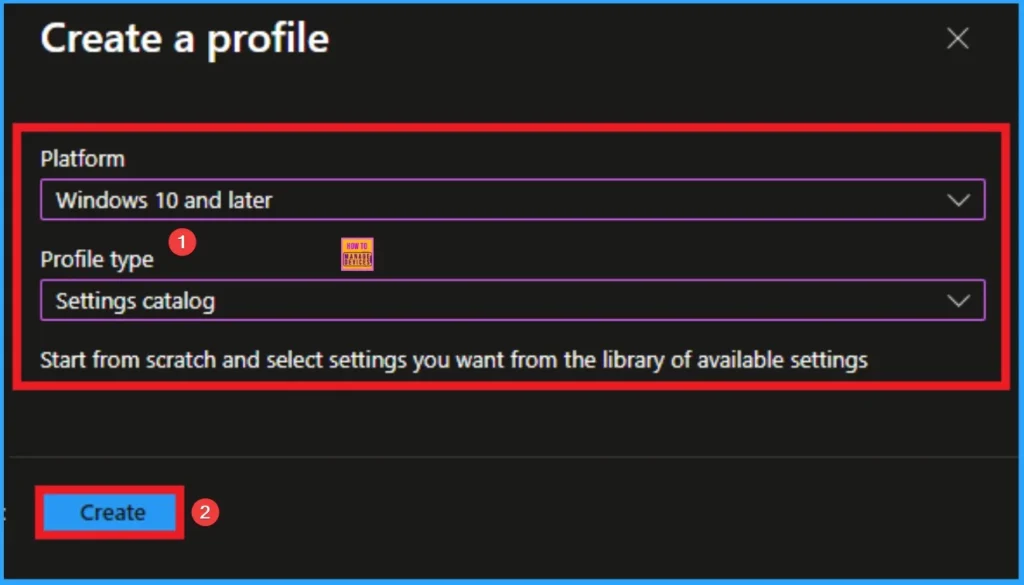
After that, you will get a profile window to select the platform and profile type. First of all, you select the platform, then you can select the profile type. Select Windows 10 and later as the platform, and select settings catalog as the profile type. Click on the create button.
Basic Tab for Adding Name and Description
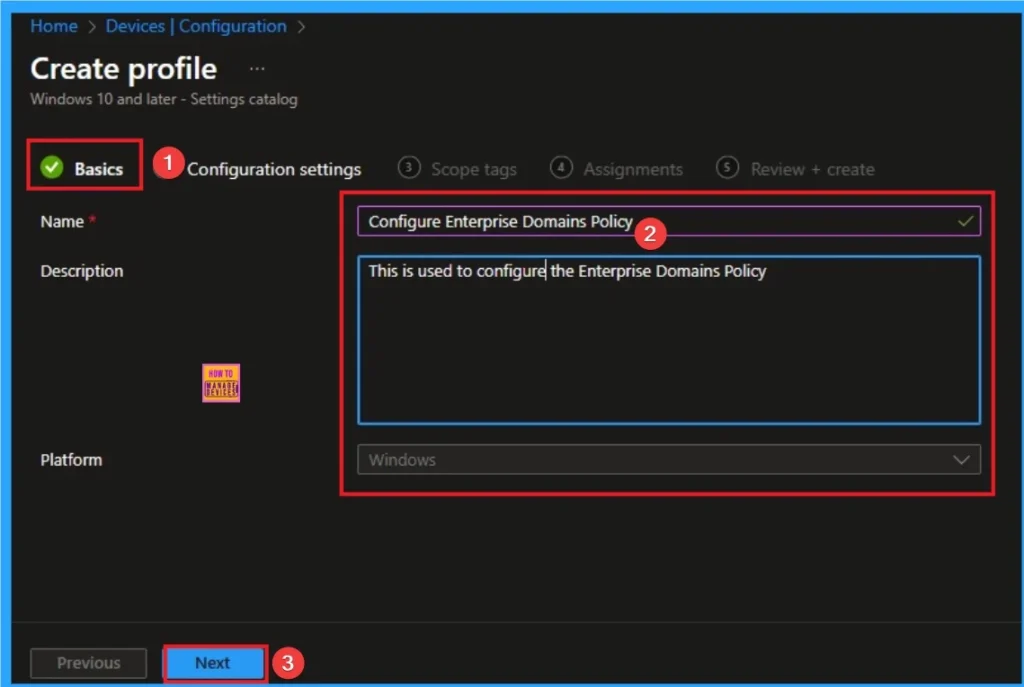
The basic tab is starting step of policy creation. On this tab, you have to give a name for the policy that you want to create. The name field is mandatory. Without giving a name, you can’t create a policy on the basic tab. You can also describe the policy, which description is not compulsory. Click on the next button.
Configuration Settings
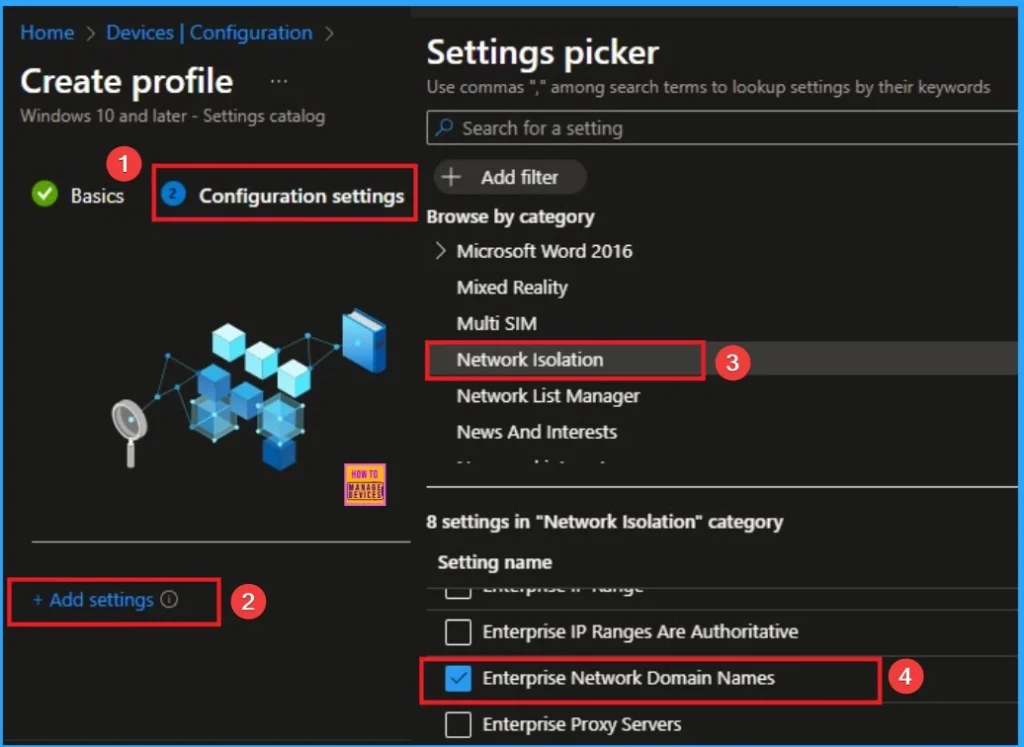
The configuration tab allows you to select specific policy settings to manage your organisation’s devices. On this page, we click on the + Add Settings hyperlink. Then you will get a settings picker that will show different types of categories to select specific settings. Here, I choose to Network Isolation category and select the Enterprise Network Domain Names settings
Add Value
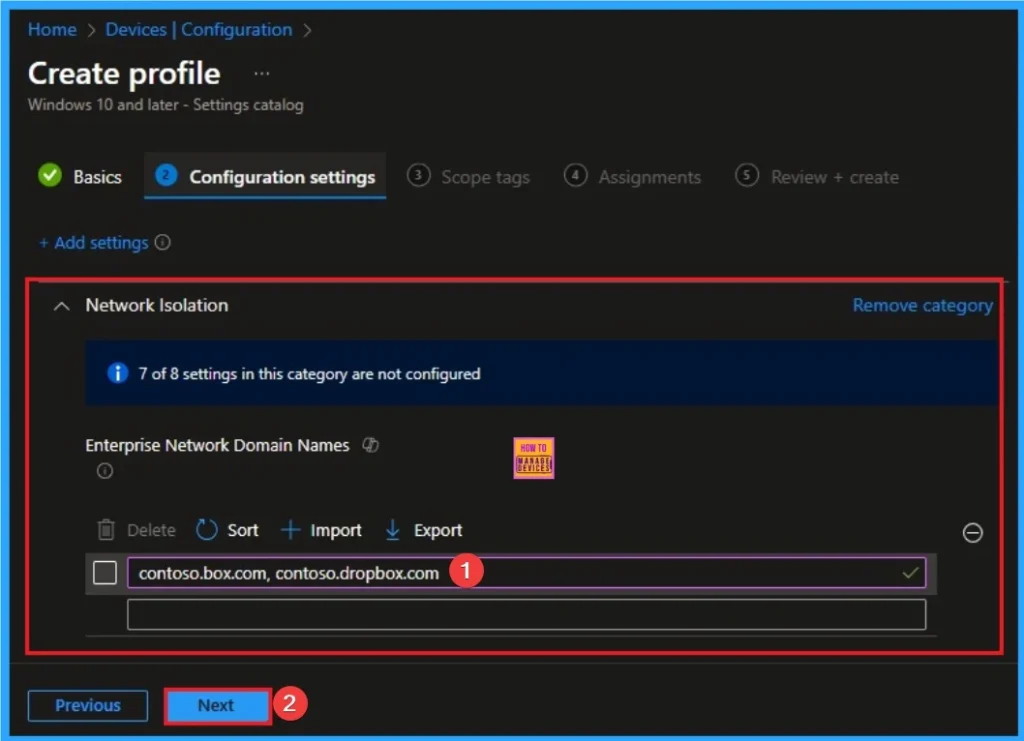
This is the list of domains that comprise the boundaries of the enterprise. This is a comma-separated list of domains, for example contoso. sharepoint. com, Fabrikam. com. Here i use contoso.box.com, contoso.dropbox.com as example.
Scope Tags
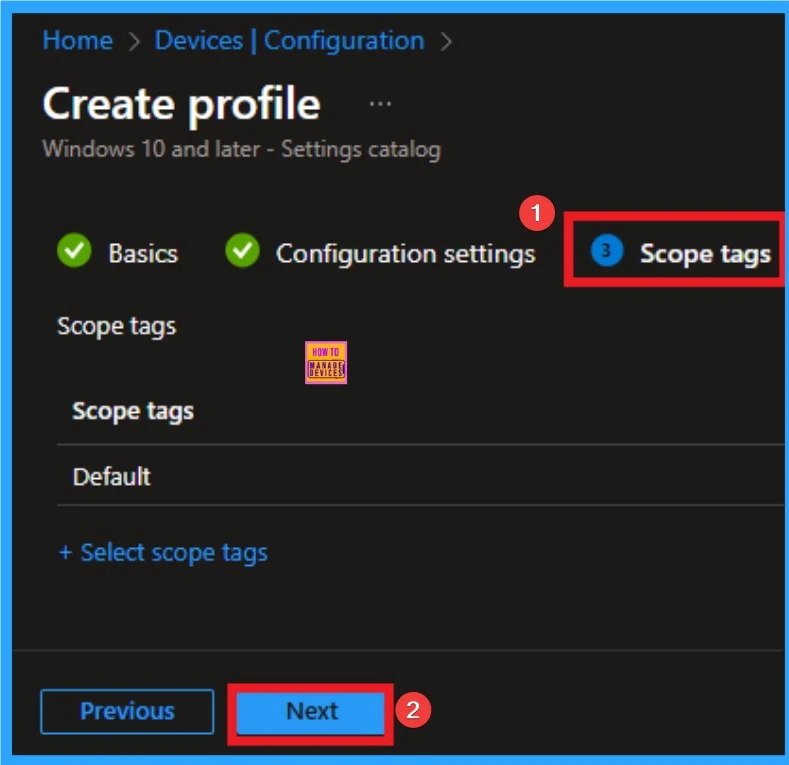
The next section is the Scope tag and which is not a compulsory step. It helps to assign this policy to a defined group of users or devices. Here, I skip the section and click on the next button.
Assignments Tab
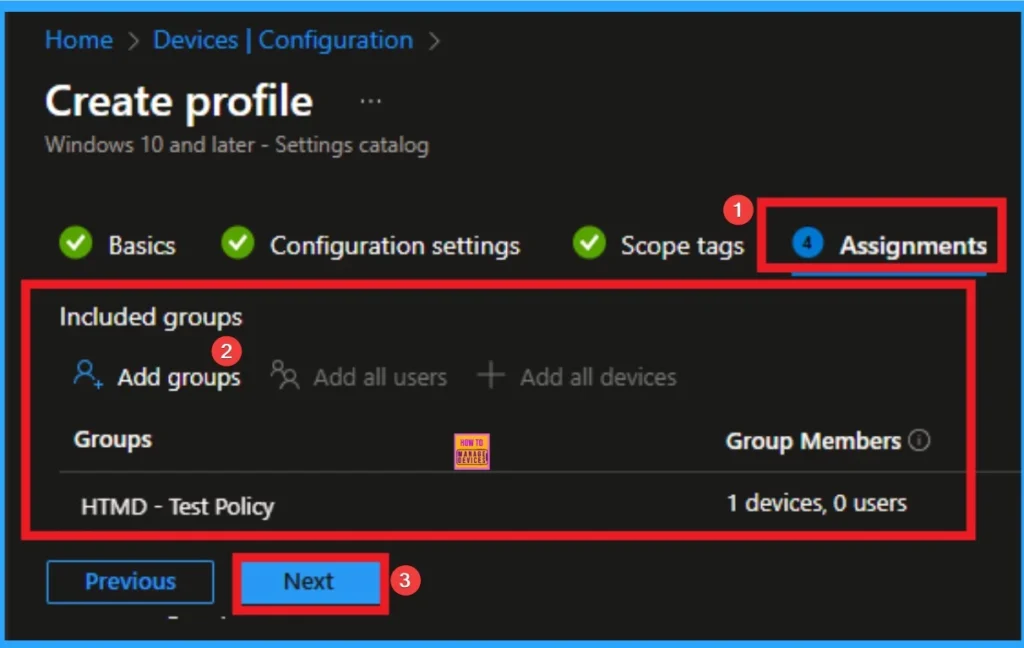
The assignments tab is the crucial step that determines which groups can be selected to assign the policy. Click on the +Add groups option under included groups. Select the group from the list of groups on your tenant.
Click on the Select button. And you can see the selected group on the Assignments tab. Click on the Next button in the window below.
Review + Create
The Review + Create tab is the last step of policy creation. On this tab, you can verify every detail of the policy which are added in the previous steps (basic configuration settings, scope tag assignments s etc). If you want to make any changes, click on the previous button; otherwise, you can click on the Create button.
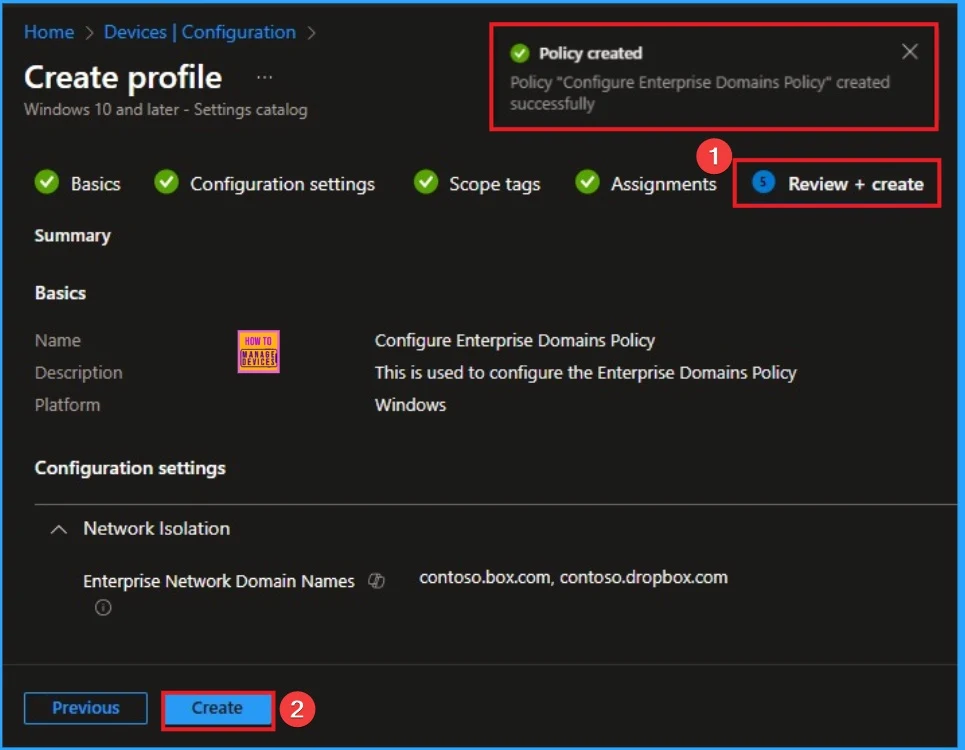
Monitoring Status
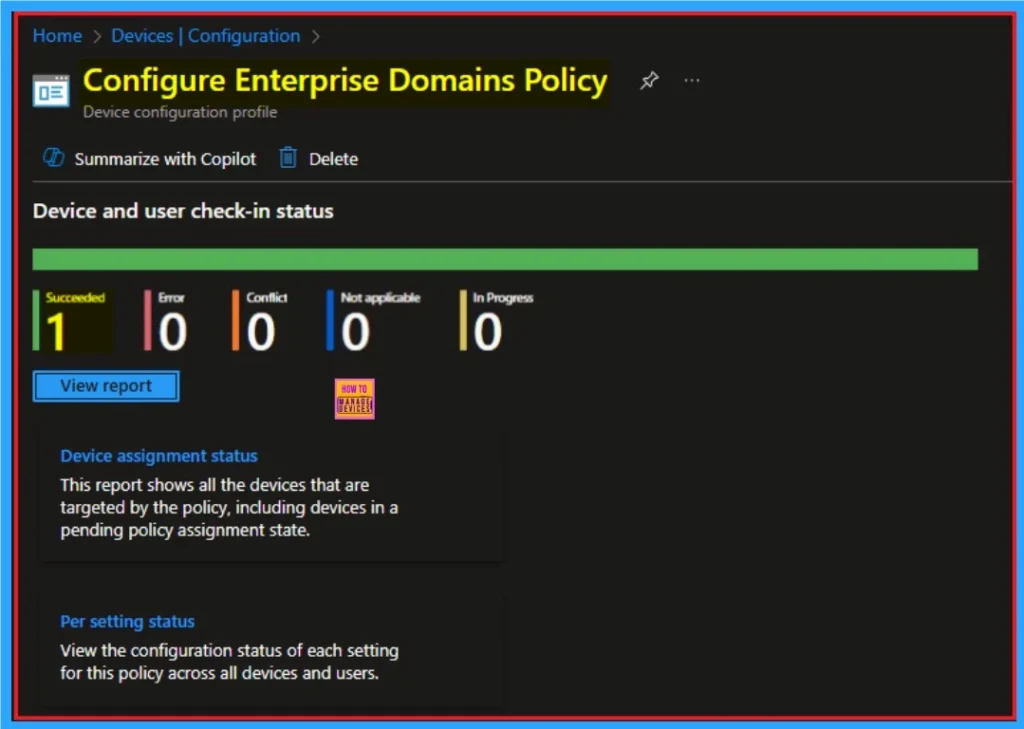
When the Policy is created successfully, you can sync the device on the Company portal for faster deployment. After syncing is completed, you can check the status on the Intune Portal. Go to Devices > Configuration and search for the policy.
Client Side Verification – Event Viewer
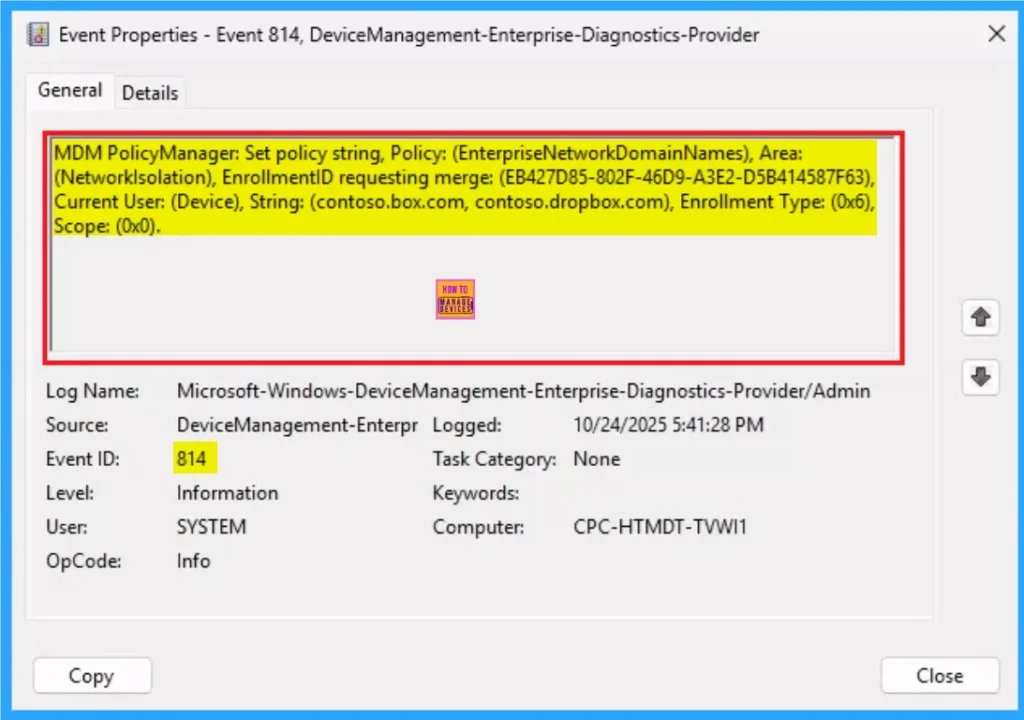
By accessing Event Viewer you can easily complete Client Side Verification. Open the Event Viewer on the assigned device. Go to Applications and Services Logs > Microsoft > Windows > Devicemanagement-Enterprise-Diagnostics-Provider > Admin to open it. Here, you can see the success event ID in 814.
| Event ID Details |
|---|
| MDM PolicyManager: Set policy string, Policy: (EnterpriseNetworkDomainNames), Area: (Networklsolation), EnrollmentID requesting merge: (EB427D85-802F-46D9-A3E2-D5B414587F63), Current User: (Device), String: (contoso.box.com, contoso.dropbox.com), Enrollment Type: (0x6), Scope: (0x0). |
Remove Enterprise Network Domain Names Policy
Intune helps you to easily remove the Enterprise Network Domain Names Policy from your tenant. To do this, open the policy from the Configuration tab and click on the Edit button on the Assignment tab. Click on the Remove button on this section to remove the policy.
For detailed information, you can refer to our previous post – Learn How to Delete or Remove App Assignment from Intune using by Step-by-Step Guide.

Delete Enterprise Network Domain Names
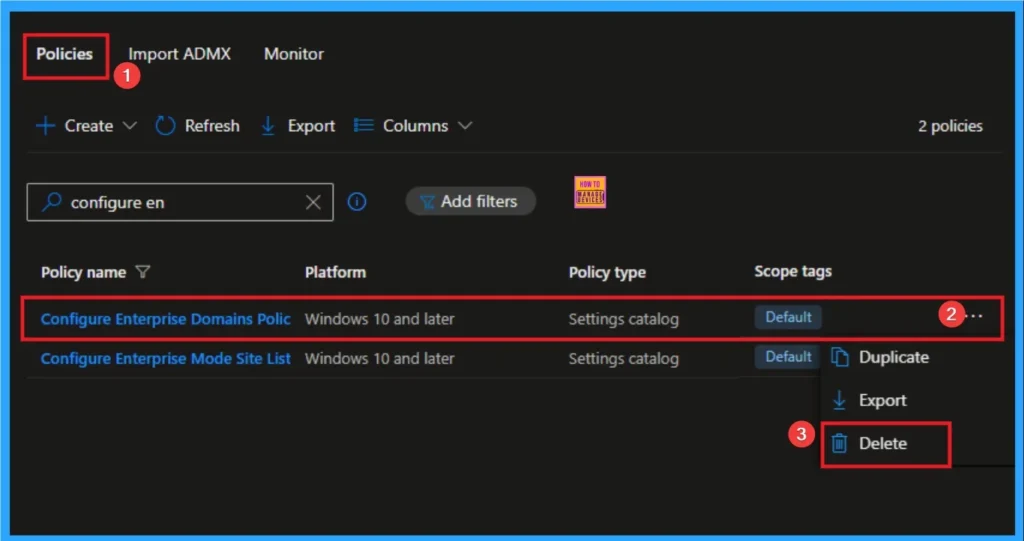
Admins may delete policies in Intune due to different reasons. If you want to quickly delete a Policy, Intune helps you to do that. To do this, search for this policy on the Intune admin center. Click on the 3-dot option and then click on the Delete button.
For more information, you can refer to our previous post – How to Delete Allow Clipboard History Policy in Intune Step by Step Guide.
Windows CSP Details
Data from one of these domains that’s sent to a device will be considered enterprise data and protected These locations will be considered a safe destination for enterprise data to be shared to. The client requires domain name to be canonical, otherwise the setting will be rejected by the client.
Here are the steps to create canonical domain names:Transform the ASCII characters (A-Z only) to lower case. For example, Microsoft. COM -> microsoft. com. Call IdnToAscii with IDN_USE_STD3_ASCII_RULES as the flags. Call IdnToUnicode with no flags set (dwFlags = 0).

Need Further Assistance or Have Technical Questions?
Join the LinkedIn Page and Telegram group to get the latest step-by-step guides and news updates. Join our Meetup Page to participate in User group meetings. Also, Join the WhatsApp Community to get the latest news on Microsoft Technologies. We are there on Reddit as well.
Author
Anoop C Nair has been a Microsoft MVP for 10 consecutive years from 2015 onwards. He is a Workplace Solution Architect with more than 22+ years of experience in Workplace technologies. He is a Blogger, Speaker, and Local User Group Community leader. His primary focus is on Device Management technologies like SCCM and Intune. He writes about technologies like Intune, SCCM, Windows, Cloud PC, Windows, Entra, Microsoft Security, Career, etc.

