Let’s check how to configure proxy settings in Windows 11 and Server 2022. I have not seen many scenarios where the proxy is used apart from the college/university campuses. Windows 11 proxy settings and Edge browser proxy settings are in one place now!
Proxy provides more secure and controlled access to the internet from Windows 11 PCs. It’s the best practice to use a proxy in most enterprise environments. Proxy is a regulatory requirement for many countries.
The students or home users of Windows 11 PCs might need to configure the proxy during some scenarios. This tutorial provides the best options to configure proxy for Windows 11 PCs.
There are the client and server-side components for proxy setup. Proxy servers are the server component that supports the management of internet traffic. Windows 11 proxy configuration is the client-side setup of proxy.
There are on-prem proxy servers (such as Blue Coat) and could proxy servers available. Many organizations are moving to cloud proxy servers (SaaS) such as Mcafee. Microsoft Defender also provides some proxy features.
- Best Antivirus For Windows 11 Microsoft Defender
- Check Firewall Port Is Open Or Block On Windows 11 Using PowerShell Command
Configure Proxy Settings in Windows 11 using Settings app
Let’s set up a proxy server in Windows 11 operating system from the Settings application as the first option. There are many different methods to configure proxy servers on Windows 11 PCs.
You can launch the settings app from the Windows 11 Start menu – Settings. You can use the Windows 11 keyboard shortcut Windows Key + I to launch the Settings app.

Another option is to use the powerful search option on Windows 11 to search for Settings and launch the Settings apps.
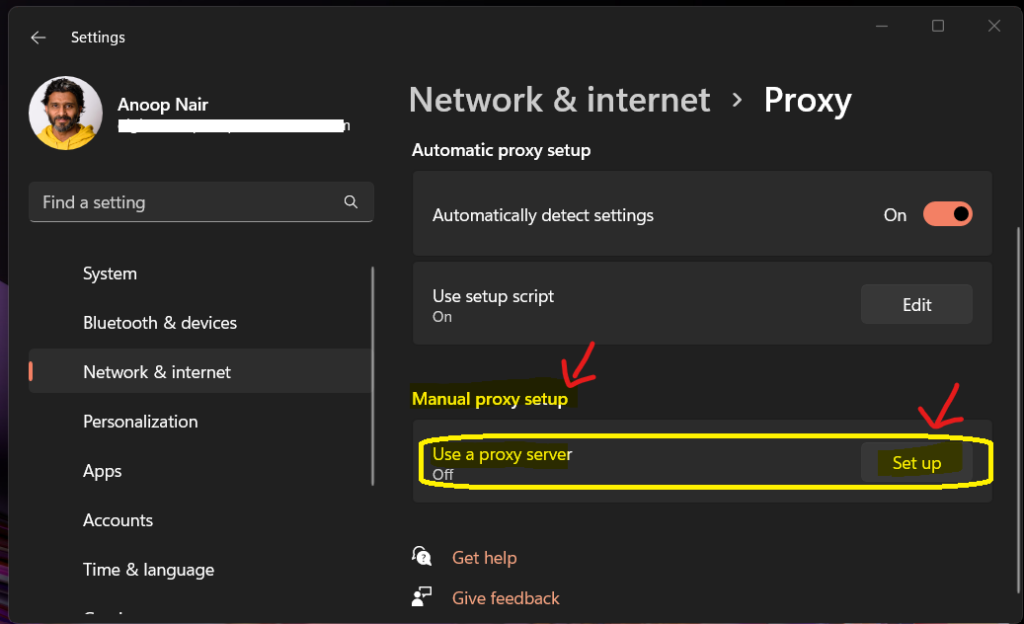
Navigate to Network & Internet tab from the Windows 11 Settings application, as shown in the below screenshot. Once you are in Network & Internet tab, scroll down until you see the Proxy tab on the right-side pane of the Settings application.
- Click on the Proxy tab to configure proxy server settings on Windows 11.

The “Automatically detect settings” option is set to ON. This is the default configuration, and this works for most of the scenarios with WiFi and ethernet connections from your home network.
NOTE! – These proxy settings don’t apply to VPN connections on Windows 11 PCs.
You can use setup script method with automatic proxy-configuration script (PAC file) on Windows 11 PC. You might need to ask the system administrator if unfamiliar with “.PAC” files. There are various ways you can use a proxy auto-configuration (.pac) file to specify an automatic proxy URL.
- Click on the Edit button from the Use Setup Script option to configure .pac file URL.

From the Edit setup script page, turn ON the use setup script option shown in the screenshot below.
- Script Address – For example – https://htmdforum.com/proxy.pac
- Enter the Script URL for the proxy sever – most of the time is a .pac file.
- Click on the Save button to save the changes.
NOTE! – You should open the firewall ports to reach the proxy server in the enterprise world. Manier times, this script address for proxy server configuration is not applicable for home proxy setup.

How to Configure Proxy Server Settings Manually
Let’s see how to configure proxy server settings manually on a Windows 11 PC. Windows 11 proxy configuration gives you an option to set up the proxy server details manually using the following method.
The Manual Proxy Server section is the last option available on the Proxy page of the Settings app. Click on the Set Up button, as shown in the below screenshot. You can get the proxy server’s details and the network communication port used from the System Administrator.

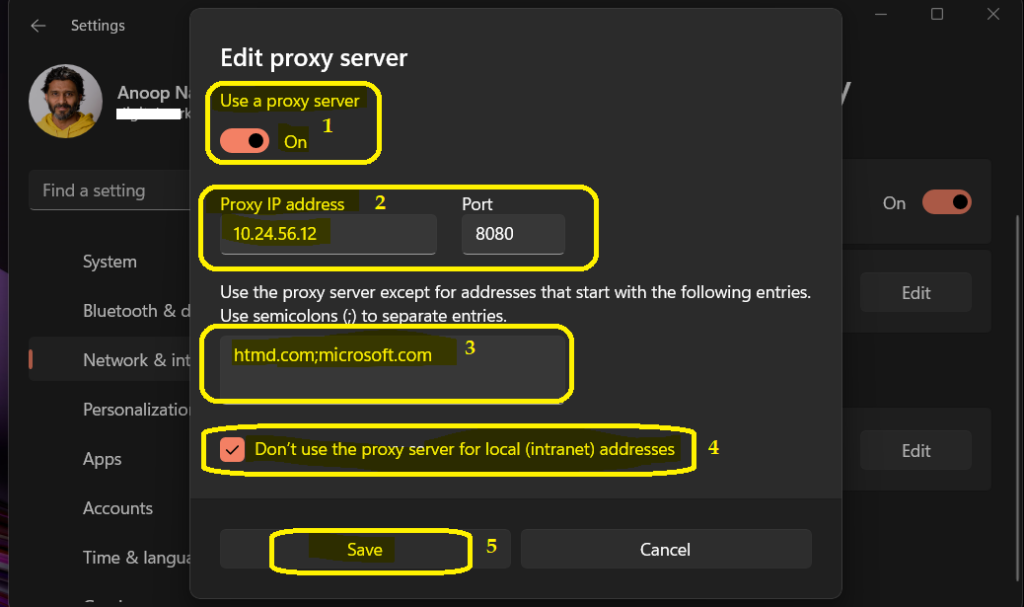
Let’s configure the proxy server manually using the following pop-up window, as shown in the below screenshot. You need to toggle to Use Proxy Server switch to ON as the first step. You will need to get the details of the proxy server IP and port number from the system administrator if you don’t have it already.
- Enter the Proxy IP Address (server ip) – 10.24.56.12 is the sample IP address of the proxy server.
- Enter the Proxy Server Communication port – It can be any non-standard port that your system administrator configured for proxy server. I used 8080 as standard proxy port.
The following are advanced configurations of the Windows 11 Proxy client. With this configuration, you ask Windows 11 proxy clients to behave differently in specific scenarios.
Use the proxy server except for addresses that start with the following entries. You have to use semicolons (;) to separate entries. You need to enter the website or external SAAS services details into an exception if you don’t want those to go through a proxy server.
NOTE! – One common example here is Microsoft Teams or Office 365 email communications normally; you don’t want to impact the performance of Microsoft Teams meetings because of proxy server interference. In that scenario, you can use the following option to send that internet traffic directly rather than going through the proxy server.
- Enter the exception list seperated with semicolons (;).
- Don’t use the proxy server local (intranet) address – This is to provide direct path of access to internal servers without being inspected by proxy servers.
- Click on the Save button to save the configurations.

Proxy Server Configuration Registry Entries in Windows 11
Let’s how to configure proxy server configuration registry entries in Windows 11. Once the manual proxy is enabled, you can check the registry to confirm whether this is reflecting as expected or not.
Registry Path for Windows 11 proxy settings – Computer\HKEY_CURRENT_USER\Software\Microsoft\Windows\CurrentVersion\Internet Settings
- ProxyEnable – 1 means Manual Proxy Setup is enabled.
- ProxyOverride – htmd.com;microsoft.com.
- ProxyServer – 10.24.56.13:8080

Proxy Error – ERR_TIMED_OUT on Windows 11 Edge Browser
Let’s check how to fix Proxy Error “ERR_TIMED_OUT” on Windows 11 Edge Browser. You have to revert any changes that you have made to the proxy setting. You can check the proxy configurations from the above section to get more details.
Once changed the proxy settings back to normal, try to check the internet connection again. Allow Microsoft Edge to access the network in your firewall or antivirus settings. If it’s already listed as a program allowed to access the network, try removing it from the list and adding it again.
- Hmmm… can’t reach this page –www.google.com took too long to respond.
If you use a proxy server: Check your proxy settings. You might need to ask your organization if the proxy server is working. If you don’t think you should be using a proxy server, go to Settings > System > Open your computer’s proxy settings.

PowerShell Command to Configure Proxy Server
You can use Windows Terminal to execute the PowerShell commands from Windows 11 PCs. You can use the netsh command to configure proxy server configuration for Windows 11. Example of proxy server using the following command as example netsh winhttp set proxy 10.10.10.5:8080.
netsh winhttp set proxy <Proxy Server IP>:<port>
How to Configure Proxy Server in Windows Server 2022
Let’s see how to Configure Proxy Server details in Windows Server 2022. You can launch the Settings application,
From the Edit setup script page, turn ON the use setup script option shown in the screenshot below.
- Script Address – For example – https://htmdforum.com/proxy.pac
- Enter the Script URL for the proxy sever – most of the time is a .pac file.
- Click on the Save button to save the changes.

Manual Proxy Server Setup for Server 2022
Let’s check how to configure Manual Proxy Server Setup for Server 2022. This manual configuration of the proxy should also be done from Settings App on Server 2022.
You need to toggle to Use Proxy Server switch to ON as the first step. Ensure that you have proxy server IP and port number from the proxy team and also you might need open firewall ports between the server VLAN and proxy server VLAN.
NOTE! – Normally proxy servers are placed on a Tier 1 network (DMZ) in the data center to connect directly to the internet in a secured way.
- Enter the Proxy IP Address (server ip) – 10.10.10.1 is the sample IP address of the proxy server.
- Enter the Proxy Server Communication port – I used 8080 as standard proxy port.
- Enter the exception list seperated with semicolons (;).
- Don’t use the proxy server local (intranet) address – This is to provide direct path of access to internal servers without being inspected by proxy servers.
- Click on the Save button to save the configurations.

3rd Party Proxy Clients on Windows 11
Many organizations use 3rd party proxy clients on Windows 11 PCs to manage internet traffic in the cloud apps world. Application modernization is the trend now, increasing the use of internet traffic. Windows 11 proxy settings won’t be enough to meet the modern workplace environments requirements.
This is where 3rd party proxy client application comes into the picture with more granular controls for a different kind of traffic. I have used McAfee Cloud Proxy and its client agent component, and it’s complex to set up and configure. However, it gives a lot of granular control than the basic Windows 11 proxy server settings.

Proxy Settings on Microsoft Edge Browser
Another option to set up a proxy server is using the Microsoft Edge browser. Let’s understand how to configure proxy settings in the Edge browser.
- Open the Edge Browser.
- Click on three horizondal dots (…) on the right side of the browser and select Settings.
- Search for Proxy and select Open your Computer’s proxy settings link to open the proxy server settings from Windows 11 Settings app explained in the above section.
So, it’s the same place where you have to set the proxy server configuration. There is no separate place where you can or need to set the proxy server configuration within Microsoft Edge Browser.


Do you know of a way to centrally restrict a users ability to change VPN-specific proxy settings? So, not the global proxy settings you talk about above but the ones set on a native Windows 11 VPN connection? Without being able to centrally lock this down a user can simply disable these settings.