Today, I will explore how to configure Friendly URL Format policy in MS Edge Browser using M365 Admin Center. You can set the default paste format for URLs copied from Microsoft Edge in its settings, and users will have access to additional paste formats beyond the default.
When Friendly URLs are turned on in Microsoft Edge, the browser will generate alternative versions of the web address and copy them to your clipboard alongside the standard URL. This setting controls the automatic paste format for URLs in other apps or Edge (without using Paste as).
When this policy is configured, the browser decides the paste format, and users would not be able to adjust it. The options in edge://settings/shareCopyPaste will be grayed out, and the options in the Paste As context menu will not be available.
This blog post offers a straightforward guide on configuring the Friendly URL Format Policy for Microsoft Edge using the Microsoft 365 Admin Center. It provides easy-to-follow, step-by-step instructions for deploying this browser policy.
Table of Contents
What are the Advantages of Configuring Friendly URL Format Policy?
The Configure Friendly URL Format policy in Microsoft Edge provides administrators with control over how URLs are copied and pasted. They can enforce either a friendly format with a hyperlinked title or a plain text URL output.
Friendly URL Format Policy
When this setting is turned on means the browser decides the paste style, and you won’t see options to change it. If the setting isn’t configured, users can pick their preferred paste format, with the default being a friendly URL, and the Paste As menu will be available in Edge.
| Value | Description |
|---|---|
| 1 | If set to 1, only plain text URLs can be pasted, the Paste As menu disappears, and friendly URLs are disabled. |
| 3 | Setting it to 3 provides friendly URLs for rich text areas and plain URLs elsewhere, but removes the Paste As menu. |
| 4 | Option 4 is currently not active. |
- Enhancing Security and User Experience with OpenID Connect and Custom URL Domains in MS Entra External ID
- Best Guide To Block URLs On Google Chrome And Microsoft Edge Using Intune
- Enable or Disable Audio Sandbox to Run Policy in MS Edge Browser using M365 Admin Center
Steps to Configure Friendly URL Format Policy in MS Edge Browser using M365 Admin Center
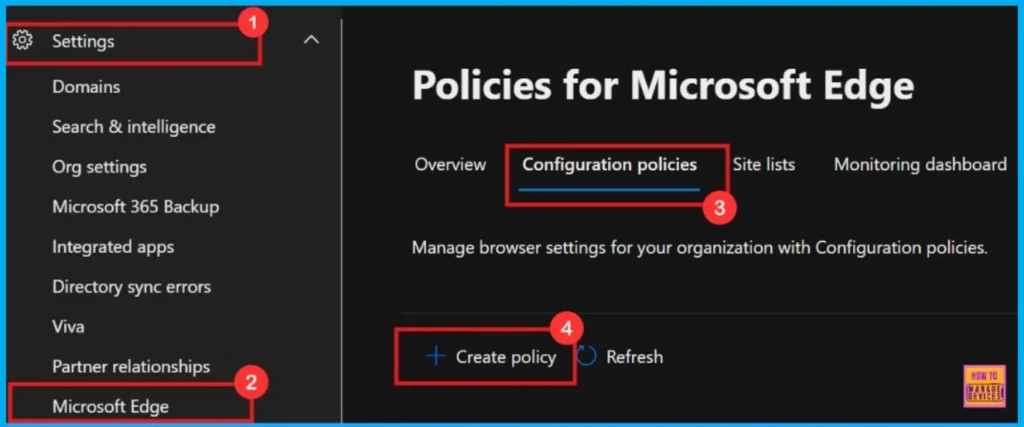
To create a new Microsoft Edge browser policy within the Microsoft 365 Admin Center, navigate to the Settings section, then select Microsoft Edge.
- From there, go to Configuration Policies and choose the option to Create policy.
Basics
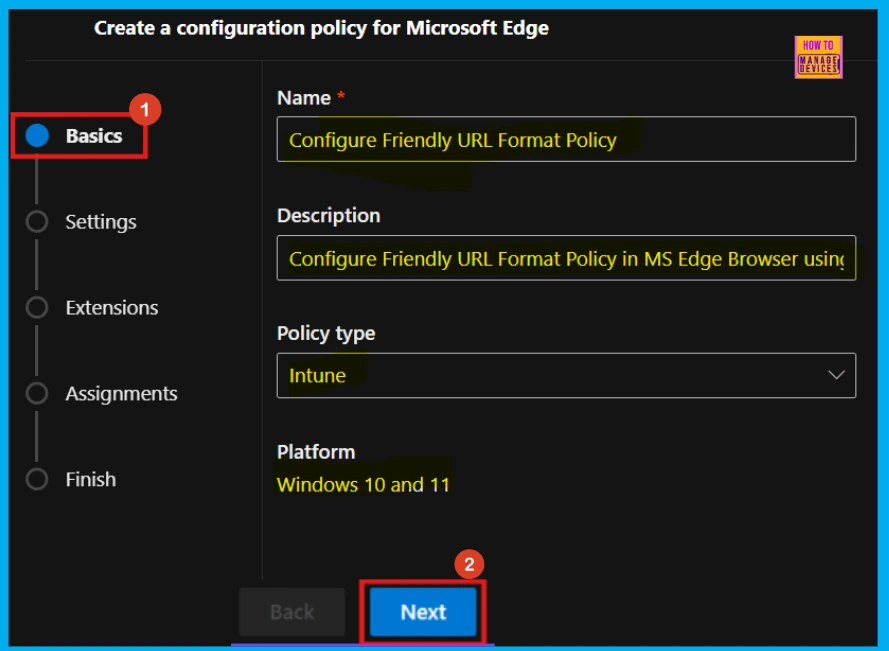
In the Basics section, when setting up policies, give each policy a name that’s easy to understand and a description that clearly explains what it does. For example, this policy is named Configure Friendly URL Format and its description explains “How to Configure Friendly URL Format Policy in MS Edge Browser using M365 Admin Center”. This helps everyone know what the policy is for.
- Policy Type: Intune
- Platform: Windows 10 and 11
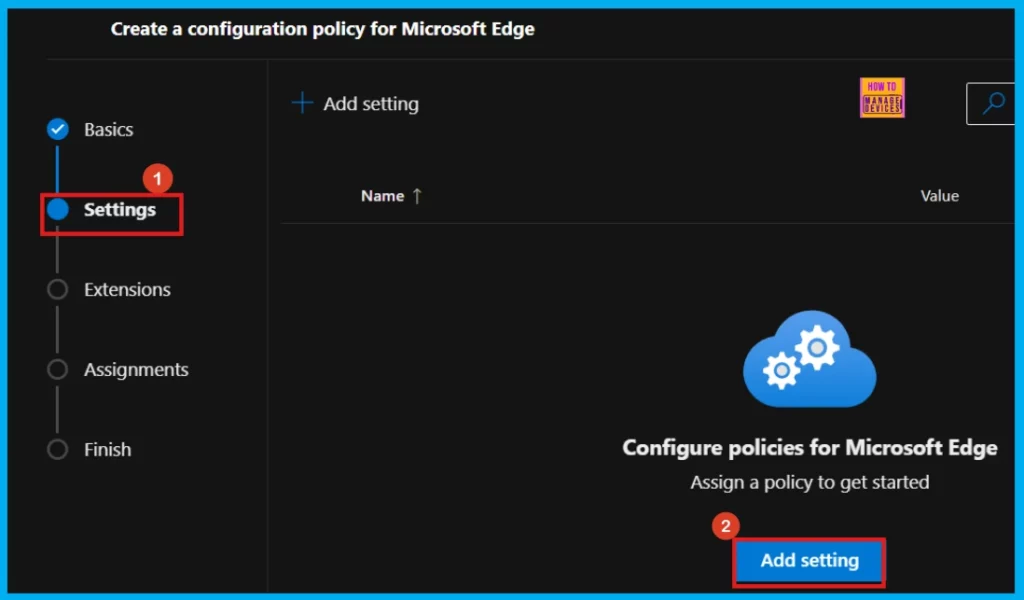
Settings
Next is the Settings section of the policy configuration process, where we need to initiate the selection of specific settings by clicking the Add settings button. This action will allow us to search for the policy that we want to implement, which can be found within the Additional Settings section.
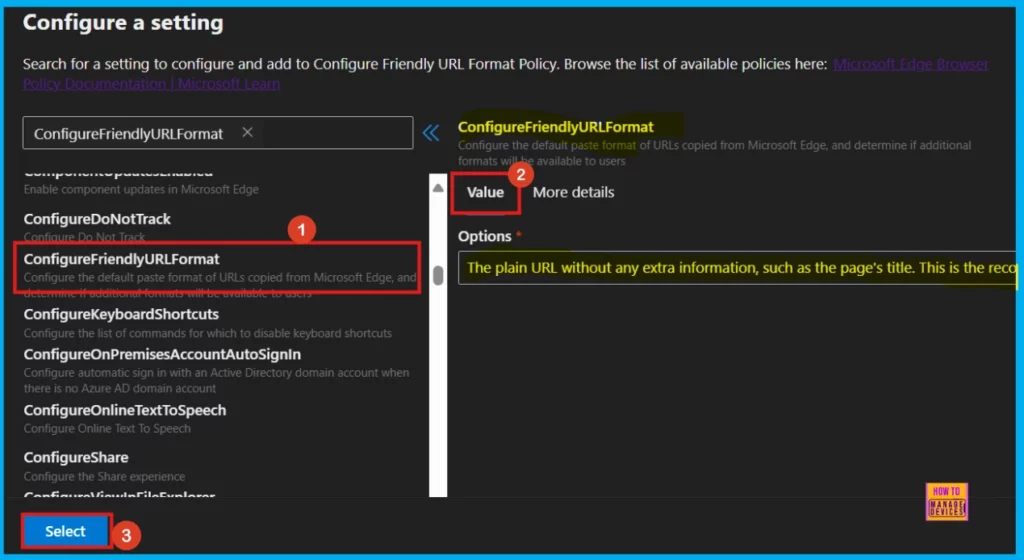
Configure a Setting
To set up a policy, just search for its name in the Additional Settings and click on it when you find it. A window will pop up on the right side showing Value and More Details, which are key to configuring the policy.
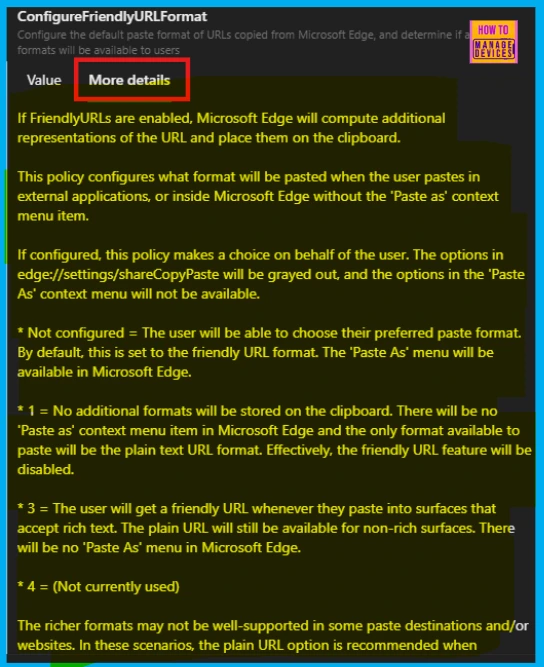
More Details
The More Details tab gives you a full explanation of the Friendly URL Format policy’s functions. Here, we can can see information about the Configure Friendly URL Format policy in the screenshot below.
Value
In the Value section, there’s a dropdown menu with options like Enable, Disable, or specific feature settings. Choose the option as per our policy need, and that policy setting will be turned on.
- I select the plain URL without any extra information, such as the page’s title option (for more details, refer to Table 1).
- Click Select to continue.
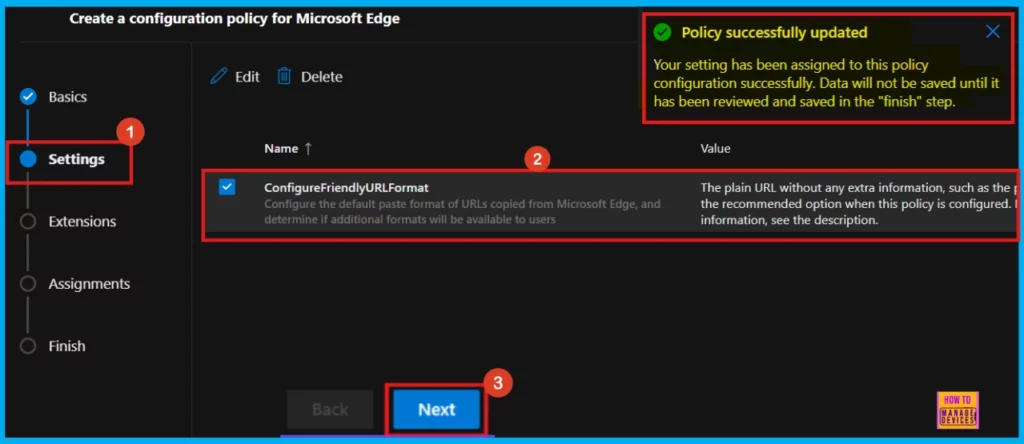
Once we click Select, we will get a confirmation that the policy is updated. In the next window, make sure the policy name and its setting are correct. Then, check the box next to the name and click Next.
- Click Next to proceed.
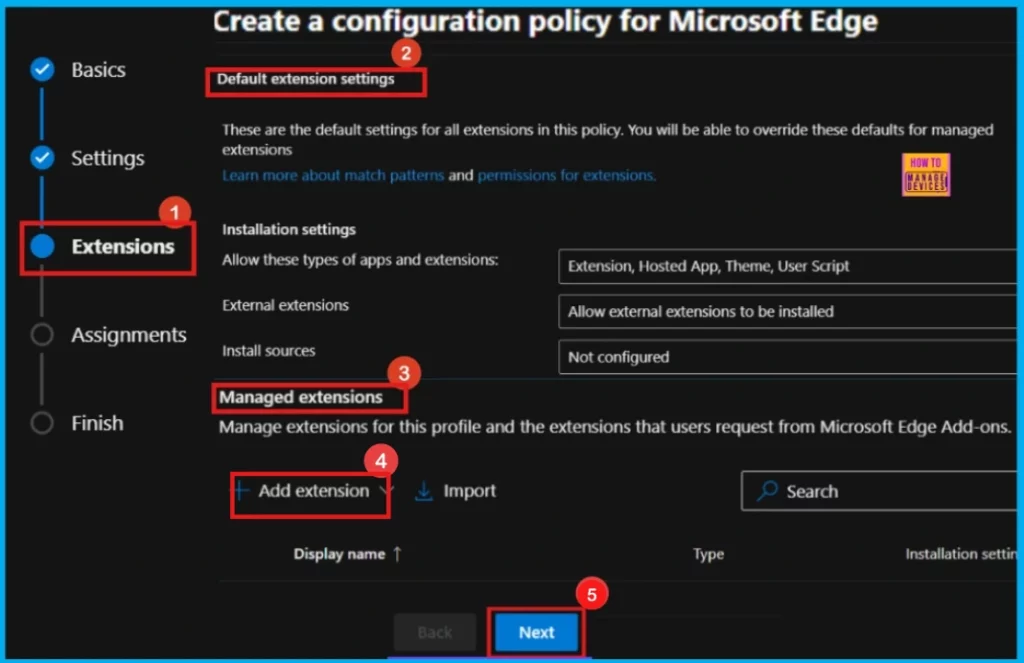
Extensions
To add extra features to the policy, go to Extensions. There are two main types: Default Extension settings for things like installation sources, and Managed Extensions to control specific extensions’ installation, what they can do, and their website addresses. Click + Add extension if needed these; if not, skip this section.
Assignments
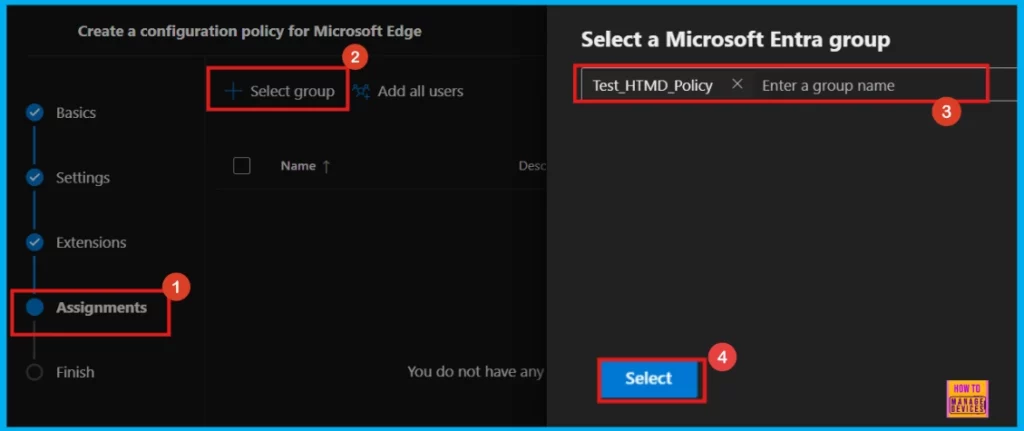
In the Assignments area, we choose which groups of people get this policy. Click Select group and pick from the available Microsoft Entra groups to decide who it applies to.
- Here, I select Test_HTMD_Policy as a group
- Then, click Select to continue.
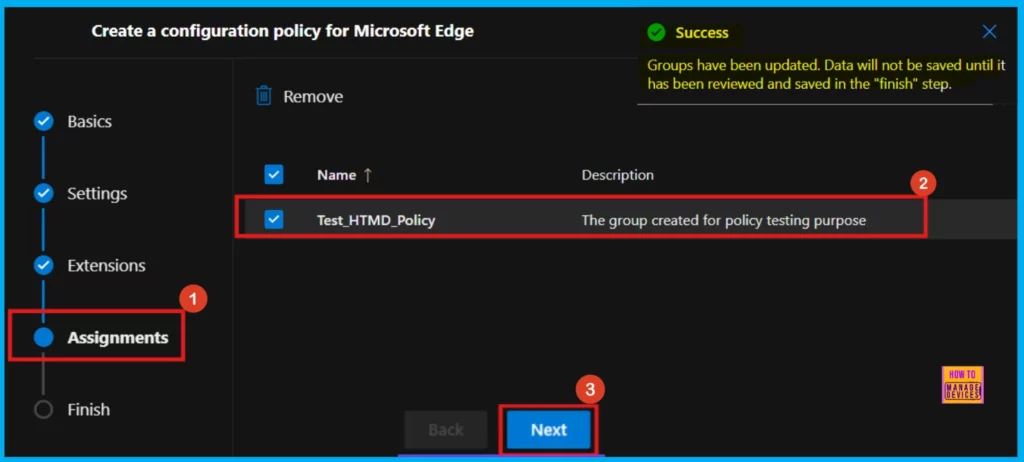
When we pick a Microsoft Entra group, we will see a message confirming it’s been assigned. For example, the group Test_HTMD_Policy is now assigned, and it’s described as The group created for policy testing purpose.
Finish
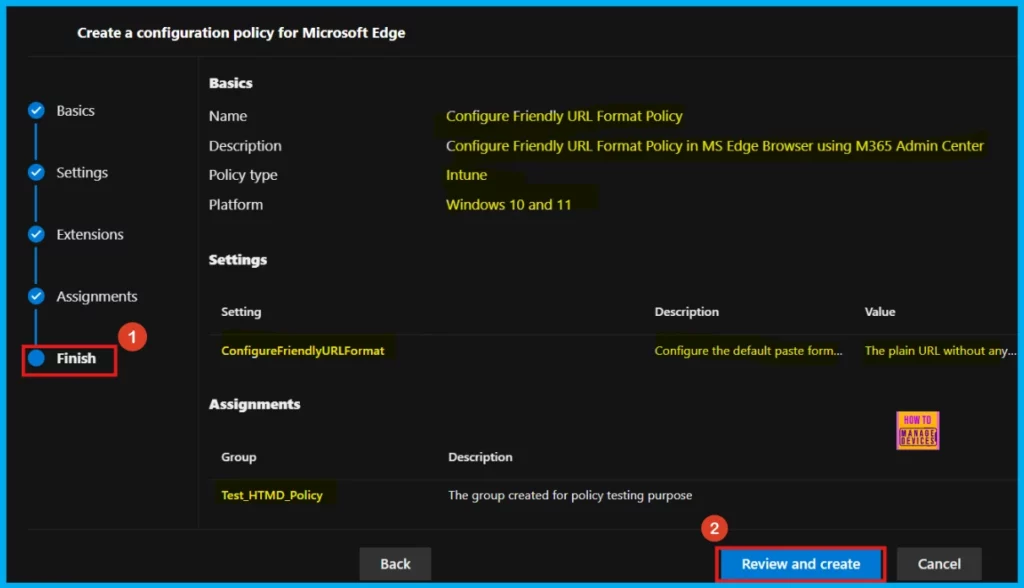
In the Finish section, we can review all our policy settings to make sure they’re correct. The summary shows who the policy applies to and any rules we have created. If need to make changes, click Back. If everything looks right, click Review and Create to activate the policy.
Monitoring Status
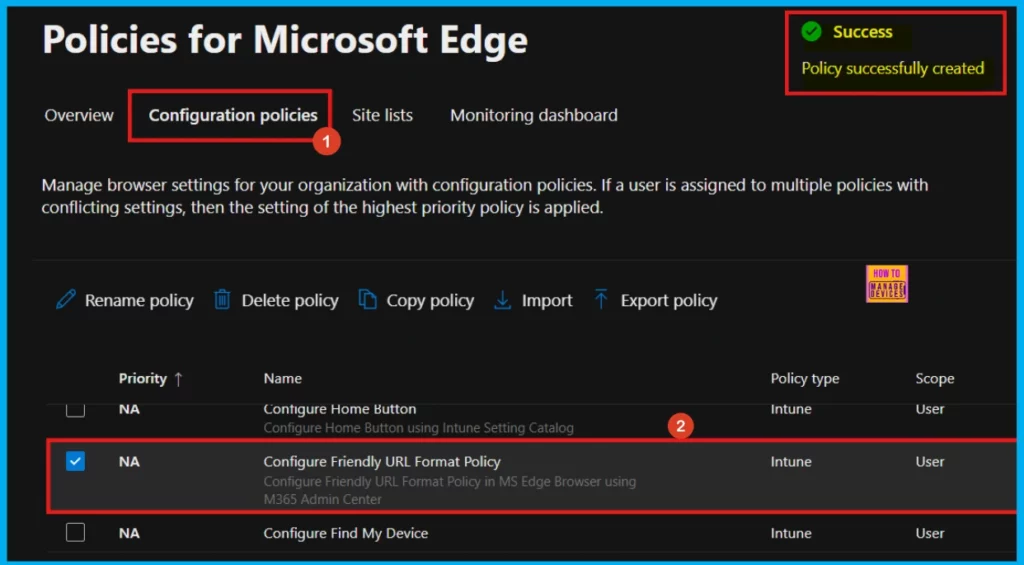
After clicking Review and Create a notification will appear stating that the Policy Succesfuly Created. To make the new policy work on devices, we need to manually sync them using the Company Portal. After they sync, we will be able to see the policy on the Policies for Microsoft Edge page.
- Settings > Microsoft Edge > Configuration Policies, and then searching for the policy you just created.
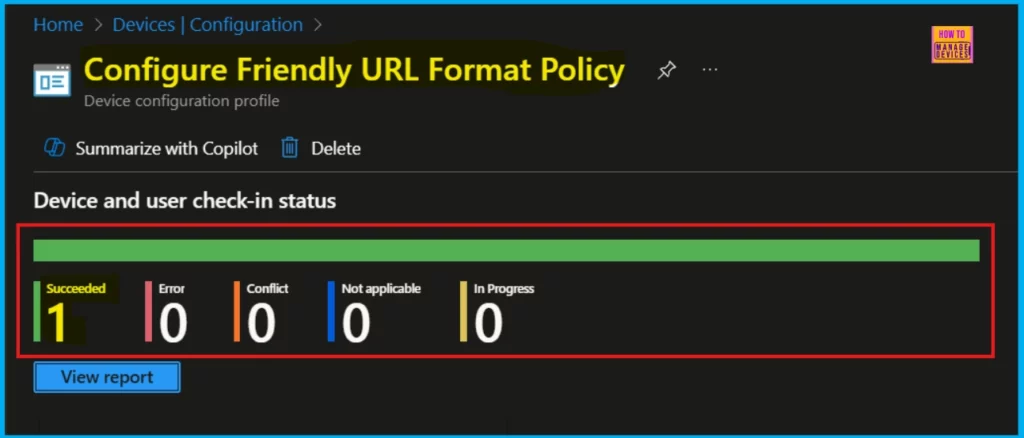
Device and User Check-in Status
To make sure the policy is working, check its status in the Intune Portal after synced the Company Portal. Go to Devices > Configuration, find your policy in the Policies tab, and look for a succeeded status. This means the policy has been successfully applied to the device.
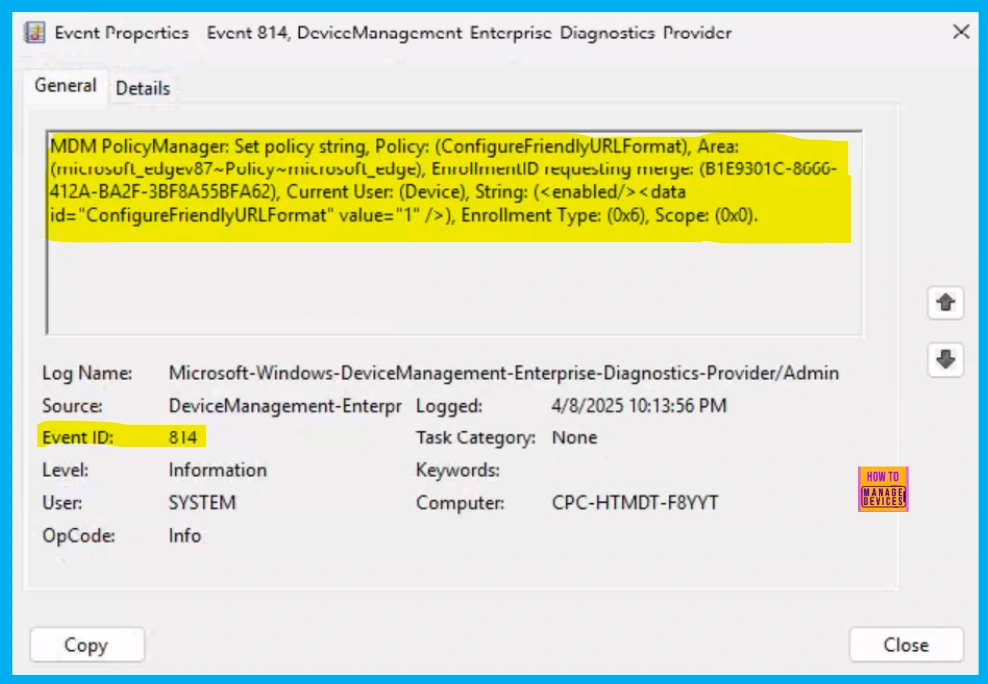
Client Side Verification through Event Viewer
Client-side verification lets users see right away if their devices are following the policy by checking the Event Viewer. This helps reduce the workload on servers and gives quick feedback.
Need Further Assistance or Have Technical Questions?
Join the LinkedIn Page and Telegram group to get the latest step-by-step guides and news updates. Join our Meetup Page to participate in User group meetings. Also, Join the WhatsApp Community to get the latest news on Microsoft Technologies. We are there on Reddit as well.
Author
Anoop C Nair has been Microsoft MVP for 10 consecutive years from 2015 onwards. He is a Workplace Solution Architect with more than 22+ years of experience in Workplace technologies. He is a Blogger, Speaker, and Local User Group Community leader. His primary focus is on Device Management technologies like SCCM and Intune. He writes about technologies like Intune, SCCM, Windows, Cloud PC, Windows, Entra, Microsoft Security, Career, etc.

