Today, we are discussing how to configure the percentage of disk space used for client computer cache policy through Microsoft Intune. This policy plays an important role in managing BranchCache settings across client computers within an organization.
By controlling how much disk space is allocated for caching, administrators can ensure an efficient balance between system performance and storage utilization. As we all know, the Settings Catalog is one of the most powerful and flexible features in Microsoft Intune.
It allows IT administrators to browse, configure, and deploy a wide range of device and user policies easily. Using the settings catalog, we can centrally manage BranchCache policies to make sure all client devices follow a uniform configuration across the enterprise.
This policy setting specifies the default percentage of total disk space that is allocated for the BranchCache disk cache on client computers. If you enable this policy setting, you can configure the percentage of total disk space to allocate for the cache. If you disable or do not configure this policy setting, the cache is set to 5 percent of the total disk space on the client computer.
Table of Contents
Why this Policy is Beneficial to Organization?
This policy is highly beneficial to organizations as it enhances network efficiency, reduces WAN bandwidth usage, and improves user productivity. By caching frequently accessed data locally, employees experience faster file access times, especially in branch offices where network connectivity might be slower.
Configure Percentage of Disk Space used for Client Computer Cache using Intune Policy
When the admin Selecting the Not Configured option means that BranchCache cache settings will not be applied through domain-level Group Policy. If Set percentage of disk space used for client computer cache is enabled in domain Group Policy, the BranchCache client computer cache setting that you specify in the policy is turned on for all domain member client computers to which the policy is applied
Real Word Example – Corporate Office Environment
This option is suitable for organizations that want to leave cache configuration decisions to computers. It ensures that domain Group Policy does not overwrite any local cache settings configured directly on client machines. In the real world, this results in reduced load on central servers, minimized network congestion, and quicker access to shared resources.
- Additionally, it helps organizations save costs on network infrastructure upgrades by optimizing data transfer and ensuring smoother operations across distributed office environments.
Sign in Microsoft Intune Portal for Policy Creation
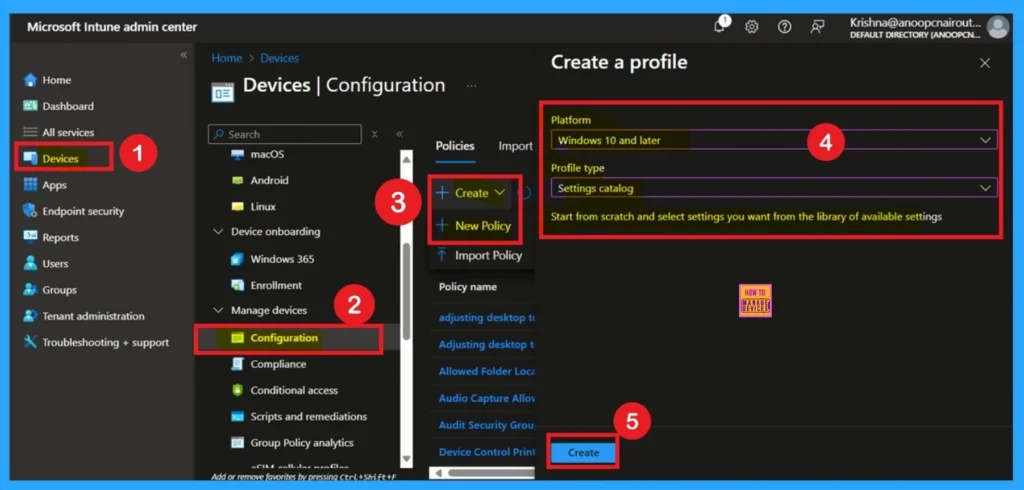
This policy allows administrators to enforce a consistent and secure behavior across all devices. For start policy creation sign in to Microsoft Intune admin center. Then go to Devices > Configuration > +Create >+ New Policy. Choosing Platform and Profile is the next step after selecting New policy. It is very necessary step to effectively configure the policy to appropriate platform.
- Here I would like to configure the policy to Windows 10 and later platform and settings catalog profile. Then click on the Create button.
- FIX Teams Icon is Missing from the Start Menu FSLogix Issue
- TeamsTfwStartupTask Registry Key is not Roamed with FSLogix ODFC Containers
- How to Block App Location Access in Windows using Intune Policy
Basic Tab for Naming Policy
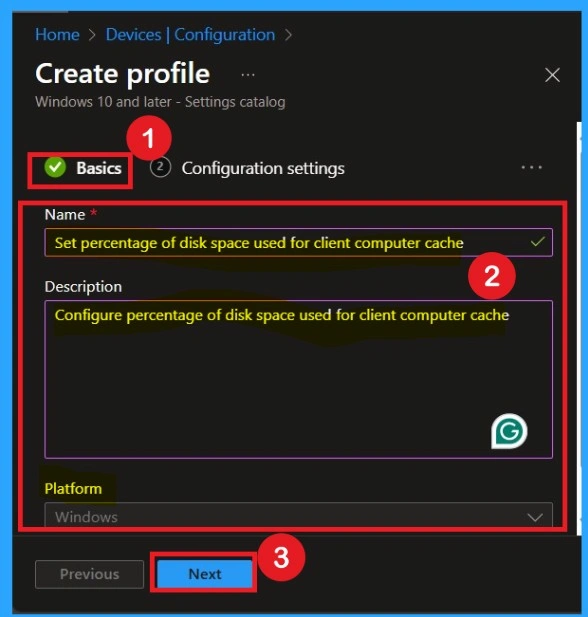
Basic Tab is used to give an identity for the policy by adding name and description. Here Name is Mandatory and Description is optional. After adding these details click on the Next button.
Configuration Settings
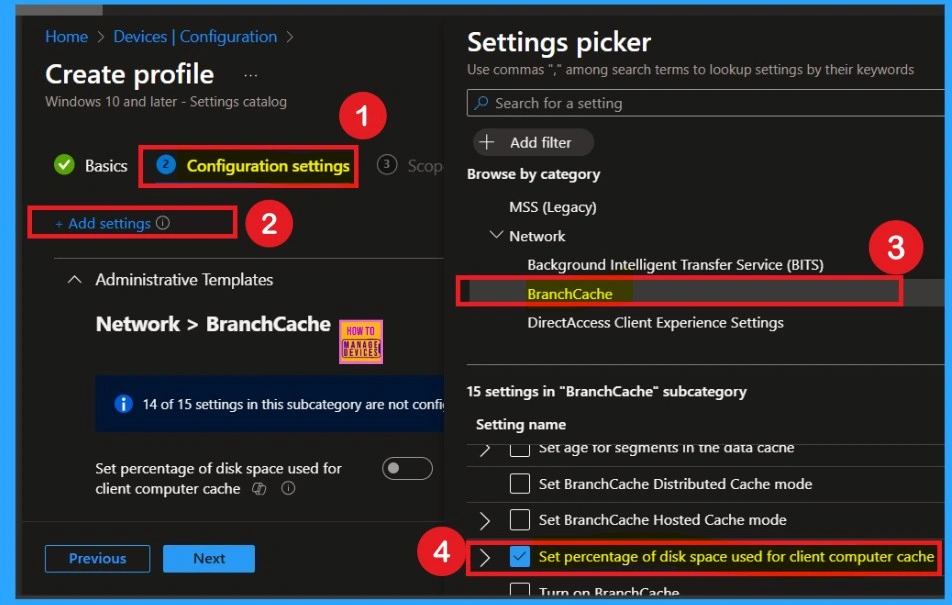
In this tab you can see Add setting option in hyperlink click on that. Then you have to go to the administrative template. Click on the Network category from the administrative template. Then select the BranchCache and select the policy as Set Percentage of Disk Space used for Client Computer Cache. Now click on the Next.
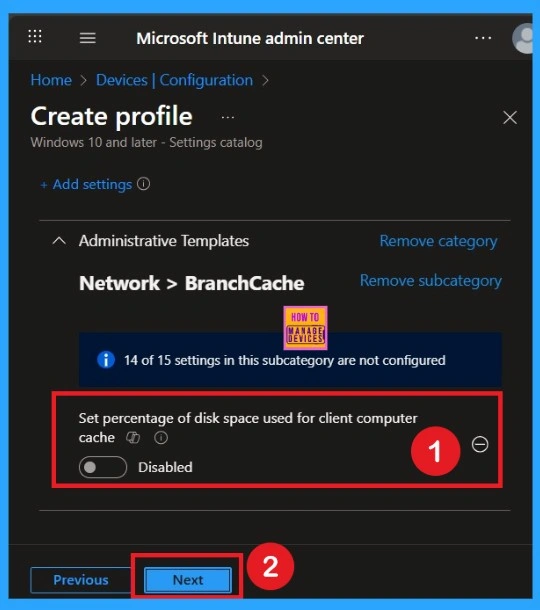
Disabled Policy Mode
After selecting the policy, you can now close the Settings Picker window. You will return to the Configuration Settings page, where you can see that the policy is currently set to Disabled by default. If you want to proceed without making any changes, simply click Next to continue.
Enabled Mode
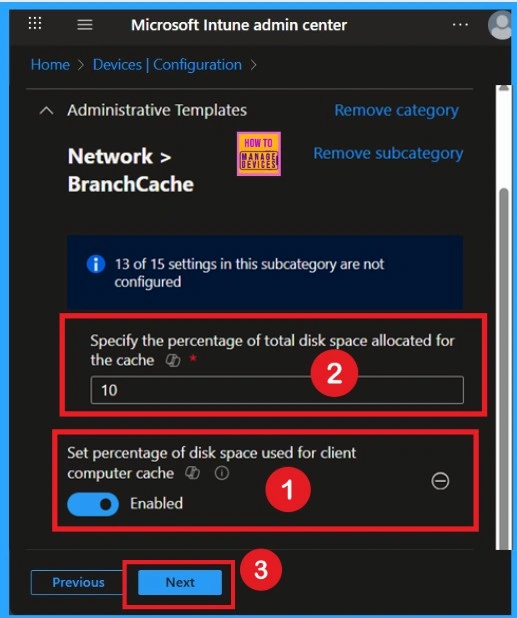
You can also enable a policy that is disabled by default. To do this, toggle the switch from left to right. Once enabled, the switch will turn blue and display the label Enabled. When its enabled you can see that another text box is available here you have to Specify the percentage of total disk space allocated for the Cache. Here I added 10 as value.
Adding Scope Tags
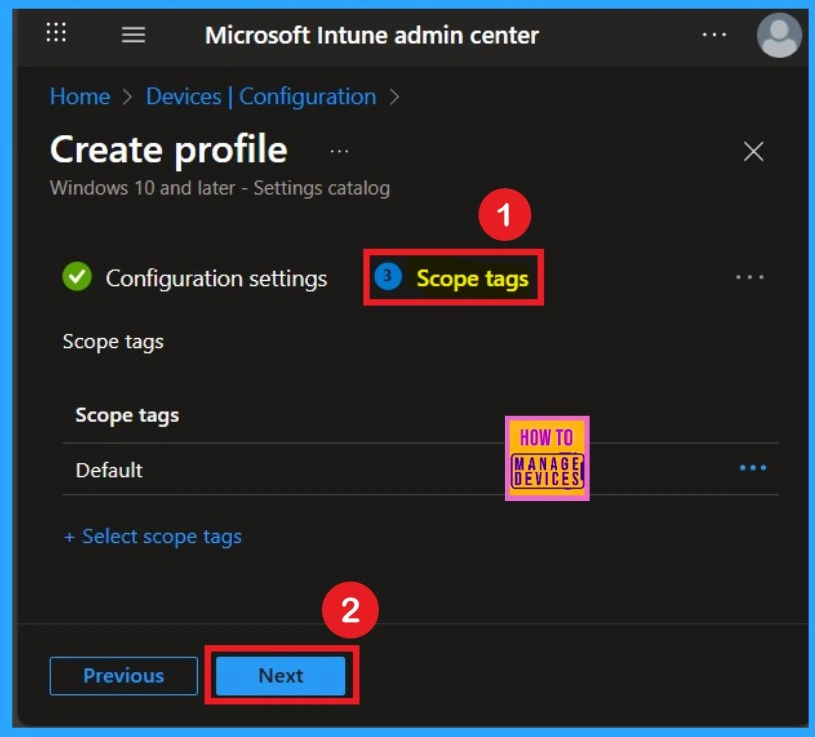
Scope Tags sections help you add restrictions to the visibility of the Policy. But it is not a mandatory step, so you can skip this step. Here, I don’t add scope tags for DO Absolute Max Cache Size Policy. Click on the Next button.
Selecting Group from the Assignment Tab
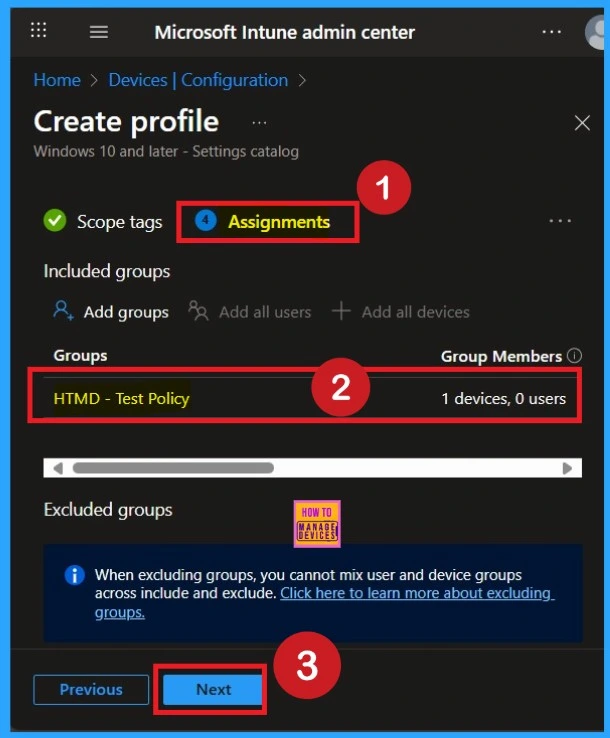
To assign the policy to specific groups, you can use the Assignment Tab. Here I click, +Add groups option under Included groups. I choose a group from the list of groups and click on the Select button. Again, I click on the Select button to continue.
Review + Create Tab
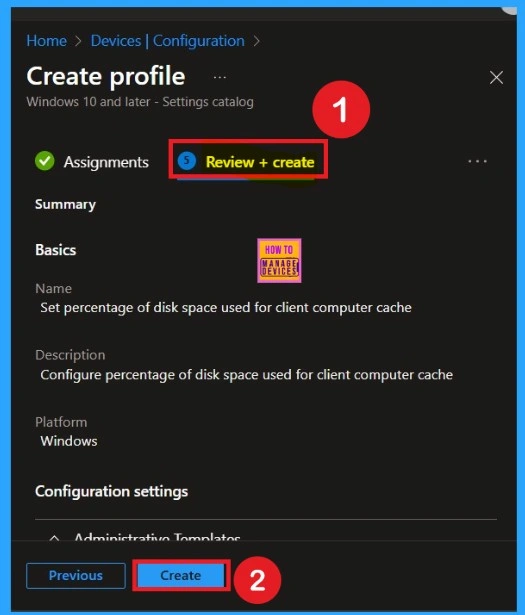
Before completing the policy creation, you can review each tab to avoid misconfiguration or policy failure. After verifying all the details, click on the Create Button. After creating the policy, you will get a success message.
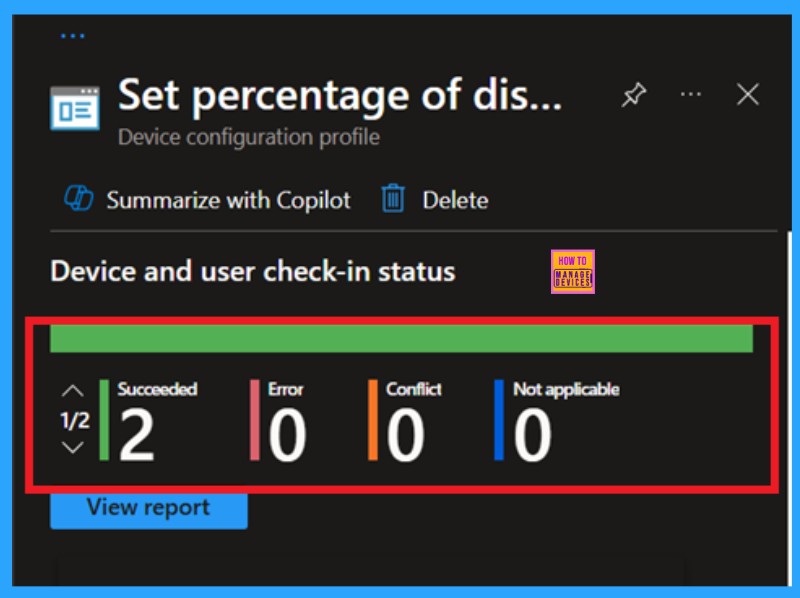
Monitoring Status
The Monitoring Status page shows whether the policy has succeeded or not. To quickly configure the policy and take advantage of the policy sync, the device on the Company Portal, Open the Intune Portal. Go to Devices > Configuration > Search for the Policy. Here, the policy shows as successful.
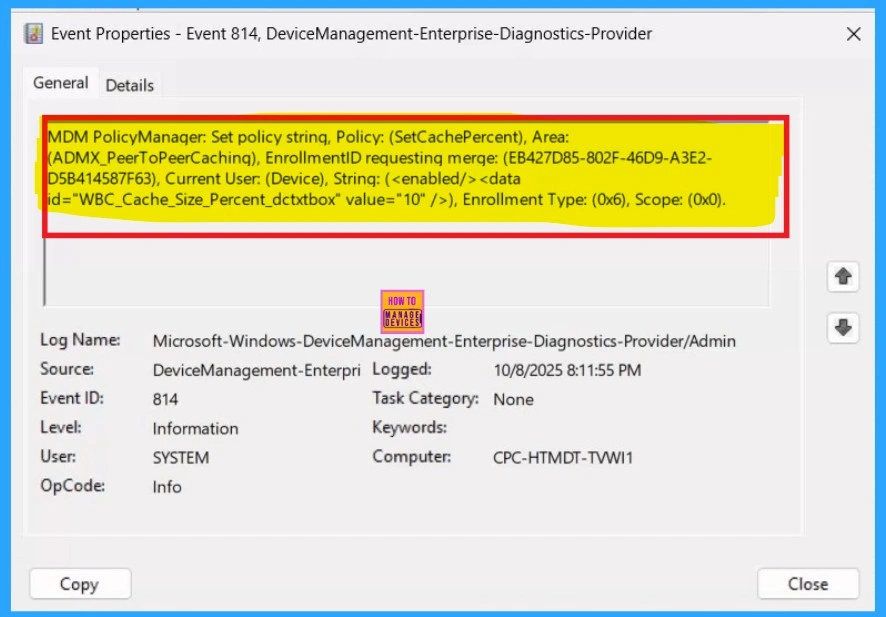
It helps you check the client side and verify the policy status. Open the Client device and open the Event Viewer. Go to Start > Event Viewer. Navigate to Logs: In the left pane, go to Application and Services Logs > Microsoft > Windows > DeviceManagement-Enterprise-Diagnostics-Provider > Admin.
| Policy Info |
|---|
| MDM PolicyManager: Set policy string, Policy: (SetCachePercent), Area: (ADMX_PeerToPeerCaching), EnrollmentID requesting merqe: (EB427D85-802F-46D9-A3E2- D5B414587F63), Current User: (Device), Strinq: (), Enrollment Type: (0x6), Scope: (0x0). |
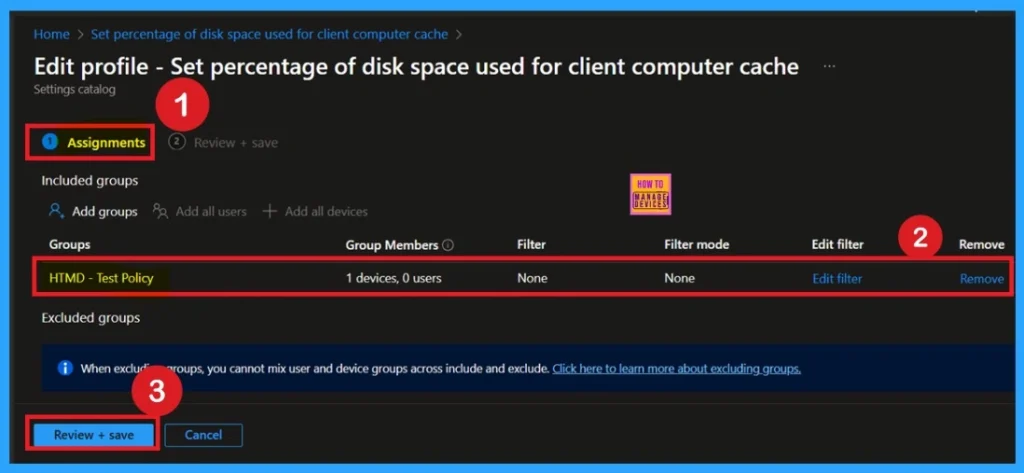
Removing the Assigned Group
If you want to remove the Assigned group from the policy, it is possible from the Intune Portal. To do this, open the Policy on Intune Portal and edit the Assignments tab and the Remove Policy.
To get more detailed information, you can refer to our previous post – Learn How to Delete or Remove App Assignment from Intune using by Step-by-Step Guide.
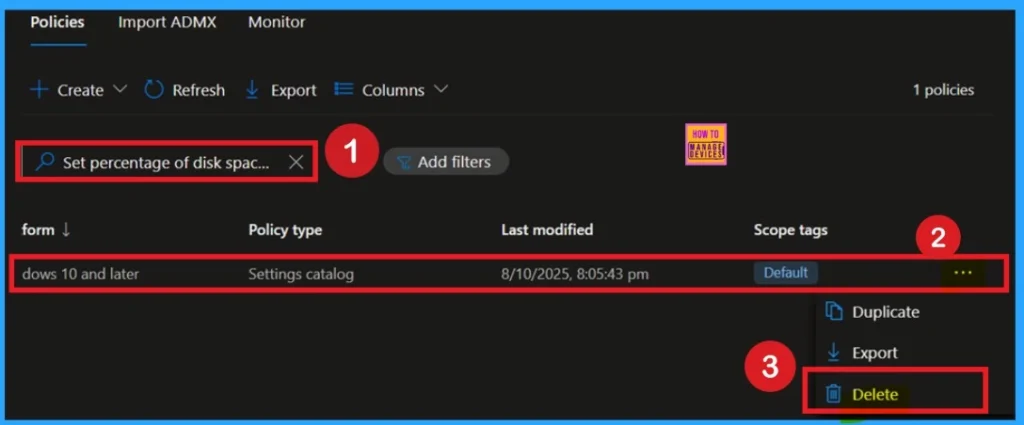
How to Delete the Policy that you created
You can easily delete the Policy from the Intune Portal. From the Configuration section, you can delete the policy. It will completely remove it from the client devices. For that search the picy name in the configuration profiles. Locate and select the specific policy you want to remove. Once you’re on the policy details page, click the 3 -dot menu in the top right corner and choose Delete from the available options.
Need Further Assistance or Have Technical Questions?
Join the LinkedIn Page and Telegram group to get the latest step-by-step guides and news updates. Join our Meetup Page to participate in User group meetings. Also, Join the WhatsApp Community to get the latest news on Microsoft Technologies. We are there on Reddit as well.
Author
Anoop C Nair has been Microsoft MVP from 2015 onwards for 10 consecutive years! He is a Workplace Solution Architect with more than 22+ years of experience in Workplace technologies. He is also a Blogger, Speaker, and Local User Group Community leader. His primary focus is on Device Management technologies like SCCM and Intune. He writes about technologies like Intune, SCCM, Windows, Cloud PC, Windows, Entra, Microsoft Security, Career, etc.

