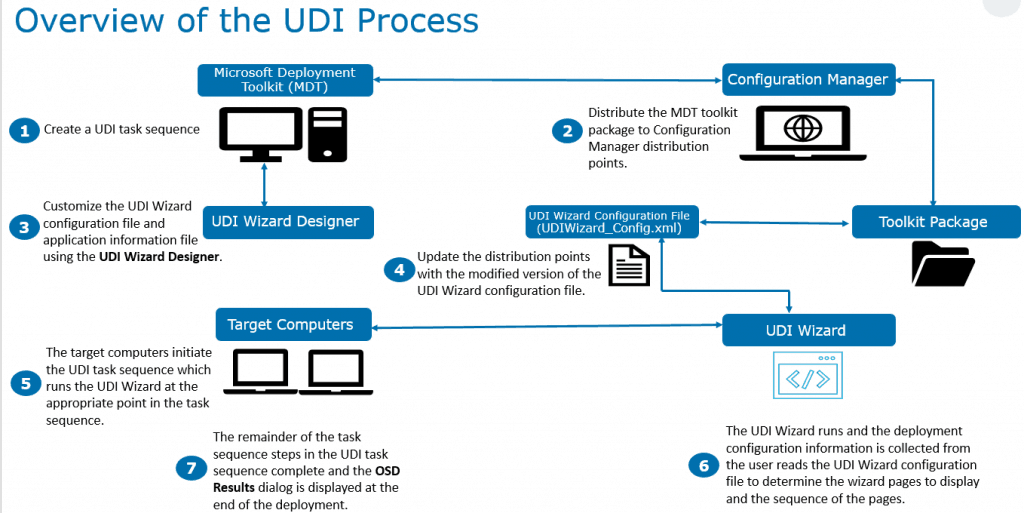
Let’s see how to Configure User Driven Installation UDI using ConfigMgr. In this guide, we will be covering how you can integrate MDT with Configuration Manager or MEMCM for creating a User-Driven Installation (UDI) in SCCM OSD to provide the various deployment configuration information before performing the deployment for getting a better end-user experience.
This behavior allows you to create generic OSD task sequences and then provide computer-specific information at the time of deployment, which provides greater flexibility in the deployment process.
User-driven installation (UDI) helps simplify the deployment of Windows client operating systems using the operating system deployment feature in Configuration Manager. UDI tasks allow you to run software on the target computer that helps with deployment.
UDI includes several built-in tasks that help you perform common tasks, such as ensuring that the target computer is not running on a battery and is connected to a wired network connection.
We can allow the support team to deploy the task sequences to select the OU to which the computer will be assigned. We also have the flexibility to install applications, configure time zones, languages, and BitLocker, and perform many common tasks.
Prerequisites
- Installed Microsoft Deployment Toolkit (MDT) with Prerequisites
- Configured SCCM or MEMCM
- Configuration Manager Packages
- Boot Image
- Operating System Image
- ConfigMgr Client Package
- USMT Package
Using the latest version to experience the best features is always recommended.
Overview – Configure User Driven Installation
UDI supports the New Computer, Refresh Computer, and Replace Computer deployment scenarios using the Configuration Manager task sequence templates provided with MDT. The primary tool for administering UDI is the UDI Wizard Designer.

The UDI Wizard Designer is part of MDT, which is installed on the same computer as the Configuration Manager Console.
Advantages of Integrating MDT With ConfigMgr
Integrating MDT With Configuration Manager provides more than 280 enhancements that MDT adds to Configuration Manager. Refer to Microsoft Article for detailed information.
The most commonly used features are:
User-Driven Installation(UDI) allows users to interact with the operating system deployment process.
Enables Dynamic Deployment—The task sequence takes additional instructions from the MDT rules. These settings are stored in a text file, the CustomSettings.ini file, but you can also store them in Microsoft SQL Server databases, Scripting, or web services.
Real-Time Monitoring – You can follow your deployments in real-time, and if you have access to Microsoft Diagnostics and Recovery Toolkit (DaRT), you can even remote into Windows Preinstallation Environment (Windows PE) during deployment.
Adds an operating system deployment simulation environment – When testing a deployment, it is important to be able to quickly test any changes you make to the deployment without needing to run through an entire deployment. MDT rules can be tested very quickly, saving significant testing time in deployment.
Adds an Optional Deployment Wizard—During deployment, you can prompt the user for information such as the computer name, the organizational unit (OU) for the computer, or which applications should be installed by the task sequence.
Configure MDT Integration into SCCM
To Integrate MDT with SCCM, you need to use the “Configure ConfigMgr Integration” program, which is available within the Microsoft Deployment Toolkit group. Check Integrated MDT with ConfigMgr By Anoop C Nair for a more detailed process.
Important Note—The integration process happens at the console level. Installing MDT does not change the ConfigMgr server. You must install and integrate MDT on every system with the ConfigMgr console installed to use the MDT extensions. You can still perform all non-MDT-related functions within ConfigMgr without integration.
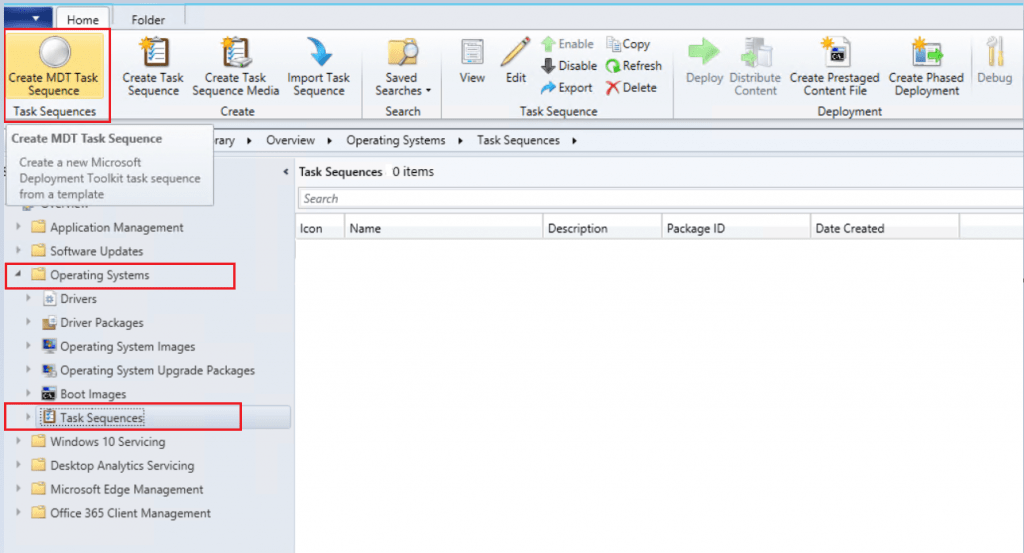
Once you finish the SCCM MDT integration process, launch the Configuration Manager console, Go to the Software Library workspace, expand Operating Systems, and click Task Sequences. You will see the new option “Create MDT Task Sequence.”

Creation of UDI Task Sequence in SCCM
This section will walk you through the process of creating a Configuration Manager task sequence using MDT Integration Wizard.
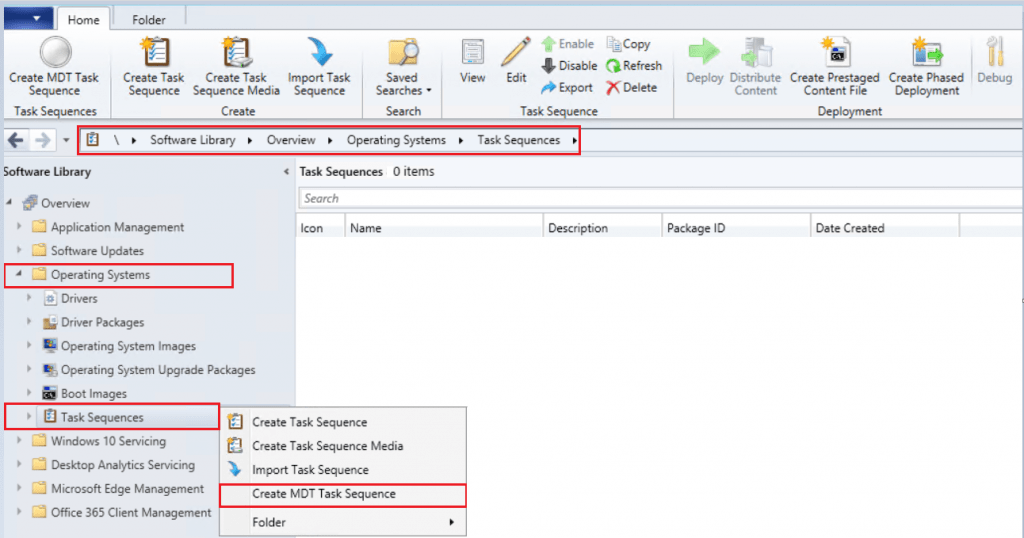
Go to the Software Library workspace in the Configuration Manager console, expand Operating Systems, right-click Task Sequences, and select Create MDT Task Sequence.

On the Choose Template page, select the Client Task Sequence and click Next.
Client Task Sequence – This task sequence template is used for the MDT New Computer, Refresh Computer, and Replace Computer deployment scenarios and is also used to build and capture images of the reference computers.

On the General page, specify the following settings and then click Next.
Task sequence name: Specify a name that identifies the task sequence.
Description: Optionally specify a description.

Choose Windows Settings, then Join a Workgroup or Domain. In this case, we will join the PC to the domain. Provide the Domain name, Account, User Name, and Organization Name, and click Next.

On the Capture Settings page, accept the default settings and click Next.

Browse and select the available boot image package on the Boot Image page. Then click Next.

Important – In the Server, create two empty shared folders with the proper name, which can be accessible. It will be used for the MDT Files Package and Settings Package during the Task Sequence creation process, where the needed files will be copied to the source folder.
The folders should now look like this:

On the MDT Package page, select Create a new Microsoft Deployment Toolkit Files package. In the Package source folder to be created (UNC Path), Provide the folder UNC path where MDT files will be copied.

Specify the Name, Version, and Comment on the MDT Details page. Click Next.

On the OS Image page, Browse and select the Operating System Package from the content folders. Then click Next.

Select Perform a “User-Driven Installation” on the Deployment Method page and click Next.
Note – After Selecting the installation option “User-Driven Installation” A wizard will be displayed during the deployment process to allow the user to provide the various deployment settings information.

On the Client Package page, Browse and select the package. Then click Next.

On the USMT Package page, Browse and select the package. Then click Next.

On the Settings Package page, select the Create a new settings package option, and in the Package source folder to be created (UNC Path): Provide the folder UNC path, where the CustomSettings.ini and unattended installation files will be copied.

Specify the Name, Version, and Comment on the MDT Details page. Click Next.

On the Sysprep Package page, accept the default settings and click Next.

On the Summary page, Review the task sequence details and click Next.

The build process has started. It will include the Toolkit package, and the settings package is all created by the wizard. The process takes approximately 5–10 minutes to complete.

After completion successfully, click Finish to close the wizard.

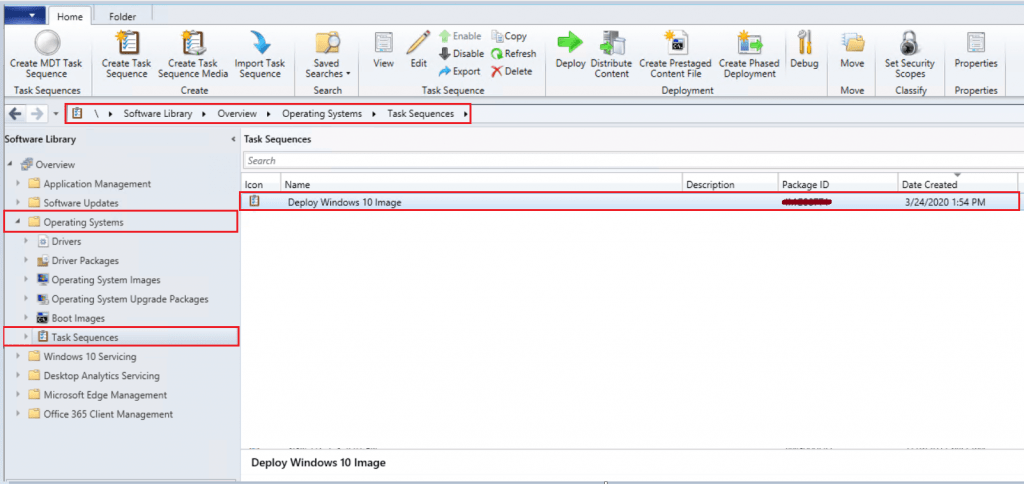
The Task Sequence is created successfully, Under Software Library > Operating Systems > Task Sequences.

Validate MDT Packages
Once the Task Sequence wizard is completed, in the Configuration Manager console, Go to the Software Library workspace, expand Application Management, and select the Packages node. You will be able to see the MDT files and settings package that need to be updated to the distribution point.
You can point to the created Toolkit package if you create another MDT task sequence within ConfigMgr.

Find the “MDT Package” folder, Inside the Package source. Here MDT content is automatically copied.

We have to change some default parameters. Typically, when deploying operating systems using the OSD feature, you must provide all the necessary information to initiate the deployment. The information is configured in configuration files or in databases (such as the CustomSettings.ini).

When a task sequence step runs the UDI Wizard, it also references the UDIWizard_Config.xml file, which controls the wizard’s behavior and is stored in the Scripts folder of the MDT files package.
You can customize the UDIWizard_Config.xml file using the UDI Wizard Designer.

Customize Task Sequence
After you create the task sequence, you can configure the task sequence for an optimal deployment experience. Under Software Library > Operating Systems > Task Sequences. Right-click on task sequences and select Edit.
The integrated task sequence length is slightly larger than the native task sequence in Configuration Manager.
Most of the Task Sequence steps are condition-based and will not go to run at deployment.

This post will be continued…In the upcoming post, we will try to cover the UDI Customization and high-level process for creating custom UDI wizard pages.
Keep on learning and growing yourself.
Resources
- Start Guide for User-Driven Installation
- Microsoft Deployment Toolkit (MDT) Download
- Deploy Windows 10 Image Using Microsoft Deployment Toolkit (MDT)
We are on WhatsApp. To get the latest step-by-step guides and news updates, Join our Channel. Click here –HTMD WhatsApp.
Author
Jitesh Kumar has over five years of experience in the IT Industry. He writes and shares his experiences related to Microsoft device management technologies and IT Infrastructure management. His primary focus area is the Windows 10 Deployment solution with Configuration Manager, Microsoft Deployment Toolkit (MDT), and Microsoft Intune.

Looking forward to part 2
good article