Let’s check how to create Intune policy using Graph Explorer with the help of the POST HTTP method. Intune Graph API queries are there to perform different actions using Graph Explorer.
Microsoft Graph Explorer is the web interface that helps system admins and developers to perform various actions using five (5) supported HTTP methods.
You can use the Intune API in Microsoft Graph to manage Devices, Applications, and Configure Policies without using the Endpoint Manager Admin center portal. The automation of modern device management is made easy with Intune API and Graph integration.
You can learn how to Create device configuration policies using Intune API and Microsoft Graph using Graph explorer. The POST HTTP method can be used for configuring operating system platform/versioning, domain membership, and configuration setting management.
- Windows Update for Business Patching using Intune | WUfB Patching Process
- Intune Vs SCCM and WSUS Vs WUfB Patching Method Differences
Quick Recap Microsoft Graph Explorer
I have discussed the basic structure of the Intune Graph API queries in the previous post. There was a quick overview of Graph Explorer given in the same post. Read more -> Intune Graph Query Samples Starters Guide.
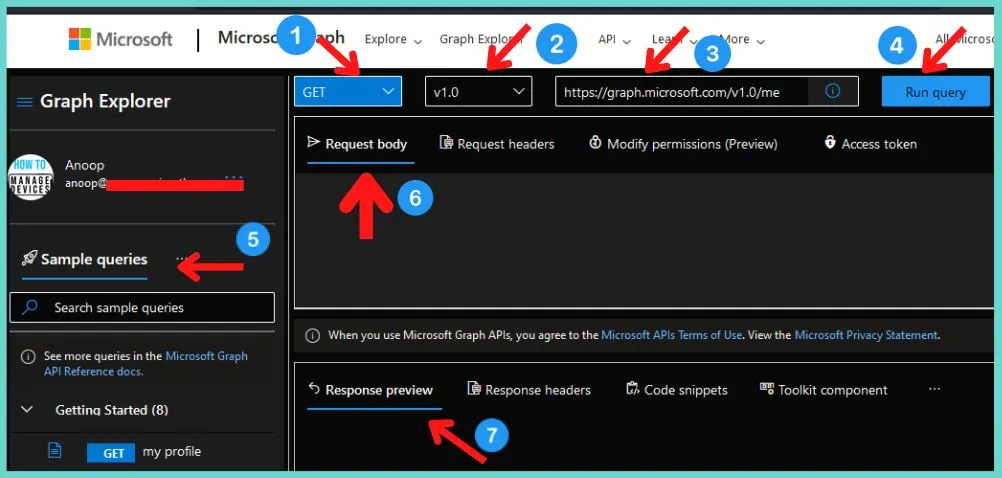
Let’s have a quick recap of the Microsoft Graph Explorer overview.
- HTTP verb drop-down list
- API version drop-down list
- Request query address bar
- Run Query button
- Sample Queries and documentation links
- Request Body/Request Header section for NON-GET commands
- Response Preview – Results Pane
Video Details – Intune Policy Creation using Graph API
Let’s find out the video tutorial to create Intune Policy Creation using Graph API.
How to Get JSON File for Intune Device Configurations Policy
You need to get the JSON representation of the Intune policy as the first step. You can try to fetch JSON details from an existing Intune policy using Microsoft Graph Explorer.
Let’s use Graph Explorer to get the JSON representation of the Intune device configuration policy. Follow the steps to get the JSON file for Intune policy.
- Open the https://developer.microsoft.com/en-us/graph/graph-explorer
- Click on the button called Sign in to Graph Explorer.
- Enter the Intune administrator user name and password to log in.
- Select the GET HTTP method and v1.0 version of API.
- Enter the following Intune Graph query “Request Query Address Bar.”
- https://graph.microsoft.com/v1.0/deviceManagement/deviceConfigurations/
- Click on the Run Query button
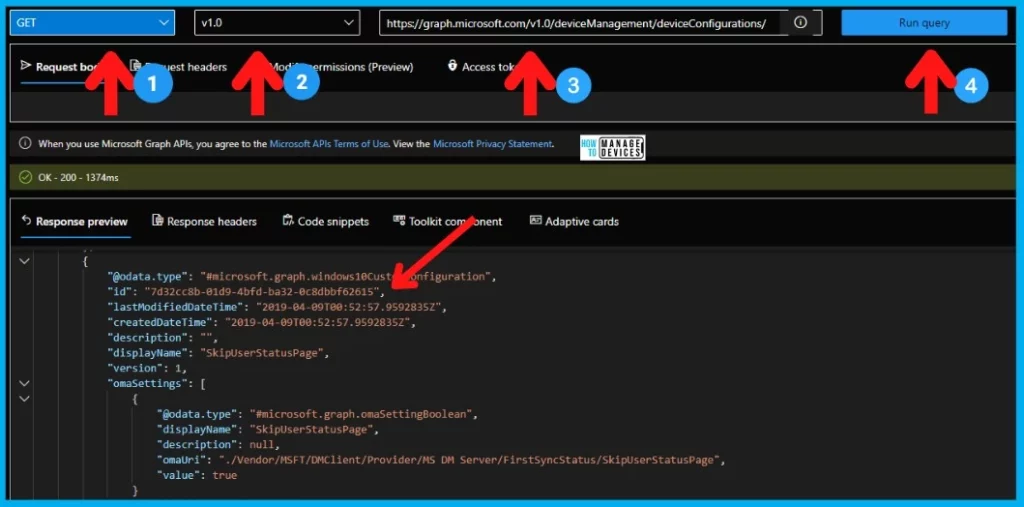
NOTE! – This is the Intune custom policy to Disable the Enrollment Status Page (ESP). The following is the MEM Admin Center portal representation of the policy.

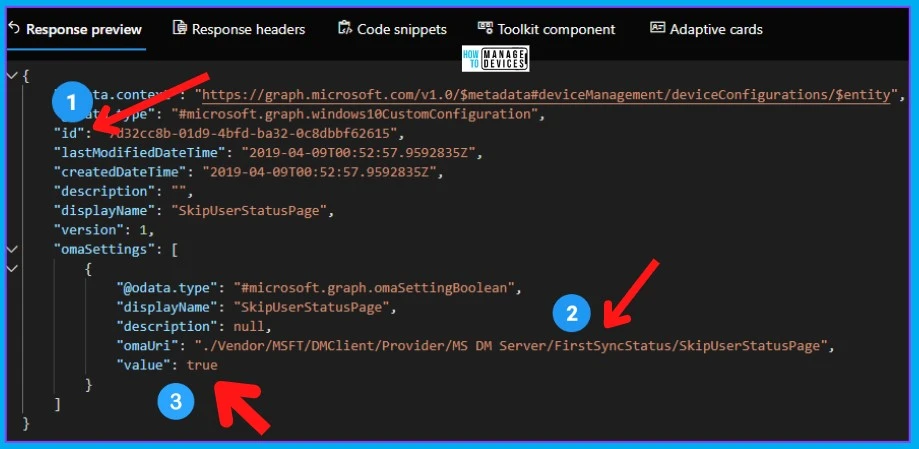
Copy the device configurations policy ID value from the response preview. Use the ID value at the end of the URL as shown below.
Let’s use the below URL in the Graph Explorer Request Query Address Bar to get the JSON representation only for this policy. Make sure to replace the policy ID with one from your Intune environment.
- https://graph.microsoft.com/v1.0/deviceManagement/deviceConfigurations/7d32cc8b-01d9-4bfd-ba32-0c8dbbf62615
{
    "@odata.context": "https://graph.microsoft.com/v1.0/$metadata#deviceManagement/deviceConfigurations/$entity",
    "@odata.type": "#microsoft.graph.windows10CustomConfiguration",
    "id": "7d32cc8b-01d9-4bfd-ba32-0c8dbbf62615",
    "lastModifiedDateTime": "2019-04-09T00:52:57.9592835Z",
    "createdDateTime": "2019-04-09T00:52:57.9592835Z",
    "description": "",
    "displayName": "SkipUserStatusPage",
    "version": 1,
    "omaSettings": [
        {
            "@odata.type": "#microsoft.graph.omaSettingBoolean",
            "displayName": "SkipUserStatusPage",
            "description": null,
            "omaUri": "./Vendor/MSFT/DMClient/Provider/MS DM Server/FirstSyncStatus/SkipUserStatusPage",
            "value": true
        }
    ]
}
Properties of Device Configurations
The following table gives you the details of the Properties of Device Configurations.
| Property | Type | Description |
|---|---|---|
| id | String | Key of the entity. |
| lastModifiedDateTime | DateTimeOffset | DateTime, the object was last modified. |
| createdDateTime | DateTimeOffset | DateTime the object was created. |
| description | String | Admin provided the description of the Device Configuration. |
| displayName | String | Admin provided the name of the device configuration. |
| version | Int32 | The version of the device configuration. |
Create Intune Policy using Graph Explorer
I now have a JSON representation of the sample Intune policy. Let’s create Intune device configurations policy using Graph Explorer and POST HTTP method.
Before proceeding further, let’s make some necessary changes to the JSON representation. Following is the list of things that I’m going to change.
- Remove the Policy ID value -> Keep that line blank. This helps Intune API to select a new/random policy ID.
- Change the Policy Name -> displayName value from SkipUserStatusPage to Enable User Status Page.
- Change the omaSettings -> value to false.
Here you go: The JSON is ready to create the policy using the POST HTTP method from Microsoft Graph Explorer.
{
    "@odata.context": "https://graph.microsoft.com/v1.0/$metadata#deviceManagement/deviceConfigurations/$entity",
    "@odata.type": "#microsoft.graph.windows10CustomConfiguration",

    "lastModifiedDateTime": "2019-04-09T00:52:57.9592835Z",
    "createdDateTime": "2019-04-09T00:52:57.9592835Z",
    "description": "",
    "displayName": "Enable User Status Page",
    "version": 1,
    "omaSettings": [
        {
            "@odata.type": "#microsoft.graph.omaSettingBoolean",
            "displayName": "SkipUserStatusPage",
            "description": null,
            "omaUri": "./Vendor/MSFT/DMClient/Provider/MS DM Server/FirstSyncStatus/SkipUserStatusPage",
            "value": false
        }
    ]
}
Using Graph Explorer, follow the steps to create the Intune Custom Device Configurations Policy.
- Open the https://developer.microsoft.com/en-us/graph/graph-explorer
- Click on the button called Sign in to Graph Explorer.
- Enter the Intune administrator user name and password to log in.
- Select the POST HTTP method and v1.0 version of API.
- Enter the following Intune Graph query “Request Query Address Bar.”
- https://graph.microsoft.com/v1.0/deviceManagement/deviceConfigurations/
- Paste the above JSON representation into the REQUEST BODY section as shown below.
- Click on the Run Query button
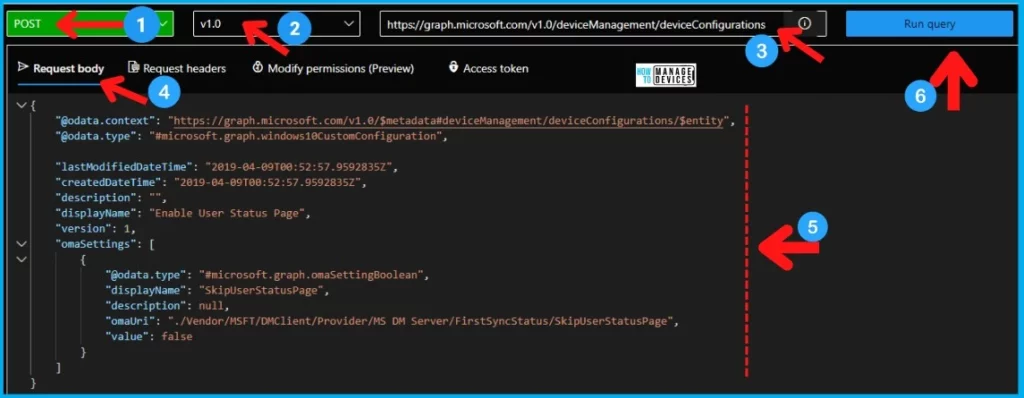
You can check the results in the same Microsoft Graph Explorer itself. The HTTP status code for successful execution of POST method Intune API query is Created – 201. The creation of Intune policy took only 993ms.
In the Response Preview section of Microsoft Graph Explorer, you can also see that Intune API created a new policy with a unique ID.
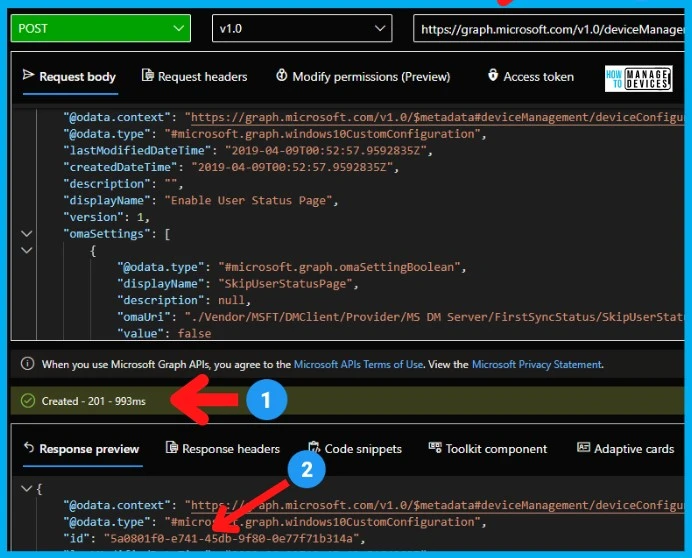
Results – Intune API POST HTTP Method to Create Policy
Let’s check the results of policy creation using Intune API using Microsoft Graph. I use the POST method to create the policy from the JSON file as explained above.

Issues with Beta API Version – Intune API POST Method
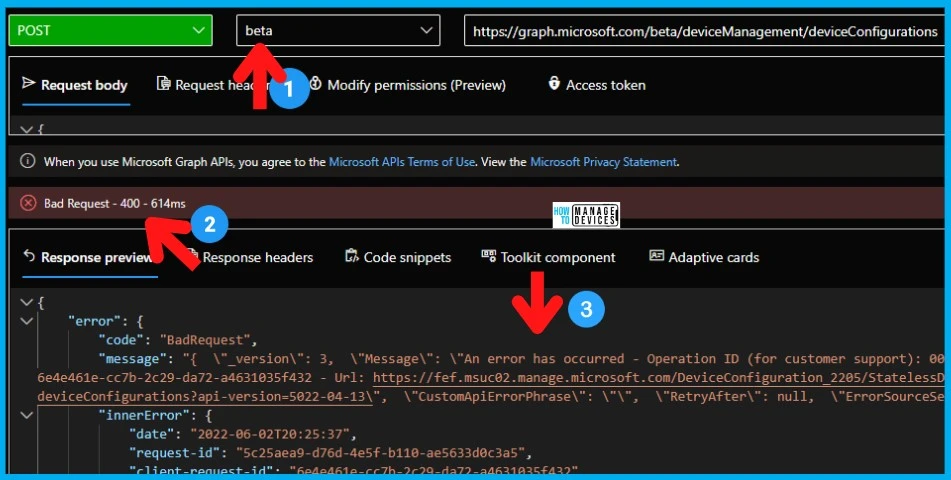
Let’s check issues with Beta API Version – Intune API POST Method. When I try to create Intune policy with the Beta API version instead of the v1.0 version of API, it gives the following error code BadRequest.
Further details of the Intune API error are -> An error has occurred – Operation ID (for customer support): 00000000-0000-0000-0000-000000000000 – Activity ID.
{
    "error": {
        "code": "BadRequest",
        "message": "{  \"_version\": 3,  \"Message\": \"An error has occurred - Operation ID (for customer support): 00000000-0000-0000-0000-000000000000 - Activity ID: 6e4e461e-cc7b-2c29-da72-a4631035f432 - Url: https://fef.msuc02.manage.microsoft.com/DeviceConfiguration_2205/StatelessDeviceConfigurationFEService/deviceManagement/deviceConfigurations?api-version=5022-04-13\",  \"CustomApiErrorPhrase\": \"\",  \"RetryAfter\": null,  \"ErrorSourceService\": \"\",  \"HttpHeaders\": \"{}\"}",
        "innerError": {
            "date": "2022-06-02T20:25:37",
            "request-id": "5c25aea9-d76d-4e5f-b110-ae5633d0c3a5",
            "client-request-id": "6e4e461e-cc7b-2c29-da72-a4631035f432"
        }
    }
} 
The BETA API version comes with much more attributes/properties if you compare it with v1.0. The following is the sample JSON I got for the similar policy as above. But you can see there are some additional or new properties.
The only guess I have is that the BETA version doesn’t support or has some known issues with the POST method. What is your experience?
{
    "@odata.context": "https://graph.microsoft.com/beta/$metadata#deviceManagement/deviceConfigurations/$entity",
    "@odata.type": "#microsoft.graph.windows10CustomConfiguration",
    "createdDateTime": "2021-03-14T08:46:33.3113053Z",
    "description": null,
    "deviceManagementApplicabilityRuleDeviceMode": null,
    "deviceManagementApplicabilityRuleOsEdition": null,
    "deviceManagementApplicabilityRuleOsVersion": null,
    "displayName": "Disable ESP",
    "id": "c6132928-5cf0-46cb-89e5-3ce565835353",
    "lastModifiedDateTime": "2021-03-14T08:46:33.3113053Z",
    "omaSettings": [
        {
            "@odata.type": "#microsoft.graph.omaSettingBoolean",
            "description": "Disable SkipUserStatusPage",
            "displayName": "SkipUserStatusPage",
            "isEncrypted": false,
            "omaUri": "./Vendor/MSFT/DMClient/Provider/MS DM Server/FirstSyncStatus/SkipUserStatusPage",
            "secretReferenceValueId": null,
            "value": true
        },
        {
            "@odata.type": "#microsoft.graph.omaSettingBoolean",
            "description": "Disable SkipDeviceStatusPage",
            "displayName": "SkipDeviceStatusPage",
            "isEncrypted": false,
            "omaUri": "./Vendor/MSFT/DMClient/Provider/MS DM Server/FirstSyncStatus/SkipDeviceStatusPage",
            "secretReferenceValueId": null,
            "value": true
        }
    ],
    "roleScopeTagIds": [
        "0"
    ],
    "supportsScopeTags": true,
    "version": 1
}
Author
Anoop is Microsoft MVP! He is a Solution Architect in enterprise client management with more than 17 years of experience (calculation done in 2018) in IT. He is Blogger, Speaker, and Local User Group Community leader. His main focus is on Device Management technologies like SCCM 2012, Current Branch, and Intune. He writes about technologies like SCCM, SCOM, Windows 10, Azure AD, Microsoft Intune, RMS, Hyper-V, etc…

Thanks Anoop for the great work. Have you tried assigning groups to the configuration policy in intune with MS graph explorer ?