Today we are on a new topic of Enhance Data Retrieval Speed by Adjusting BranchCache Age using Intune Policy. As we all know that Settings catalog in MS Intune have different categories for policy deployment. In that we are on the Network category that help us to deploy Set Age for Segments in the Data Cache.
This policy setting specifies the default age, in days, for which cached segments in the BranchCache data cache remain valid on client computers. Essentially, this setting defines how long data stored in the local cache is considered usable before it expires and must be replaced.
If this policy setting is enabled, administrators can explicitly configure the number of days that BranchCache keeps data segments in the cache. This enables organizations to control how often cached data should be refreshed.
If you disable or do not configure this policy setting, the age is set to 28 days. This default value is generally suitable for most environments where data changes are not very frequent. However, organizations with rapidly changing data or compliance requirements may need to shorten the cache age to ensure data accuracy.

Table of Contents
How this policy Helpful to Organizations?
This policy helps reduce WAN (Wide Area Network) bandwidth usage. By caching content locally on client computers for a defined number of days, users can access data directly from their local cache instead of repeatedly downloading it from a remote server.
This minimizes network traffic and improves speed, especially in branch offices where bandwidth may be limited
Enhance Data Retrieval Speed by Adjusting BranchCache Age using Intune Policy
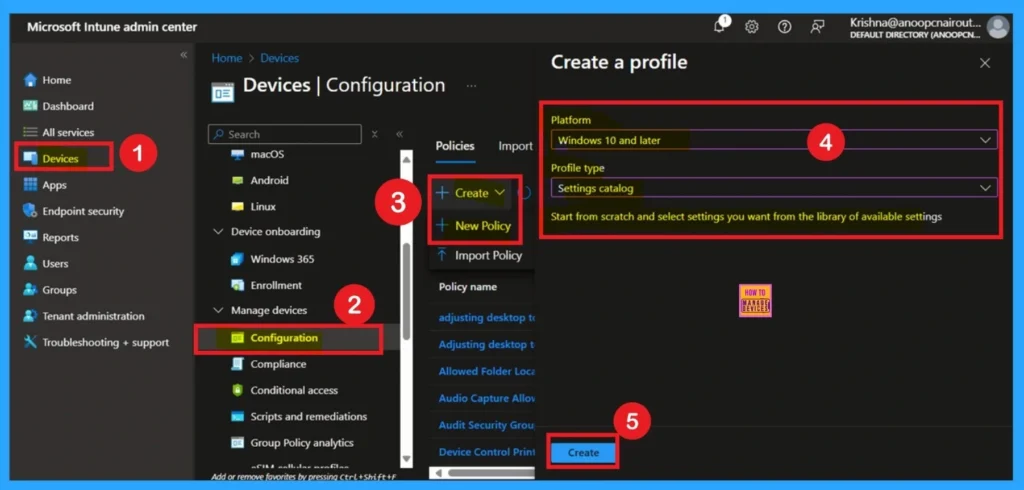
Now, let’s look at how to deploy this policy using the Microsoft Intune Admin Center. To begin, sign in to the Microsoft Intune Admin Center and navigate to the Devices section. Under Devices, go to Configuration, and click on the + Create option to set up a new profile
- In the setup window,Select Windows 10 and Later as the platform and choose Settings catalog as the profile type.
- Once these options are selected, click on Create to continue with the policy configuration.
- Stop User Language Overrides Deploy a Bulletproof Default UI Language on all your Windows Devices using Intune
- How to Set Business Hours to Limit Background Download Bandwidth Policy using Intune
- Enhance Windows Autopilot Bandwidth Efficiency with Connected Cache
Understand the Basics
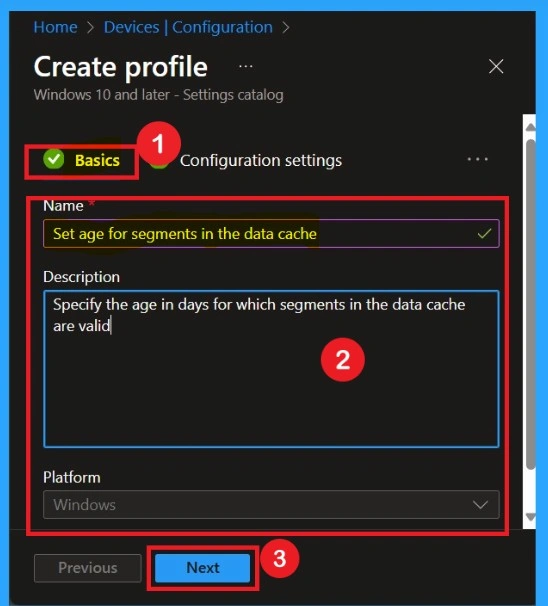
The Basic tab is one of the most important sections during policy creation because it helps identify and organize the policy clearly. In this section, you need to provide essential details that define the purpose and scope of the policy.First, you must enter a name for the policy.
The name should be clear and meaningful so that administrators can easily recognize the policy later. For example, you could name it “ Set Age for Segments in the Data Cache” to make it easily identifiable among other configurations.
- You can add a Description of you want
- The platform as Windows
- Click on the Next.
Configuration Settings
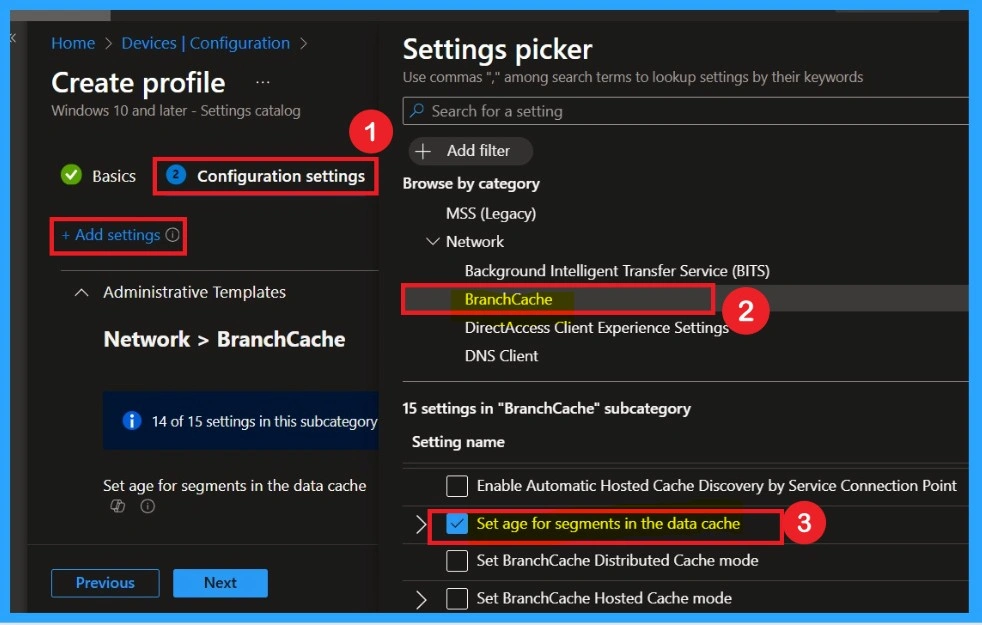
Now you are on the Configuration settings page. Here, click on Add settings. Once you click it, the Settings picker will appear. In the settings picker, select Administrative Templates. After expanding the Administrative Templates, navigate through the following path: Network > BranchCache.
Under the BranchCache category, find and select the policy named “Set age for segments in the data cache.” Once you’ve selected it, close the Settings picker to proceed with the configuration.
Defaulted Disable Mode
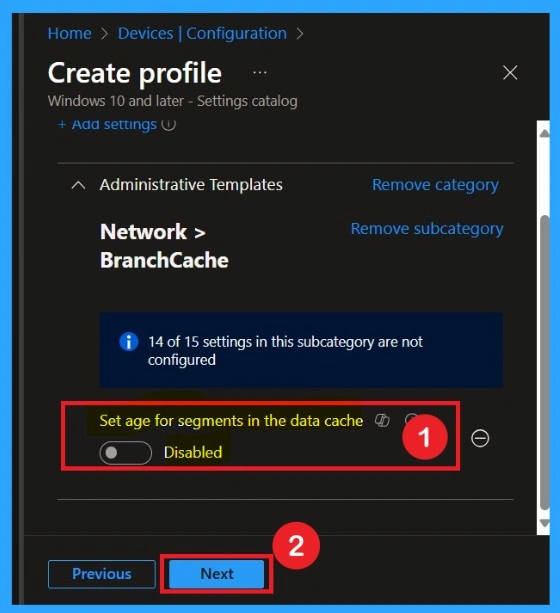
If you want to disable the policy, drag the toggle from right to left. In this mode, the toggle will turn gray, and the status will show as Disabled. This means the policy will not be applied to users. You can then click on Next to continue in the disabled mode.
Enable the Policy
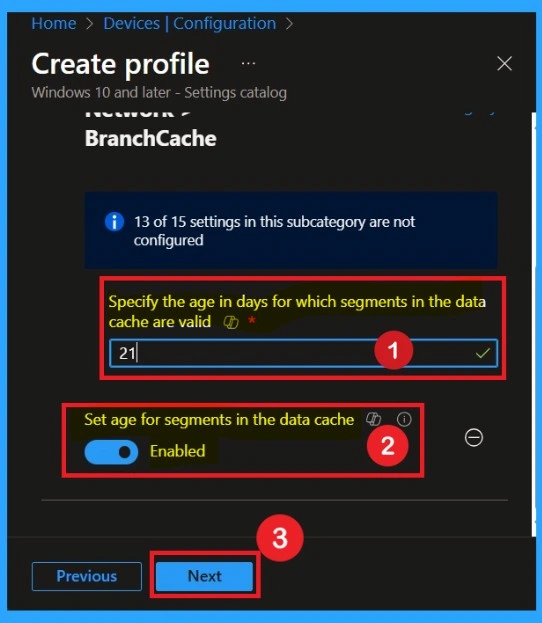
You can also enable a policy that is disabled by default. To do this, toggle the switch from left to right. Once enabled, the switch will turn blue and display the label Enabled. There another check box called Specify the age in days for which segments in the data cache are valid set that as 21.
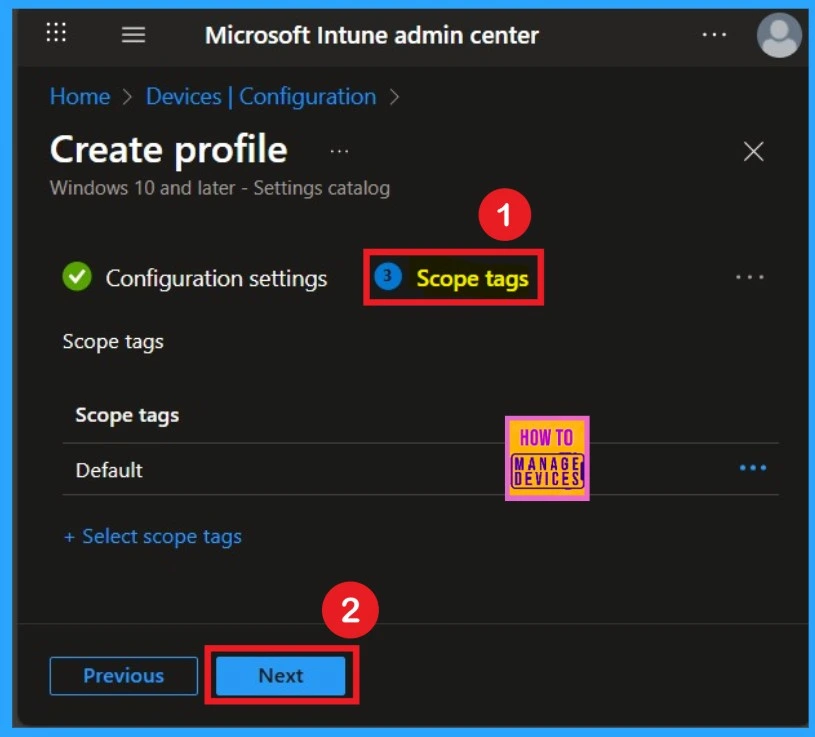
Scope Tags
The scope tag is not mandatory, so you can skip this section. It functions as a tool for organisation and access management, but assigning it is optional. Click Next if they’re not required for your setup.
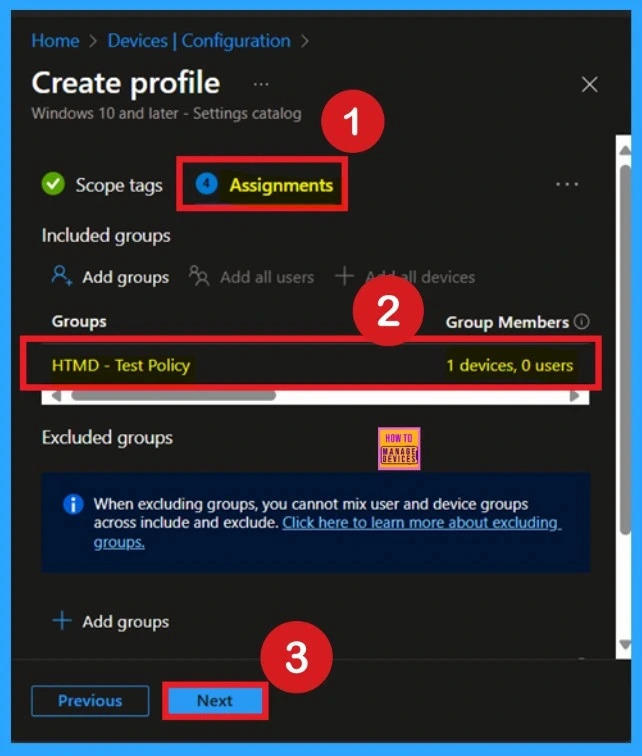
Assignment Tab for Selecting Group
To assign the policy to specific groups, you can use the Assignment Tab. Here I click, +Add groups option under Included groups. I choose a group from the list of groups and click on the Select button. Again, I click on the Select button to continue.
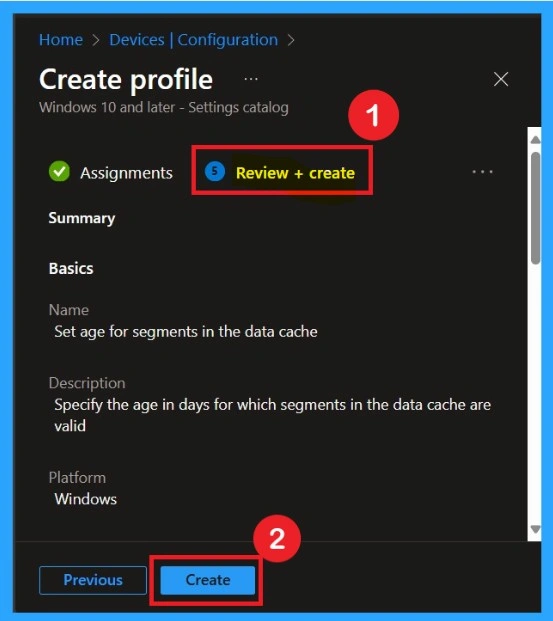
Review + Create Tab
Before completing the policy creation, you can review each tab to avoid misconfiguration or policy failure. After verifying all the details, click on the Create Button. After creating the policy, you will get a success message.
Know About Monitoring Status
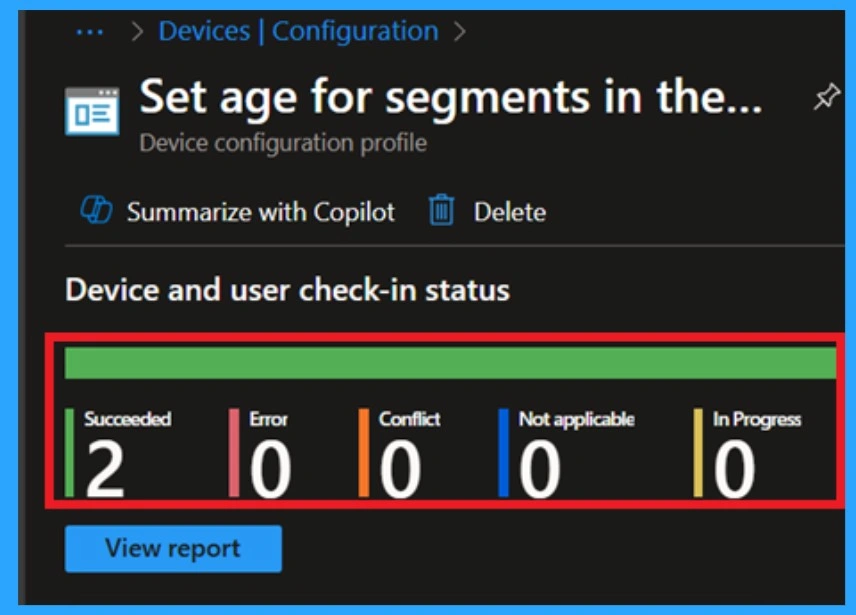
The Monitoring Status page shows if the policy is succeeded or not. o quickly configure the policy and take advantage of the policy sync the assigned device on Company Portal. Open the Intune Portal. Go to Devices > Configuration > Search for the Policy. Here, the policy shows as successful.
Event Viewer Details
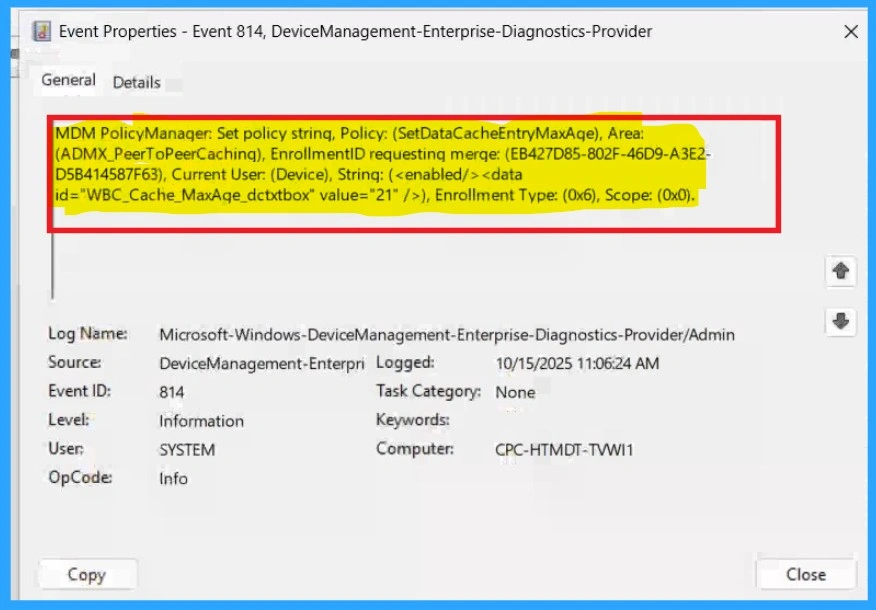
Event Viewer helps you check the client side and verify the policy status. Open the Client device and open the Event Viewer. Go to Start > Event Viewer. Navigate to Logs: In the left pane, go to Application and Services Logs > Microsoft > Windows> DeviceManagement-Enterprise-Diagnostics-Provider > Admin.
- Filter for Event ID 814, This will help you quickly find the relevant logs.
Removing the Assigned Group from these Settings
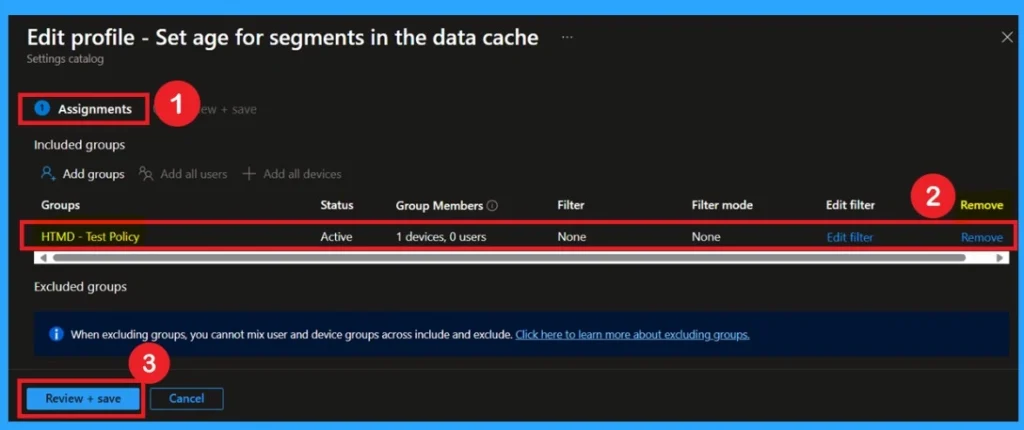
If you want to remove the Assigned group from the policy, it is possible from the Intune Portal. To do this, open the Policy on the Intune Portal, edit the Assignments tab, and then remove the policy. For the steps, go to the Configuration page search the policy name that you created.
When you click on that you are on the monitoring status page. You can scroll down the page to get Assignment edit option page. then you can do the method shown in the screenshot.
How to Delete the Policy that you created
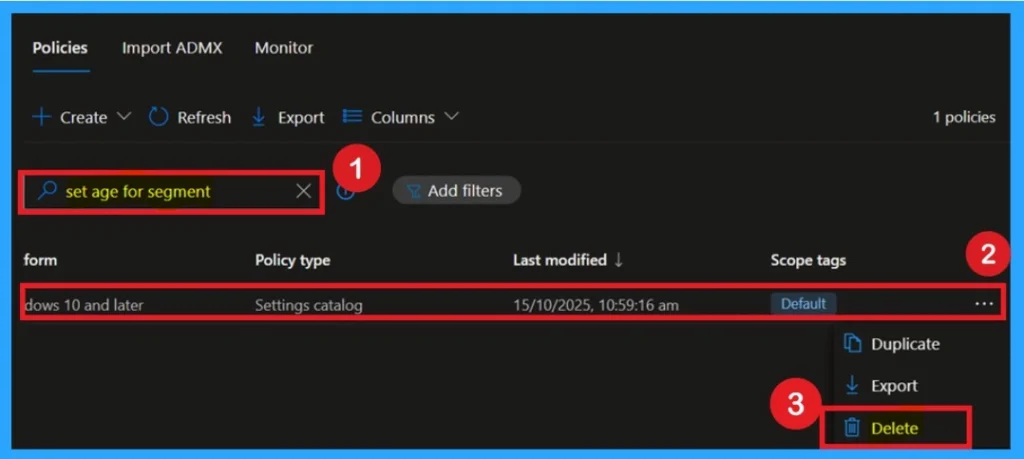
To delete a policy in Microsoft Intune, first sign in to the Microsoft Intune Admin Center. Navigate to Devices and then select Configuration. Locate and select the specific policy you want to remove. Once you’re on the policy details page, click the 3 -dot menu in the top right corner and choose Delete from the available options.
For detailed information, you can refer to our previous post – How to Delete Allow Clipboard History Policy in Intune Step by Step Guide.
Need Further Assistance or Have Technical Questions?
Join the LinkedIn Page and Telegram group to get the step-by-step guides and news updates. Join our Meetup Page to participate in User group meetings. Also, Join the WhatsApp Community to get the latest news on Microsoft Technologies. We are there on Reddit as well.
Author
Anoop C Nair has been Microsoft MVP for 10 consecutive years from 2015 onwards. He is a Workplace Solution Architect with more than 22+ years of experience in Workplace technologies. He is a Blogger, Speaker, and Local User Group Community leader. His primary focus is on Device Management technologies like SCCM and Intune. He writes about technologies like Intune, SCCM, Windows, Cloud PC, Windows, Entra, Microsoft Security, Career, etc.

