Let’s discuss how to Collect Disk Drive ID Details using Intune Property Catalog. A Disk Drive is reffered to as a physical part inside your computer. It stores everything your Windows system, apps, photos, documents, and other files. The most common types are HDDs (Hard Disk Drives) and SSDs (Solid State Drives).
This is where all your data is saved and loaded from when you use your computer. Unlike folders or drive letters like C: or D:, which are just sections of storage. The disk drive is the real hardware. It is the part you could touch if you opened up your laptop or desktop. Every computer usually has at least one disk drive, but sometimes it can have more.
Both storage and data safety are important when it comes to managing information on your computer. You can easily store your data with the help of a disk drive, which is the physical hardware. At the same time, you can keep that data safe using disk encryption, a powerful security method that turns your stored information into unreadable code. This ensures that only authorized users can access the data, even if someone tries to break into the device.
In this post, you will find everything you need to know about how to collect Disk Drive ID details using the Intune Property Catalog. We will walk you through the steps to access hardware-level information about disk drives.
Table of Contents
How to Collect Disk Drive ID Details using Intune Property Catalog
The Intune Property Catalog is a feature in Microsoft Intune that helps IT admins collect and view hardware details from company managed devices. It shows important information like the type of disk drive, battery status, TPM info, and more. This makes it easy for organizations to keep track of their devices and check if everything is working as expected.
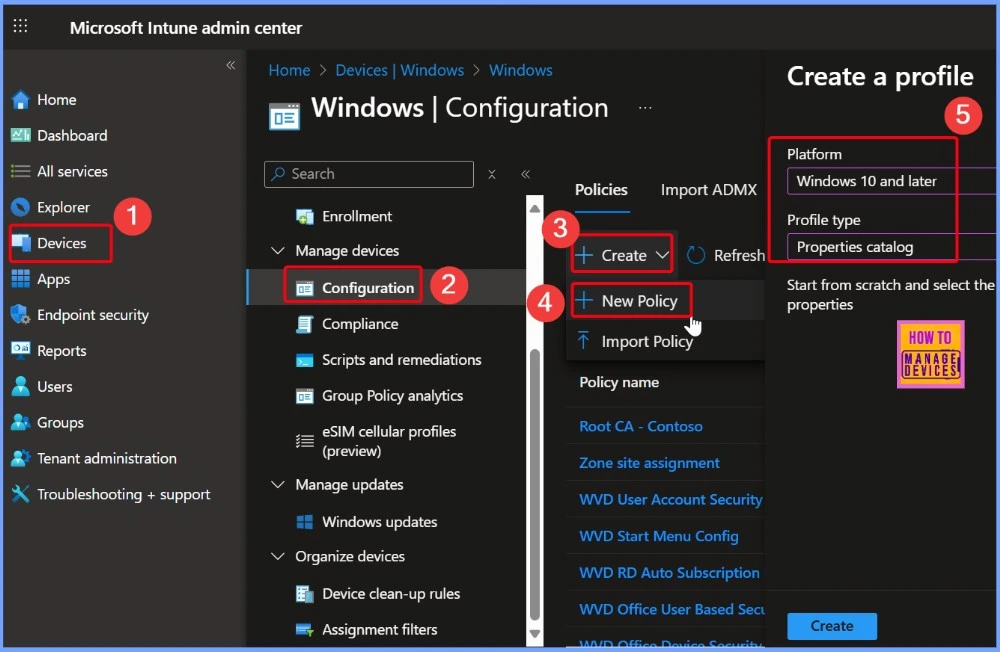
- To get started, sign in to the Microsoft Intune admin center.
- On the left side, click on Devices, then go to Manage devices and choose Configuration.
- Next, click Create, and select New Policy to start setting up your profile.
- Select the Platform as Windows 10 and later
- Seletc the Profile Type as Properties catalog
- How to Track Device Battery Information using Intune Property Catalog
- How to Collect Physical and Virtual Memory Information using Intune Properties Catalog
- Intune Managing OneDrive File Downloads for Low Disk Space
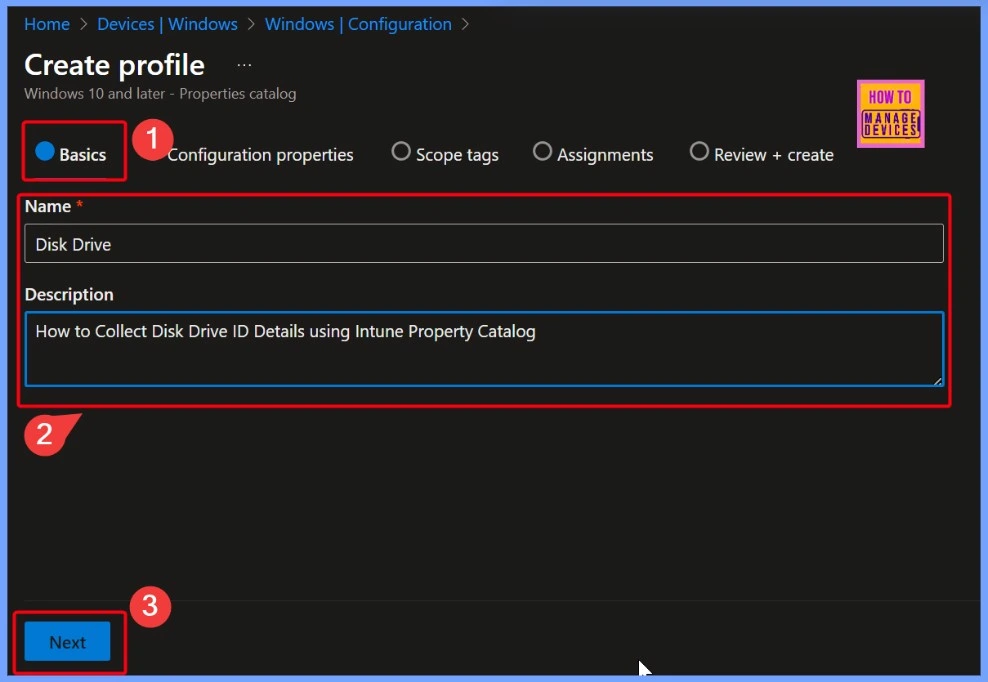
Basic Details of Disk Drive
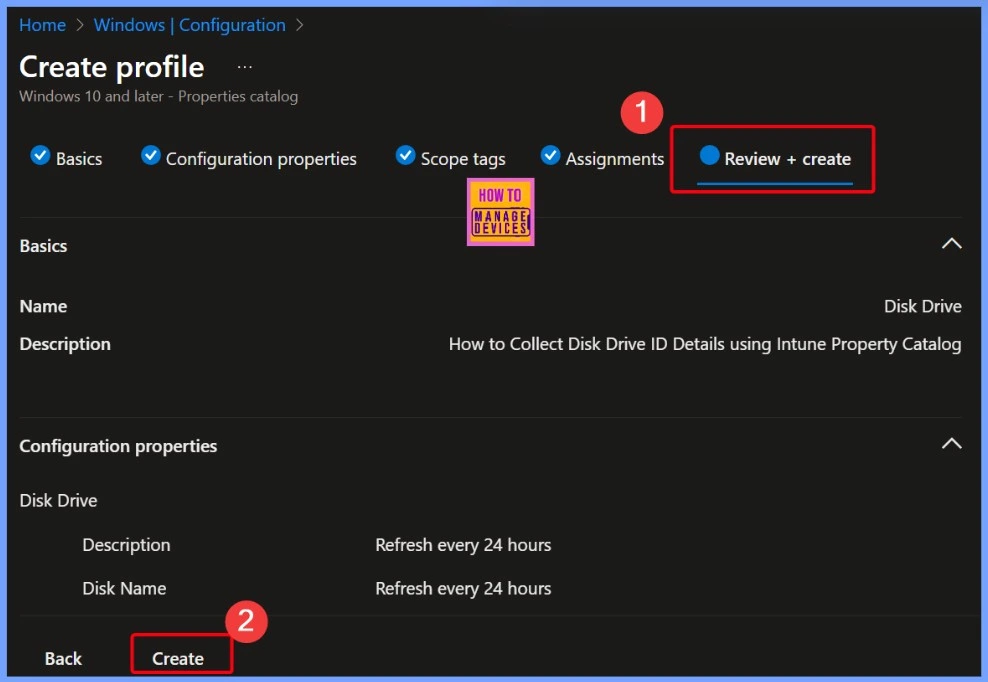
In the Basics tab, start by entering a Name for the policy, such as “Disk Drive“. This helps you quickly identify the policy’s purpose. Next, add the Description with something like “Collect Disk Drive ID Details using Intune Property Catalog” to provide a clear explanation of what the policy does. Adding a meaningful name and description makes it easier to manage and understand the policy later.
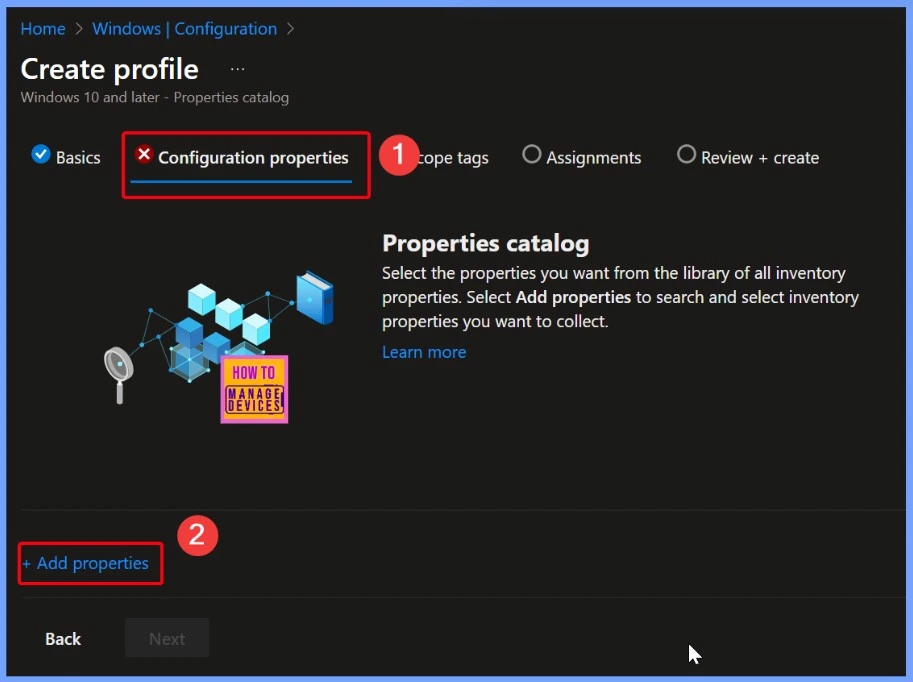
Configuration Properties Settings
In the Configuration Properties tab, you will see a short introduction about the Properties Catalog and what it’s used for. This section helps you understand that you can collect hardware details from devices. You will also see a +Add properties link, which you can click to choose the specific device information you want to collect, such as disk drive details.
Disk Drive in Properties Picker
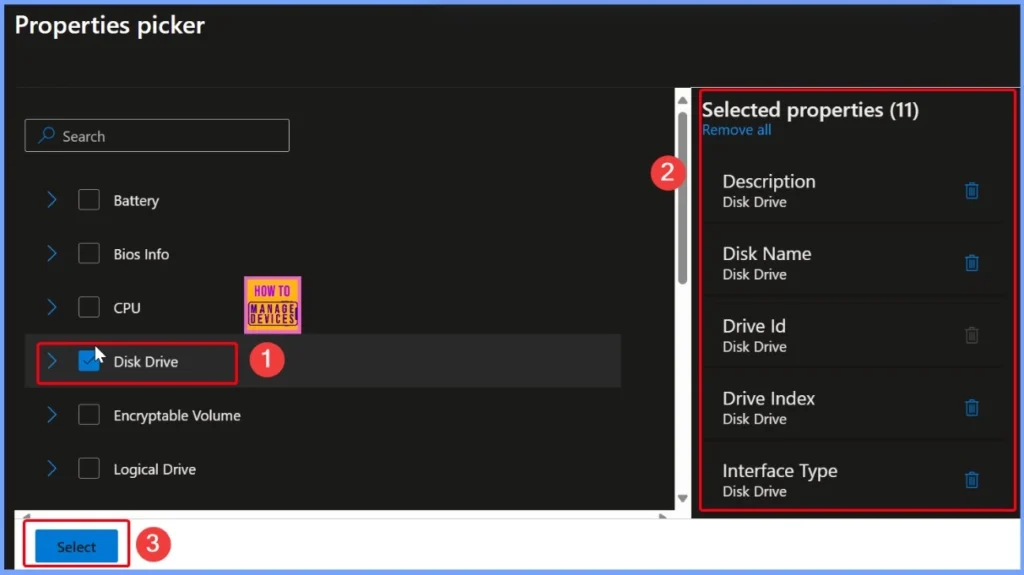
In the Properties picker, you’ll find a wide range of device information, including details about the battery, BIOS, CPU, disk drive, encryptable volume, and more. Since I needed information related to the disk drive, I selected it from the list. After selecting Disk Drive, I could see various details such as disk name, disk ID, disk index, disk type, and other useful hardware properties that help in managing and tracking storage devices across systems.
- Once all needed properties are selected, click the Select button to confirm your choices.
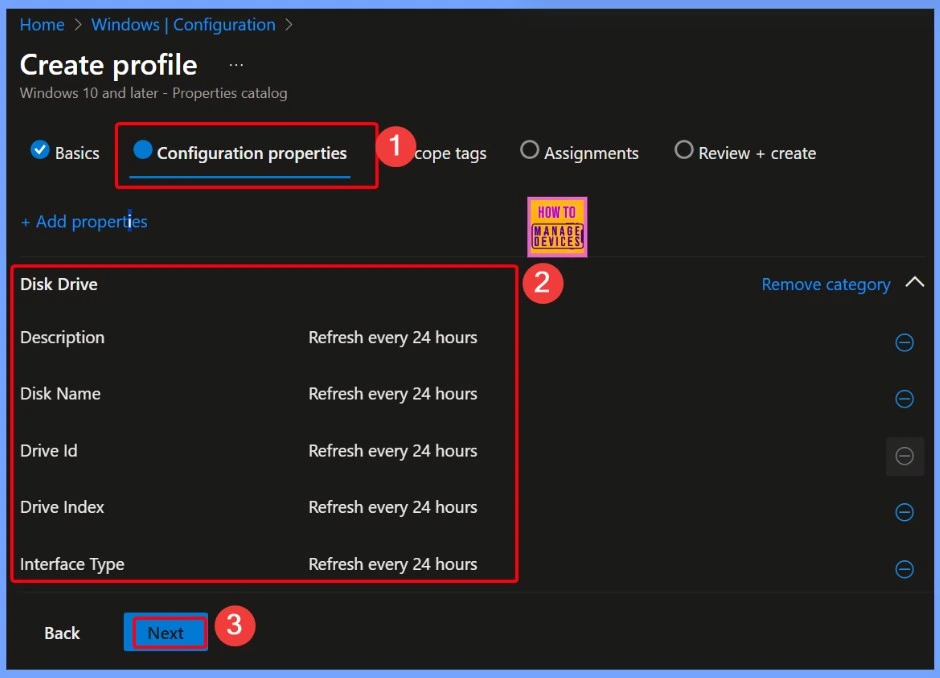
Review and Manage Selected Properties in Configuration Settings
Under the Configuration Properties section, you will see all the properties you selected earlier. If you want to make changes, you can easily remove any category by clicking the Remove Category button. Once you have reviewed and verified all the selected details, simply click Next to continue with the setup process.
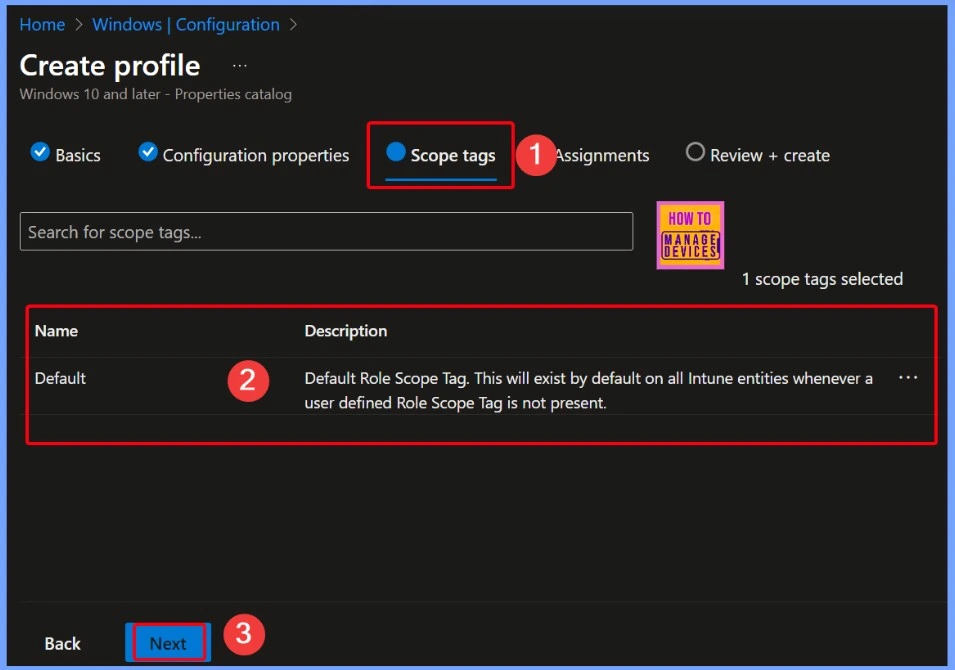
Using Scope Tags to Limit Admin Access
If you have IT admins assigned to different regions or departments, like HR, Finance, or Sales. Using scope tags, you can make sure each admin only sees and manages the devices and policies relevant to their assigned group. It helps keep things organized, secure, and limited to what each admin needs.
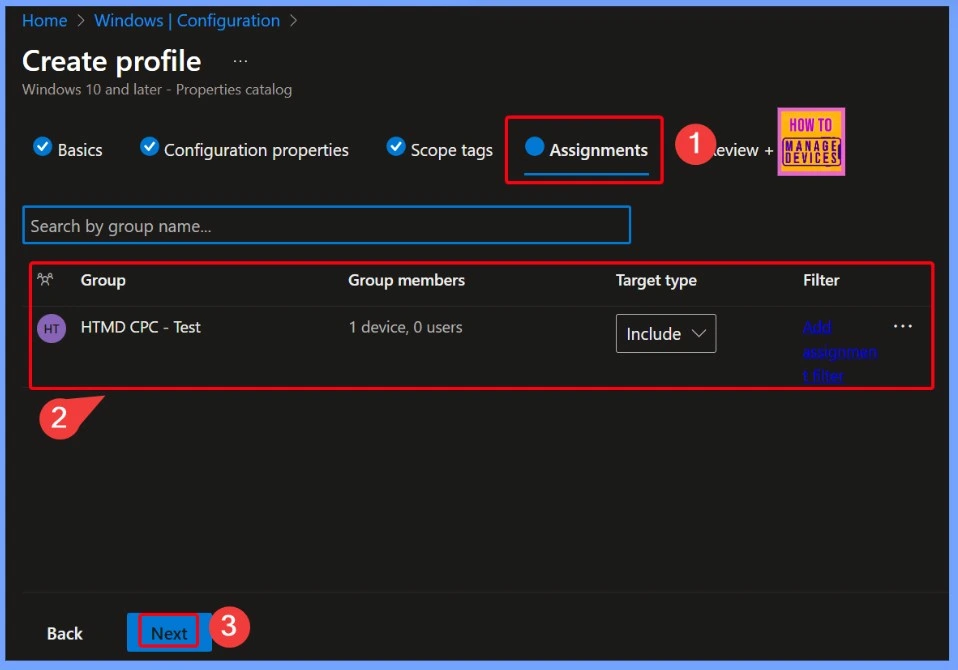
Assigning the Policy to a Group in Intune
When you create some policy in Intune like a compliance policy, Wi-Fi profile, or app. You need to assign it to the right audience. Without an assignment, the setting won’t take effect on any device or user. Here i select the assignment group as HTMD CPC – Test after selection click the Ok button.
Review + Create in Intune Configuration
Review + Create is the final step in most Intune configuration workflows. It gives you a summary of all the settings you have configured so far, allowing you to double-check everything before applying it.
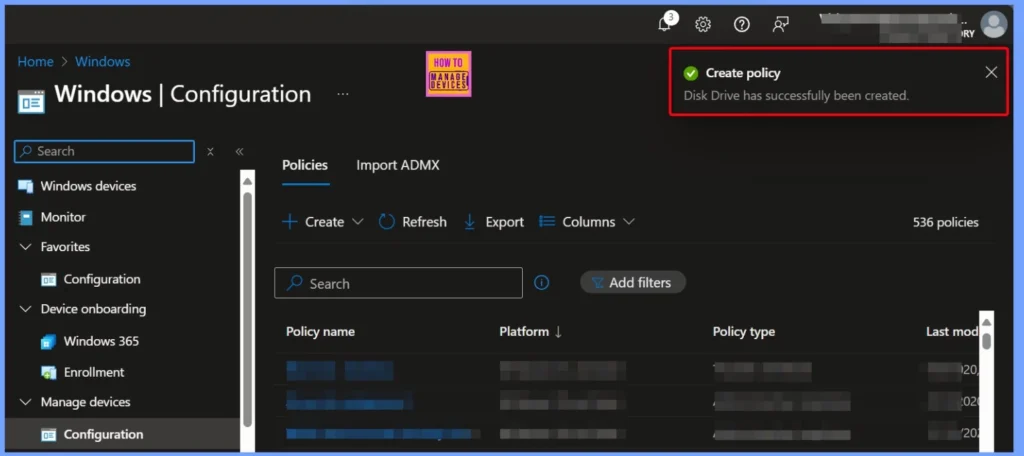
Disk Drive Successfully Created
After you finish creating the Disk Drive policy, you will receive a notification confirming that the policy was successfully created. This message lets you know that all your selected settings and configurations have been saved, and the policy is now ready to be applied to the assigned devices.
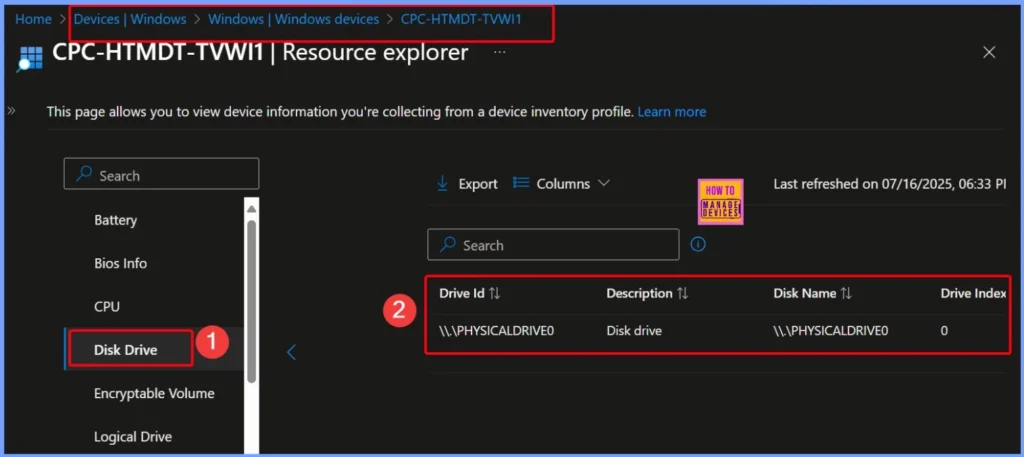
End Result
To view the collected disk drive data, go to Devices > Windows Devices in the Intune admin center and select the device you want to check. Then, under the Monitor section, click on Resource Explorer. From there, you can choose a category to see detailed hardware information, including disk drive details. Keep in mind that after a device syncs with Intune, it may take up to 24 hours for the initial inventory data to appear.
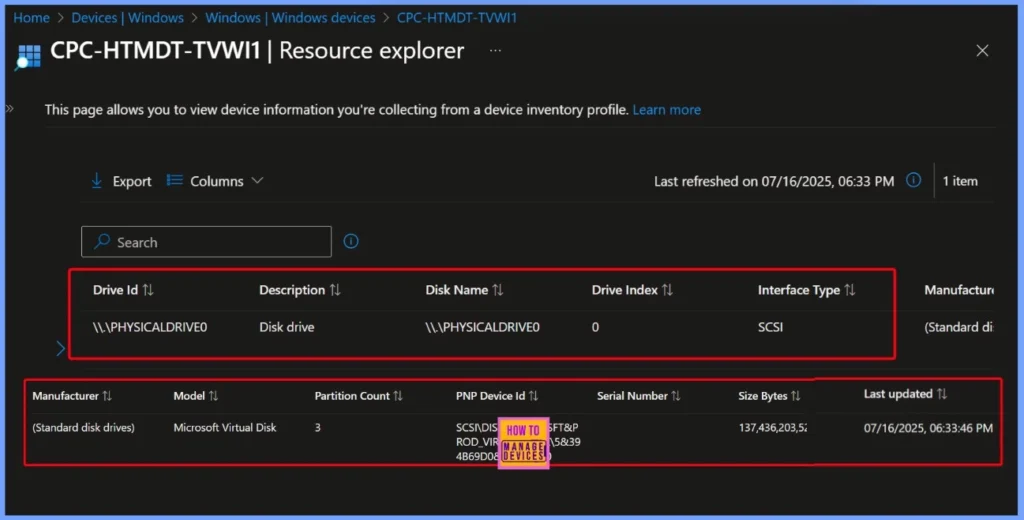
Collected Important Details Related to the Disk Drive
In the table and screenshot below, you can see all the important details related to the disk drive. This includes the Drive Index, Manufacturer, Model, Partition Count, and other key properties. These details help you understand the type of disk being used and how it’s configured on the device.
| Drive Id | Description | Disk Name | Drive Index | Interface Type | Manufacturer | Model | partition count |
|---|---|---|---|---|---|---|---|
| \.\PHYSICALDRIVEO | Disk drive | \.\PHYSICALDRIVEO | 0 | SCSI | standard disk drives | Microsoft virtual disk | 3 |
Need Further Assistance or Have Technical Questions?
Join the LinkedIn Page and Telegram group to get the latest step-by-step guides and news updates. Join our Meetup Page to participate in User group meetings. Also, join the WhatsApp Community to get the latest news on Microsoft Technologies. We are there on Reddit as well.
Author
Anoop C Nair has been Microsoft MVP for 10 consecutive years from 2015 onwards. He is a Workplace Solution Architect with more than 22+ years of experience in Workplace technologies. He is a Blogger, Speaker, and Local User Group Community leader. His primary focus is on Device Management technologies like SCCM and Intune. He writes about technologies like Intune, SCCM, Windows, Cloud PC, Windows, Entra, Microsoft Security, Career, etc.

