Let’s see, what is the easy method to deploy Visual Studio 2019 using SCCM? There are two main challenges in deploying the Visual Studio 2019 version using SCCM. The first one is to download the offline version of VS 2019. The second challenge is to create the SCCM client cache size to deploy more than 35GB of the app.
Visual Studio 2019 version 16.11 is the fifth and final supported servicing baseline for Visual Studio 2019. Microsoft is already working on Visual Studio 2022 version. The 2022 version of Visual Studio is in preview. We will have a guide to deploying Visual Studio 2022 using SCCM whenever it’s out of preview.
You need to make sure all the prerequisites are in place before deploying Visual Studio 2019 using SCCM. You can check the Visual Studio 2019 prerequisites that Microsoft documents before proceeding further. We will cover the server-side configuration of VS 2019 deployment in this post.
Download Offline Version of Visual Studio 2019 for SCCM Deployment
You can download the vs_enterprise.exe to create a local cache and to create the SCCM Visual Studio 2019 application. You can also go through the Microsoft download location to get professional or community bootstrap versions of visual studio 2019.
NOTE! – I couldn’t find vs_enterprise.exe file. The downloaded file name is vs_enterprise__848675208.1615478113.exe. This is not documented in Microsoft docs as well?

- Open browser and Download the Visual Studio bootstrapper.
- Copy the boot strapper to SCCM package source server (make sure fast internet connection is avilable on that server).
- Prepare the commandline for offline download of Visual Studio 2019 source files.
I have only included the US English language pack in the following command line. I used the bootstrap version of VS_ENTERPRISE<version>.exe to download the offline versions of Visual Studio enterprise for SCCM application creation and deployment.
- You will need to use the LayOut parameter option to Download the Visual Studio for offline install.
- You can use the same command line with different VS_Professional.EXE files to download the professional version of Visual Studio 2019.
- The same applies to Visual Studio Community and the professional versions as well.
- You just need to download the respective bootstrap exes for those versions.
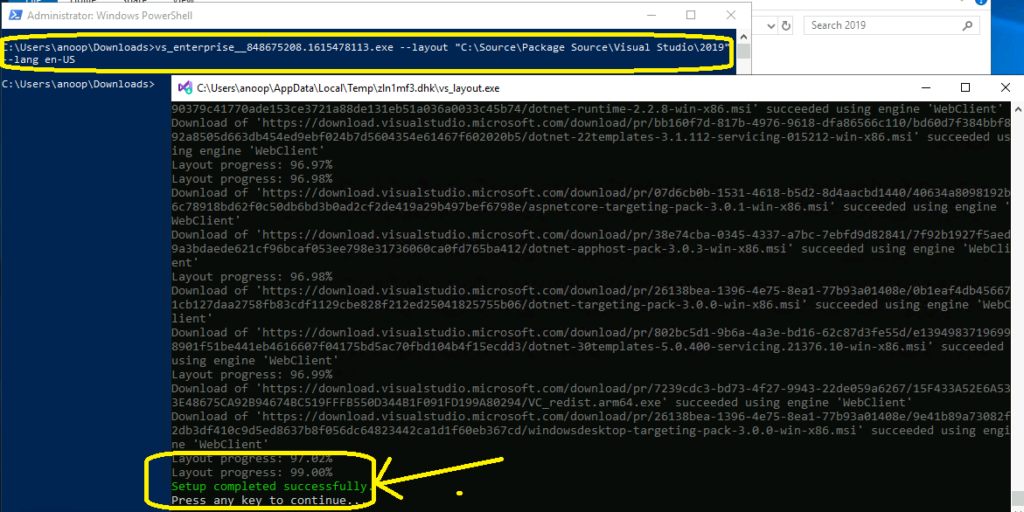
vs_enterprise__848675208.1615478113.exe --layout "C:\Source\Package Source\Visual Studio\2019" --lang en-US
Normally, the download of the offline version of Visual studio takes around an hour to complete. So sit tight and relax until you see the following message on the download screen. You can see whether the download is reached 100% or not from the screen itself. The size of the Visual Studio 2019 enterprise version with US-EN is and 46 GB.
- Layout progress: 99:00%
- Setup Completed Successfully.
- Press any key to continue.
Create Visual Studio 2019 Application in SCCM
Let’s create Visual Studio 2019 application in SCCM. Make sure that you have already downloaded the offline version of VS 2019 before proceeding further.
- Launch Configuration Manager (ConfigMgr) console.
- Navigate to \Software Library\Overview\Application Management\Applications.
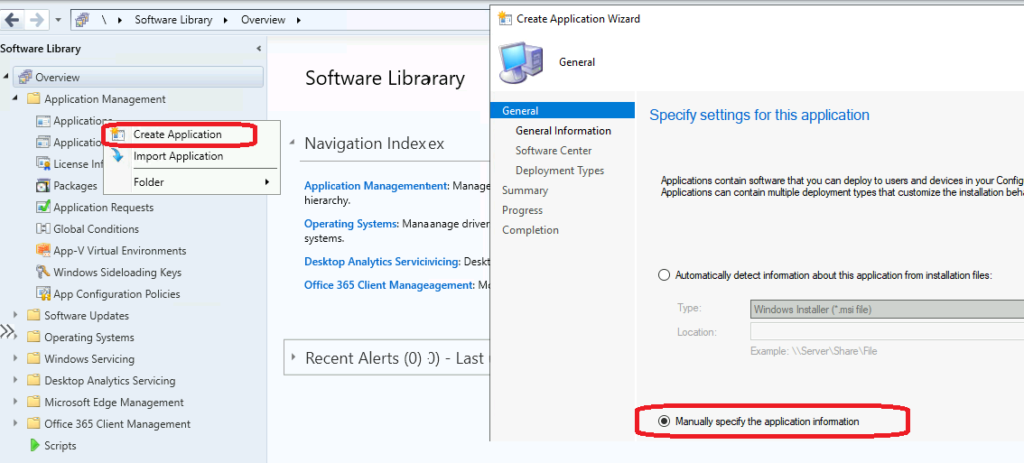
- Right-click on Applications and select Create Application.
- Select “manually Specify the application information” option from General – Specify settings application window.
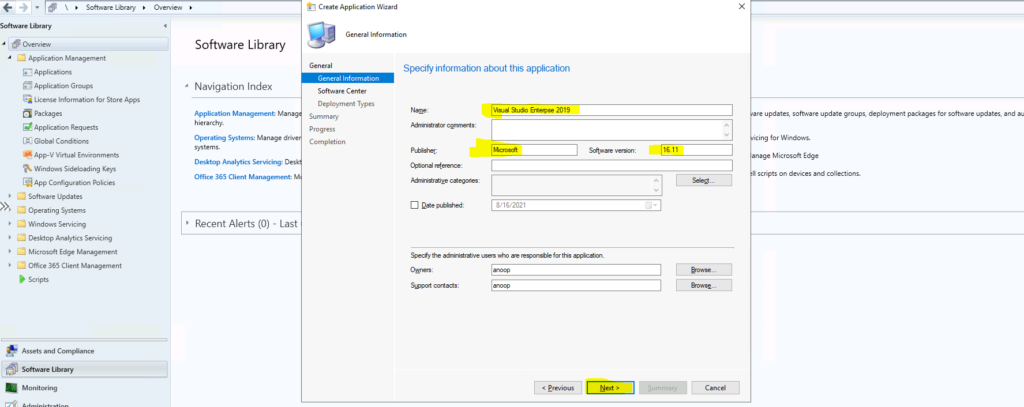
On this General information page, you will get options to specify the name of the Visual Studio 2019 application in SCCM. You can enter the name of the application, publisher details, and version details of the application. You will need to click on the NEXT button to continue.
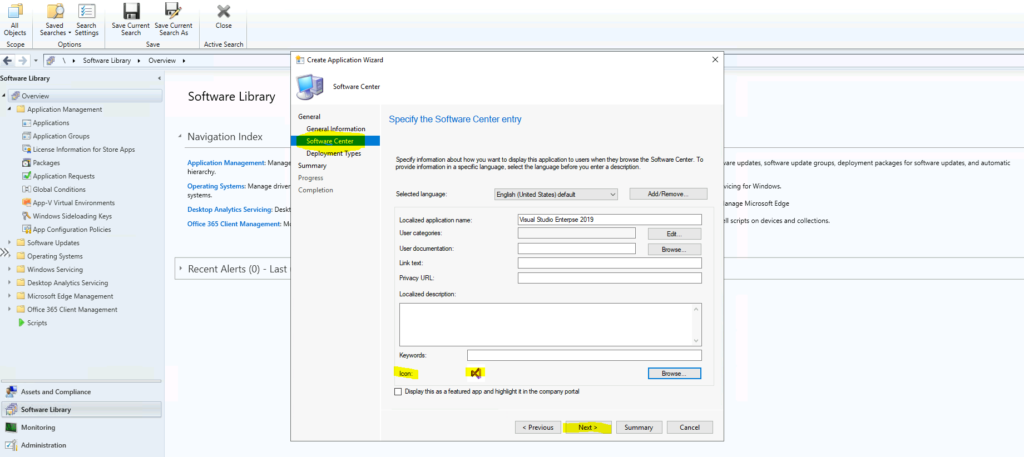
You can specify the Software center related details on the below page. I have uploaded the Microsoft Visual studio icon to this wizard page. This will help end-users to get a better experience while they launch applications from the SOftware center. Click on the Next button to continue.
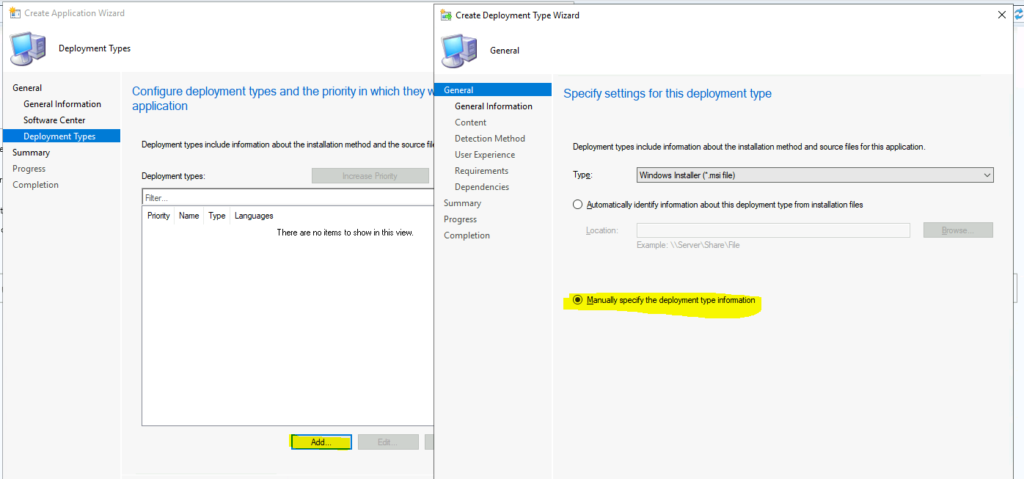
Click on Add button to create a deployment type. You will need to build a new deployment type for the Visual Studio application in SCCM. You will also need to specify the installation command line for Visual Studio 2019 application in the deployment type creation wizard.
- You will need to selecct the optiion called Manually Specify the Deployment type information.
- Clcik on the Next button to continue.
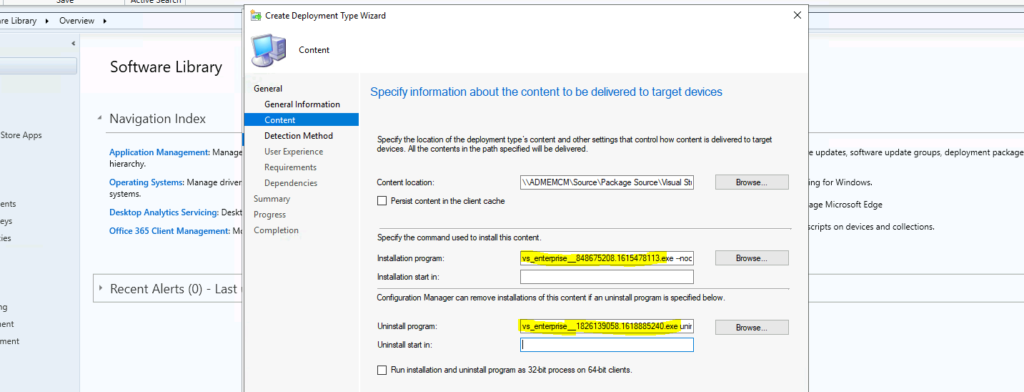
Visual Studio Enterprise Install Command Line
You need to check the VS_ENTERPRISE_<version>.exe from the source folder and use the same exe as the command line parameter to install and uninstall Visual Studio 2019. It seems Microsoft does not support vs_setup.exe.

The following are the command line parameters for installing or uninstalling the Visual Studio 2019 Enterprise version. There are some changes you will need to make before using it within SCCM. More details on parameters.
- You should use the correct file name with version details -> vs_enterprise__848675208.1615478113.exe or whatever the version you have downloaded.
- You should have productkey (not mandatory always) – More details.
- Default Install location should be changed based on VS version -> %ProgramFiles(x86)%\Microsoft Visual Studio\2019\enterprise
Install Command Line - vs_enterprise__848675208.1615478113.exe --nocache --wait --noupdateinstaller --noWeb --quiet --productKey xxxxxxxxxxxxxxxxxxxxxUninstall Command Line - vs_enterprise__1826139058.1618885240.exe uninstall --installpath %ProgramFiles(x86)%\Microsoft Visual Studio\2019\enterprise --q --norestart /log "C:\Windows\Temp\VS_Uninstall.logNOTE! – You can check with Microsoft Chat support (free) to ensure you use the correct install and uninstall command line parameters. I have used this service to come up with the above command line.
Continue… Deplyment Type Creation
You will need to enter the name for deployment type and administrator comments if needed. Click on the Next button to continue.

You can use the command lines used in the above section. Also, you need to enter the source location where you have stored the source files. As mentioned in the above section, the location where you have downloaded the source files.
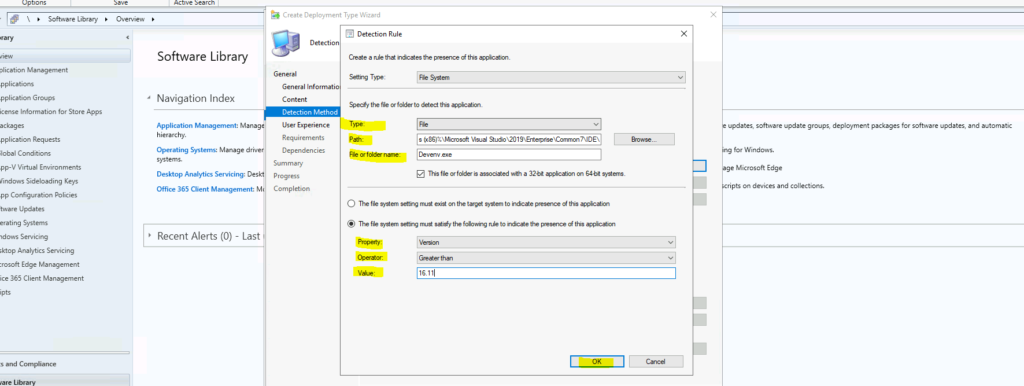
Visual Studio Detection Method
Let’s find the best detection method for Visual Studio 2019 version. You can check the registry keys, or you can check the file called devenv.exe. Check the version details of that exe file to detect which version of VS is installed.
NOTE! – More options to detect and manage Visual Studio instances

- Type -> File
- Path -> %Program Files (x86)%\Microsoft Visual Studio\2019\Enterprise\Common7\IDE\
- File -> devenv.exe
- You will need to click on the following option called “The file systems setting must satisfy the following rule to indicate the presence of this application.”
- Property -> Select Version from drop down list.
- Operator -> Greater than or equal to
- Value -> 16.11
- Click OK to continue and click on Next, Next, Next, and Close to finish creating deployment type for Visual Studio 2019 application deployment.
NOTE! – You can have the build numbers/versions of the Visual Studio on Microsoft docs.
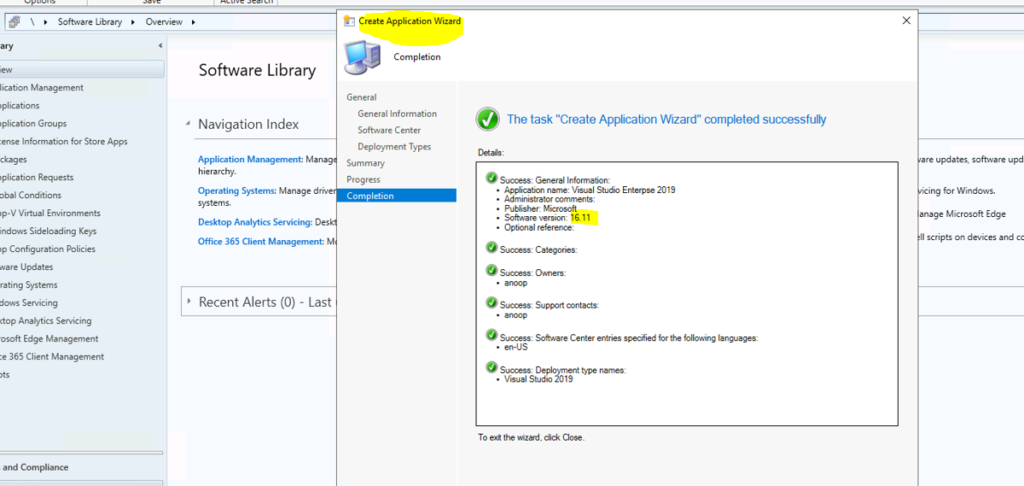
You need to go through the application creation wizard and close it. So the Visual Studio 2019 application is created in SCCM, and it’s ready to use.
Deploy Visual Studio 2019 using SCCM
Let’s have a quick look at the deployment options for the Visual Studio 2019 August 2021 release. This is similar to any other application deployment in SCCM.
NOTE! – Before deploying, make sure that SCCM clients and distribution points have enough cache size and disk space respectively to handle this VS 2019 deployment. The package size is around 46 GB.
- You can navigate to \Software Library\Overview\Application Management\Applications
- Search for Visual Studio.
- Select on the Application called Visual Studio 2019 and click on Deploy button from ribbon menu.

- You can select the device collection that you want to deploy visual studio 2019 and click on the Next button to continue.
- You can select the Distribution Point that you wnat to distribute this particular package. Click on the NEXT button to continue.
- You can make this an Install and Avialble application for the users.

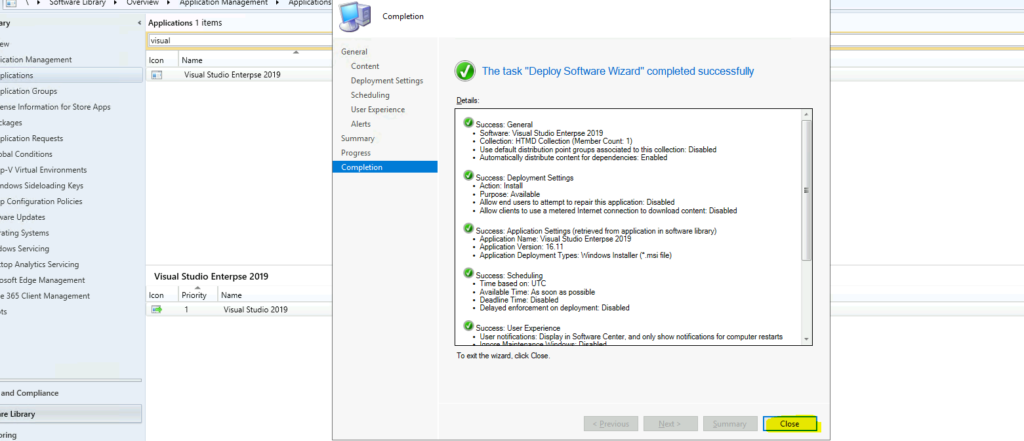
You can click on the Next, Next, Next, Next, and Close buttons to complete the deployment wizard for VS 2019 August release.
Results
I will include client-side Configurations, testings, and installation status in the next blog post. This includes changing the client cache size to 49 GB etc…
