Let’s discuss Get Free Windows 10 ESU Support for Physical Endpoints used for Accessing Windows 365 Cloud PC using Intune Policy. Microsoft Intune allows Windows 365 Cloud PC users to extend the Windows 10 support to access critical and important security updates with ESU Subscription.
ESU extends the use of Windows 10 devices past the end of support date on October 14, 2025. To enable ESU for Windows 10, you must meet the some prerequisites. The Devices need requirements like Windows 10, version 22H2 with KB5066791, or a later update installed. Administrative privileges on the device.
A common scenario where this policy is crucial is for organizations leveraging Windows 365 Enterprise or Windows 365 Frontline (Dedicated) Cloud PCs. With Intune Enable ESU Subscription Check policy, instructs the Windows 10 physical device to check the Microsoft Entra ID/Windows 365 subscription status to confirm its eligibility to receive the ESU patches.
Windows 10 devices accessing Windows 365 Enterprise Cloud PCs and Windows 365 Frontline Cloud PCs in dedicated mode are automatically entitled to ESU for the duration of the ESU offer if the user has an active Windows 365 Enterprise license assigned or Windows 365 Frontline Cloud PC in dedicated mode provisioned.
Table of Contents
Get Free Windows 10 ESU Support for Physical Endpoints used for Accessing Windows 365 Cloud PC using Intune Policy
For many scenarios, the Windows 10 Extended Security Updates (ESU) are free if you’re using Microsoft-hosted or Azure-integrated environments. It includes Azure Virtual Desktop, Azure VMs, Dedicated Host, Stack Hub, Stack Edge, Local (Azure Stack HCI), Windows 365 Cloud PCs (Enterprise or Frontline in dedicated mode).
As mentioned, Windows 365 Frontline Cloud PC in dedicated mode provisioned, provided the following conditions are met. The below table shows the conditions.
| Conditions |
|---|
| Device is Microsoft Entra joined/hybrid joined. |
| User has active Windows 365 Enterprise or Frontline (dedicated mode) license. |
| User signs in with same Entra ID at least once every 22 days. |
| Devices must be managed via Intune or MDM with EnableESUSubscriptionCheck policy. |
- Unsupported Windows 10 Devices in Intune may Experience Limited or Unreliable Functionality
- Windows 10 Version Numbers Build Numbers Major Minor Build Rev
- Microsoft Products Reaching End of Support in 2025
- Updated Windows 10 End of Life Dates
How to Configure Enable ESU Subscription Check Flag
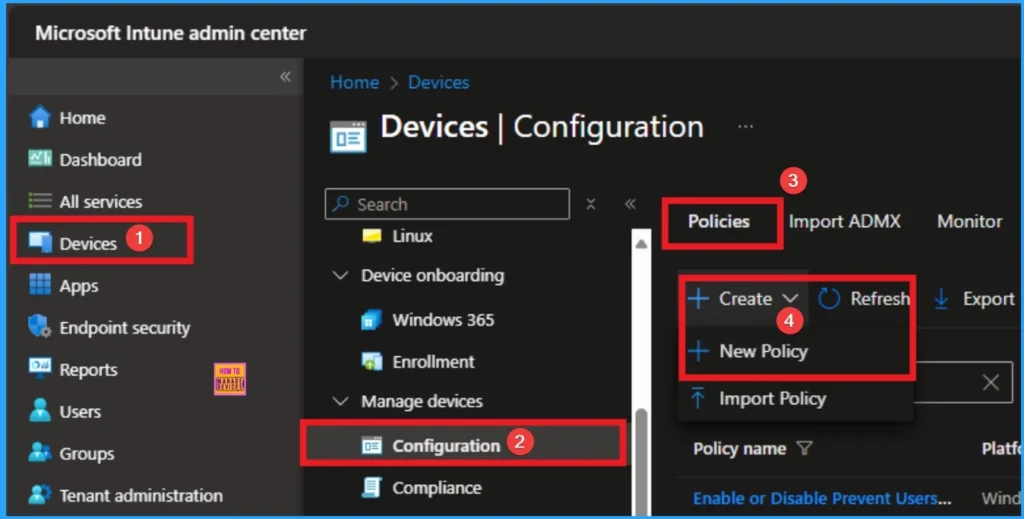
As an admin, you can easily configure this policy from Intune Portal. For this, Sign in to Microsoft Intune Portal with your credentials. Then go to Devices > Configuration > +Create >+ New Policy.
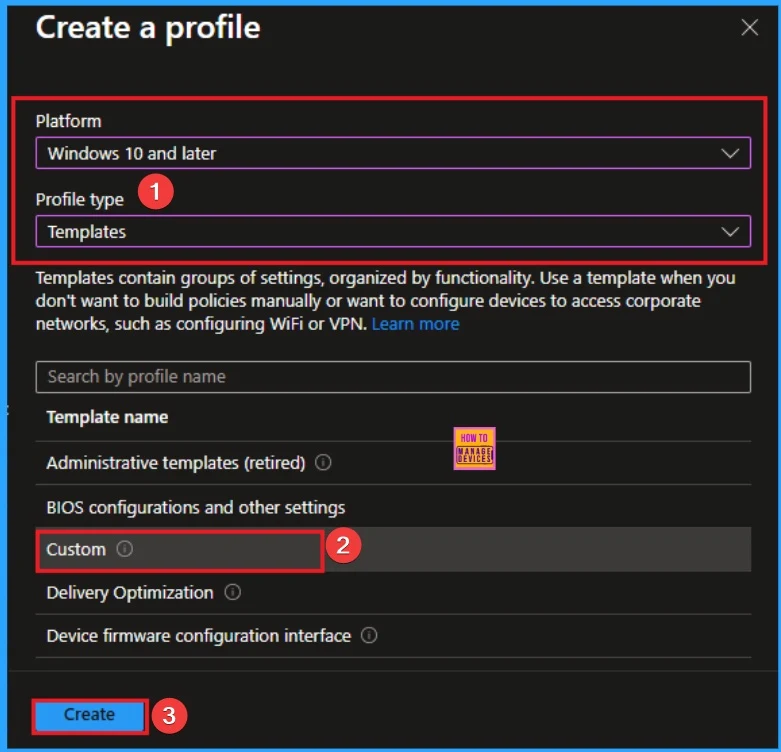
Choosing Platform and Profile Type
Choosing Platform and Profile is the next step after selecting New policy. It is very necessary step to effectively configure the policy to appropriate platform. Here I would like to configure the policy to Windows 10 and later platform and Templates and choose custom profile. Then click on the Create button.
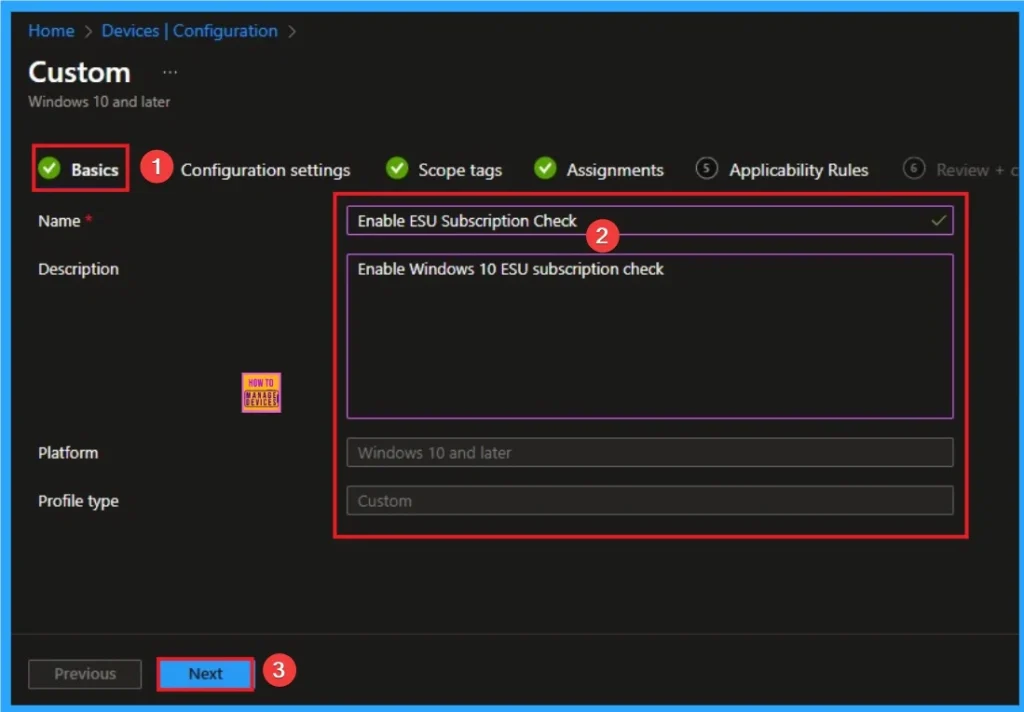
Basic Tab
The basic tab is starting step of policy creation. On this tab, you have to give a name for the policy that you want to create. The name field is mandatory. Without giving a name, you can’t create a policy on the basic tab. You can also describe the policy, which description is not compulsory. Click on the next button.
Configuration Settings
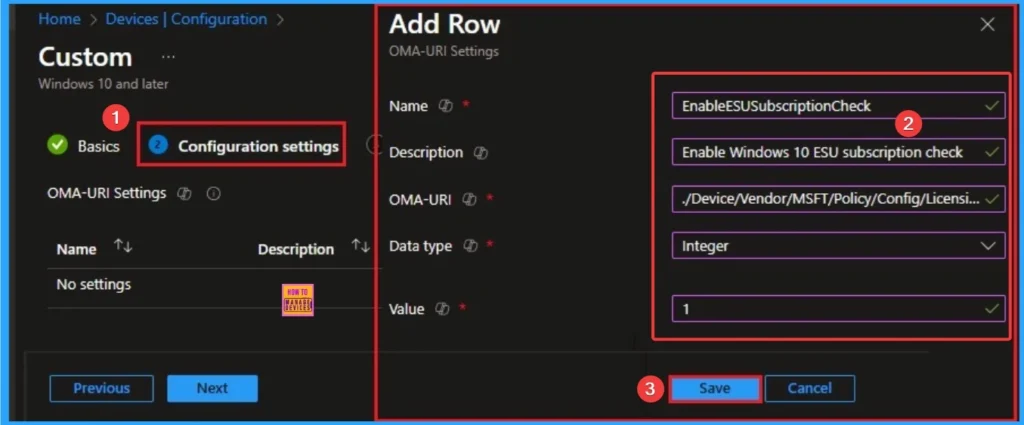
On this tab clcik on the + Add to configure the specific setting. By adding Name, Description, OMA-URI, Data Type and value you can complete this tab. Follow the below steps to Configure the OMA-URI Setting.
- After entering the above details, click Save.
- Enter a name for this setting, EnableESUSubscriptionCheck
- Briefly describe the setting, e.g., Enable Windows 10 ESU subscription check
- Enter the following OMA-URI path
- ./Device/Vendor/MSFT/Policy/Config/Licensing/EnableESUSubscriptionCheck
- Set the Data type to Integer.
- Enter the value
- 1 to enable
- Click on the Save Button.
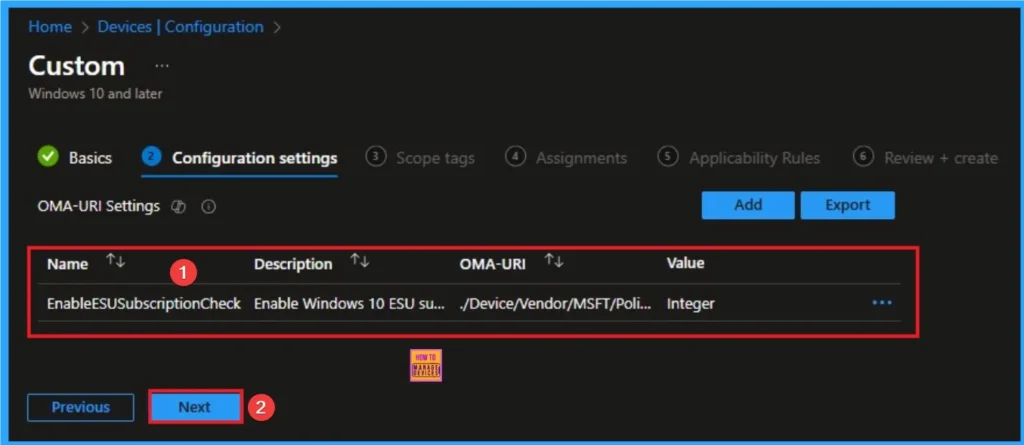
After that, you can see the added configurations details on the Configuration Settings Tab. It inclides, Name, Description, OMA-URI Path, Value etc. Click on the Next button.
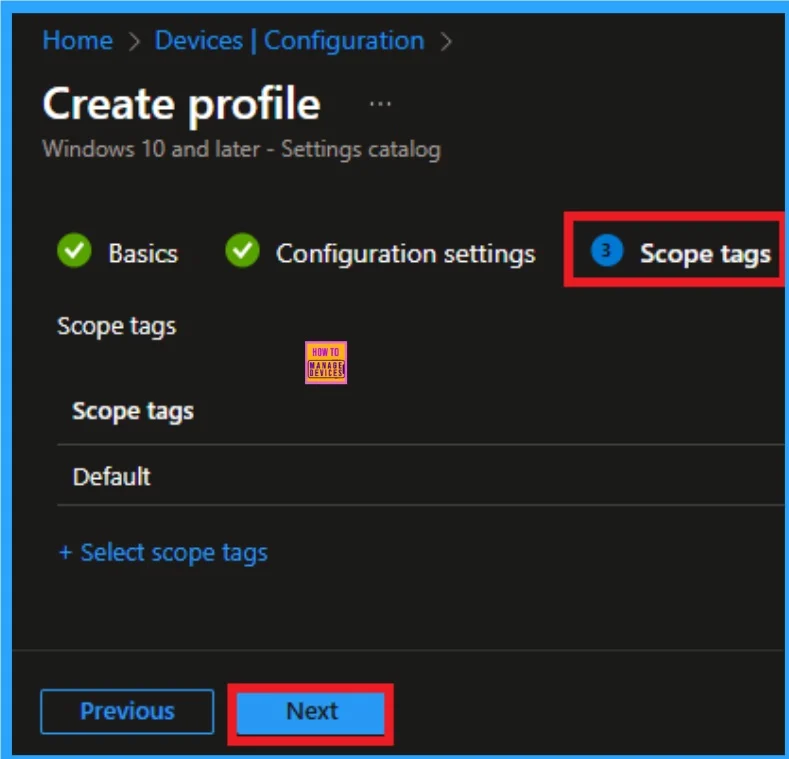
Scope Tags
Scope Tags sections help you add restrictions to the visibility of the Policy. But it is not a mandatory step, so you can skip this step. Here, I don’t add scope tags for EnableESUSubscriptionCheck Policy. Click on the Next button.
Assignment Tab for Selecting Group
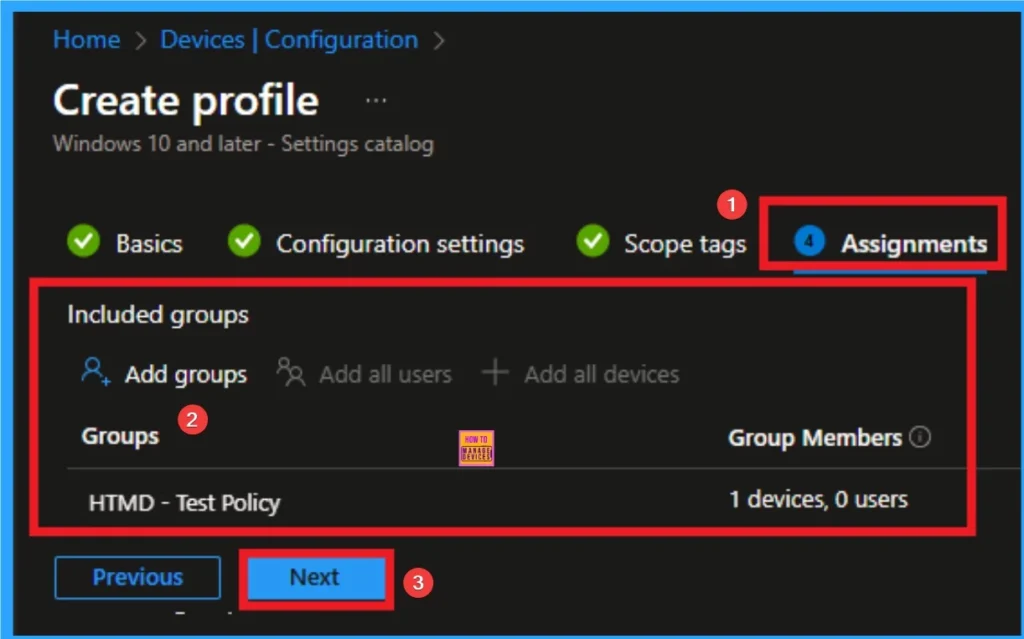
To assign the policy to specific groups, you can use the Assignment Tab. Here I click, +Add groups option under Included groups. I choose a group from the list of groups and click on the Select button. Again, I click on the Select button to continue.
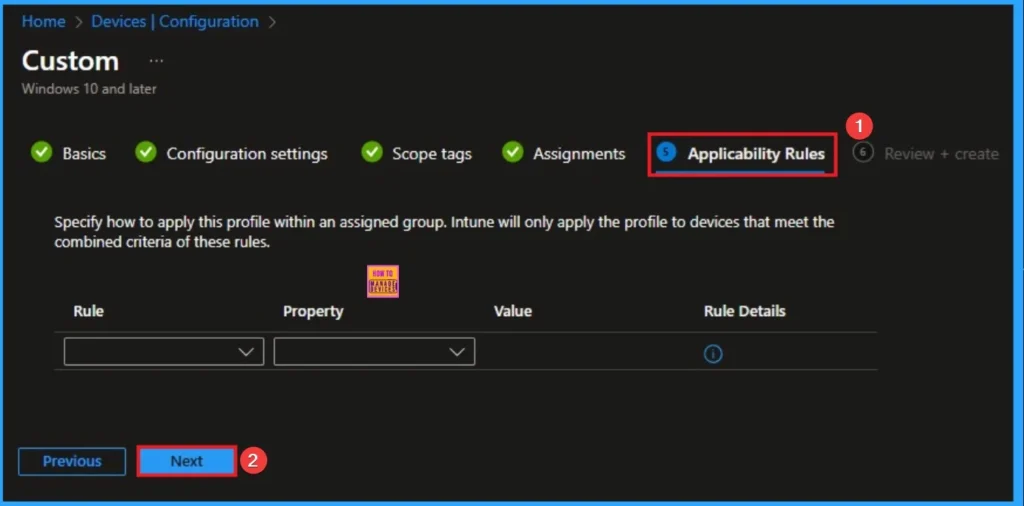
Applicability Rule
It Specify how to apply this profile within an assigned group. Intune will only apply the profile to devices that meet the combined criteria of these rules. This is not a mandatory step so click on the next button.
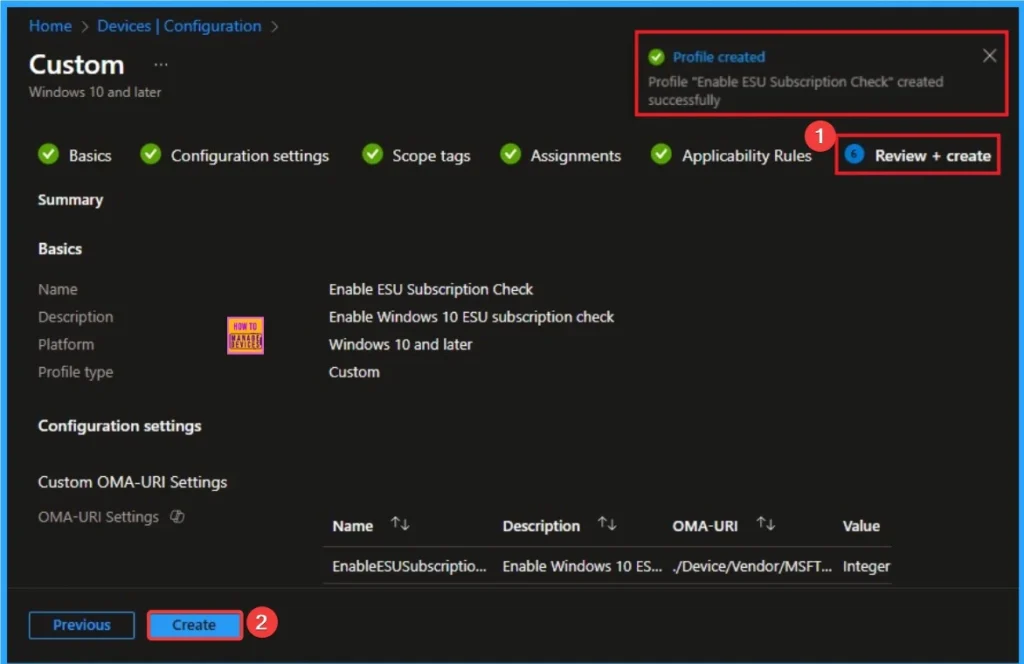
Review + Create Tab
Before completing the policy creation, you can review each tab to avoid misconfiguration or policy failure. After verifying all the details, click on the Create Button. After creating the policy, you will get a success message.
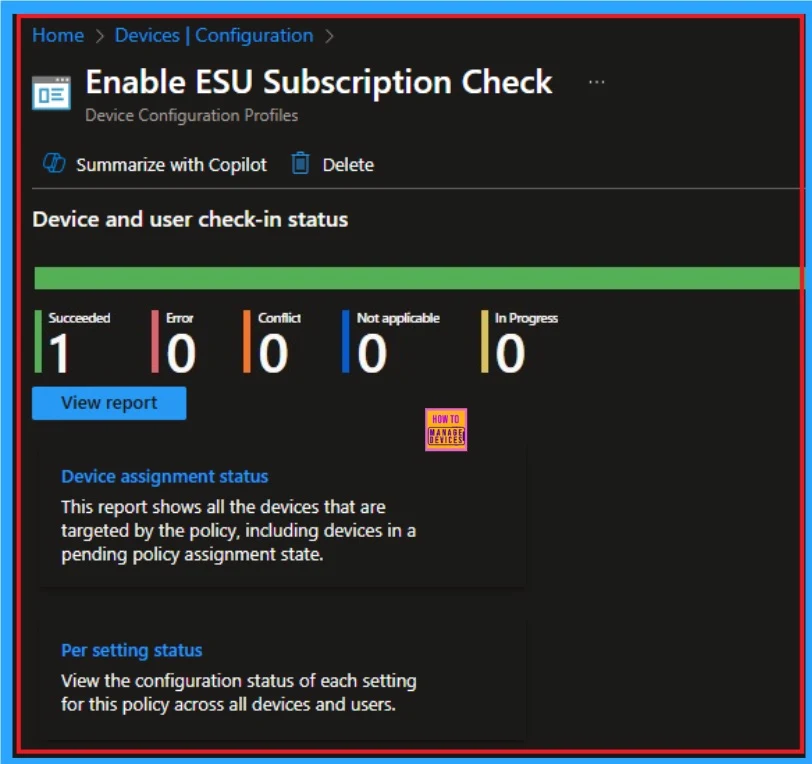
Monitoring Status of ESU Subscription Check Policy
The Review + Create tab is the last step of policy creation. On this tab, you can verify every detail of the policy which are added in the previous steps (basic configuration settings, scope tag assignments s etc). If you want to make any changes, click on the previous button; otherwise, you can click on the Create button.
How to Verify ESU Enrollment for Windows 365 Users and Devices
You can Verify ESU enrollment for Windows 365 users and devices for Windows 365 Enterprise and Windows 365 Frontline (Dedicated) with different methods.
- Sign in to the Microsoft 365 admin center.
- Select Billing > Licenses.
- Select the Windows 365 Enterprise subscription.
- Select a user you’d like to verify, then select Manage apps & services.
- In the flyout, confirm the user has the Windows 10 ESU Commercial listed and enabled for the user.
To confirm ESU Enrollment for Windows 365 Frontline Users
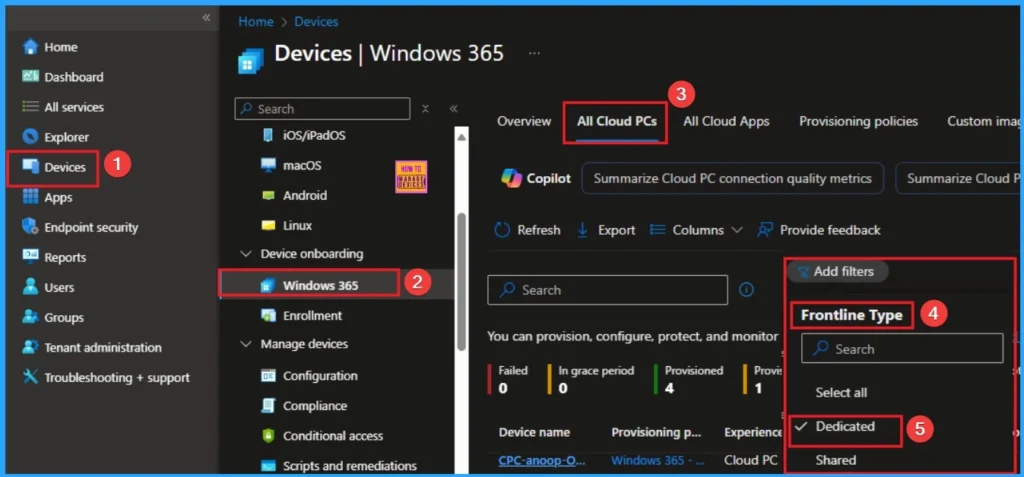
From the Microsoft Intune admin center, go to Devices > Windows 365 > All Cloud PCs. Filter the Cloud PCs by Frontline Type = Dedicated. From the Microsoft 365 admin center, go to Billing > Your Products > Windows 365 Frontline.
Need Further Assistance or Have Technical Questions?
Join the LinkedIn Page and Telegram group to get the step-by-step guides and news updates. Join our Meetup Page to participate in User group meetings. Also, Join the WhatsApp Community to get the latest news on Microsoft Technologies. We are there on Reddit as well.
Author
Anoop C Nair has been Microsoft MVP for 10 consecutive years from 2015 onwards. He is a Workplace Solution Architect with more than 22+ years of experience in Workplace technologies. He is a Blogger, Speaker, and Local User Group Community leader. His primary focus is on Device Management technologies like SCCM and Intune. He writes about technologies like Intune, SCCM, Windows, Cloud PC, Windows, Entra, Microsoft Security, Career, etc

