Today, we are discussing Enable or Disable OneNote Backup Copies to Keep Policy in MS Intune. As you all know, the Settings Catalog is one of the features in Microsoft Intune that allows us to deploy various types of policies. OneNote is one of the supported applications that provides multiple policy options.
In this discussion, we are focusing on a OneNote Settings Catalog policy called Number of backup copies to keep (User). OneNote is an essential tool used on our devices, helping users store and manage important data. By enabling this policy, organizations can ensure that important information is backup securely and consistently across all user devices.
The “Number of backup copies to keep (User)” policy in Microsoft Intune controls how many old versions of OneNote notebooks are saved on a user’s device. This is helpful in organizations were keeping data safe and organized is important.
So, this policy is to be deployed because of users can go back to older versions of their notes if they delete or change something by mistake. In this post Let’s look how this policy deployed through Microsoft Intune admin center.
Is this Policy being Secure for Organizations?
This policy helps organizations keep the same backup settings for everyone. These backups to protect important work documents in organizations.
Enable or Disable OneNote Backup Copies to Keep – Get Started
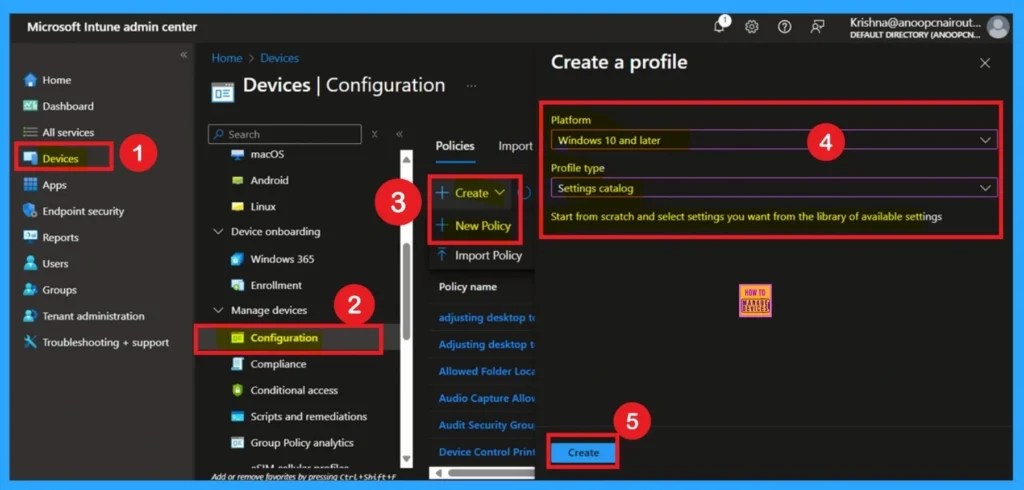
Above, we discussed various details about the OneNote policy “Number of backup copies to keep for users” and its importance in protecting data. Now, let’s see how to deploy this policy through the Microsoft Intune Admin Center. First, sign in to the Microsoft Intune Admin Center.
Then, go to the Devices section and select Configuration Profiles. Click on the + Create button to open a new window called Create a Profile. In this window, you need to choose the Platform as Windows 10 and later, and the Profile type as Settings Catalog. Once selected, click on Create to move to the next step of the configuration process.
- Enable Disable Full Screen Mode in MS Edge Browser using Intune Policy
- Allow Manual Start of Microsoft Account Sign In Assistant Using Intune Settings Catalog
- How to Allow Direct Memory Access for Data Protection Through Intune Settings Catalog
How to Add Basic Details
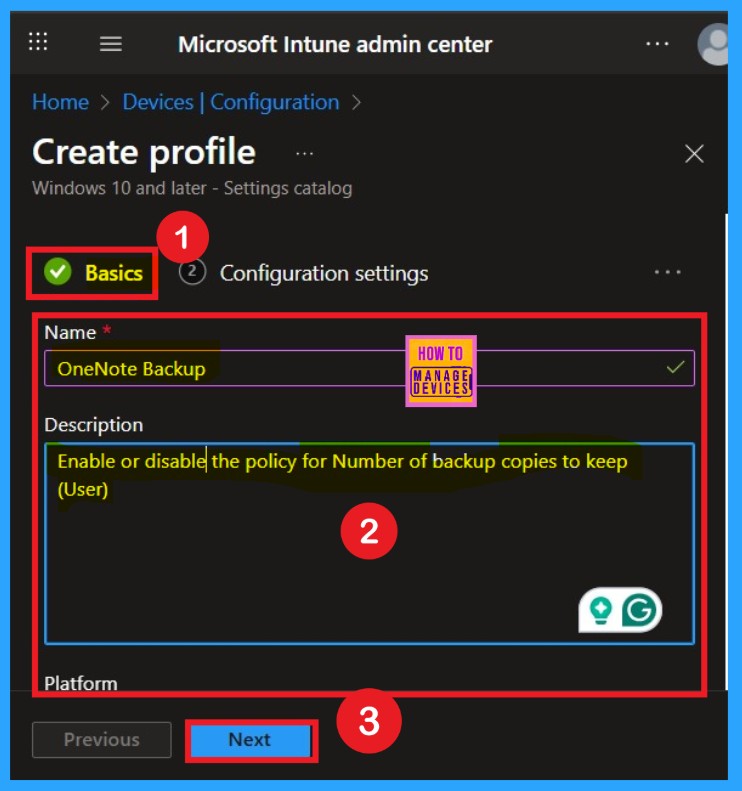
The Basics section is the first step in deploying a policy. In this step, we need to understand the purpose of the policy and give it a meaningful name. This name helps in identifying the policy later. Here, you can see that I have added a specific name and description for the policy. The Platform is already set as Windows 10 and later, as we selected it in the previous step, so there is no need to change it again.
- Once everything is filled in, click on Next to continue.
Configuration Settings – Settings Picker
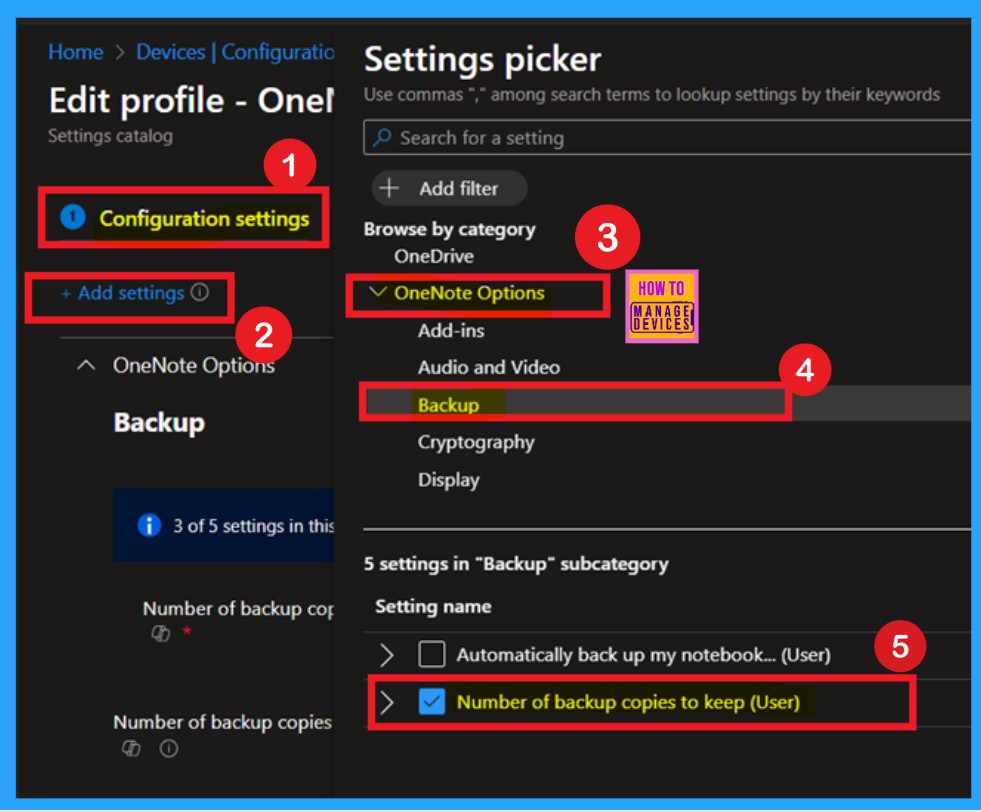
After completing the Basics section, you will move to the Configuration Settings section, also known as the Settings Picker page. This is an important step where you add specific settings to the policy. First, click on Add Settings. A Settings Picker window will appear, showing different categories of settings. I scrolled through the list and selected the OneNote category.
When I expanded it, it displayed several setting sections. From there, I chose the Backup section, which contains five different settings. I selected the “Number of backup copies to keep (User)” option. Once selected, the setting will be highlighted in blue. After that, close the Settings Picker window to continue.
Disable the Policy
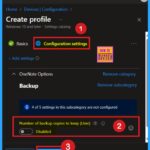
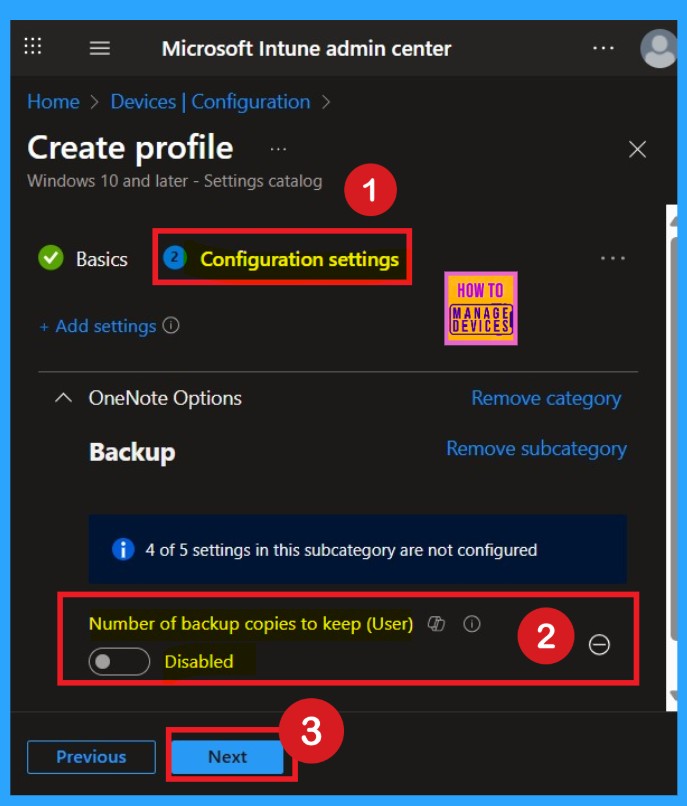
After selecting the policy, you will now be on the Configuration main page. Here, you can see the policy you selected is displayed under the configuration tab. By default, the policy is disabled. If you want to keep it that way, you can simply click on Next to proceed.
Enable the Policy
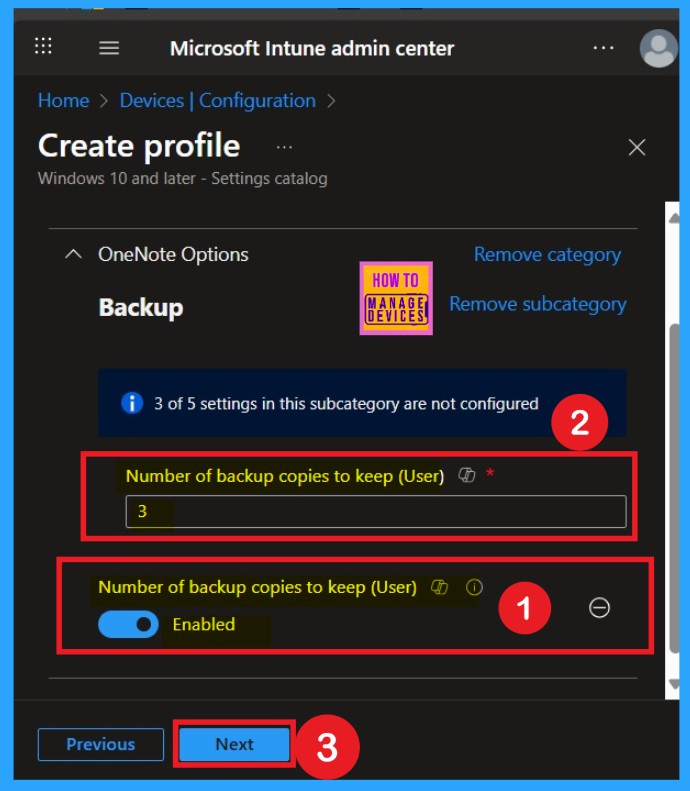
However, if you want to enable the policy, you need to toggle the switch from left to right. Once enabled, it will turn blue and show the label Enabled. After enabling the policy, a text box will appear labeled “Number of backup copies to keep (User)”. The default value shown is 3. If you’re okay with that number, you can continue by clicking Next. In my case, I didn’t change the value and proceeded with the default setting.
Know About Scope Tags
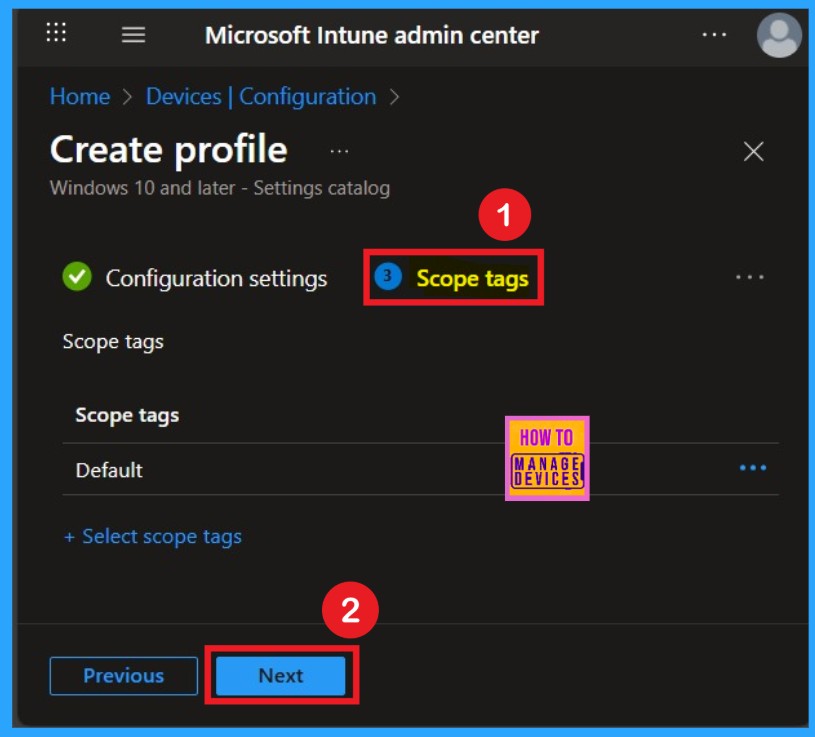
The next tab is Scope tags, which help you organize and manage access to the policy, such as for the department or location. This section is optional, so if you don’t want to apply the Scope tags, just click Next to continue.
Importance of Assignments
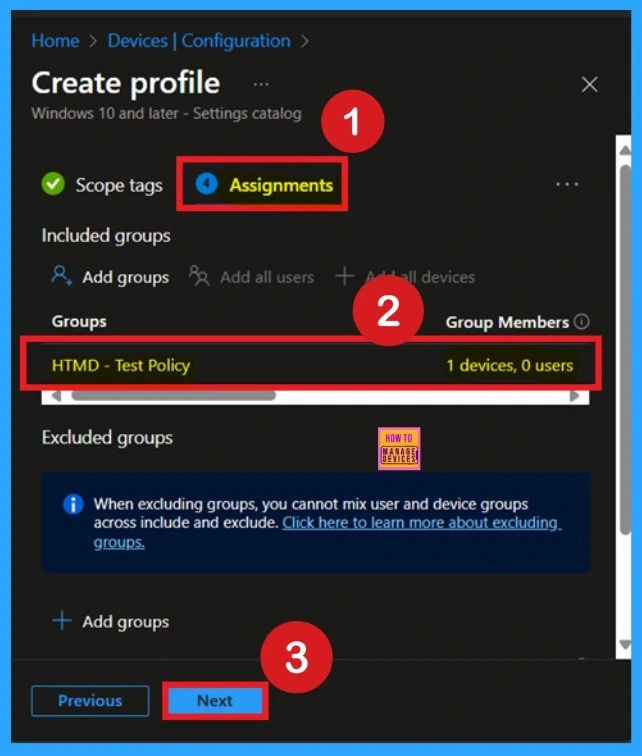
Assignment is another important step you need to complete, just like Configuration settings. In this step, you have to decide which group you want to deploy the policy to. First, click on Add groups under the Include groups section, and select the group to which you want to apply the policy. Then, click Next to continue.
Review +Create
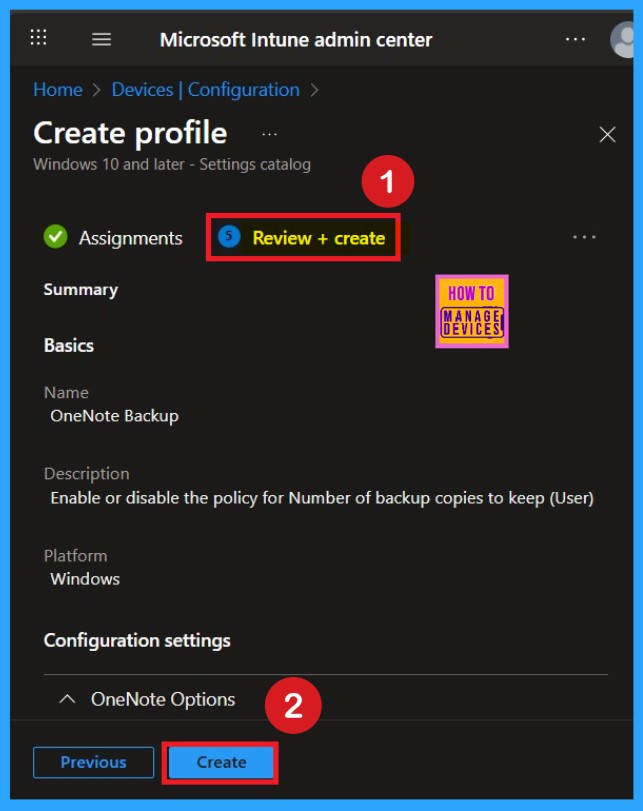
Review + Create is the final tab in the policy creation process. This section acts like a summary page, showing all the steps, you have previously completed. If you notice any mistakes, you can edit them. If everything looks correct, click on the Create button.
How to Check Policy Deployment Status
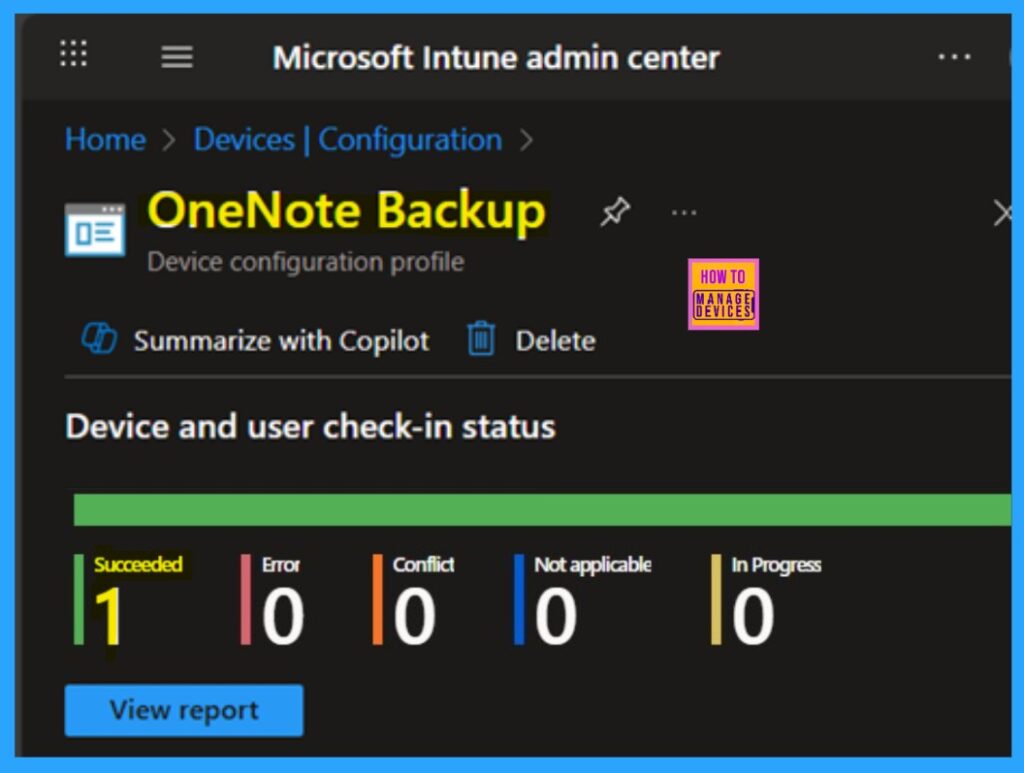
We can verify the policy’s status directly in the Intune Portal. Policy deployment usually takes about 8 hours. To avoid the time consumption, try a manual sync from the Company Portal app on the device, then recheck the status.
- Navigate to Devices, then Configuration.
- Select the Check for Signatures Before Running Scan policy.
- We can see its status as succeeded 1
Monitoring Status using Event Viewer
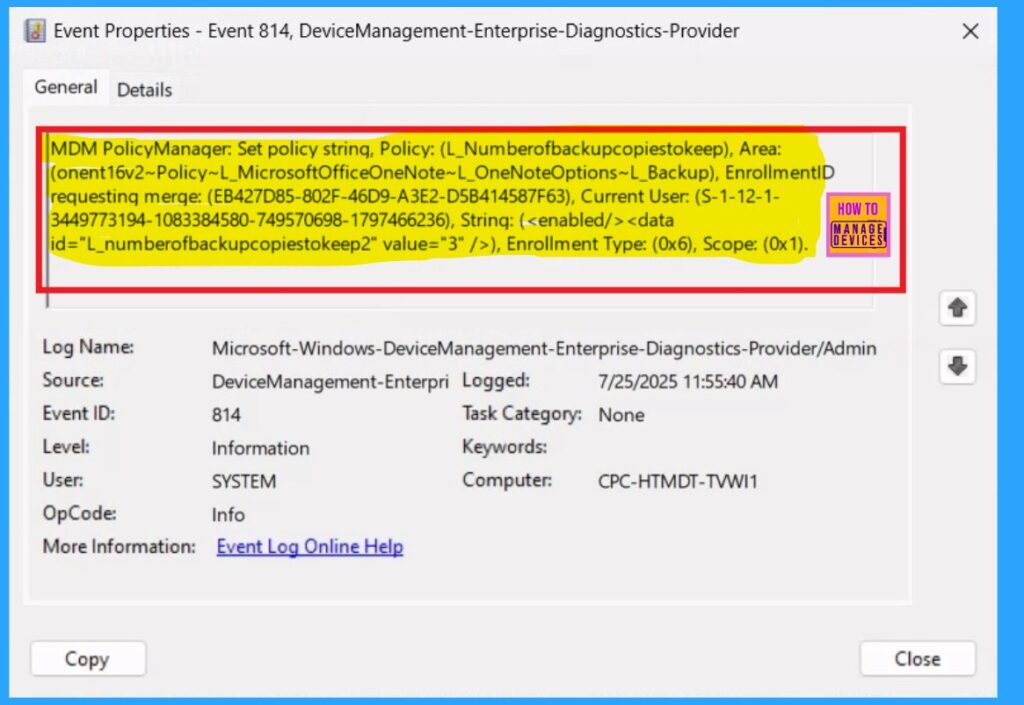
You can check the confirmation in the Event Viewer. To do this, open Event Viewer and look for Event ID 813 or 814. Go to: Applications and Services Logs > Microsoft > Windows > Device Management Enterprise Diagnostic Provider > Admin.
- There, you’ll see a list of policy-related events.
- In my case, I found the policy details in the Event ID 814.
| Policy Details |
|---|
| MDM PolicyManager: Set policy string, Policy: (L_Numberofbackupcopiestokeep), Area: (onent16v2~Policy~L_MicrosoftOfficeOneNote~L_OneNoteOptions~L_Backup), EnrollmentID requesting merqe: (EB427D85-802F-46D9-A3E2-D5B414587F63), Current User: (S-1-12-1- 3449773194-1083384580-749570698-1797466236), Strinq: ( ), Enrollment Type: (0x6), Scope: (0x1). |
Remove the Policy
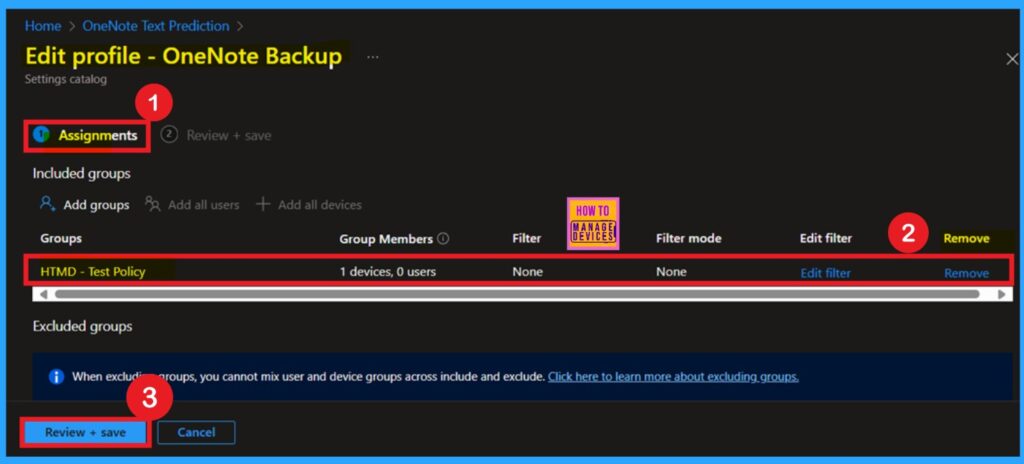
We can easily remove groups from a policy. Just open the policy from the Configuration section , then click the Edit button on the Assignments. From there, click the Remove button to unassign the policy from the desired groups.
For detailed information, you can refer to our previous post – Learn How to Delete or Remove App Assignment from Intune using by Step-by-Step Guide.
Delete the Policy
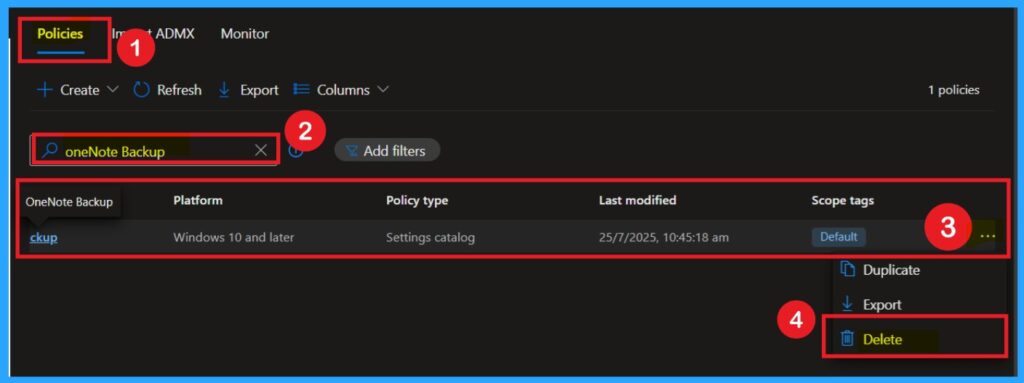
To delete a policy, first, sign in to the Microsoft Intune Admin Center. Go to Devices > Configuration profiles, then select the policy you wish to delete. On the policy details page, click the three-dot menu and choose Delete from the given option. The following screenshot provided for reference.
For more information, you can refer to our previous post – How to Delete Allow Clipboard History Policy in Intune Step by Step Guide.
Need Further Assistance or Have Technical Questions?
Join the LinkedIn Page and Telegram group to get the latest step-by-step guides and news updates. Join our Meetup Page to participate in User group meetings. Also, Join the WhatsApp Community to get the latest news on Microsoft Technologies. We are there on Reddit as well.
Author
Anoop C Nair has been a Microsoft MVP for 10 consecutive years from 2015 onwards. He is a Workplace Solution Architect with more than 22+ years of experience in Workplace technologies. He is a Blogger, Speaker, and Local User Group Community leader. His primary focus is on Device Management technologies like SCCM and Intune. He writes about technologies like Intune, SCCM, Windows, Cloud PC, Windows, Entra, Microsoft Security, Career, etc.

