Let’s learn How to Run Program Compatibility Troubleshooter on Windows 11. Sometimes it happens user-facing problems by opening apps on Windows 11 and the app has been there for years on your PC, but now the app is not compatible with the current version of Windows.
For the above-mentioned problem, windows have its built-in troubleshooter to get rid of the compatibility issue problem. Windows has the Program Compatibility Troubleshooter to resolve such issues. The program-compatible troubleshooter checks the applications to diagnose to run on the current version of Windows.
If the developers built an app for an older version of Windows does not mean that it can not run on the newer version of the Operating System (OS). Windows also develops the compatibility troubleshooter to run old programs in the current version of Windows without having any issues. It helps to run a series of processes to identify the particular compatibility issue, and the tool applies the best settings to it, for smooth running of the app on Windows 11.
So you have to run the particular app with a compatibility mode in the current version of Windows. Still, you need to know how to run the program compatibility troubleshooter before trying any other method for a solution. Follow the guide to know the processes of the program compatibility troubleshooter.
- Windows Update Troubleshooting using MoUxCoreWorker-Udiag and MoNotificationUx-Udiag
- New Intune Troubleshooting options using Security Copilot
Methods to Run Program Compatibility Troubleshooter
The built-in tool of Windows PC is the Program Compatibility Troubleshooter, it helps to run the old applications in the latest Windows update if that causes any problem when you use the application. There are various methods to use the Program Compatibility Troubleshooter listed below.
- Run Program Compatibility Troubleshooter Using Settings App
- Run Program Compatibility Troubleshooter Using Control Panel
- Run Program Compatibility Troubleshooter Using Desktop Shortcut
- Run Program Compatibility Troubleshooter Using Context Menu
What is a Program Compatibility Troubleshooter?
The Program Compatibility Troubleshooter is a useful tool on Windows PCs that helps you diagnose and fix any app that is experiencing compatibility issues. For example, it helps if an app works perfectly on an earlier version of Windows, but it does not work properly, like any graphical glitches or crashes on Windows 11.
Run Program Compatibility Troubleshooter Using Settings App
Most settings are stored inside the Windows Settings app, which you can also use to make certain changes to any settings. For example, you can use the Settings app to Run Program Compatibility Troubleshooter in Windows 11.
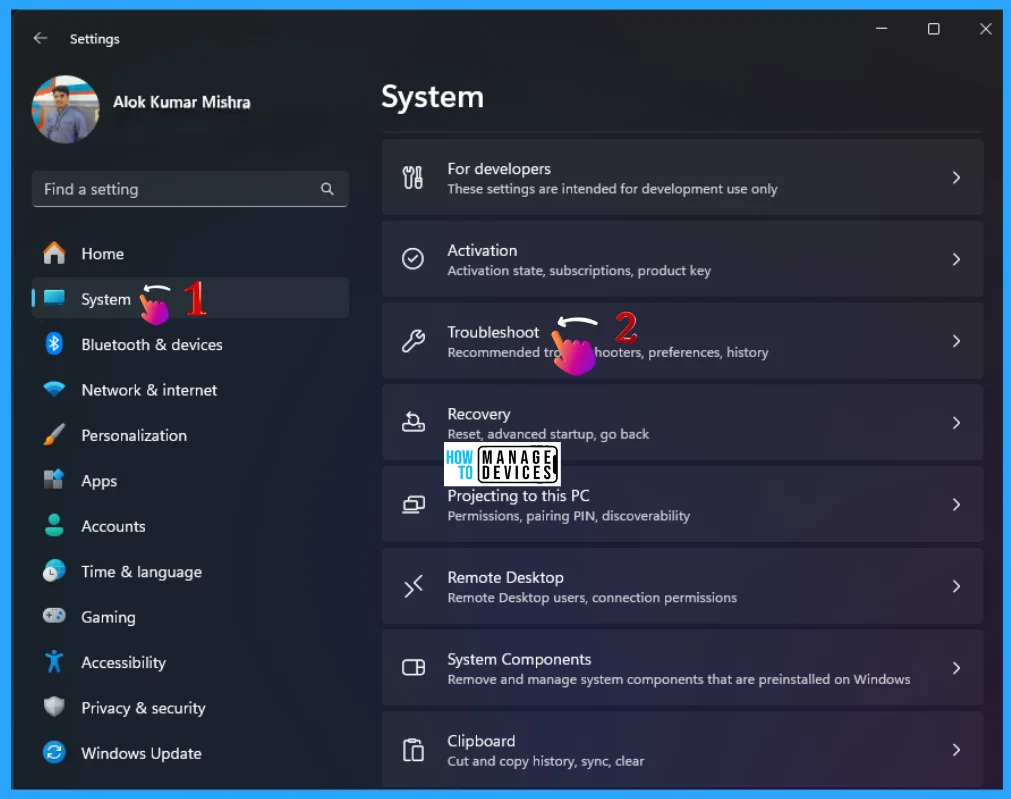
To do so, press Win key + I to open the settings window, then click on the System option present in the left panel, then click on the sub-options as Troubleshoot shown in the right panel, illustrated below.
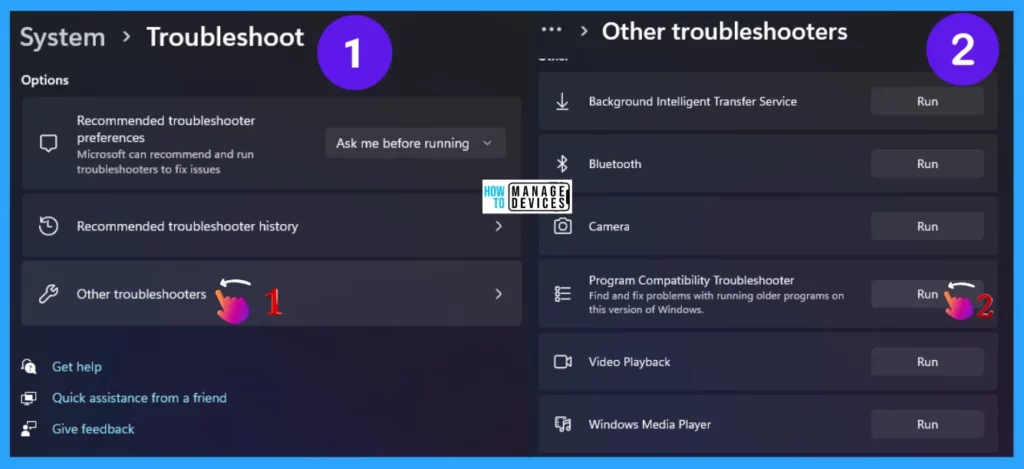
Now you are in the Troubleshoot option under System; It has three options, as shown in the image below. Click on the Other Troubleshooters option. In the other troubleshooter, scroll down to find the option Program Compatibility Troubleshooter, it works to find and fix problems with running older programs on this version of Windows; click on Run to start troubleshooting.
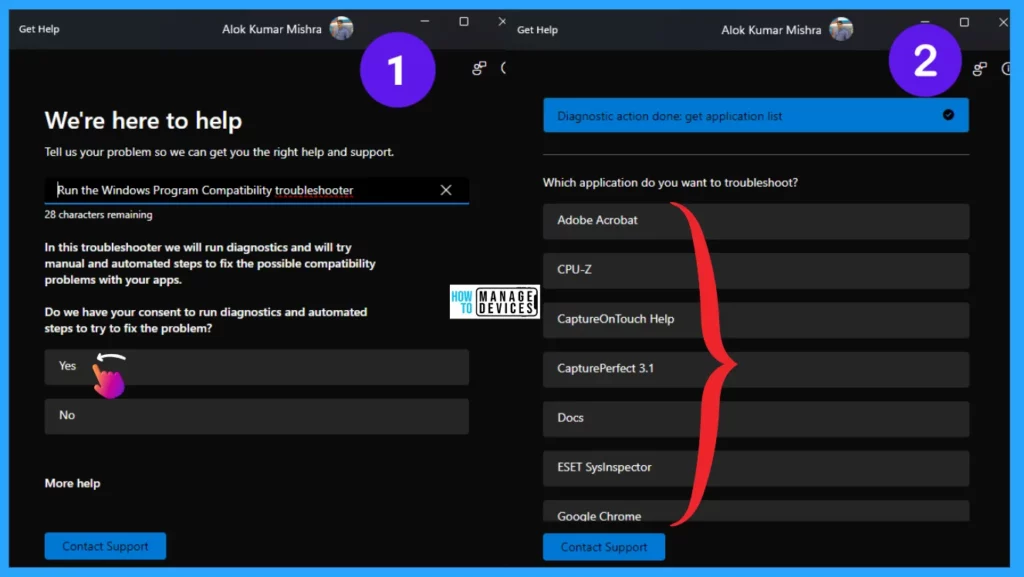
When you press the Run button, the Get Help window opens and asks “Do you have your consent to run diagnostics and automated steps to try to fix the problem?” press Yes to continue.
Then the list of diagnostic actions done and the application installed on your PC are listed, then choose the application that has some issue and follow the on-screen instructions to troubleshoot the app.
Run Program Compatibility Troubleshooter Using Control Panel
Control Panel is an important utility available on Windows 11 and its previous versions. You can use it to manage the network, customize your computer, run troubleshooters, and change many other settings. Here, we will show you how to use the Control Panel to run the Program Compatibility Troubleshooter.
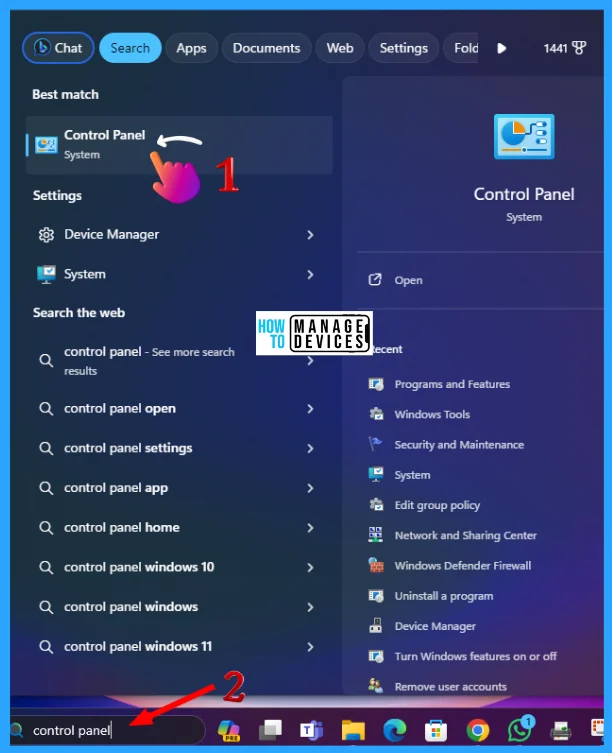
Type Control Panel in the Search Box presented on the Taskbar, select, and click on the appropriate options shown in the list.
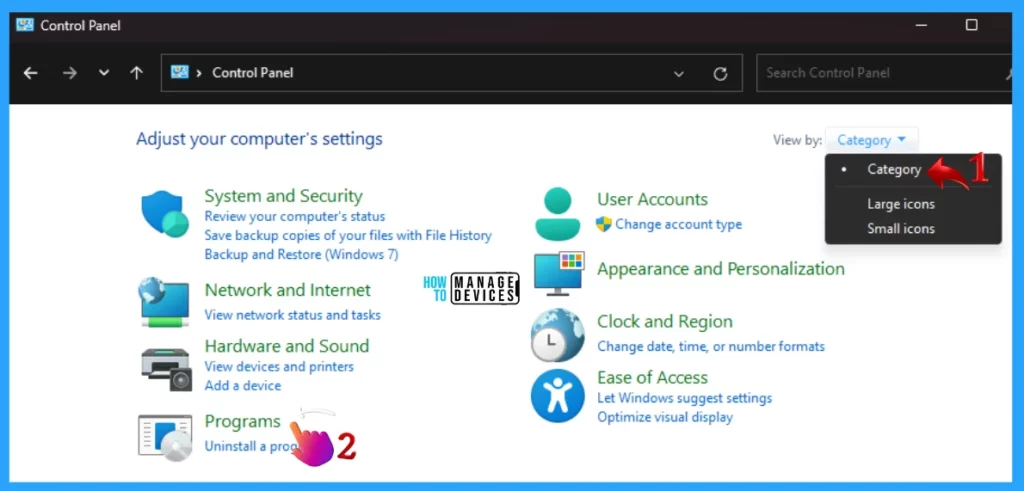
If the control panel box is in the category view, move to the Program option for further action. If the control panel is in the mode of Large Icons or Small Icons, change it to category view, as shown in the figure below.
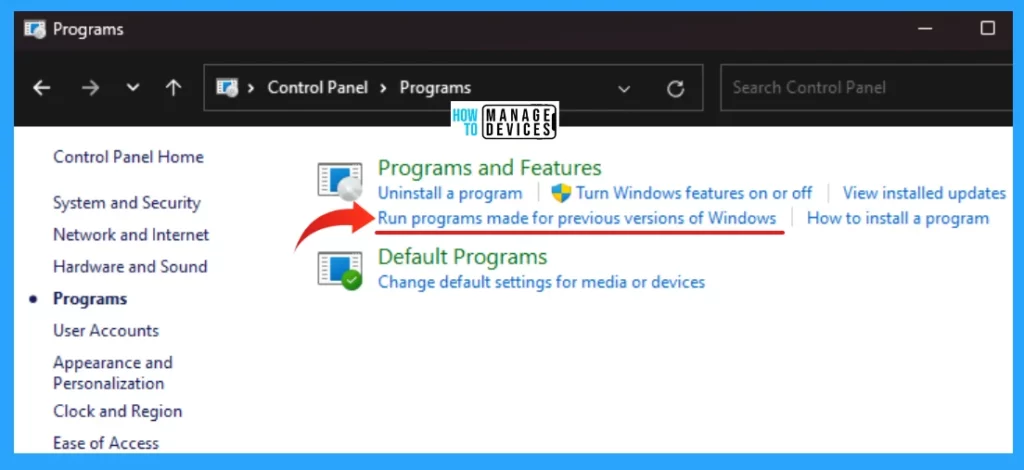
When you enter the Programs option, you can see there is an option available as Programs and Features. Under this, some sub-options are available. Click on Run Programs Made for Previous Version of Windows.
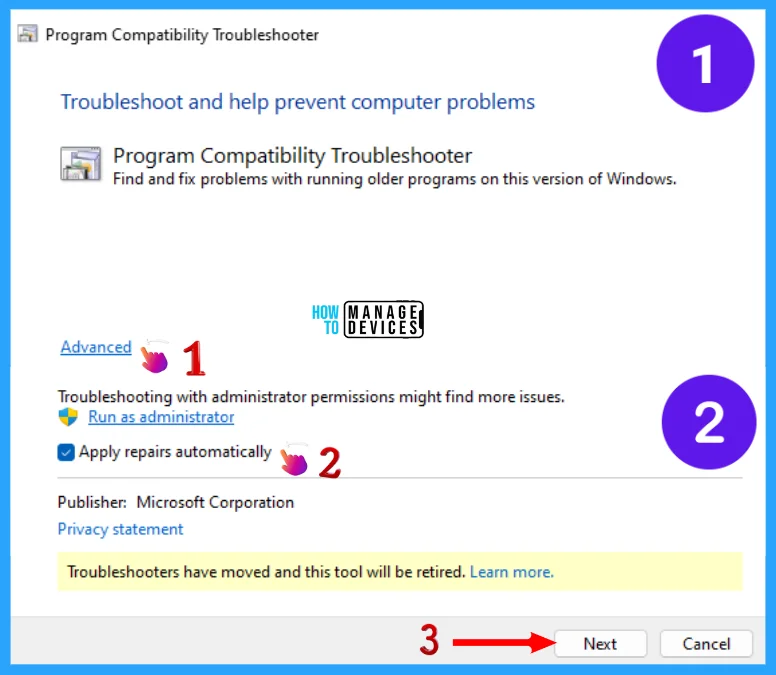
After clicking on the option described above, your Program Compatibility Troubleshooter window opens; click on the Advanced option, and it will expand; now check the box near the Apply Repairs automatically option and click the Next button for the next action.
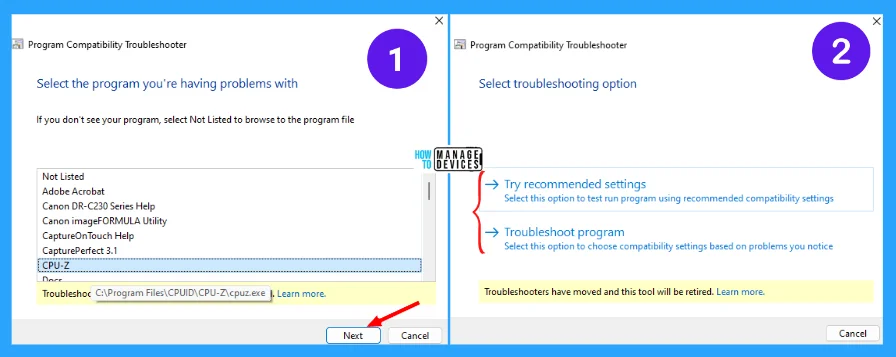
In the next window, it says to select the program you are having problems with, are listed. If you do not see your program, select Not Listed to browse to the program file, then click Next. Here, in the next window, the ” select troubleshooting option is present. One is to Try recommended settings, and the other is to troubleshoot programs. Click on one option that you need.
Run Program Compatibility Troubleshooter Using Desktop Shortcut
In Windows, you can create shortcuts for your most used applications and troubleshooters. If you face compatibility issues, then you can create the Program Compatibility Troubleshooter shortcut on your desktop to quickly access it and fix the issue.
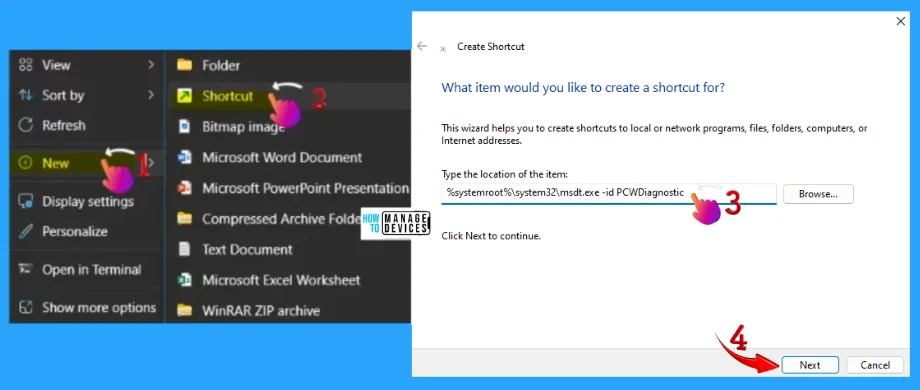
To do so, right-click on the blank space on your desktop, select New, and then select the shortcut option from the context menus. Type or copy %systemroot%\system32\msdt.exe -id PCWDiagnostic and click on Next.
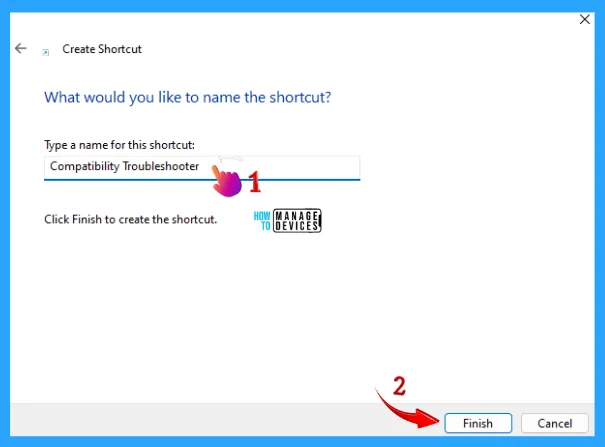
After fixing the item’s location, provide a name for your shortcut windows. Then click the Finish button to complete the process. When required, double-click on the created shortcut to run the Program Compatibility Troubleshooter.
Run Program Compatibility Troubleshooter Using Context Menu
The context menu is another way to run program compatibility troubleshooting. But in many devices, the compatibility troubleshooter is not available. To initiate the compatibility troubleshooting into the context menu for the process.
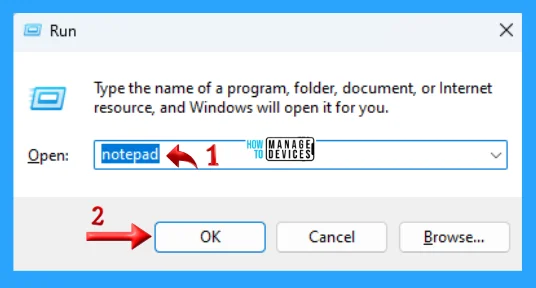
- Press Win Key + R to open the Run window.
- Type Notepad
- Press OK
Now, the blank notepad opens. Here, copy and paste the following code shown below. Then click on File in the left upper corner and select and click the Save As option from its menu.
Windows Registry Editor Version 5.00

; BAT files

[HKEY_CLASSES_ROOT\batfile\shellEx\ContextMenuHandlers\Compatibility]

@="{1d27f844-3a1f-4410-85ac-14651078412d}"

; CMD files

[HKEY_CLASSES_ROOT\cmdfile\shellEx\ContextMenuHandlers\Compatibility]

@="{1d27f844-3a1f-4410-85ac-14651078412d}"

; EXE files

[HKEY_CLASSES_ROOT\exefile\shellex\ContextMenuHandlers\Compatibility]

@="{1d27f844-3a1f-4410-85ac-14651078412d}"

; MSI files

[HKEY_CLASSES_ROOT\Msi.Package\shellex\ContextMenuHandlers\Compatibility]

@="{1d27f844-3a1f-4410-85ac-14651078412d}"

[HKEY_CLASSES_ROOT\MSILink\shellex\ContextMenuHandlers]

@="{1d27f844-3a1f-4410-85ac-14651078412d}"

[HKEY_CLASSES_ROOT\MSILink\shellex\ContextMenuHandlers\{1d27f844-3a1f-4410-85ac-14651078412d}]

@="Compatibility Context Menu"

; Clear block

[HKEY_LOCAL_MACHINE\SOFTWARE\Microsoft\Windows\CurrentVersion\Shell Extensions\Blocked]

"{1d27f844-3a1f-4410-85ac-14651078412d}"=-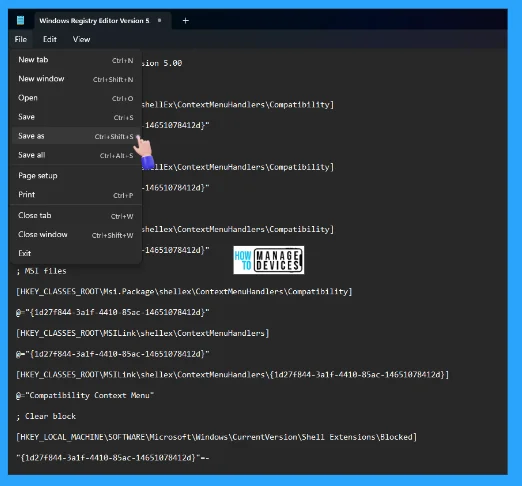
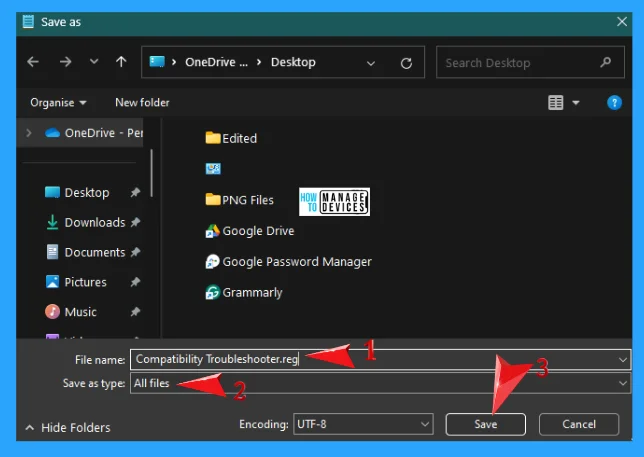
When the Save as window opens, in the File Name space, provide a suitable name according to your settings with the .reg extension. Then, change the text file to All Files in the Save as Type section. Now click on the Save button to create the registry file.
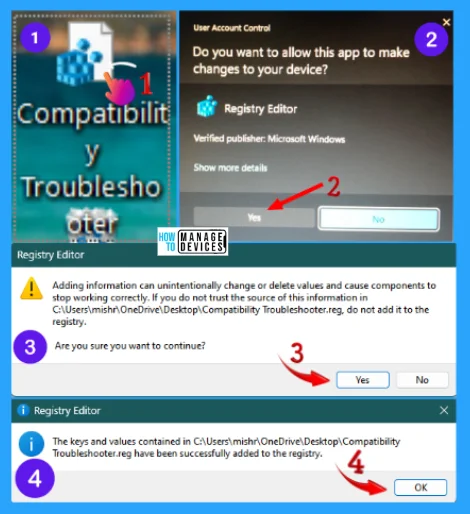
One: double-click on the newly created.REG file. Two: the User Account Control Window opens and asks for permission to allow this setting to make changes to your device. Click YES to allow the changes.
Three: the Registry Editor warning window opens and warns that Adding information can unintentionally change or delete values and cause components to stop working correctly. If you do not trust the source of this information, stop working on the source of the information and click YES to continue.
Four: Another window opens, showing that the keys and values contained in the location have all been successfully added to the registry. Press OK. Now, the changes you made have been initiated to your device but have not been applied yet. You have to restart your device to apply the changes made.
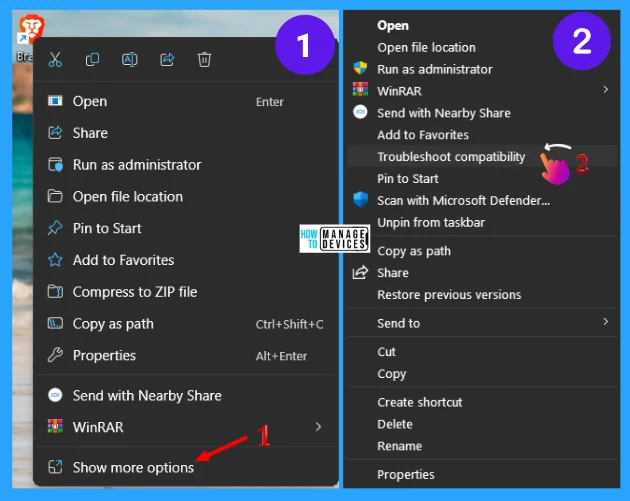
When your device is restarted, select the program that has the problem and right-click on it to open the context menu, then scroll down & click on Show more options. In the next context menu, find & select Troubleshoot Compatibility to run the troubleshooting, as shown in the image below.
Conclusion
There might be a long list of applications that have not received any update for a long time, which makes them incompatible with the latest version of Windows Operating System. By following the above methods, you can quickly eliminate the compatibility issue by running the Program Compatibility Troubleshooter.
I hope the guide How to Run Program Compatibility Troubleshooter on Windows 11 is helpful. Please follow us on the HTMD Community and visit our website HTMD Forum, if you like our content. Suggest improvements, if any, and we would love to know which topic you want us to explore next.
We are on WhatsApp. To get the latest step-by-step guides and news updates, Join our Channel. Click here –HTMD WhatsApp.
Author
Alok is a Master of Computer Applications (MCA) graduate. He loves writing on Windows 11 and related technologies. He likes to share his knowledge, quick tips, and tricks with Windows 11 or Windows 10 with the community.
