Today, we are discussing Enable Disable Sets Layout for Printing in MS Edge using Intune Policy. As you know, the Edge browser provides various policy settings that help organizations manage and control browser behavior effectively.
Among these, the printing category includes policies that allow administrators to standardize the printing experience across all users. One such setting is the policy for defining whether webpages should be printed in Portrait or Landscape layout.
When printing a webpage, the layout is important to make sure the content looks clear and fits properly. The layout can be set to Portrait (vertical) or Landscape (horizontal). This policy lets administrators decide how webpages should be printed. They can either fix the layout to one option or let users choose the layout themselves.
The main purpose of this policy is to control whether webpages are printed in Portrait or Landscape. This helps organizations keep printing consistent. If the policy is disabled or not set, users can choose the layout they want. If the policy is enabled, the browser will use the layout chosen by the administrator, and users cannot change it.
Table of Contents
What Does this Policy Control?
This policy controls the page layout used when printing webpages in Microsoft Edge. It decides whether the printout will appear in Portrait or Landscape format.
Enable Disable Sets Layout for Printing in MS Edge using Intune Policy
Above we discussed a lot of things about the set layout for the printing policy for MS Edge. In this Post, we will discuss how it functions, and the options available when configuring it. We will also cover how this policy can be deployed and managed through Microsoft Intune, ensuring that organizations can enforce consistent printing layouts and maintain better control over printing configurations.
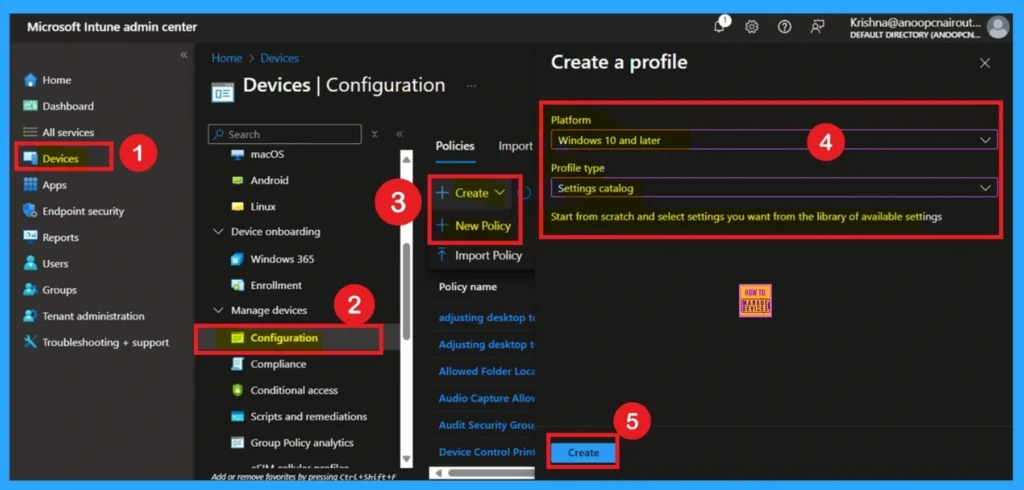
- First, we go to Device Configuration in Intune, and from there, we create a new policy.
- Next, fill in the Platform and Profile type details in the Create profile window.
- Set Platform to Windows 10 and later, and set Profile type to Settings catalog.
- Then click Create.
- Enable or Disable Physical Computer Location Support for Printers using Intune Policy.
- Prevent Users From Installing Printer Drivers Using Intune
- Best way to Activate Internet Printing through Setting Catalog Via Intune
Get Start with Basic Tab
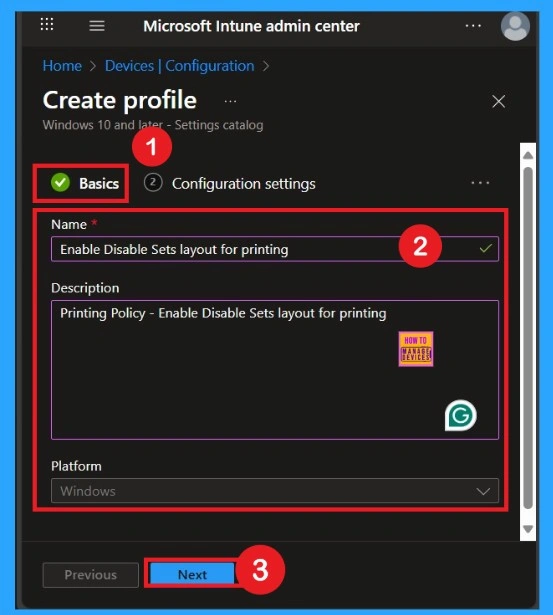
The Basics section is the first step in creating the policy. Here, you need to fill some basic details such as the Name, Description, and Platform. The Name field is very important because it helps you quickly identify the policy later from a long list of other policies. You should give it a clear name. You can also fill in the Description field to explain the purpose of the policy.
- The Platform section is already filled in as “Windows 10 and later,” so you don’t need to change anything there.
- Once you’re done, click Next to move to the next step.
How Deal with the Configuration Settings
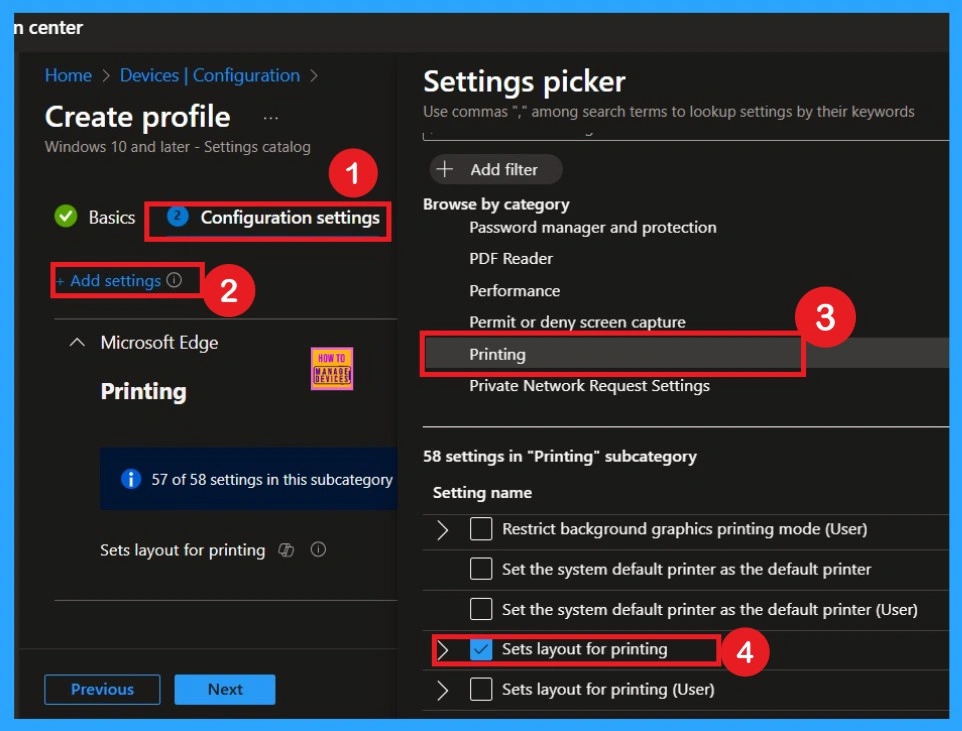
The next step is Configuration Settings. In this section, you will see an Add Settings option. Click on it to proceed. Once selected, you will get with different categories. From the list of categories, choose the Printing category under Microsoft Edge. In the Printing section, you will find around 58 available settings. From these, select the Set Layout for Printing option. When you click on it, a blue check mark will appear, confirming that the setting has been selected.
Disable Mode of Policy
After selecting the configuration settings, you can now close the Settings picker window. Once it is closed, you will see the selected policy listed on the Configuration settings page. By default, the policy is set to Disabled. If you want to proceed with the current settings or make changes later, simply click Next to continue with the policy creation process.
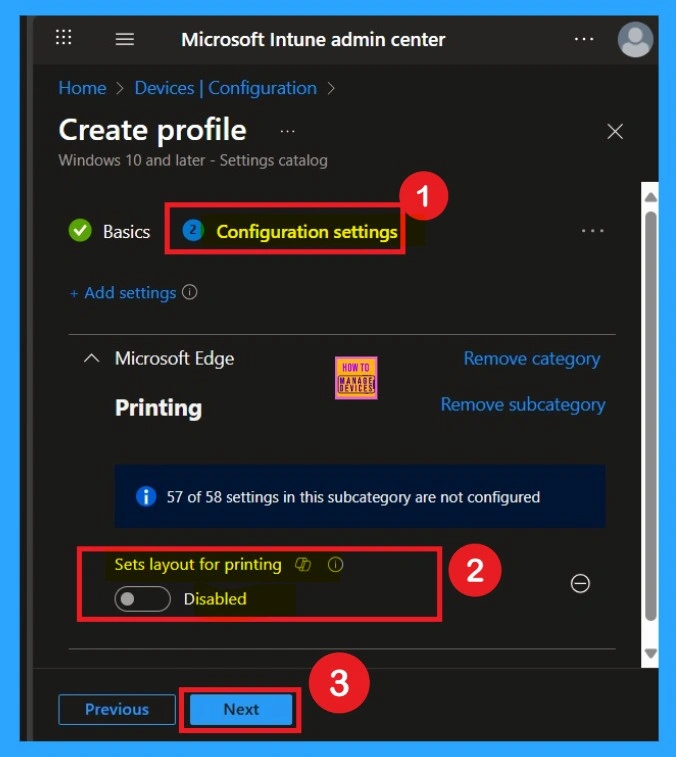
How to Enable the Policy
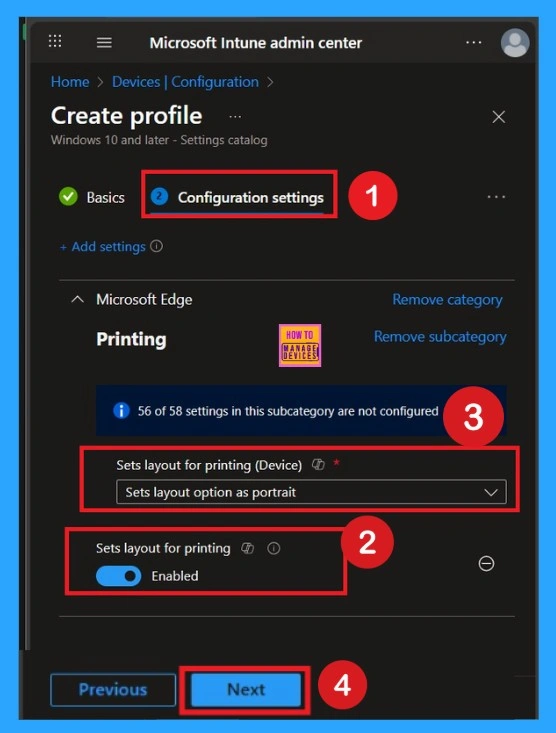
Enabling this policy is very simple. You just need to move the toggle button from left to right, and it will turn blue, indicating that the policy is enabled. Once enabled, another text box will appear with two options: Set layout option as Portrait and Set layout option as Landscape
Choose the option you prefer. For example, if you want webpages to print in Landscape, select that option. After making your selection, click on Next to continue.
Know the Scope Tags
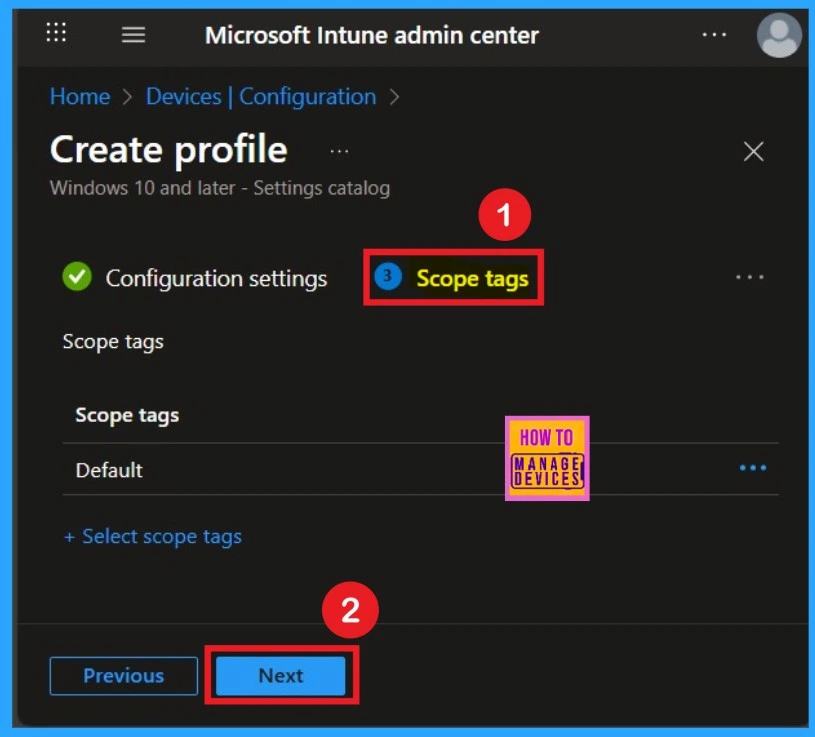
Now your are on the Scope tags section. Scope tags are used to assign policies to specific admin groups for better management and filtering. If needed, you can add a scope tag here. However, for this policy, I chose to skip this section.
What is the Role of Assignment Tabs
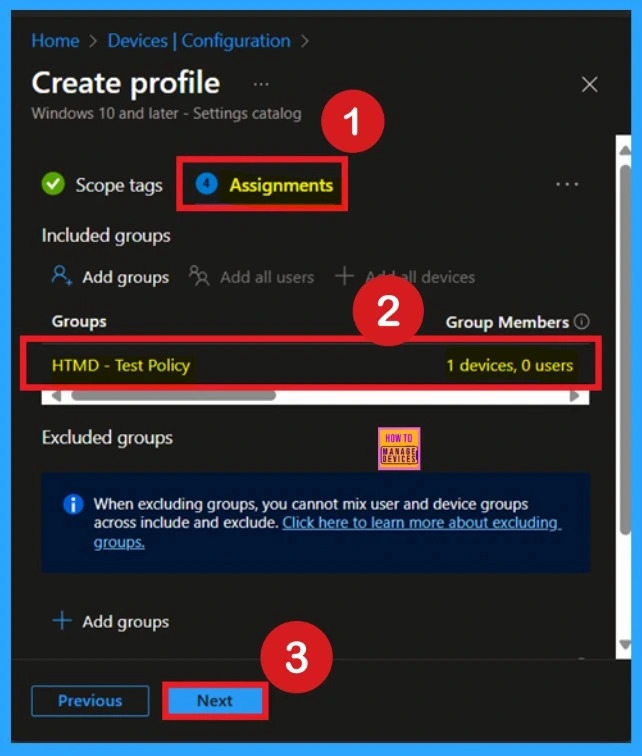
Next, you’ll reach the Assignments section, which is a very important step. This is where you decide which user or device groups should receive the policy. In this case, I selected the specific group I wanted to apply the policy to. After selecting the group, click Next to continue.
Review + CReate Tab Importance
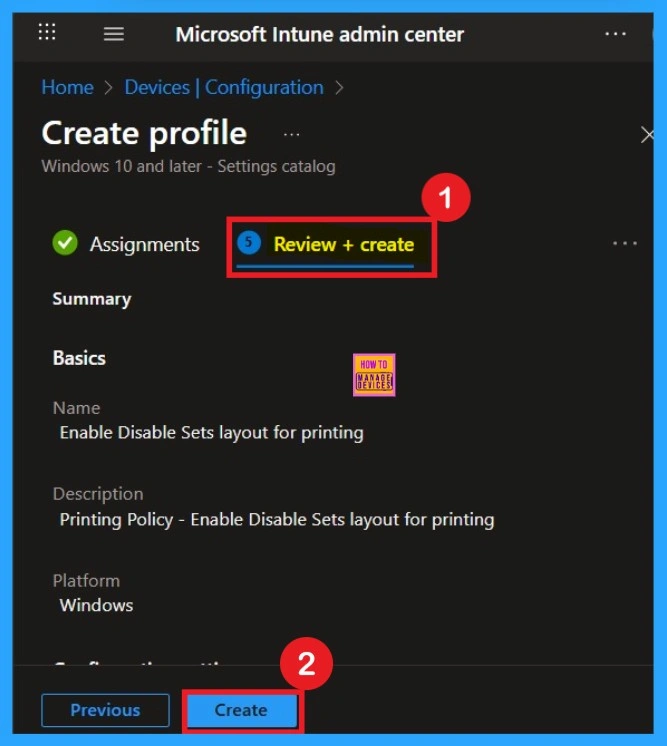
The last step is the Review + Create tab, here, you’ll find a complete overview of all the details and settings you’ve configured for the policy. Take a moment to review everything carefully. If everything looks fine, click Create to complete the process.
- If you spot any errors or need to make changes, you can return to the previous sections and update the information as needed.
- After clicking Create, you’ll receive a confirmation notification indicating that the policy has been successfully created.
Monitoring Status – How Important it is
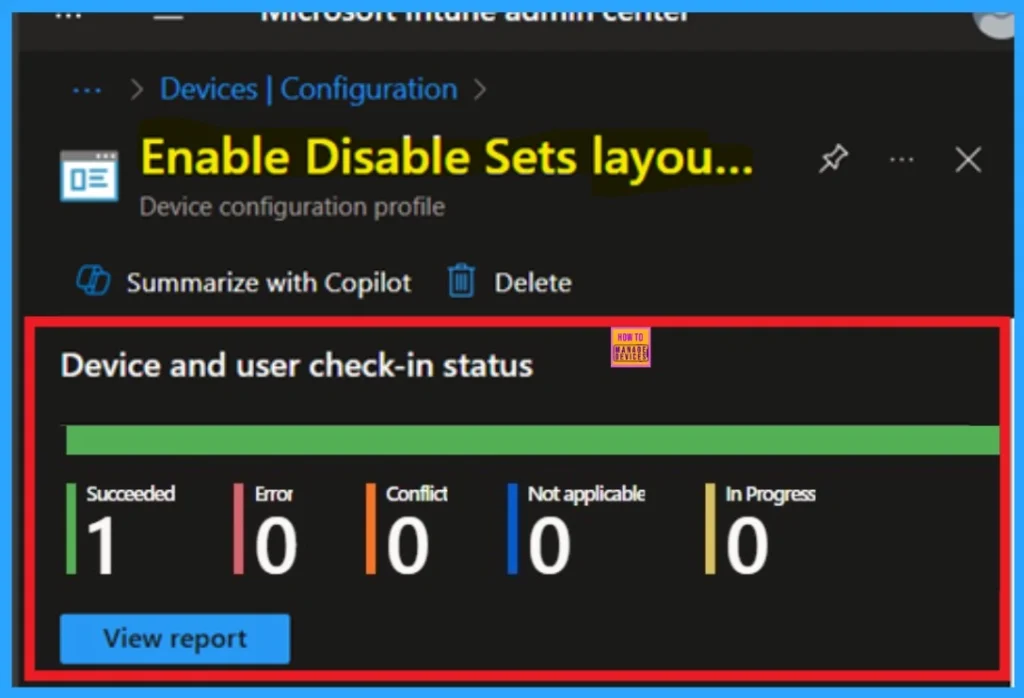
After creating the policy, administrators may want to confirm whether it has been successfully deployed. To check this, go to Devices > Configurations and search for the policy name you created. Once you find the policy, click on it to open the Monitoring Status page.
On this page, you can view the deployment details for both devices and users. The status will show if the policy has been applied successfully. If it is marked as Succeeded, it means the deployment worked as expected. You may see 1 or 2 under “Succeeded.”
- If there are no entries under Error, Conflict, Not Applicable, or In Progress, it indicates that the policy has been deployed without issues.
Client-Side Verifications
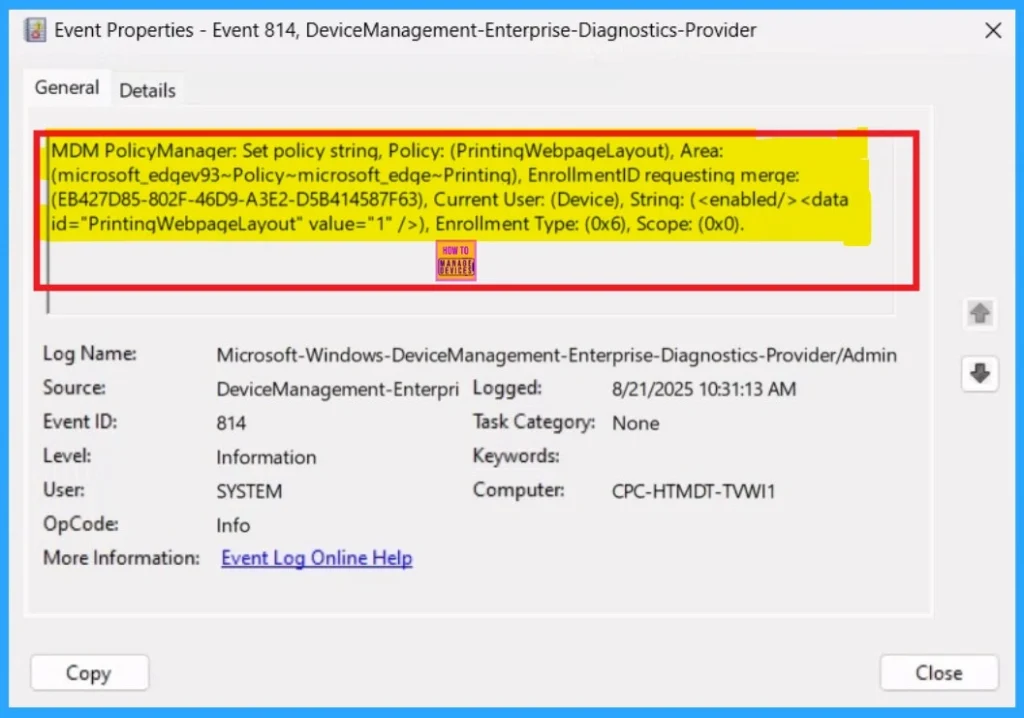
You can verify the confirmation in the Event Viewer by looking for Event ID 813 or 814. To access this, open Event Viewer and navigate to Applications and Services Logs > Microsoft > Windows >Device Management Enterprise Diagnostic Provider > Admin.
- You can see a list of policy-related events now.
- I found the policy details in the Event ID 814.
How to Delete a Policy Permenently
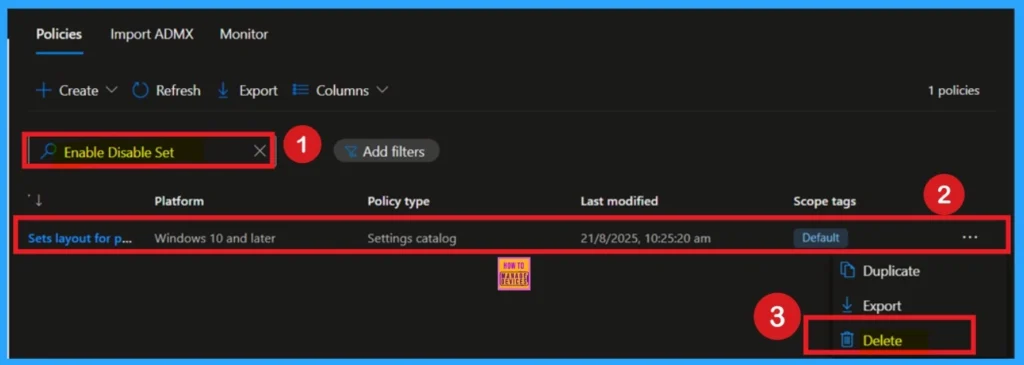
If you want to permanently delete a policy, search for the policy name in the Configuration search bar. Once the policy appears, click on the 3-dot menu next to it. You will see 3 options: Duplicate, Export, and Delete. Select Delete, and the policy will be permanently removed.
How to Remove Policy Group
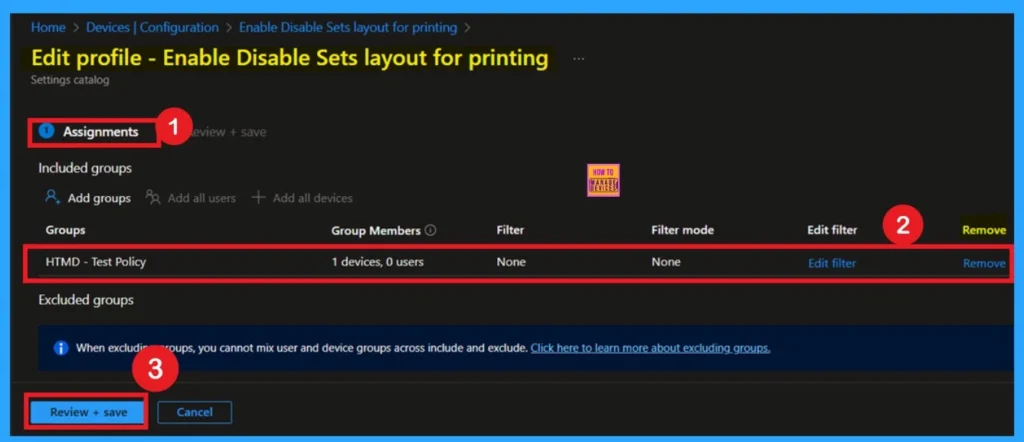
Start by navigating to the Monitoring status page via Devices > Configuration. Search for the policy by name and click on it to open its monitoring details. Scroll down to the Assignments section and click Edit. This will take you back to the policy’s assignment settings.
- From here, you can remove the group you no longer want the policy to apply to. For a view of the process, refer to the screenshot below.
For detailed information, you can refer to our previous post – Learn How to Delete or Remove App Assignment from Intune using by Step-by-Step Guide.
Need Further Assistance or Have Technical Questions?
Join the LinkedIn Page and Telegram group to get the latest step-by-step guides and news updates. Join our Meetup Page to participate in User group meetings. Also, join the WhatsApp Community to get the latest news on Microsoft Technologies. We are there on Reddit as well.
Author
Anoop C Nair has been Microsoft MVP for 10 consecutive years from 2015 onwards. He is a Workplace Solution Architect with more than 22+ years of experience in Workplace technologies. He is a Blogger, Speaker, and Local User Group Community leader. His primary focus is on Device Management technologies like SCCM and Intune. He writes about technologies like Intune, SCCM, Windows, Cloud PC, Windows, Entra, Microsoft Security, Career, etc.

