Let’s discuss Enable or Disable Physical Computer Location Support for Printers using Intune Policy. As you all know that Microsoft Intune is a powerful Cloud service and its features like setting catalog is one of the crucial ones for organizations. With the setting catalog it is possible to deploy an important policy to an organisation very Easily.
In this post we are discussing the Printer policy such as Computer location(Physicallocation). In organizations we know that they use many computers and printers in different places, managing and finding printers can be tough for the employees.
In this difficulty, Intune introduces a policy for setting up the work more easily than called location tracking. Implementing physical location support for printers using Intune policies offers several benefits, such as improved user experience by allowing users to easily find and connect to the nearest printer.
It removes the need to know the exact printer names or locations and automatically fills in default locations set by administrators. This helps users connect to printers quickly, reduces errors, and improves efficiency by using physical locations instead of confusing IP addresses.
Table of Contents
What Happens When You Enable the Physical Location?
Enabling the Physical Location Tracking setting allows users to browse for printers by location without needing to know the printer’s exact location or naming scheme. It adds a Browse button in the Add Printer wizard and Printer Properties.
Physical Location Support in Printer using Intune Policy
Above we discussed a lot of things about Computer location (Physical Location Support) and discussed about Intune policy deployment through setting catalog. Now we have to discuss about the CSP detail of the policy. This setting is only a placeholder and should not be used in a production environment. The description framework properties for this setting are as follows.
| Property Name | Property Value |
|---|---|
| Format | chr (string) |
| Access Type | Add, Delete, Get, Replace |
./Device/Vendor/MSFT/Policy/Config/ADMX_Printing/PhysicalLocationSupport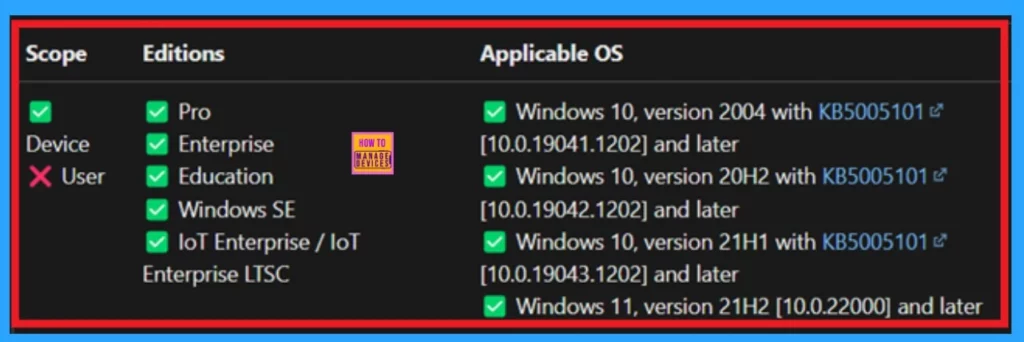
- How to Create Intune Settings Catalog Policy
- List of Intune Settings Catalog Policies
- Fix Issue on USB Connected Dual-Mode Printers on Windows Client
Create Policy
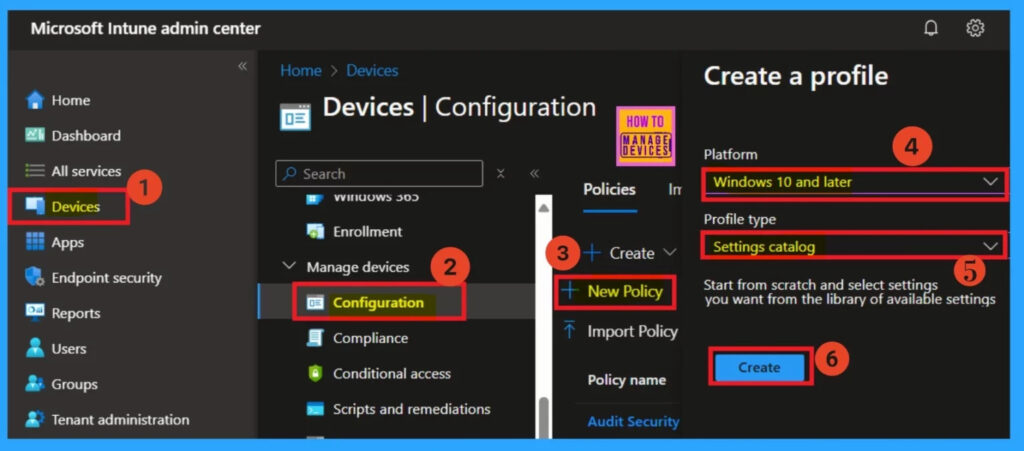
Creating a policy is the first step you have to do for a policy creation. First, you have to sign in to the Microsoft Intune admin center with your credentials. Then navigate through Devices > Configurations in the configuration menu, you will get a +Create option there.
- Click on the +New policy option, then you will get a platform and profile type area.
- They are you have to select the platform as Windows 10 and later set the profile type to the Setting catalog.
Basics
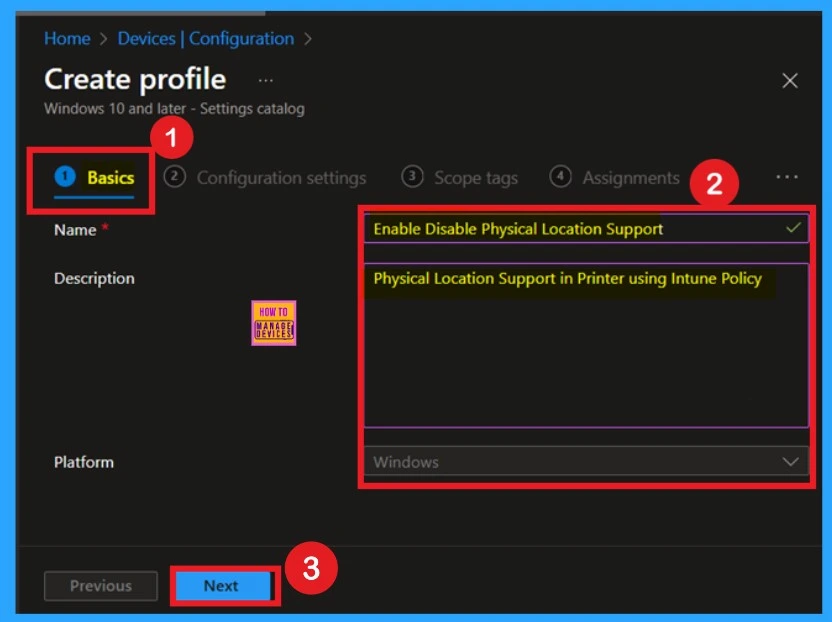
The Basic details are very important here you have to enter the basic details such as name and description. The Description is not mandatory but you can enter the description to understand the policy later. The platform is already selected as Windows so you don’t need to do anything.
- Click on Next.
Configuration Settings
The next is Configuration settings in that tab you can see that +Add settings option in a hyperlink click on that. When you click on that you will get a Settings Picker window there you can select the settings category and Settings. In settings picker click on the Administrative Templates enlarge then by clicking on the arrow.
Then you will get the Printers option click on that. When you click on that you will get a list of Settings names. Here you can select the Computer location (physical location).
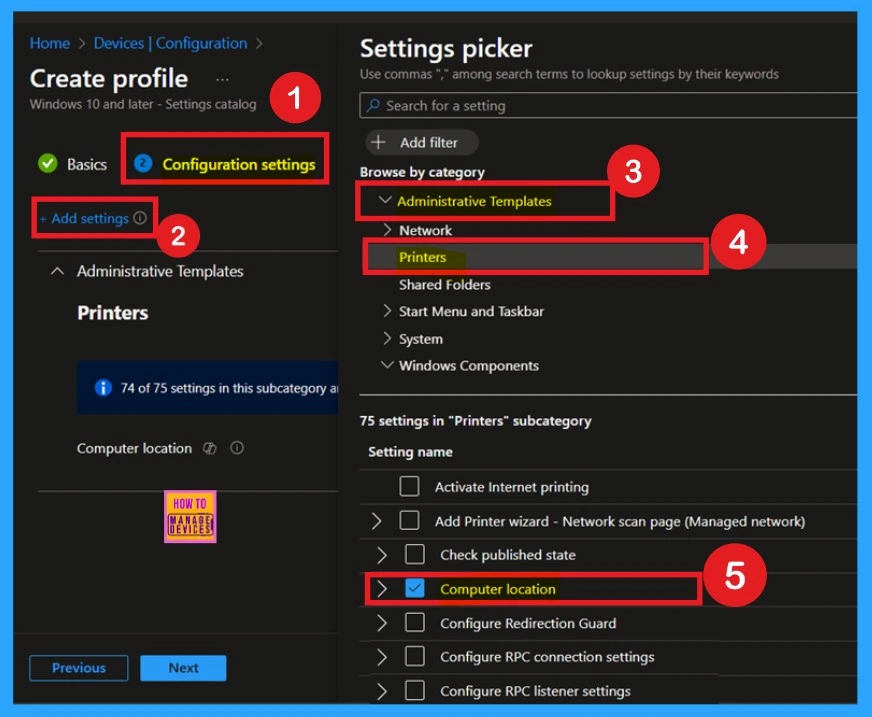
Disable Physical Computer Location Support
Now you can close the Settings Picker window then you can see that the policy is displayed on your configuration page that is disabled by default if you want to continue with this policy disabled you can click on the Next option.
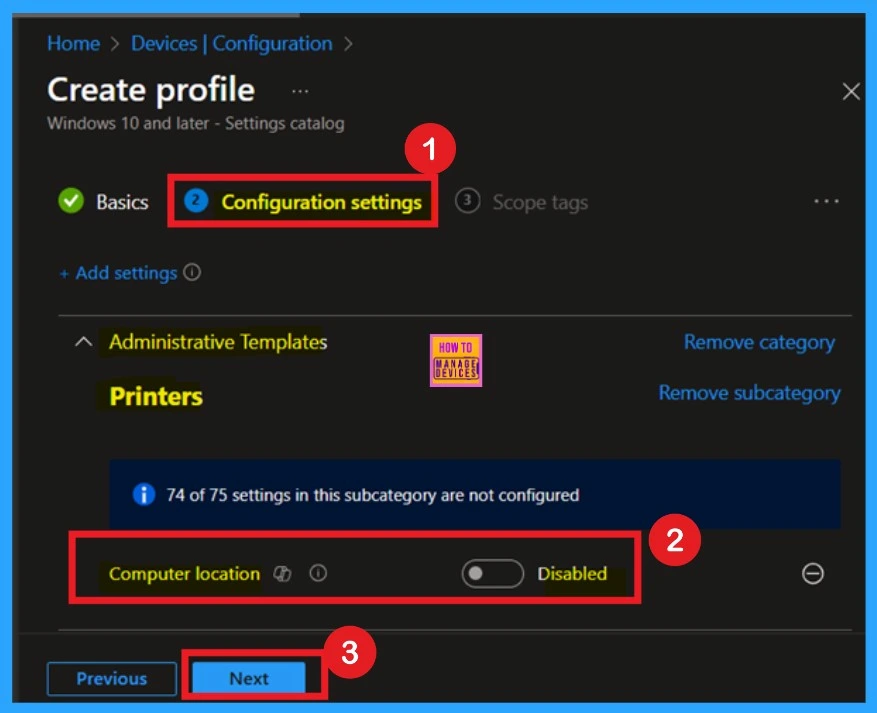
Enable Physical Computer Location Support
If you want to Enable the policy now, you have to toggle the pane left to the right and now you can see the pane in a blue color that means the policy is Enabled. There you can see that another details that you have to enter called Location(Device) here you can set the device location for it. For example I gave it as a Desktop and Click on the Next.
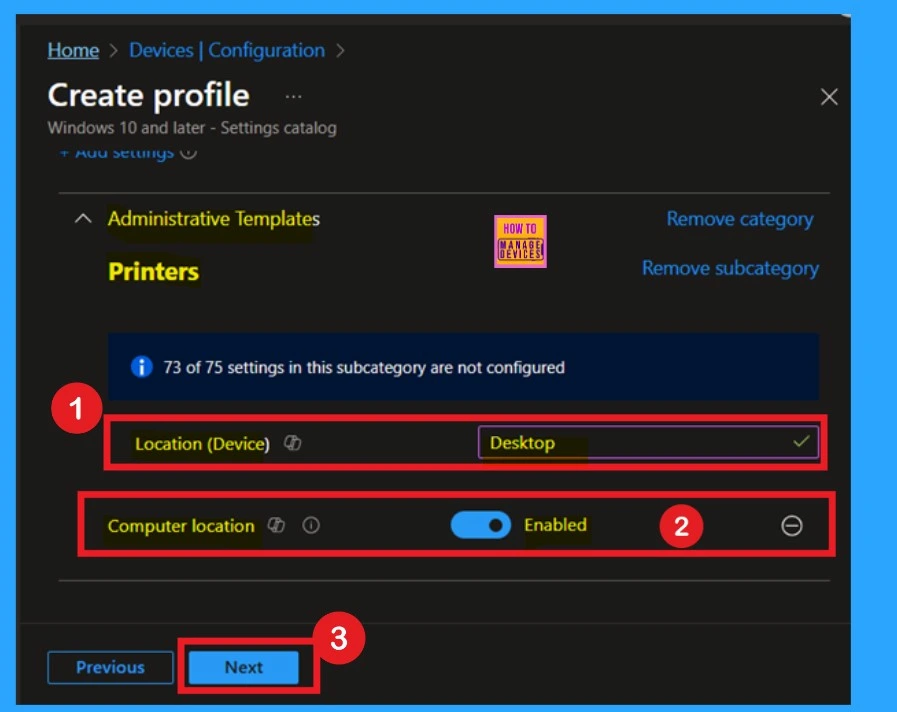
Scope Tags
Scope tags are used to categorize and link your policy to a specific scope, simplifying the management of assignments for particular environments. You have the option to add a scope tag for the policy, but it is not required.
- I will skip this section and proceed by clicking Next.

Assignments
The next step is the Assignment tab, which is essential for deploying policies. In this section, you can choose the group to which the policy will be applied. I clicked on “Add Groups” under the Include Groups option.
- After selecting the desired group, I clicked Next to proceed.
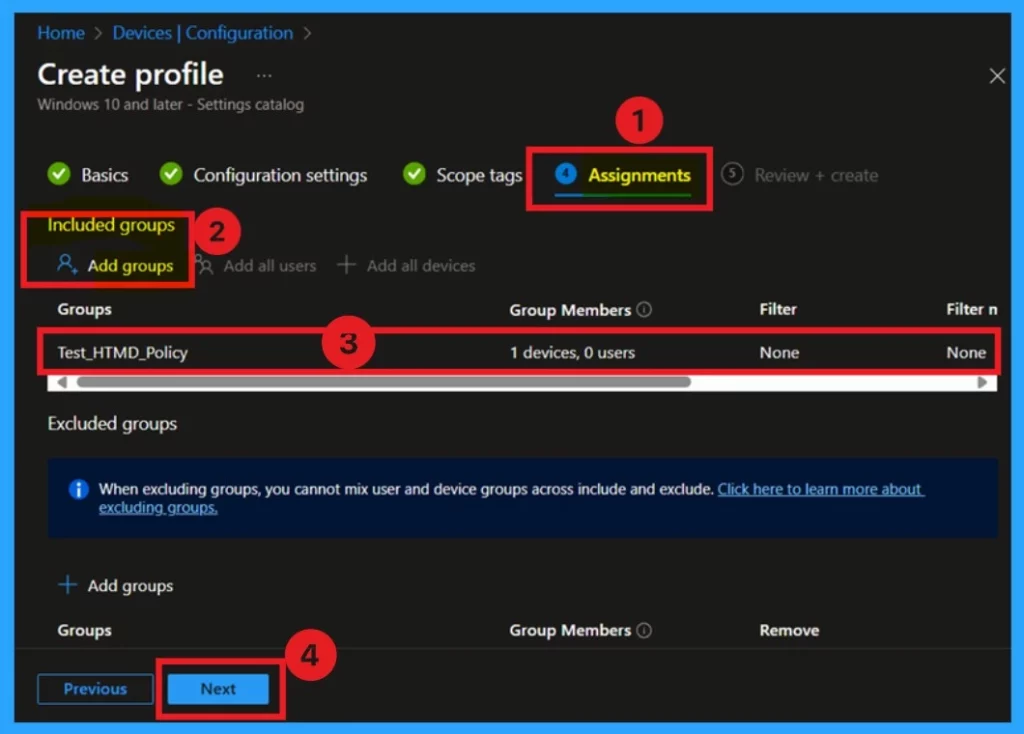
Review + Create
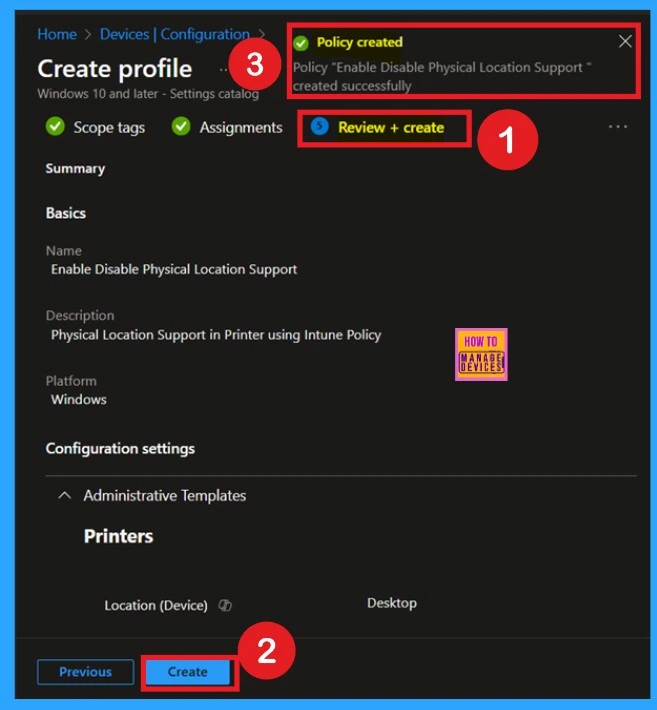
Once the assignments are complete, you’ll reach the Review +Create stage, which is the final step in policy creation. Here, you can review all the details of the policy, including the basic information and configuration settings.
- If you’re satisfied with the summaries and settings, click the Create button to finalize the process.
Monitoring Status
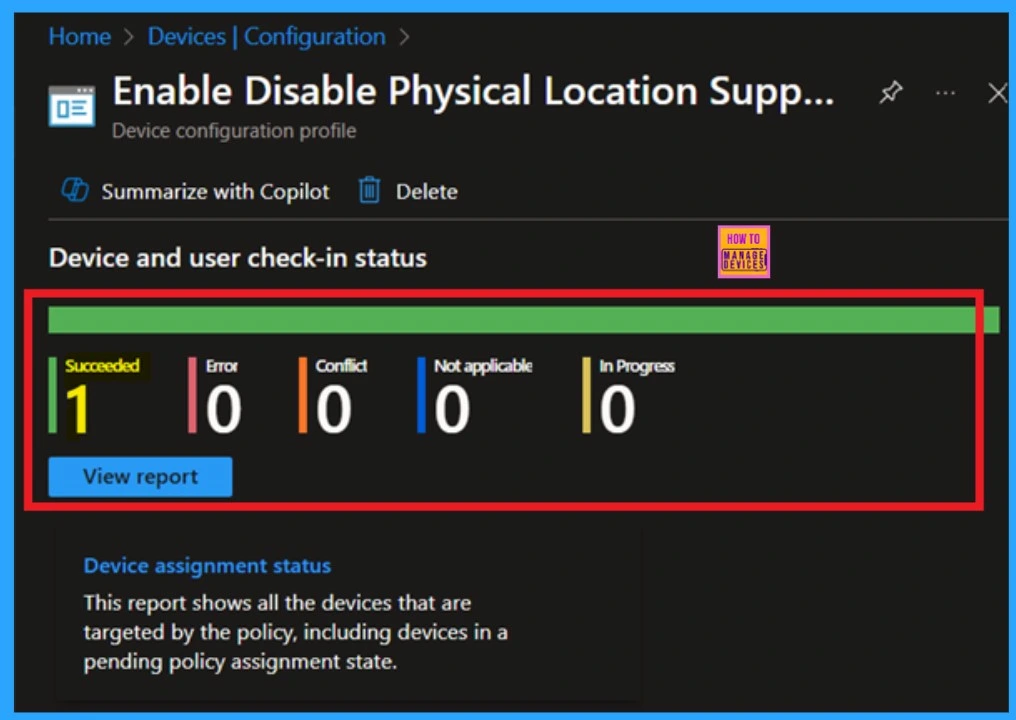
When you create a new policy for a device, it typically takes up to 8 hours for the policy to apply automatically. However, you can speed up this process by manually syncing the policy. After syncing, you can confirm that the policy has been successfully applied by checking in Intune.
- To do this, go to Device > Configuration and select the policy.
Client Side Verification
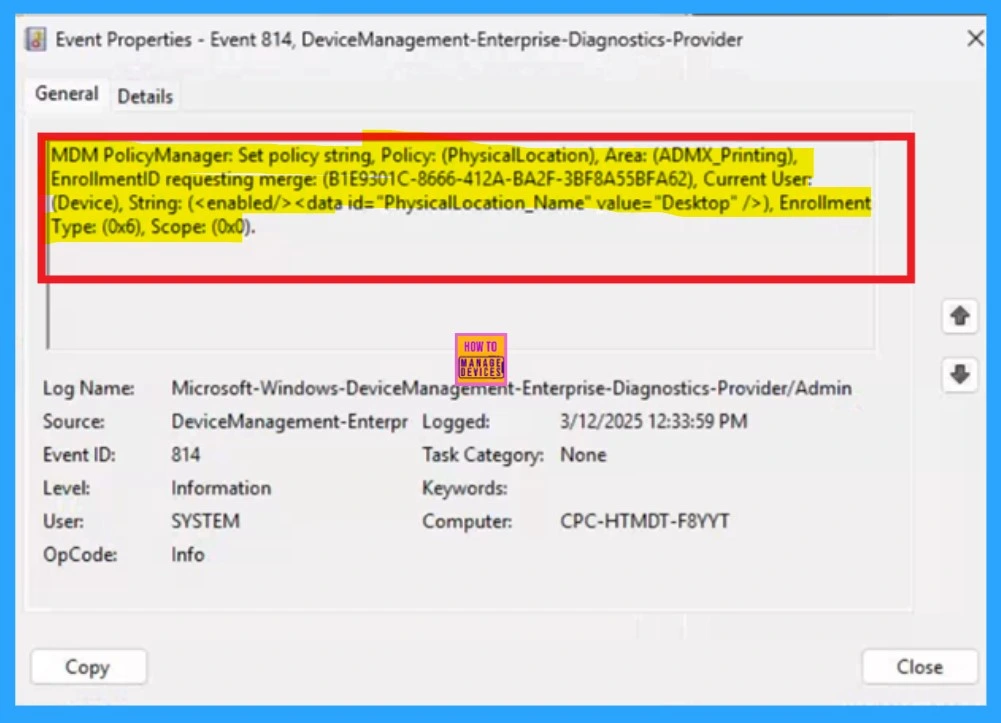
To monitor the status of Intune, you can use Event Viewer. First, open the Start menu and type “Event Viewer.” Then, navigate to the following path: Application and Services Logs > Microsoft > Windows > DeviceManagement-Enterprise-Diagnostics-Provider > Admin.
- In the right pane, click Filter Current Log, enter 814 in the Event IDs field, and click OK.
| Policy Details |
|---|
| MDM PolicyManager: Set policy string, Policy: (PhysicalLocation), Area: (ADMX_Printing), EnrollmentID requesting merge: (B1E9301C-8666-412A-BA2F-3BF8A55BFA62), Current User: (Device), String: (), Enrollment Type: (0x6), Scope: (0x0). |
Need Further Assistance or Have Technical Questions?
Join the LinkedIn Page and Telegram group to get the latest step-by-step guides and news updates. Join our Meetup Page to participate in User group meetings. Also, Join the WhatsApp Community to get the latest news on Microsoft Technologies. We are there on Reddit as well.
Author
Anoop C Nair has been Microsoft MVP for 10 consecutive years from 2015 onwards. He is a Workplace Solution Architect with more than 22+ years of experience in Workplace technologies. He is a Blogger, Speaker, and Local User Group Community leader. His primary focus is on Device Management technologies like SCCM and Intune. He writes about technologies like Intune, SCCM, Windows, Cloud PC, Windows, Entra, Microsoft Security, Career, etc.
