Hey, let’s discuss about Stop Windows AI Data Leakage Secure your Network by Blocking Image Creator using Intune. This policy is important because it allows administrators to control the use of the Image Creator feature in the Windows Paint app. It helps maintain security and prevent unauthorized image generation within organizational systems. This control ensures that resources are used only for work-related purposes.
For users, this policy helps provide a focused and secure working environment. It prevents distractions or misuse of AI-generated images within the Paint application. This ensures that employees stay productive while using company devices.
For organizations, enabling this policy enhances data security and compliance. It reduces the risk of sensitive images being created or shared without permission. Companies can manage creative tools according to their operational needs.
An example of this policy in use is in schools or offices where AI image creation is restricted. IT admins can enable this policy to block the Image Creator tool in Paint. This ensures that only approved tools are available for official or educational work.
Table of Contents
What are the Advantages of Disabling this Policy using Intune?
Disabling this policy allows users to freely access the Image Creator feature in the Windows Paint app. It encourages creativity and helps users easily design or enhance images without needing extra software. This can improve productivity for individuals working on visual or design-related tasks.
1. Users can use AI-powered Image Creator tools directly in Paint.
2. It saves time and resources by removing the need for third-party apps.
3. Encourages creativity and innovation among users.
4. Enhances collaboration by allowing easy creation of visual content.
5. Helps organizations improve efficiency in design, marketing, and presentations.
Stop Windows AI Data Leakage Secure your Network by Blocking Image Creator using Intune
Before this policy was applied, users could freely access the Image Creator feature in the Windows Paint app. There were no restrictions on creating or editing AI-generated images. This allowed users to experiment creatively but also increased the risk of misuse or unnecessary resource use.
After the policy is applied and enabled, the Image Creator functionality becomes restricted in Paint. Users will no longer be able to access or use the AI image generation tools. This helps organizations maintain control, improve security, and ensure Paint is used only for approved purposes.
- Enable Disable Print PDF as Image Default using Intune Security Policy
- PDF24 Creator Deployment using Intune Enterprise App Catalog App
- Create AI Images from Microsoft Edge
Create a Profile
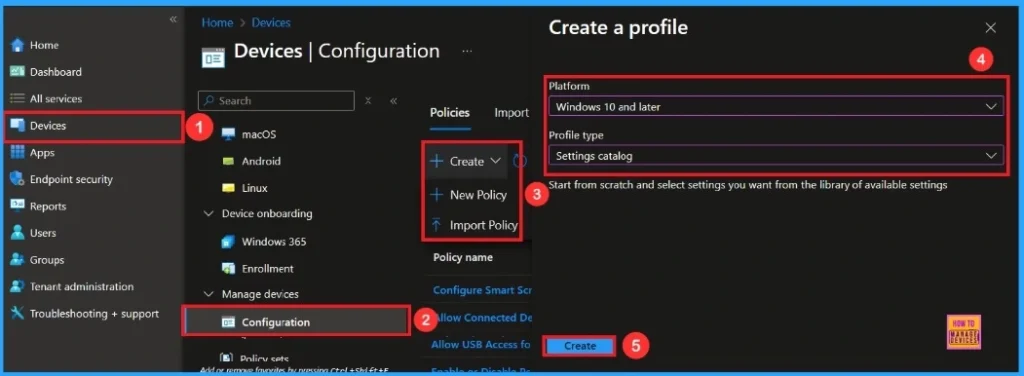
To start deploying a policy in Intune, sign in to the Microsoft Intune Admin Center. Then go to Devices> Configuration under the Manage devices> Policies> Create> New policy. In the create a profile window, add the platform Windows and later, profile type is Settings Catalog. Then click the create button.
Basic Step
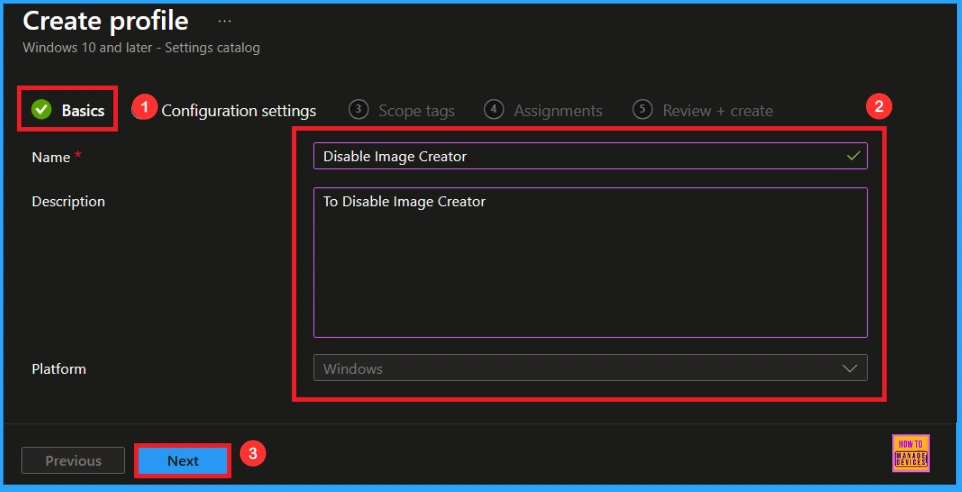
To begin configuring a policy in Intune, start with the Basics step. Here, we can add the name(Disable Image Creator) of the policy, give a brief description(not mandatory) and platform is Windows.
Configuration Settings
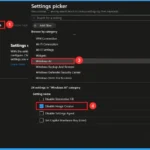
In the Configuration settings tag, you can see the Add settings option. When you click on the Add Settings option, a Settings Picker window will appear. There, search for Windows AI settings and then select Disable Image Creator.
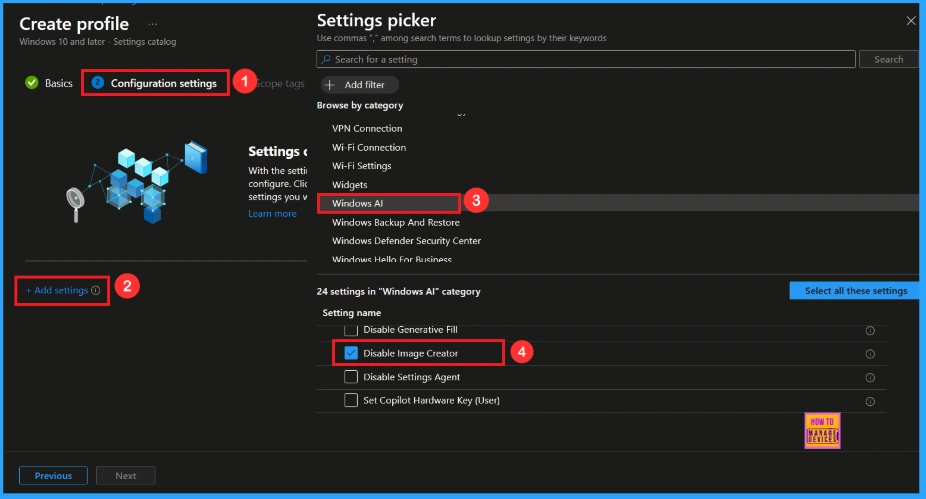
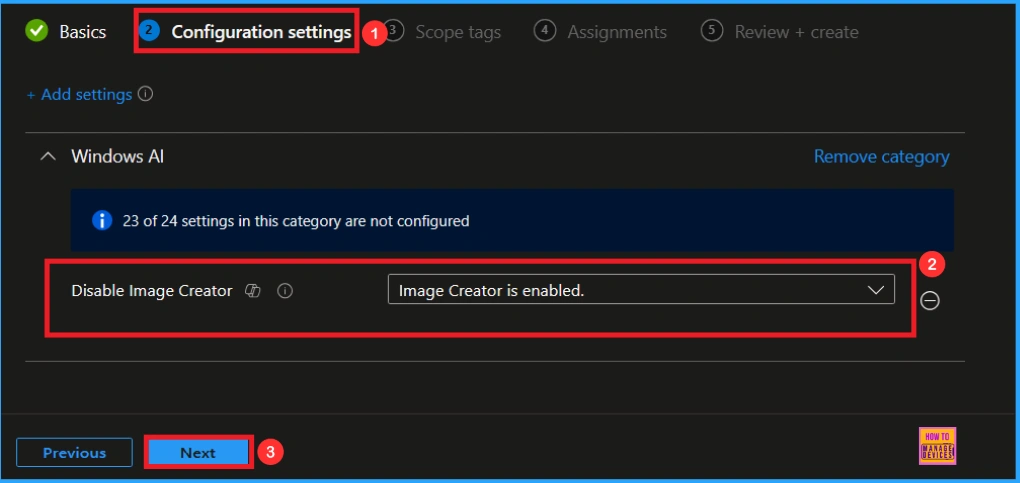
When you close the Settings Picker, you will see it in the Configuration Settings, here you can set the Image Creator Policy to Enable or Disable. By default, it will be Enabled. Should you wish to proceed with this particular setting, click Next.
Block Image Creator Policy
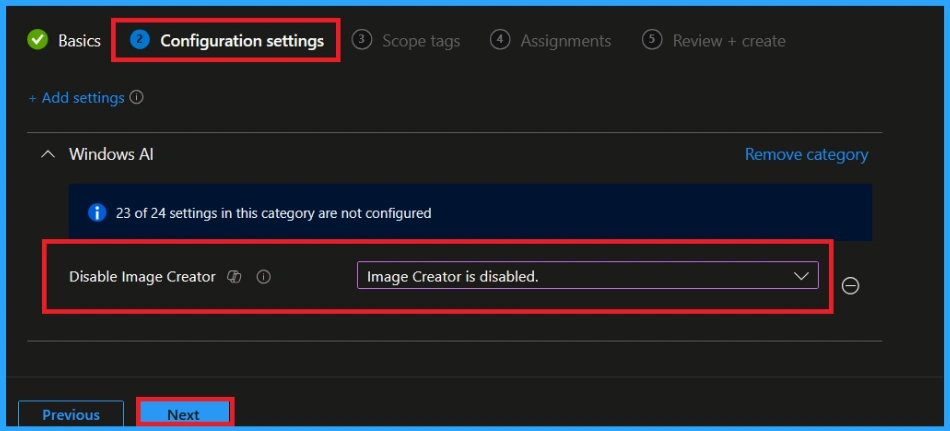
We can Disable or not configure this policy by clicking the dropdown menu and select Image Creator is disabled setting. Then, click Next to continue.
Scope Tags
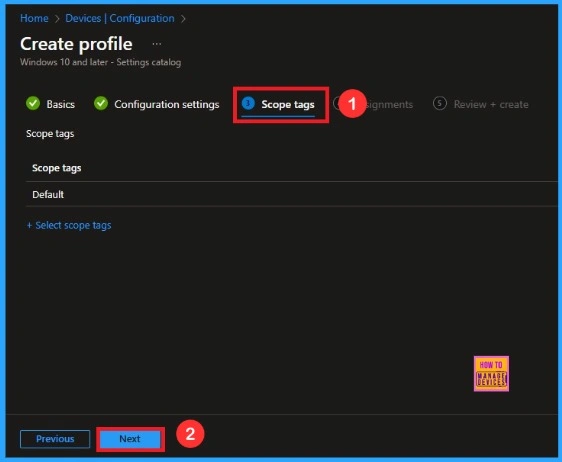
A scope tag is used to assign policies to specific groups within an organisation. The scope tag is not mandatory, so you can skip this section. Click Next if they’re not required for your setup.
Assignments
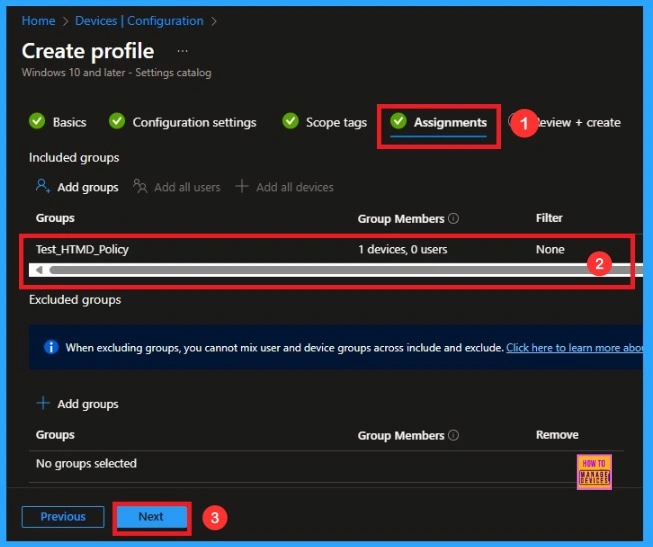
Here, you will see an option called Add Groups under the Include Groups section. Click on it. When you click, a list of available groups will appear. You can search for the group you want (e.g Test_HTMD_Policy). Then click the Next button.
Final Step
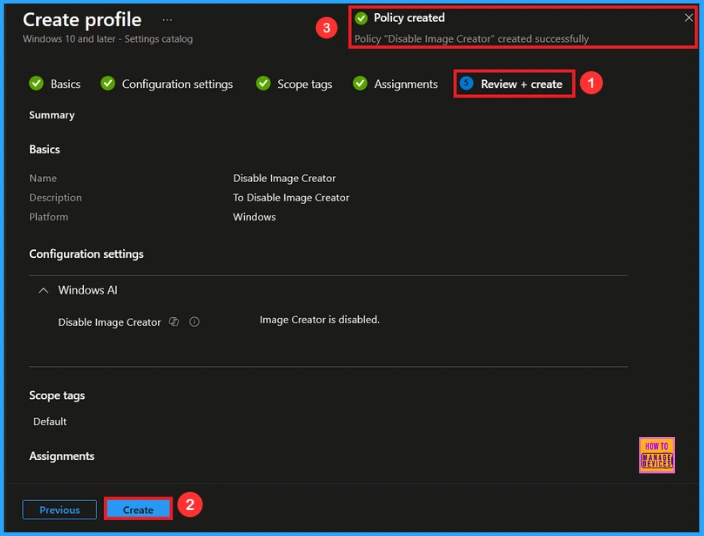
In this section, you can see a summary of everything you entered in the previous steps, such as basic details, configuration settings, assignment details, and more. If you want to change or edit anything, you can easily go back to the previous section. Click Create to finish, and a message will confirm that the “Disable Image Creator created successfully.
Device and User Check-in Status
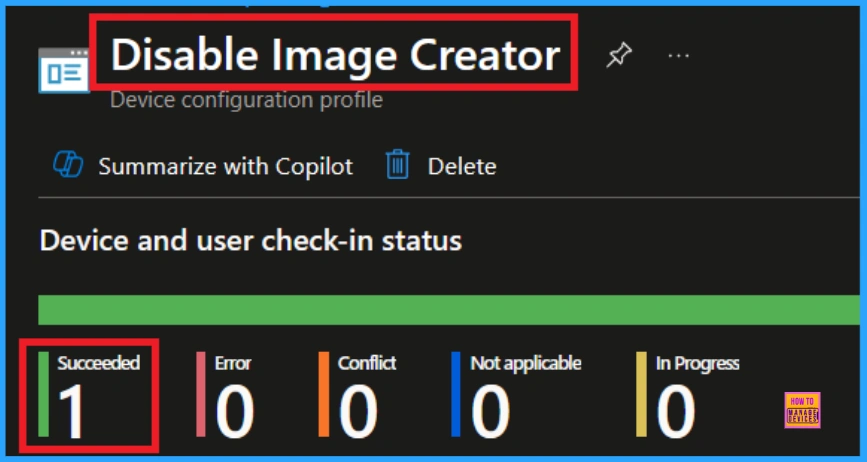
To view a policy’s status, go to Devices > Configuration in the Intune portal, select the policy(Disable Image Creator) and check that the status shows Succeeded (1). Use manual sync in the Company Portal to speed up the process.
Client Side Verification
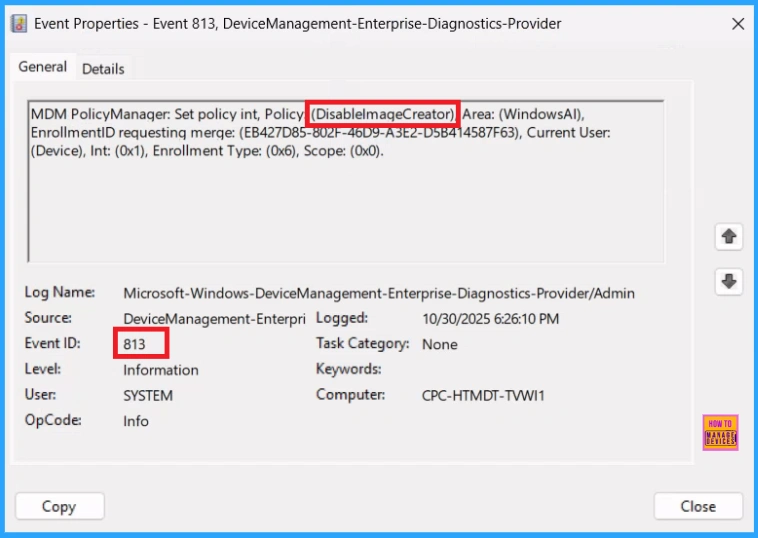
To confirm whether the policy is successful or not, you can use the Event Viewer. First, open Event Viewer and navigate to Applications and Services Logs > Microsoft > Windows > Device Management > Enterprise Diagnostic Provider > Admin. Use Filter Current Log and search the Event ID 813.
MDM PolicyManager: Set policy int, Policy (DisablelmaqeCreator),Area: (WindowsAl),
EnrollmentlD requestinq merqe: (EB427D85-802F-46D9-A3E2-D5B414587F63), Current User:
(Device), Int: (0x1), Enrollment Type: (0x6), Scope: (0x0).
How to Remove Assigned Groups from Image Creator Policy
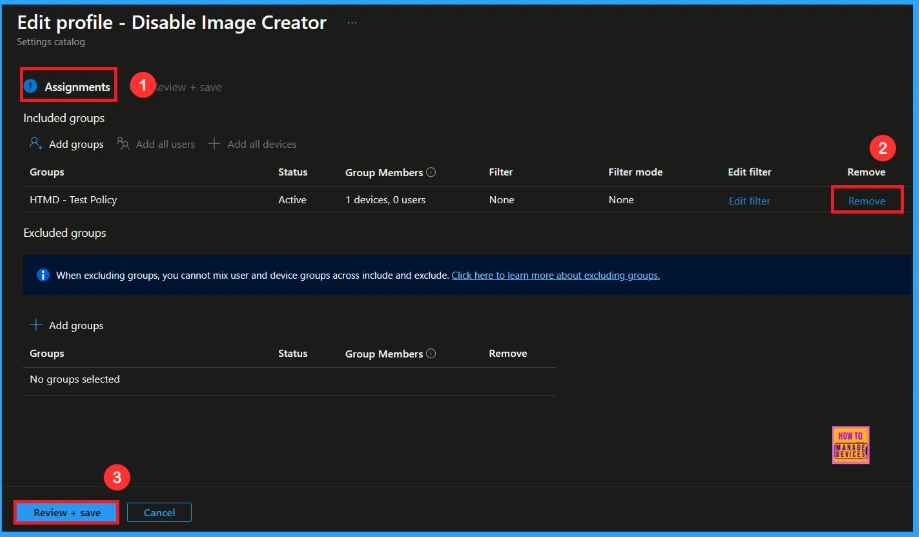
After creating the policy, if you want to remove the specific group that you previously selected, you can easily do that. First, go to Devices > Configuration policies. In the Configuration policy section, search and select the policy. In the Assignment section, you will find an Edit option and click on it. Then, click the Remove option.
For detailed information, you can refer to our previous post – Learn How to Delete or Remove App Assignment from Intune using by Step-by-Step Guide.
How to Delete Image Creator Policy from Intune
If you want to delete this policy for any reason, you can easily do so. First, search for the policy name in the configuration section. When you find the policy name(Disable Image Creator), you will see a 3-dot menu next to it. Click on the 3 dots, then click the Delete button.
For detailed information, you can refer to our previous post – How to Delete Allow Clipboard History Policy in Intune Step by Step Guide.

Windows Configuration Service Provider (CSP)
The Policy Configuration Service Provider (CSP) is a feature used by organisations to manage and control settings on Windows 10 and 11 devices. It explains what each policy does, what settings or values can be used, and how it connects to older Group Policy settings (Group Policy Mapping details).
Allowed Values
| Value | Description |
|---|---|
| 0(Default) | Image creator is enable |
| 1 | Image creator is disable |
Description framework properties
- Format – Int
- Access type – Add, Delete, Get, Replace
- Default value – 0
Group Policy Mapping
| Name | Value |
|---|---|
| Name | DisablelmageCreator |
| Friendly Name | Disable Image Creator |
| Location | Computer Configuration |
| Path | Windows Components > Paint |
| Registry Key Name | Software\Microsoft\Windows\CurrentVersion\Policies\Paint |
| Registry Value Name | DisablelmageCreator |
| ADMX File Name | WindowsCopilot.admx |
./Device/Vendor/MSFT/Policy/Config/WindowsAI/DisableImageCreator

OMA-URI Settings
An OMA-URI is a unique address that points to a specific setting controlled by a Configuration Service Provider (CSP). It is a text string that sets custom configurations on Windows 10/11 devices, and its format depends on the CSP itself. Here’s a step-by-step guide.
- Sign in to Microsoft Intune
- Go to Devices > Configuration
- Click Create, and then the new policy.
- Choose the platform as Windows 10 or later.
- For Profile type, select Templates and then choose Custom.
- Provide a Name: Disable Image Creator
- Add a Description(To Disable Image creator)
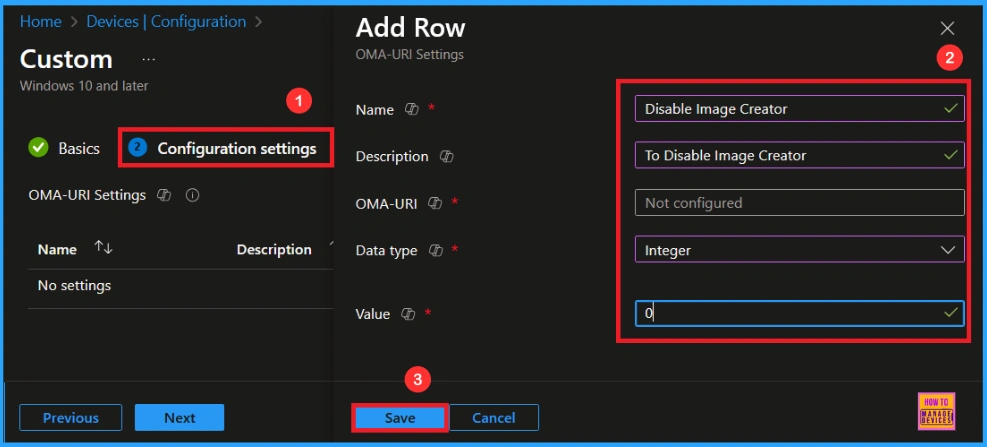
- Click on + Add under OMA-URI Settings to configure the specific setting.
- To Configure the OMA-URI Setting, do the following
- Enter a name, such as Disable Image Creator
- Description: To Disable Image Creator
- Enter the following OMA-URI path: ./Device/Vendor/MSFT/Policy/Config/WindowsAI/DisableImageCreator
- Set the Data type to Integer.
- Enter the value
- 1 to Disable Image Creator Policy
- 0 to Enable Image Creator Policy.
- After entering the above details, click the Save button
Need Further Assistance or Have Technical Questions?
Join the LinkedIn Page and Telegram group to get the latest step-by-step guides and news updates. Join our Meetup Page to participate in User group meetings. Also, Join the WhatsApp Community to get the latest news on Microsoft Technologies. We are there on Reddit as well.
Author
Anoop C Nair has been Microsoft MVP from 2015 onwards for 10 consecutive years! He is a Workplace Solution Architect with more than 22+ years of experience in Workplace technologies. He is also a Blogger, Speaker, and Local User Group Community leader. His primary focus is on Device Management technologies like SCCM and Intune. He writes about technologies like Intune, SCCM, Windows, Cloud PC, Windows, Entra, Microsoft Security, Career, etc.

