In this post, let’s learn 4 Methods to Enable Credential Guard on Windows 11 Devices. Microsoft introduced Credential Guard in Windows 10 Enterprise and Windows Server 2016. The privileged system software can only access user credentials when Credential Guard is active.
The Credential Guard helps to prevent “pass the hash” attacks and other attacks. This is not a new feature; it has been available since Windows 10. Credential guard uses virtualization-based security to isolate system data.
The credential guard and its security features enable organizations to better protect against credential theft attacks, and the malware running in the operating system with administrator privileges cannot find the secrets that VBS protects.
It’s important to understand that Starting from Windows 11 Enterprise, version 22H2, and Windows 11 Education, version 22H2, “compatible systems” have Windows Defender Credential Guard TURNED ON by default.
In this post, I would like to talk about the Microsoft Windows Defender Credential Guard; what do you think about it? How does it work, and how to enable if not enabled? I’d like you to please read the following content to learn more about credential guard.
- 4 Methods Enable or Disable Virtualization-Based Security VBS on Windows 11
- Windows 11 Camera is Blocked because of Privacy Shutter
What is Microsoft Windows Defender Credential Guard
Microsoft Windows Credential Guard is a security feature that isolates users’ login information from the rest of the operating system from theft. Credential Guard uses virtualization-based security (VBS) to separate system data; the authorized system software only accesses them.
Credential Guard helps prevent unauthorized access, known as credential theft attacks, such as pass-the-hash and pass-the-ticket. This also protects NTLM password hashes and Kerberos Ticket Granting Tickets.
The credential guard provides hardware-assisted security, which takes advantage of platform security features like Secure boot and virtualization-based security. Both protect credentials in an isolated environment when the credential guard is enabled.

How Microsoft Windows Defender Credential Guard Works
Using virtualization-based security, Kerberos, NTLM, and Credential Manager isolate the non-sharable information. The same data is stored in the Local Security Authority (LSA) in the previous version of Windows.
As per Microsoft, when the Windows Defender Credential Guard is enabled, NTLMv1, MS-CHAPv2, Digest, and CredSSP can’t use the signed-in credentials. So it is recommended that valuable certifications like sign-in credentials not to used with any of the above protocols.
Kerberos did not allow unconstrained Kerberos delegation or DES encryption for signed-in credentials and prompted or saved credentials when the Windows Defender Credential Guard was enabled.
#1 Default Enablement of Microsoft Windows Credential Guard
Windows 11 Enterprise, version 22H2, and Windows 11 Education, version 22H2, are compatible systems where the Windows Defender Credential Guard is turned on by default. The system administrator can modify this default setting.
Your device needs the following minimum requirements to enable Windows Defender Credential Guard by default.
| Component | Requirement |
|---|---|
| Operating System | Windows 11 Enterprise, version 22H2 or Windows 11 Education, version 22H2 |
| Existing Windows Defender Credential Guard Requirements | Support for Virtualization-based security (required), Secure boot (required), Trusted Platform Module (TPM, preferred – provides binding to hardware) versions 1.2 and 2.0 are supported, either discrete or firmware, UEFI lock (preferred – prevents an attacker from disabling with a simple registry key change) |
| Virtualization-based Security (VBS) Requirements | 64-bit CPU, CPU virtualization extensions plus extended page tables, Windows hypervisor (does not require Hyper-V Windows Feature to be installed) |
Registry Editor to Enable Microsoft Windows Defender Credential Guard
You can manually enable Microsoft Windows Defender Credential Guard using the registry editor. Follow the steps to allow Microsoft Windows Defender Credential Guard shown below:
- Window Key + R (To open run command)
- Type ‘regedit‘ and press OK
- Administrator permission press Yes
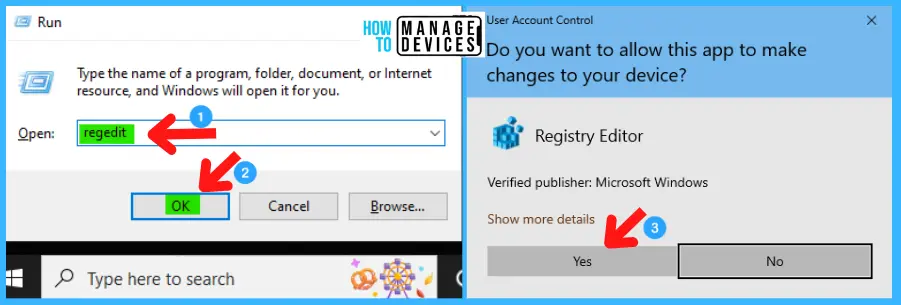
The Registry Editor opens. HKEY_LOCAL_MACHINE\System\CurrentControlSet\Control\DeviceGuard is the path. Following the trail, I reached the Device Guard sub-folder for further action.
HKEY_LOCAL_MACHINE\System\CurrentControlSet\Control\DeviceGuard

To enable Virtualization-based security, follow the above location. In the Device, Guard adds two new DWORD values to enable it to, such as
- Add a new DWORD value named EnableVirtualizationBasedSecurity. And double click to set the value. Select 1 to enable virtualization-based security and set 0 to disable it.
- Add another DWORD value named RequirePlatformSecurityFeatures. Again double, click on it, and set the value 1 to use Secure Boot only or set 3 to use Secure Boot and DMA protection.
The details of the setting are shown in the table below for a better understanding:
| Setting Type | Hive | Key | Value | Value Name | Value Data |
|---|---|---|---|---|---|
| Registry | HKEY_LOCAL_MACHINE | System\CurrentControlSet\Control\DeviceGuard | DWORD (32-bit) | EnableVirtualizationBasedSecurity | 0 to Disable 1 to Enable |
| Registry | HKEY_LOCAL_MACHINE | System\CurrentControlSet\Control\DeviceGuard | DWORD (32-bit) | RequirePlatformSecurityFeatures | 0 to Disable 1 to enable Secure Boot 3 to enable Secure Boot and DMA Protection |
The virtualization-based security is enabled. Now you can enable the Windows Defender Credential Guard using the registry editor. Follow the path HKEY_LOCAL_MACHINE\System\CurrentControlSet\Control\Lsa is the path.
HKEY_LOCAL_MACHINE\System\CurrentControlSet\Control\Lsa

Add a new DWORD value name as LsaCfgFlags. Set value 1 to enable Windows Defender Credential Guard with UEFI lock, set value 2 to enable Windows Defender Credential Guard without lock, and put 0 to disable. Details are shown in the table below:
| Setting Type | Hive | Key | Value | Value Name | Value Data |
|---|---|---|---|---|---|
| Registry | HKEY_LOCAL_MACHINE | System\CurrentControlSet\Control\Lsa | DWORD (32-bit) | LsaCfgFlags | 0 to Disable 1 to Enable Windows Defender Credential Guard with UEFI lock 2 to Enable Windows Defender Credential Guard without lock |
The above settings are illustrated below for a better experience.

Group Policy to Enable Microsoft Windows Defender Credential Guard
To enable Windows Defender Credential Guard, you can use the Group Policy to enable it manually. The steps to enable Windows Defender Credential Guard are shown below:
- Open Run command.
- Type ‘gpedit.msc‘ and press OK
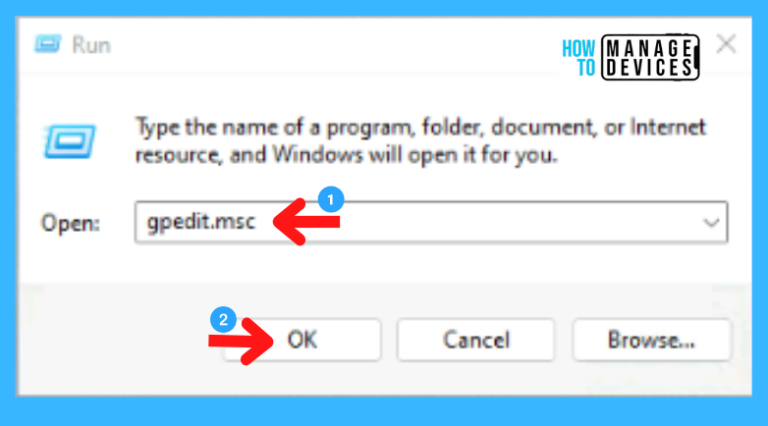
When the group policy editor opens, follow the path “Computer Configuration/Administrative Templates/System/Device Guard” to reach the proper location to perform the desired task.
Computer Configuration/Administrative Templates/System/Device Guard
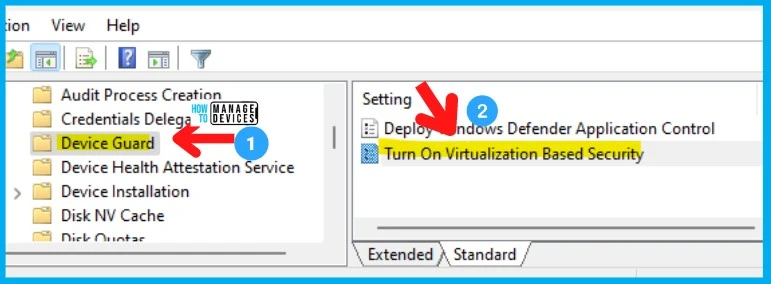
After reaching Device Guard click on it to explore. Select and double-click on the option Turn On Virtualization Based Security now follow the steps below:
- Select the Enable option
- Choose Secure Boot or Secure Boot and DMA Protection, in the Select Platform Security Level box
- Select Enabled with UEFI lock in the Credential Guard Configuration box. If you want to turn off Windows Defender Credential Guard remotely, choose Enabled without lock
- Select Apply then press OK and close the Group Policy Management Console
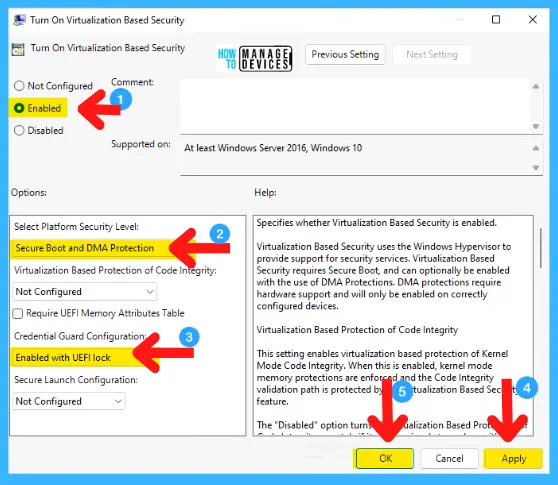
To execute the processing of the group policy, you can run gpupdate /force
Intune Policy to Enable Microsoft Windows Defender Credential Guard
Let’s look at Intune policy options to Enable Microsoft Windows Defender Credential Guard. We have already seen 3 methods to do this in this post and the Intune settings catalog method achieves the same.
The configuration of the Credential Guard is done using different profiles. One with an Endpoint protection profile using the settings catalog and another with an Account protection profile.
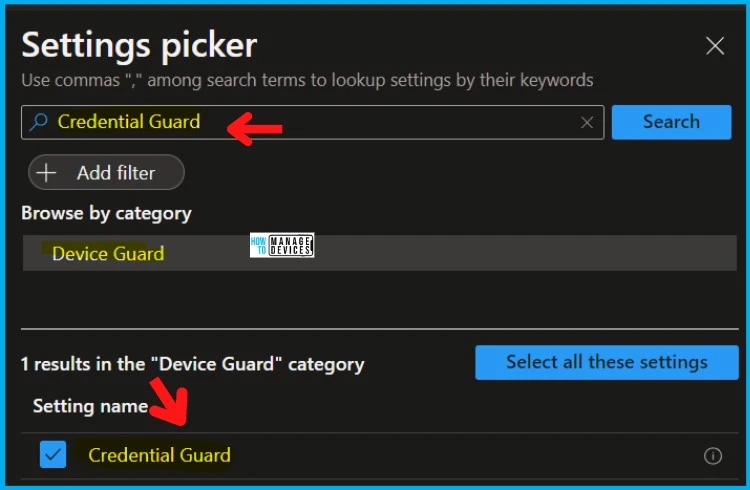
You can go through Intune Settings Catalog Guide to create the policy in detail. However, for this context, search with the following keyboard – Credential Guard. This is what is explained in the following section.
NOTE! – More details on Intune settings catalog guide – Create Intune Settings Catalog Policy.
- Open Intune admin center portal, select Devices
- Select Configuration Profiles
- Select Create Profile -> Windows 10 and later -> Settings catalog -> Create
- Click on the + Add Settings link.
- Search with “Credential Guard” in the Settings picker search box.
- Select the Device Guard Category.
- Credential Guard options from the Settings name section.
- Keep the policy’s settings DISABLED or ENABLE if you want to.
- Go through the Settings Catalog creation guide above to complete the process.
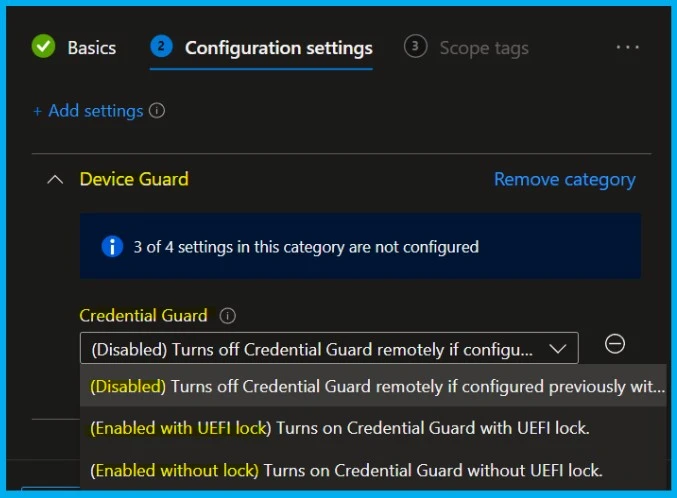
The following are the Credential Guard Configurations available in Microsoft Intune : 0 – Turns off CredentialGuard remotely if configured previously without UEFI Lock, 1 – Turns on CredentialGuard with UEFI lock. 2 – Turns on CredentialGuard without UEFI lock.
- Disabled
- Enabled with UEFI Lock
- Enabled without UEFI Lock
Account Protection is another option to enable Credential Guard on Windows devices. Open the Intune admin center portal, navigate to Endpoint security, then move to Account protection to open the Account Protection option.
- From the Account Protection menu, click Create Policy to open the Create a profile page.

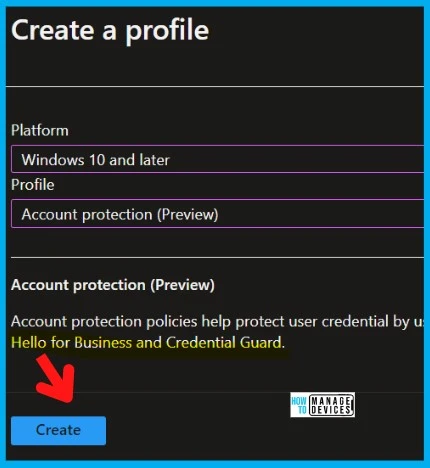
Then on Create a profile page, Select Windows 10 and later as value for Platform, and select Account protection (preview) as value. Now click Create to open the Create profile wizard.
- The Basics page is open now, provide some information in such fields shown below
- Name: Provide a name for the profile
- Description: Provide a description for the profile (Optional)
- Platform: Windows 10 and later (Selected earlier)
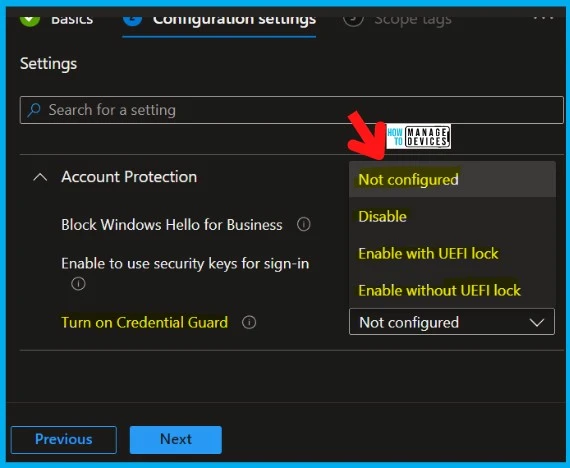
On the Configuration settings page, provide the information shown below and click on Next. The following are the 3 configuration options that you get.
Block Windows Hello for Business: Leave Not configured, Enable to use of security keys for sign-in: Leave Not configured, or Turn on Credential Guard: Select Enable with UEFI lock. Once selected go ahead and complete the process.
- Next on the Scope tags page, configure the required tags and click Next
- On the Assignments page, configure assignments to the required user or device and click Next
- On Review and create the page, verify the configuration and click Create
That’s about the procedure to enable Windows Defender Credential Guard described above. Please follow us on Twitter HTMD Community and visit our website HTMD Forum if you like our content.
Author
Alok is a Master of Computer Applications (MCA) graduate. He loves writing on Windows 11 and related technologies. He likes to share his knowledge, quick tips, and tricks with Windows 11 or Windows 10 with the community.

I have enabled this both ways in intune and it still does not enable even though it states success – I’m at a loss
Needs to be the enterprise version of windows.