Let’s discuss Allow or Block Language Features Uninstall Policy in Text Input using Intune. The Microsoft Intune Settings simplifies device management by centralizing various configurable settings. This allows IT administrators to efficiently deploy policies, enforce security, and customize user experiences, ultimately boosting organizational productivity and security.
In this blog post, we will discuss how to allow or block the uninstallation of language features when a language is uninstalled. When this policy is enabled, some language features, such as handwriting recognition and spell-checking dictionaries, can be removed from a user’s device when the language is uninstalled.
We can easily manage language features. If you uninstall a language pack, some features might stay active if a certain policy is turned off. This means we can reinstall those features later if we want. However, when a policy is disabled, it separates the removal of features from the uninstallation of the language pack.
This configuration setting applies specifically to devices running certain editions of Windows 10 and later. It is compatible with Pro, Enterprise, Education, Windows SE, and IoT Enterprise (including LTSC) editions, but does not apply to user-level settings. The setting is supported on devices running Windows 10 version 1607 (build 10.0.14393) and newer.
Table of Contents
What are the Description Framework Properties and the Allowed Value of Allow Language Features Uninstall Policy?
This property is a simple integer that can be allowed (1) or not allowed (0). It likely controls permissions or features. You can change this property using four actions: add, delete, get, and replace.
Description framework properties:
Format : int
Access Type : Add, Delete, Get, Replace
Default Value: 1
Allowed values:
0 : Not allowed.
1 (Default) : Allowed
Allow or Block Language Features Uninstall Policy in Text Input using Intune
This setting controls whether language features like handwriting and spell-check are deleted when a language is uninstalled. If enabled, these features are removed to save space, but can be reinstalled later. If disabled, they stay on the device, using more storage but allowing instant access if the language is re-added.
- Top 75 Latest Intune Interview Questions and Answers
- Allow Manual Start of Microsoft Account Sign-In Assistant Using Intune Settings Catalog
- Explore Kusto Query Language (KQL) and Intune Device Query
CSP Details of Allow Language Features Uninstall Policy
This configuration setting applies specifically to devices running certain editions of Windows 10 and later. It is compatible with Pro, Enterprise, Education, Windows SE, and IoT Enterprise (including LTSC) editions, but does not apply to user-level settings. The setting is supported on devices running Windows 10 version 1607 (build 10.0.14393) and newer.
| Scope | Editions | Applicable OS |
|---|---|---|
| Device | Pro Enterprise Education Windows SE IoT Enterprise / IoT Enterprise LTSC | Windows 10, version 1607 [10.0.14393] and later |
Steps to Configure Allow Language Features Uninstall Policy
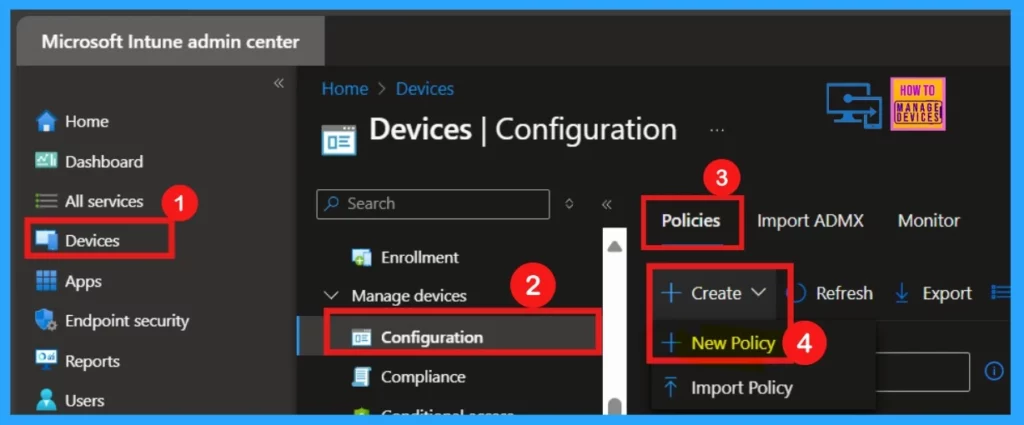
To configure language feature uninstallation in Intune, log in to the Microsoft Intune admin center, then go to Devices > Configuration. Now, we are in the Policies tab, which is situated on the left pane. Click the dropdown arrow of the Policies and select New Policy.
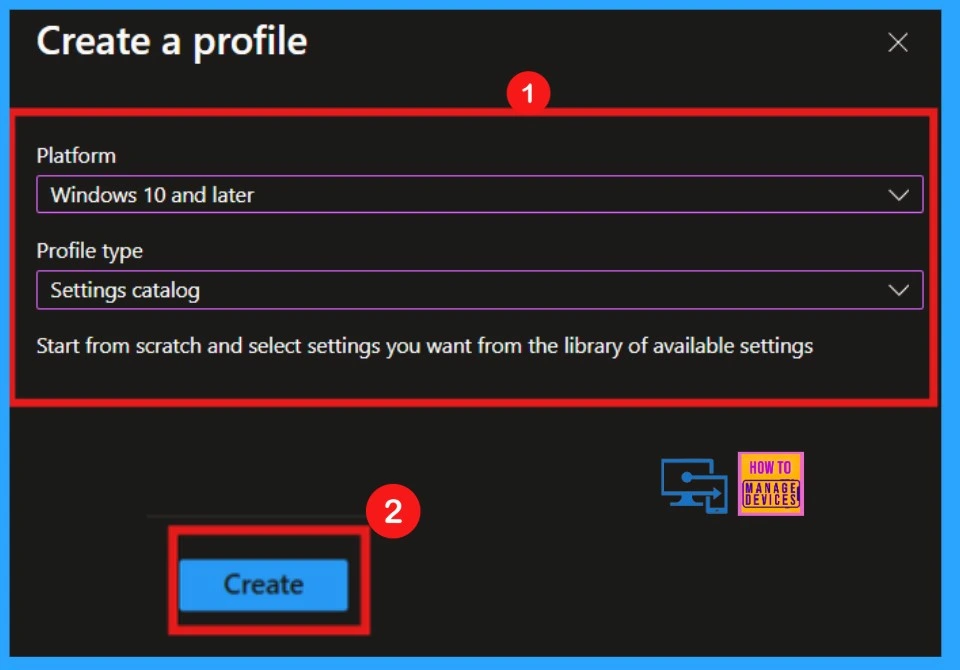
Upon clicking New Policy, we can choose the platform and profile type. This is crucial as it determines which devices and settings apply to the policy we are creating. We can typically select Windows 10 and later as the platform for language feature uninstallation and then choose Settings catalog as the profile type.
- Click Create to proceed.
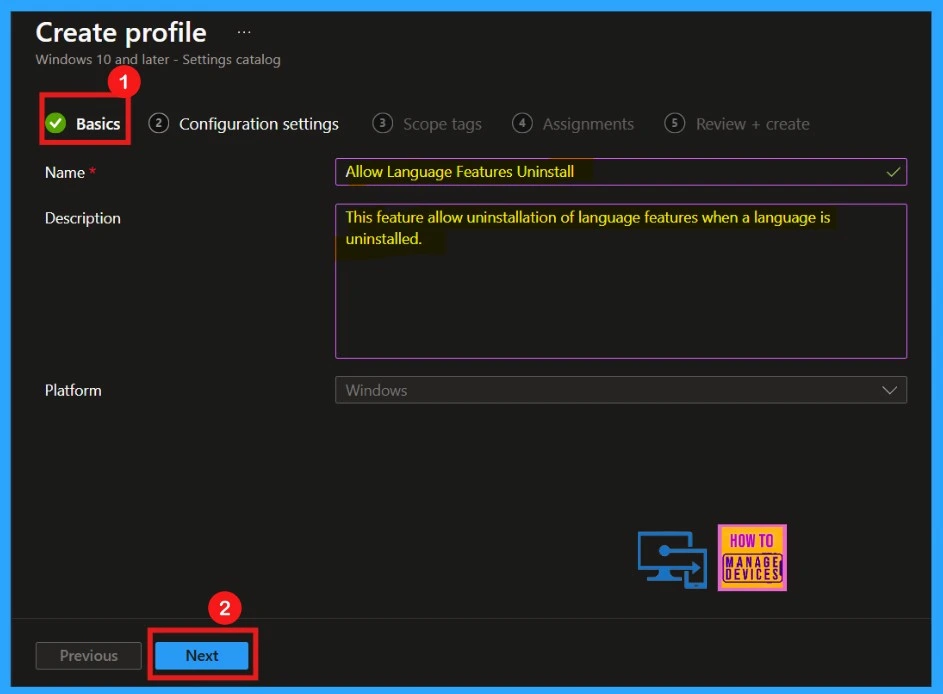
In the initial Basics tab of the Intune policy creation, provide a name and description for the policy, ensuring we can easily identify its purpose later. With the platform set to Windows by default, proceed to the next step by clicking Next.
- Name: Allow Language Features Uninstall
- Description: This feature allows the uninstallation of the language feature when a language is uninstalled.
After entering a name and description for the policy on the Basics tab, we will move on to the Configuration settings. This section is where you can make key adjustments for uninstalling language features. Here, you can specify exactly which features should be removed from the targeted devices.
- Click on the Add Setting in the configuration settings menu.
- Search desire a policy or category by typing in the search bar of the Settings Picker window.
- Here, I choose Text Input as a category.
- Select Allow Language Feature Uninstall from the list of available settings.
- After making your selections, close the Settings Picker window.
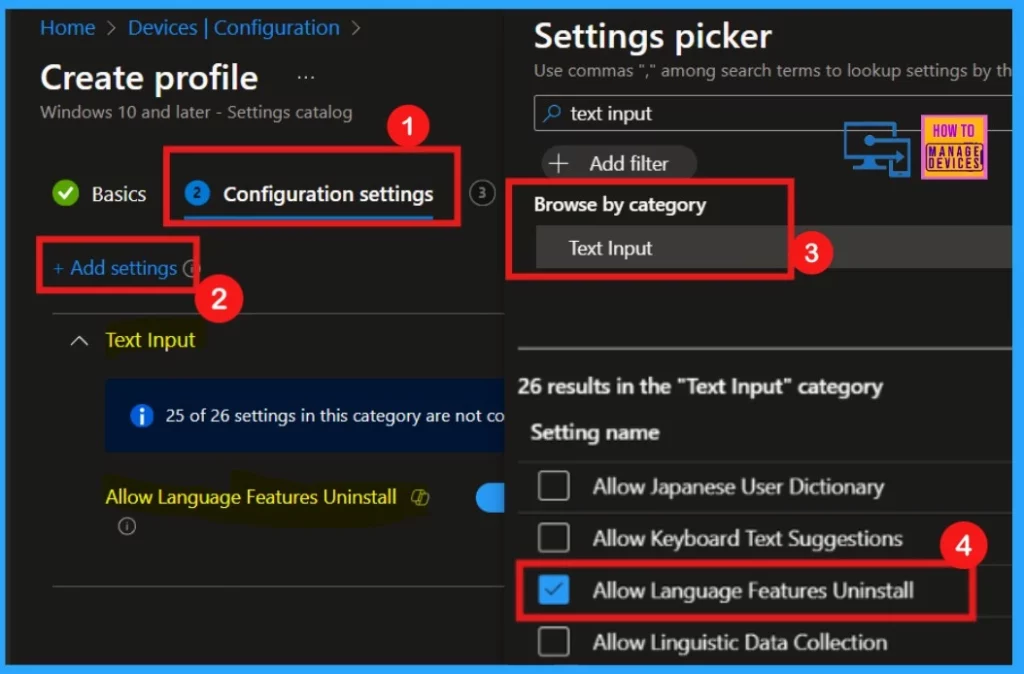
Allow or Block Language Features Uninstall
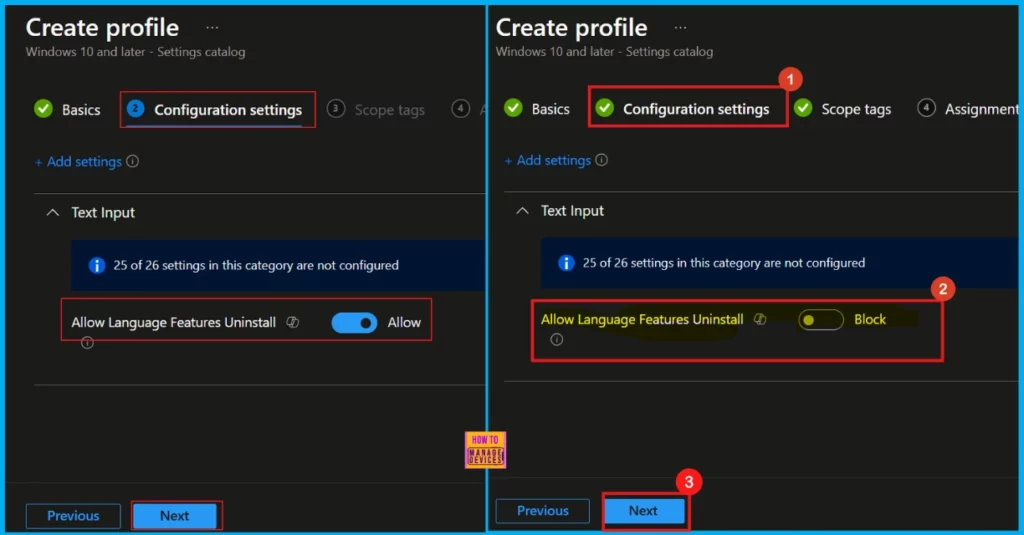
Return to the main configuration page after selecting the Allow Language Features Uninstall settings in the picker. Here, you can choose to Allow or Block the policy.
- The default setting of Allow Language Features Uninstall is Allow, but we will now configure it to Block.
- Click Next to proceed to the next step.
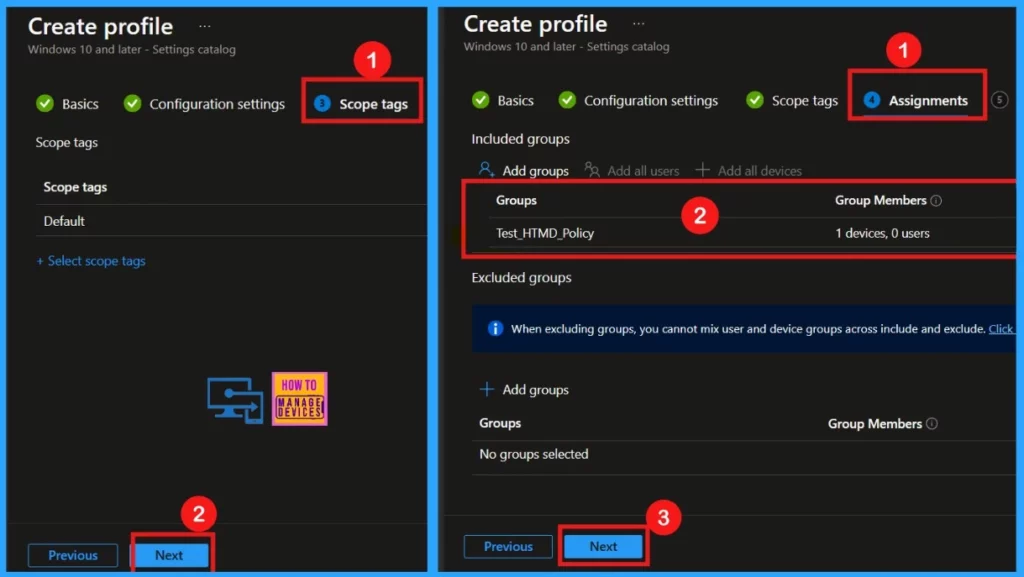
Upon reaching the Scope tags section, you have the option to apply tags for policy filtering. Since I’m proceeding without optional scope tags, I clicked Next to continue the policy creation.
Next is the Assignments section, which is essential for configuring an Intune policy. Here, we can specify the groups of users or devices that should receive the policy. By clicking Add groups under Included groups, we can select the desired target group and proceed to the next step by clicking Next.
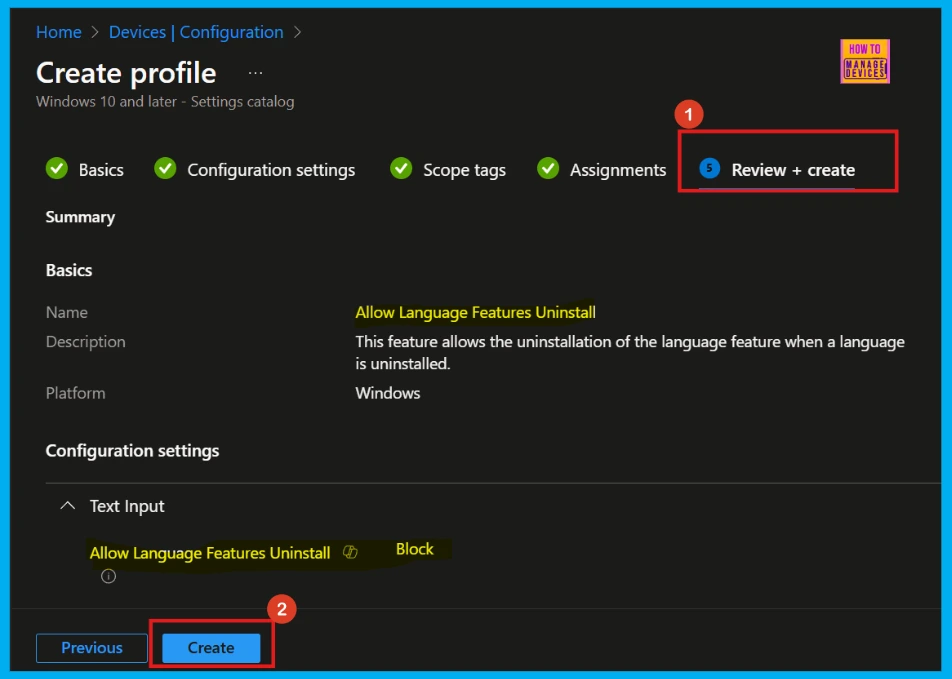
The entered details can be reviewed in the Review and Create section before finalising the configuration. If any adjustments are necessary, use the Previous button to return and modify. Otherwise, proceed by clicking the Create button. After completing it, a confirmation message will be received.
Monitoring Status
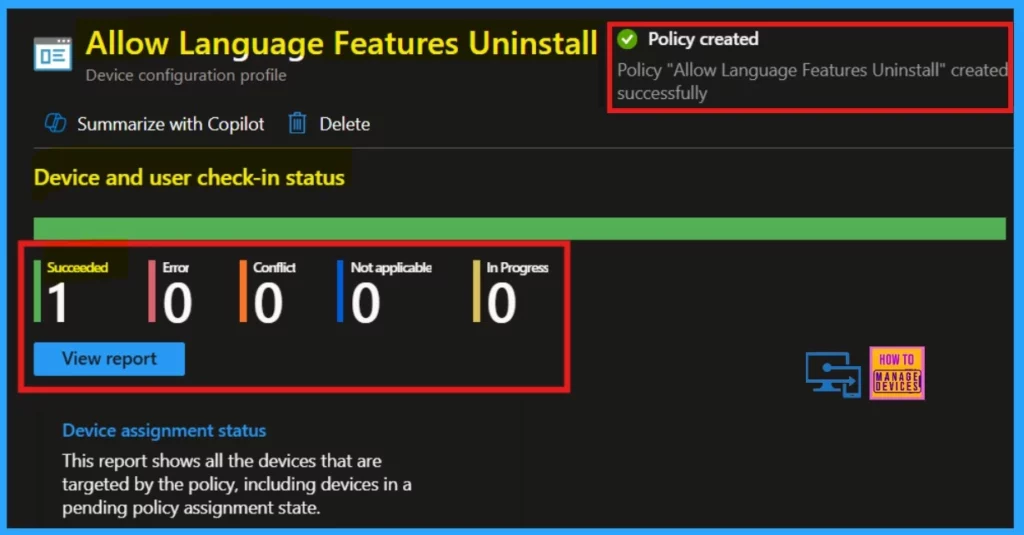
When we click Create, a confirmation message appears, indicating that the policy was created successfully. For quicker deployment, sync the device on the company portal. Afterward, monitor the policy’s status in the Intune Portal by navigating to Devices > Configuration, searching for the policy name, and verifying “Succeeded as 1.”
End User Experience
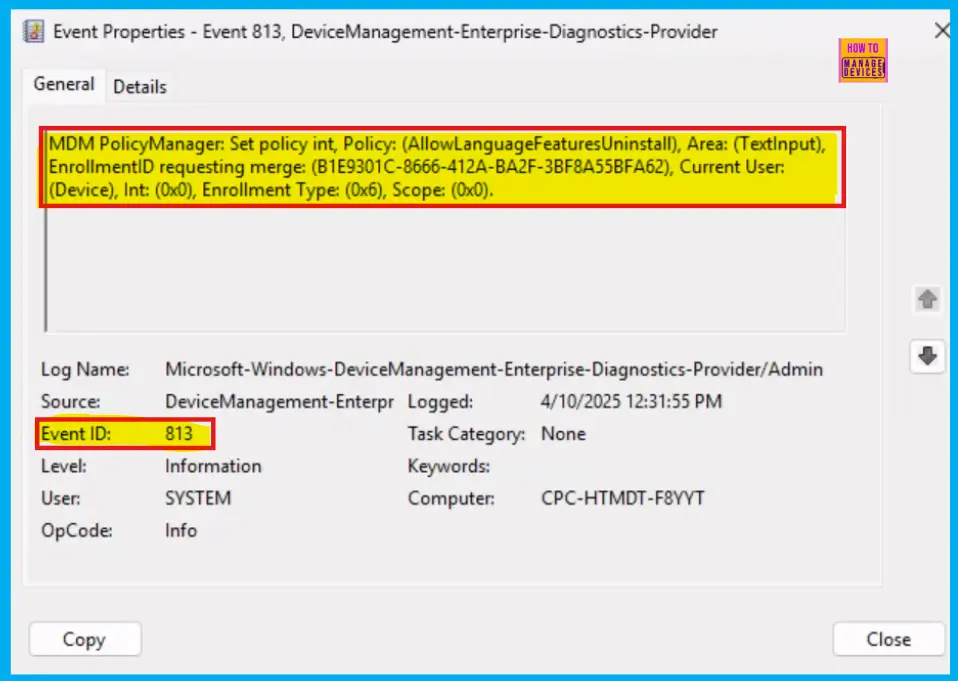
To verify policy application on a client machine, utilize the Event Viewer. Navigate to Applications and Services Logs > Microsoft > Windows > Device Management > Enterprise Diagnostic Provider > Admin. Here, we will find policy logs. Use the Filter Current Log option to refine the search. Specifically, Intune event ID 813 confirms a string policy’s application on Windows 10 or 1.
Remove Assigned Group
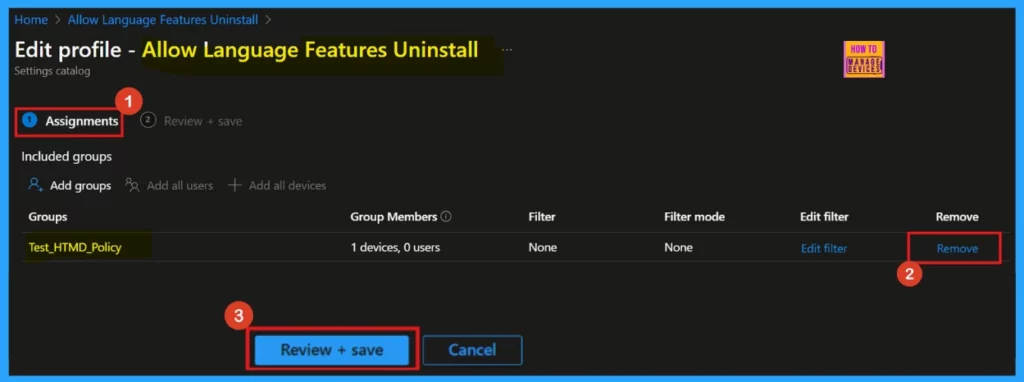
To enhance security, ensure compliance, or improve operational efficiency, we need to remove an assigned group from a policy. The screenshot shows the steps for this removal. Once the group is removed, click Review + Save.
For detailed information you can refer our previous post – Learn How to Delete or Remove App Assignment from Intune using Step by Step Guide
Deleting a Policy From Intune
We might need to delete a policy in Microsoft Intune to improve security, ensure compliance, or streamline operations. Here are the steps for deleting a policy, as shown in the screenshot below.
For detailed information you can refer our previous post – How to Delete Allow Clipboard History Policy in Intune Step by Step Guide

Need Further Assistance or Have Technical Questions?
Join the LinkedIn Page and Telegram group to get the latest step-by-step guides and news updates. Join our Meetup Page to participate in User group meetings. Also, Join the WhatsApp Community to get the latest news on Microsoft Technologies. We are there on Reddit as well.
Author
Anoop C Nair has been Microsoft MVP for 10 consecutive years from 2015 onwards. He is a Workplace Solution Architect with more than 22+ years of experience in Workplace technologies. He is a Blogger, Speaker, and Local User Group Community leader. His primary focus is on Device Management technologies like SCCM and Intune. He writes about technologies like Intune, SCCM, Windows, Cloud PC, Windows, Entra, Microsoft Security, Career, etc.


