Let’s discuss the best way to Allow Language in Intune Via Setting Catalog. We all know about Intune, a cloud-based endpoint management solution, and what language is, but how to enable the function in Intune via setting catalog is different, right?
The Intune Settings catalog provides all the settings you can configure in one place. This makes it easier for administrators to add, configure, customize, and manage devices and user policy settings. The benefit of using the Intune settings catalog is that we can configure settings for Windows computers.
Intune compliance policies are sets of rules and conditions used to evaluate the configuration of managed devices. These policies help secure organisational data and resources from devices not meeting the set configuration requirements.
There are many ways to install the language using Microsoft Intune. We will deploy the policy ‘Allow Languages’ through the Settings Catalog. In this blog, we will provide step-by-step guidance for deploying the policy.
Table of Contents
What is Setting Catalog?

The settings catalog provides a comprehensive list of all configurable settings in one location. This feature simplifies how you create a policy and how you see all the available settings.
Best Way to Allow Language in Intune Via Setting Catalog
When we create the policy, we need to start from the base. We add only the settings we want to control and manage. More settings are continually being added to the settings catalog. The following steps to enable the Allow Language in Intune via the Setting Catalog.
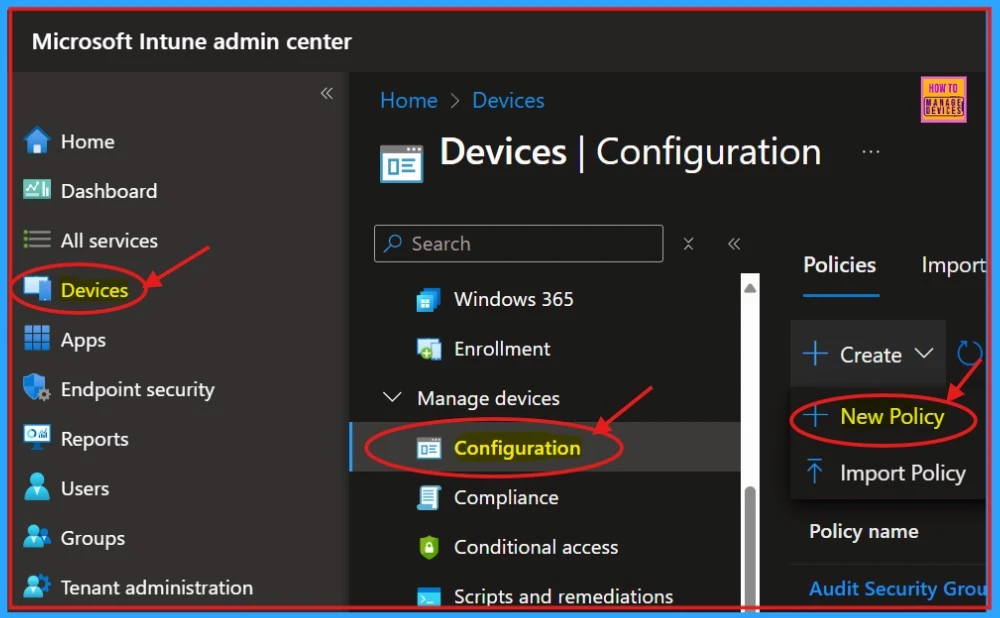
- Sign in to the Microsoft Intune admin center
- Select Devices and click on Configuration
- Click on +Create and select New Policy
- Allow Manual Start of Microsoft Account Sign In Assistant Using Intune Settings Catalog
- Hide the Try the New Outlook Toggle in Outlook using Intune Settings Catalog Policy
- Data Loss Prevention is Now Available on macOS Settings Catalog
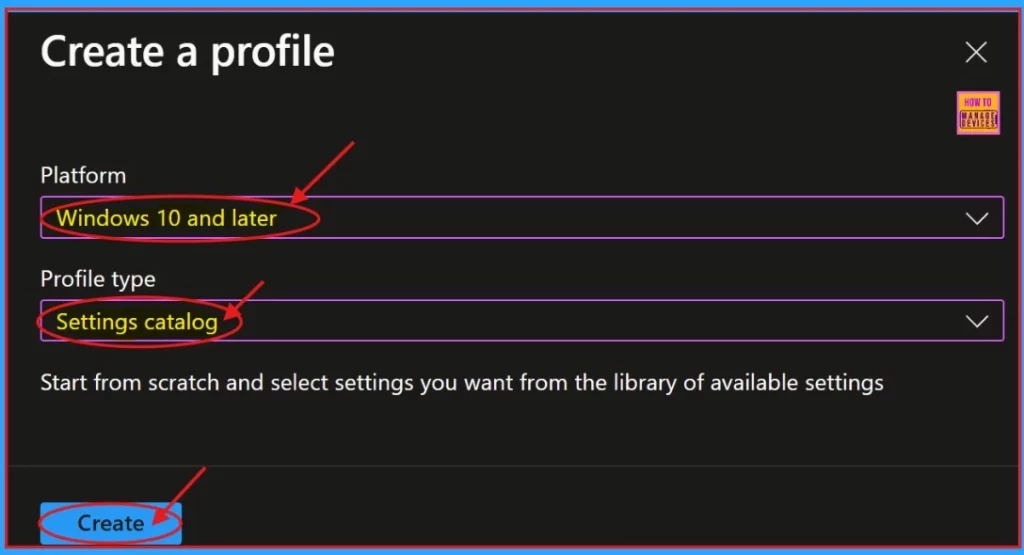
A new window will appear on the screen where you can select the Platform and Profile Type. Choose “Windows 10 and later” as the platform and “Settings catalog” as the Profile type. Then, click the “Create” button to proceed.
Basics
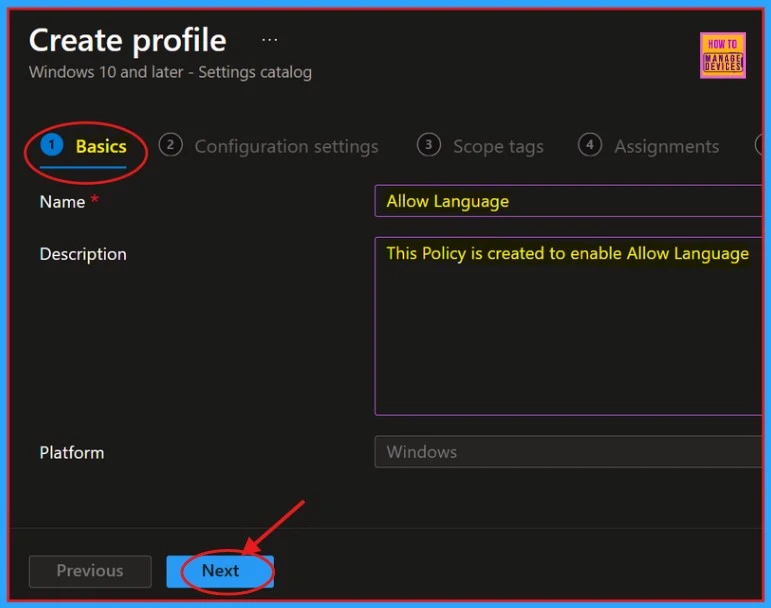
After that, you create a profile to Allow Language. The primary part of the profile creation process is Basic. In this section, we need to provide the proper Name and Description. This is a mandatory section; we must add it to continue creating Profiles.
- The description allows users to learn about the policy at any time.
- Click on the Next button after adding the Name and Description.
Configuration Settings
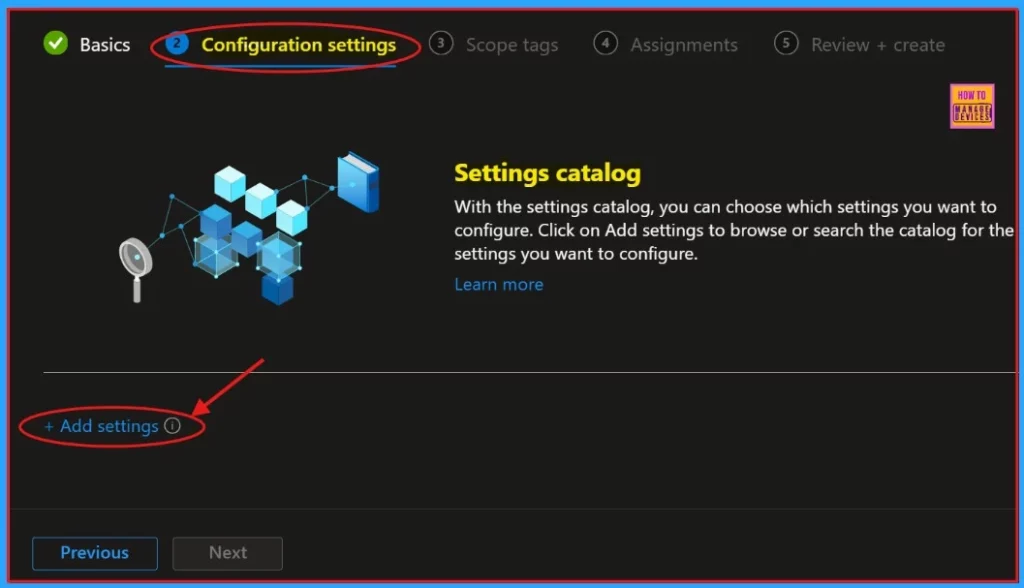
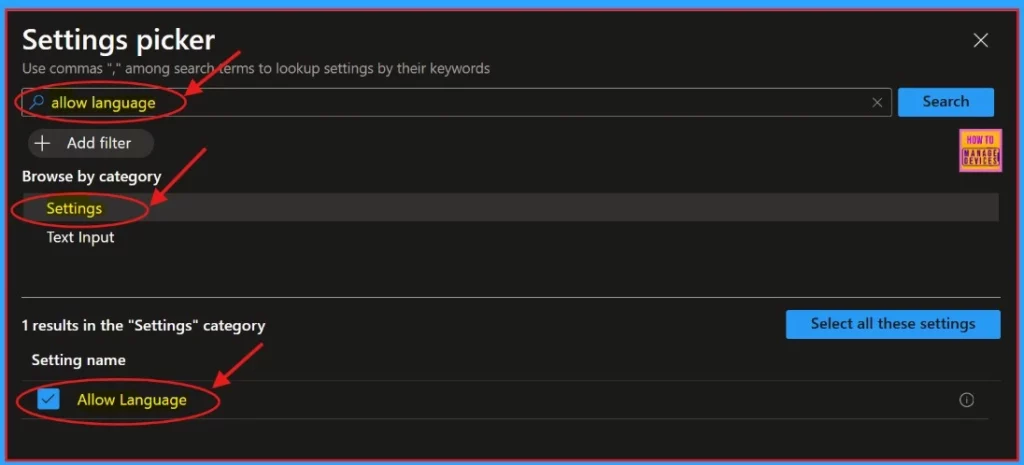
The next section is Configuration Settings, an important part of policy creation. We can select which settings to configure by using the settings catalog. Click on “+ Add Settings” to browse or search for the specific settings.
By clicking the “Add settings“, we will get a settings window to select the preferred settings. Here, we can search for settings manually. Otherwise, we need to browse settings by category. Here, we will choose settings and Allow language.
| Browse by catagory | Settings Name |
|---|---|
| Settings | Allow Language |
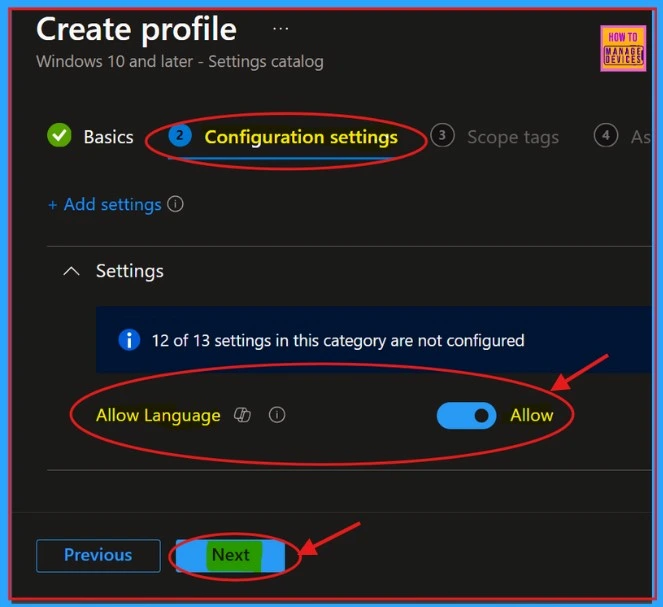
Once we have chosen the desired policy, it will be displayed on the configuration page. Allow the preferred language, then click the Next button.
- Easy Way to Install a Language Pack using Intune PowerShell Script
- Easy to Change Display Language in Microsoft Edge
- How to Deploy Windows App Win32 Using Intune |Language Pack
Scope Tags
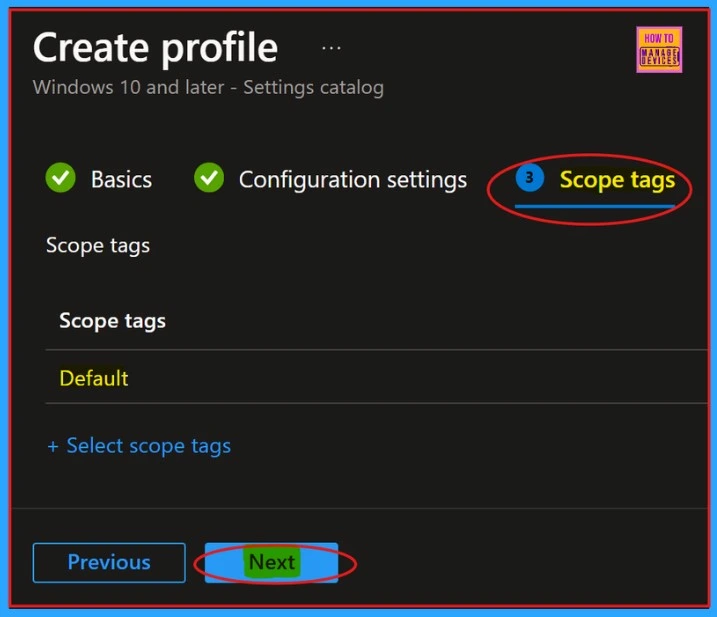
Here are the Scope tags. We can skip this tab and complete this section on the Intune Portal. Because adding scope tags to create a policy is not mandatory, click on the Next button to continue.
Assignments
On the Assignment tab, we can select groups to assign the policy to. Tap on the Add Groups from the Included Groups button and select the groups from the group list. Click the Select button. The selected groups will appear on the Assignment tab. Then tap the Next button.

Review+ Create
Review + Create is the tab that helps us review and manage settings. We can check each tab and if we need to change any previous settings, we can do it here. After modifying all the steps, click on the Create button.
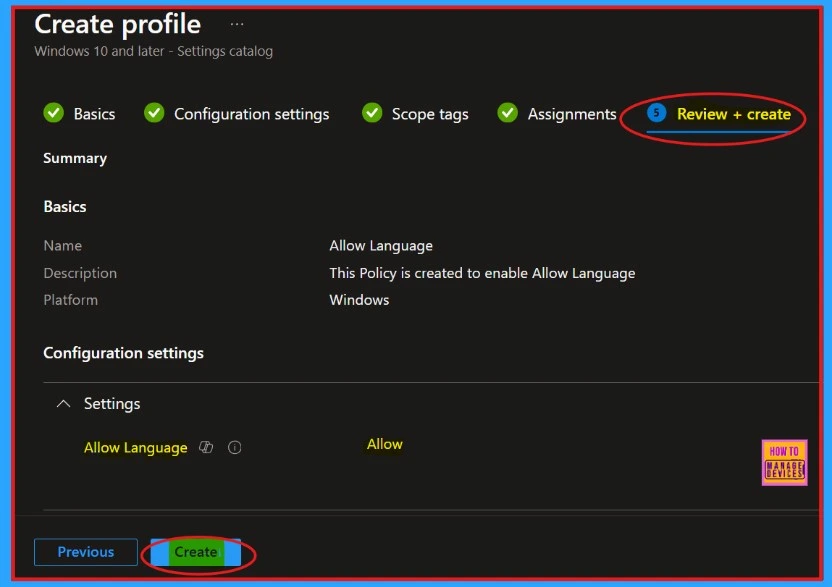
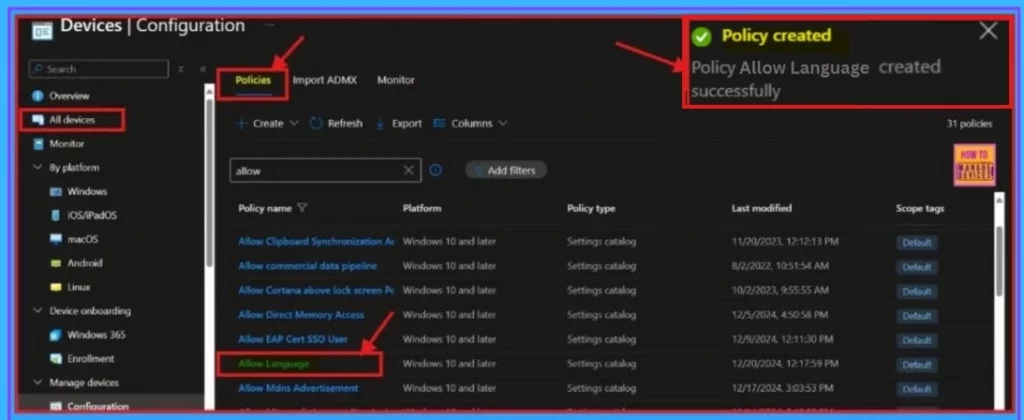
When we click on the Create button, we will get a notification that the Policy has been created successfully. We can check the policy on the Intune Portal. To access this, go to Devices and Configuration, search for our policy, then open it.
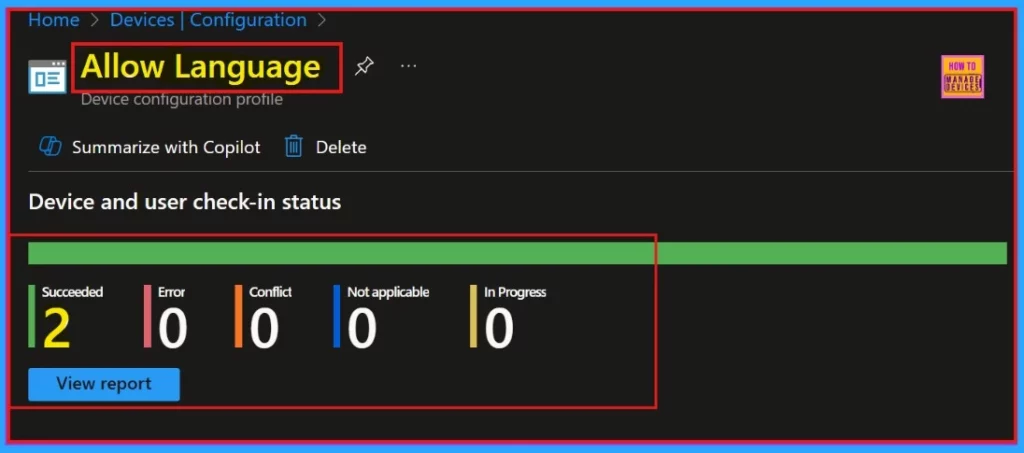
Check-in Status
Now the Allow Language policy is succeeded, with 2 instance marked as succeeded. The below screenshot shows more details.
End User Experience
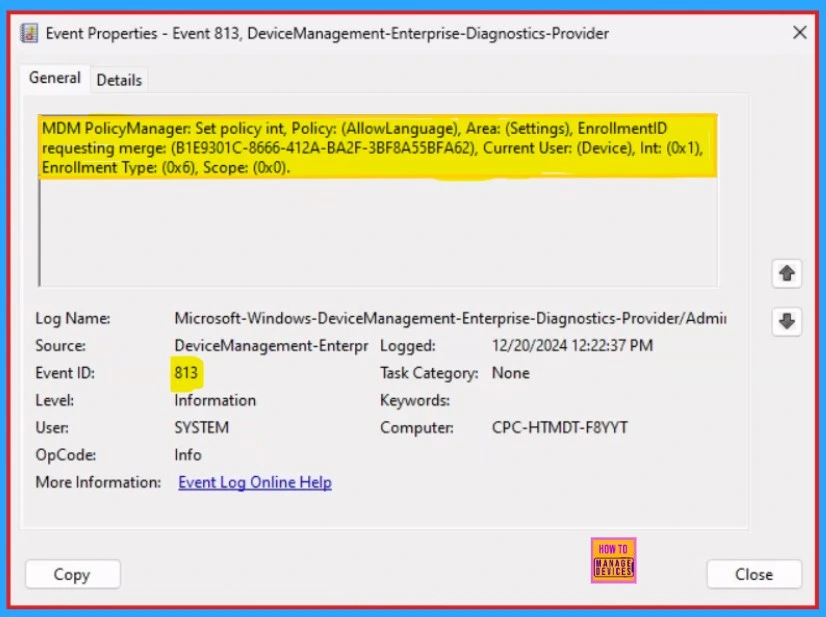
We can easily check our created Intune policy Allow Language using Event viewer. Here are the steps to view our policy in Event viewer.
- Open Event Viewer: Go to Start > Event Viewer.
- Navigate to Logs: In the left pane, go to Application and Services Logs > Microsoft > Windows > DeviceManagement-Enterprise-Diagnostics-Provider > Admin.
- Filter for Event ID 813. This will help us easily find the relevant logs.
MDM PolicyManager: Set policy int, Policy: (AllowLanguage), Area: (Settings), EnrollmentID
requesting merge: (B1E9301C-8666-412A-BA2F-3BF8A55BFA62), Current User: (Device), Int: (0x1),
Enrollment Type: (0x6), Scope: (0x0).
Need Further Assistance or Have Technical Questions?
Join the LinkedIn Page and Telegram group to get the latest step-by-step guides and news updates. Join our Meetup Page to participate in User group meetings. Also, Join the WhatsApp Community to get the latest news on Microsoft Technologies. We are there on Reddit as well.
Author
Anoop C Nair has been Microsoft MVP for 10 consecutive years from 2015 onwards. He is a Workplace Solution Architect with more than 22+ years of experience in Workplace technologies. He is a Blogger, Speaker, and Local User Group Community leader. His primary focus is on Device Management technologies like SCCM and Intune. He writes about technologies like Intune, SCCM, Windows, Cloud PC, Windows, Entra, Microsoft Security, Career, etc.
