I will demonstrate language pack deployment using Endpoint Manager Intune in this post. Let’s see option #2: Deploy Windows App Win32 Using Intune. I have explained option #1 to deploy the Windows 10 language pack per Microsoft’s recommendation.
Table of Contents
Download CAB File
You can download Windows 10, version XXXX Language Pack, from a Visual Studio subscription or VLSC. Once you have the cab file called “Microsoft-Windows-Client-Language-Pack_64en-gb.cab” for en-GB language.
NOTE! Localization packages for Windows are delivered as a .cab file, for example, Microsoft-Windows-Client-Language-Pack_x64_en-GB.cab. They include UI elements like text for dialog boxes, menu items, and help files.

Install Windows 10 Language Pack
Now, the question is how to deploy this cab file using Intune (Language Pack Deployment). Apart from option #1, several ways to install a Language pack exist. The following are some of the most used methods to install Language packs on Windows 10.
- DISM
- Example – Dism /Image:”C:\mount\windows” /Add-Package /PackagePath=”C:\repository\Microsoft-Windows-Client-Language-Pack_x64_en-GB.cab”
- PowerShell
- Example – Add-WindowsPackage -online “C:\Windows\Temp\LanPack\Microsoft-Windows-Client-Language-Pack_x64_en-gb.cab”
NOTE! – In this guide, I will use the PowerShell command to install a language pack.
Deploy Windows App Win32 Using Intune | Language Pack
As I mentioned above, the Intune Win32 application deployment is the best option for deploying Windows 10 Language Pack. Let’s create a batch file to deploy this CAB file via Intune and then create the IntuneWin package.
NOTE! – I don’t know whether this is the best way to deploy the Language pack to Intune managed Windows 10 devices. Let me know in the comments what you think?
Create a Batch File for Intune Win32 Application Deployment
- The following batch file is used as an executable while creating the IntuneWin package. Let’s call it LanguagePack.cmd or LanguagePack.batch.
- Created a small script option as below to execute the batch file
MD C:\Windows\Temp\LanPack
Copy "%~dp0*.cab" C:\Windows\Temp\LanPack /Y
Copy "%~dp0*.ps1" C:\Windows\Temp\LanPack /Y
PUSHD C:\Windows\Temp\LanPack
PowerShell -NoProfile -ExecutionPolicy Bypass -Command Add-WindowsPackage -online -packagepath "C:\Windows\Temp\LanPack\Microsoft-Windows-Client-Language-Pack_x64_en-gb.cab"
@echo 1.0>C:\Windows\Temp\LanPack\Ver1.0.txt
Del C:\Windows\Temp\LanPack\*.cab
Del C:\Windows\Temp\LanPack\*.ps1
NOTE! – Ver1.0.txt file and Folder Path C:\Windows\Temp\LanPack shall be used while creating the Win32 Application from Intune portal.
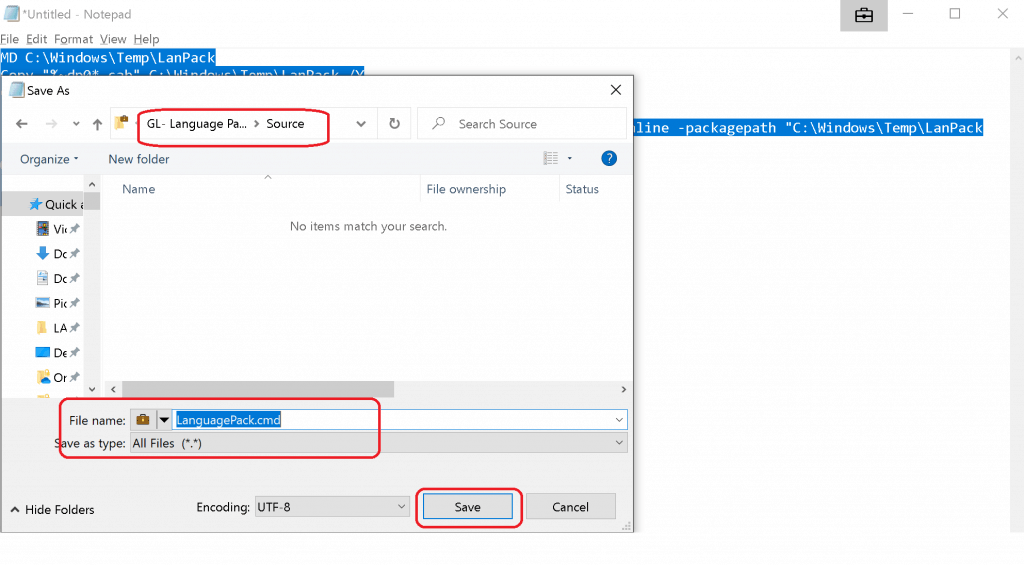
- Copy the content above and SAVE this file as LanguagePack.cmd
- LanguagePack.cmd is the SETUP file
Prepare Folder Structure for IntuneWin
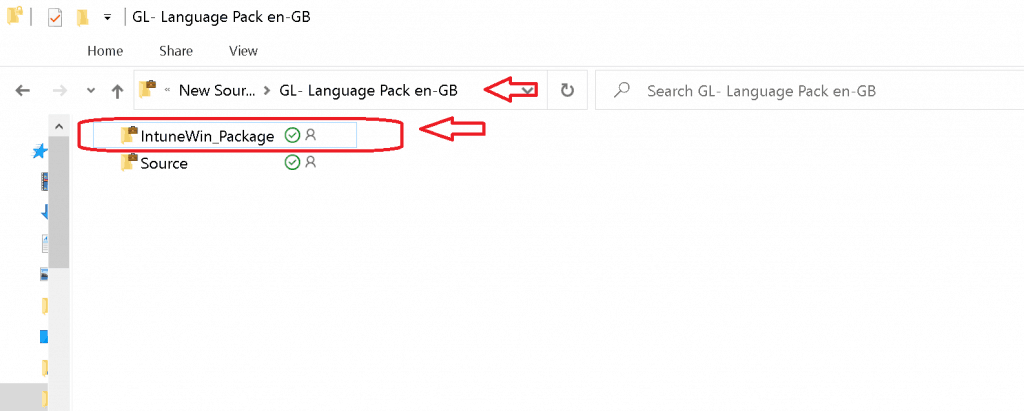
- Copy the CAB file “Microsoft-Windows-Client-Language-Pack_x64_en-gb.cab” from the above downloaded ISO path “D: x64langpacks” to the Source folder where you already have a language pack.cmd file.
NOTE! – This guide is to deploy the en-GB language pack for Intune managed Windows 10 devices.

- Also, create the IntuneWin_Package folder to store the IntuneWin package.
Create IntuneWin Package
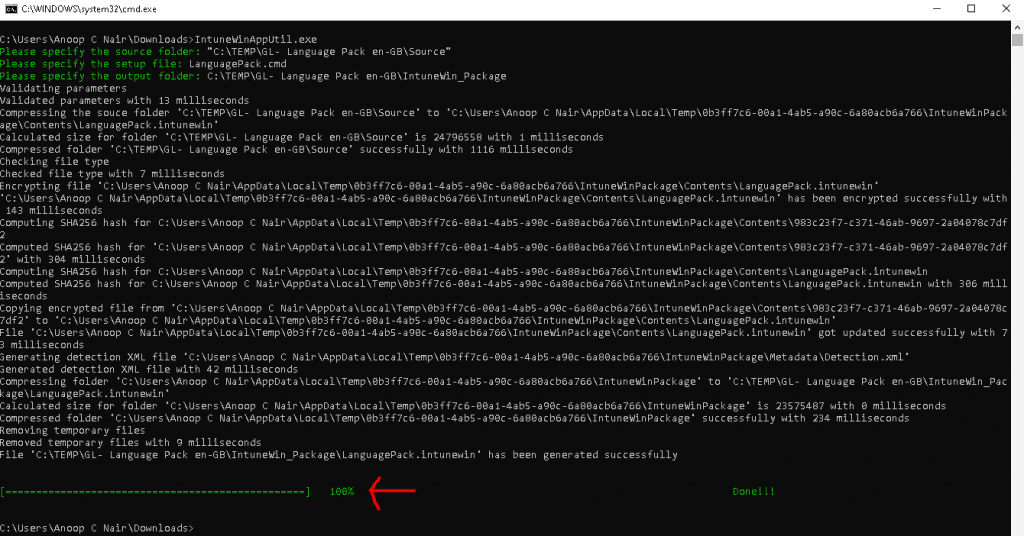
Download the updated IntuneWinAppUtil.exe from GitHub, navigate to the folder where you saved the file, and run the IntuneWinAppUtil.exe by typing “IntuneWinAppUtil.exe” in the command prompt.
- Run IntuneWinAppUtil.exe file
- C:\Users\Anoop C Nair\Downloads>IntuneWinAppUtil.exe
- Enter the Source Folder
- “C:\TEMP\GL- Language Pack en-GB\Source”

Enter the SETUP file – LanguagePack.cmd (this file is created above!)

Enter the OUTPUT folder details where the IntuneWin package will be created
- C:\TEMP\GL- Language Pack en-GB\IntuneWin_Package
Let’s check the OUTPUT package (IntuneWin)
- LanguagePack.intunewin

Upload Win32 Application to Intune
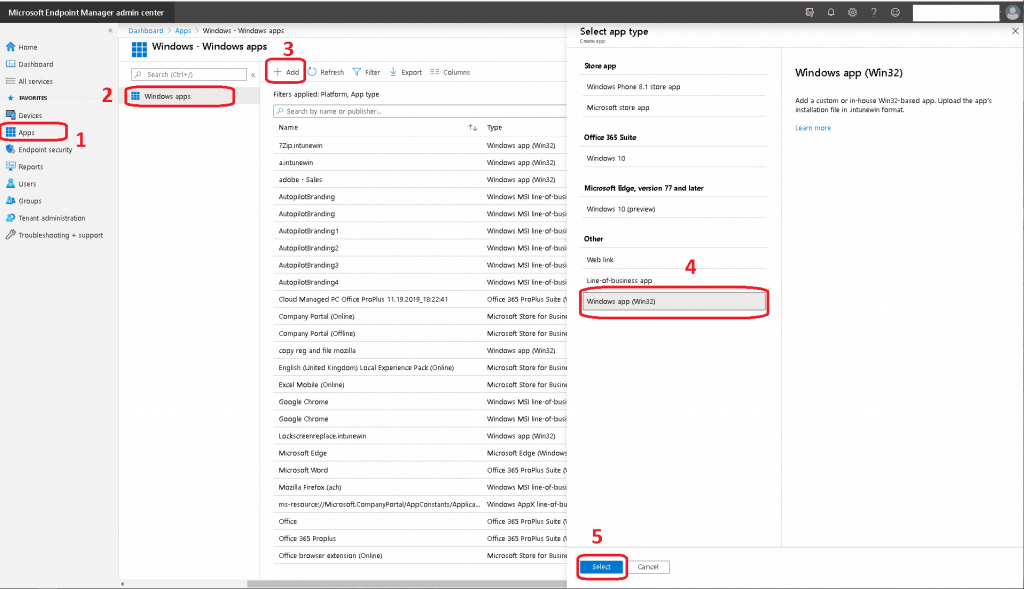
Login to Intune Devicemanagement.microsoft.com portal with appropriate access rights and Navigate through – Apps -> Windows -> Windows Apps
- Click on +Add
- Select Windows App (Win32) and click on the SELECT button
App Information
Click on the Select App package file hyperlink from App Information Tab. Browse and Select the IntuneWin file (already created above)
- Click OK to continue
Name: LanguagePack.intunewin
Platform: Windows
Size: 22.48 MiB
MAM Enabled: No

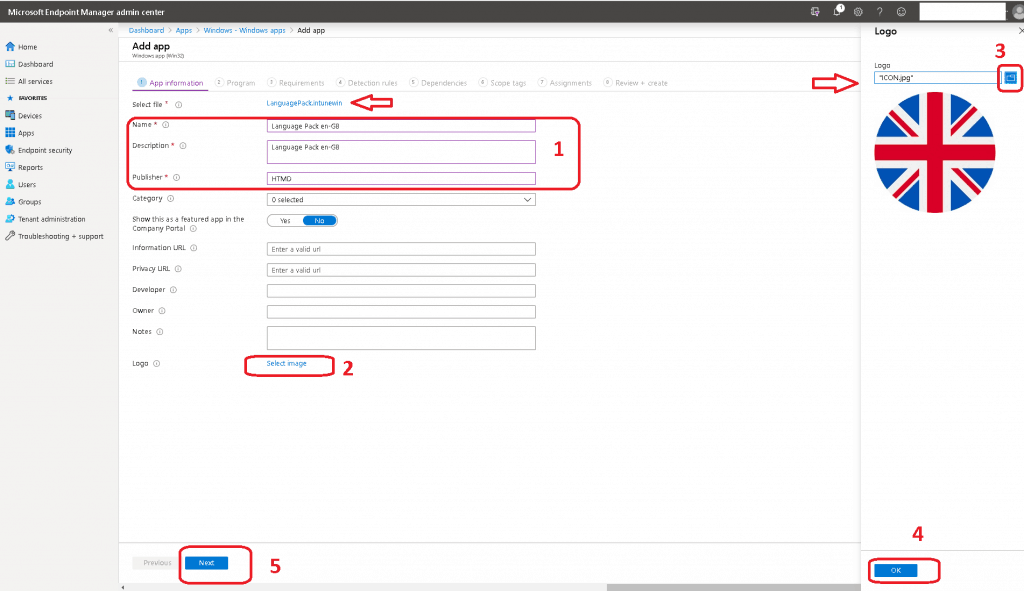
- Enter the Name of the Windows App Win32
- Language pack en-GB
- Enter Description of the Windows App
- Language pack en-GB
- Enter the Publisher’s name
- Microsoft
NOTE! – Above are the mandatory fields. If you want it’s ok to add other fields as well. I have shown one example of adding icons in the below screen capture.
Program
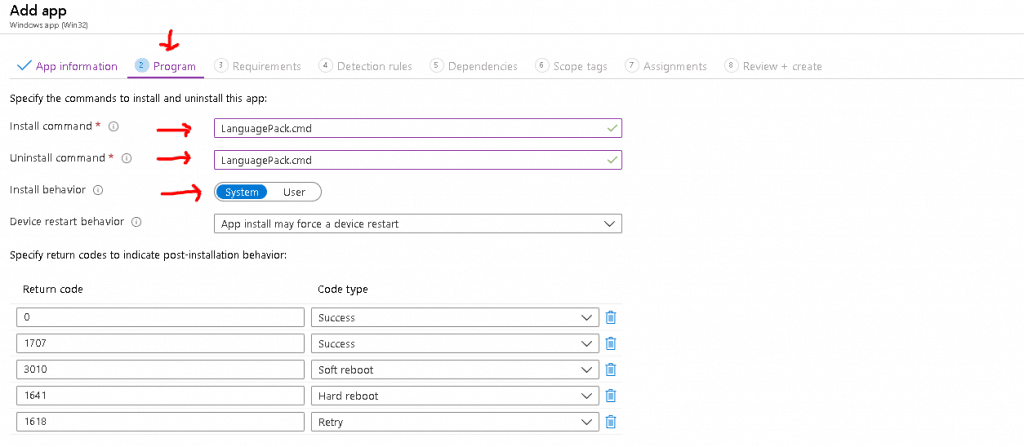
In this part of the process, you must specify the commands to install and uninstall this app. As you might have noticed, a setup file creates the IntuneWin package. In this scenario, the same batch file name, “LanguagePack.cmd,” can be used for Installation and uninstallation.
- Enter the Install command
- LanguagePack.cmd
- Enter the Uninstall command
- LanguagePack.cmd
- Install Behavior
- System
- Click on NEXT to Continue
NOTE! – I have only entered/filled the mandatory options. No need to change other options unless you have specific requirements.
Requirements
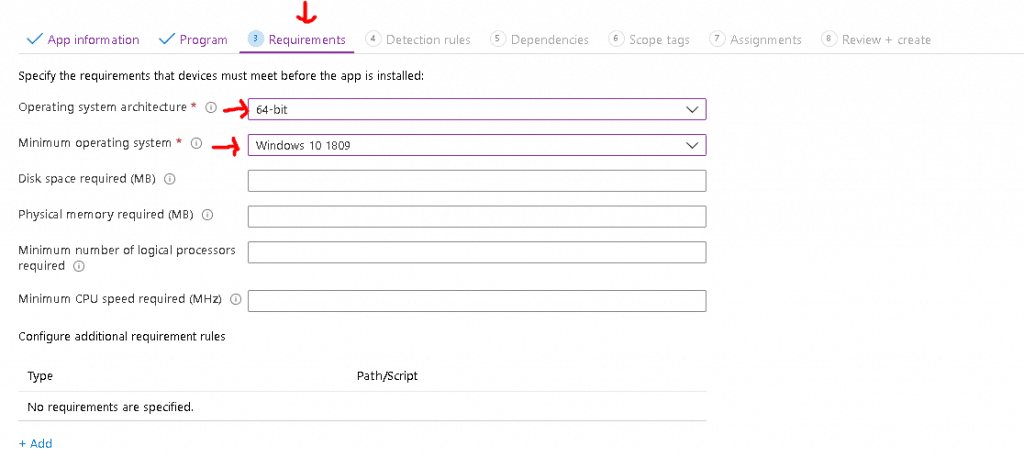
In this section, we need to specify the requirements that devices must meet before the app is installed. I have only selected only the mandatory fields.
- Select Operating System Architecture
- 64-bit
- Select Minimum Operating System
- Windows 10 1809
Detection Rules
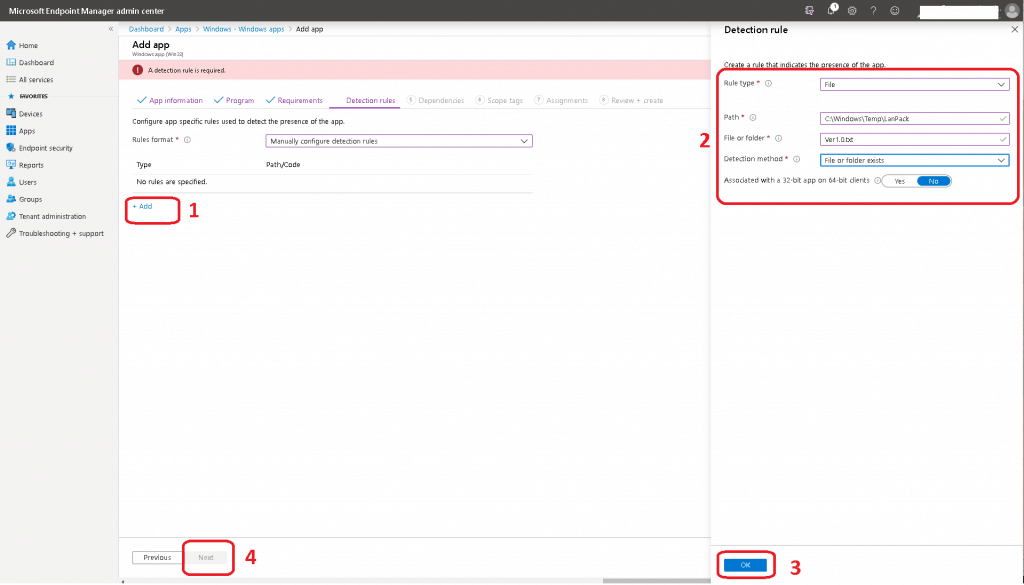
In this section, you shall select Configure app-specific rules used to detect the presence of the app.
- Select Manually Configure Detection Rules from the drop-down list Rules format

- Click on +Add to Create a rule that indicates the app’s presence.
- Select the Rule Type as a File
- Enter the details of Path – Full path of the folder containing the file to detect
- Enter the File Name to detect
- Select the Detection Method as File or Folder Exists
Dependencies
Click on the NEXT button to continue via the Dependencies tab.
NOTE! – Software dependencies are applications that must be installed before this application can be installed. There is a maximum of 100 dependencies, including the dependencies of any included dependencies and the app itself.

Scope Tag
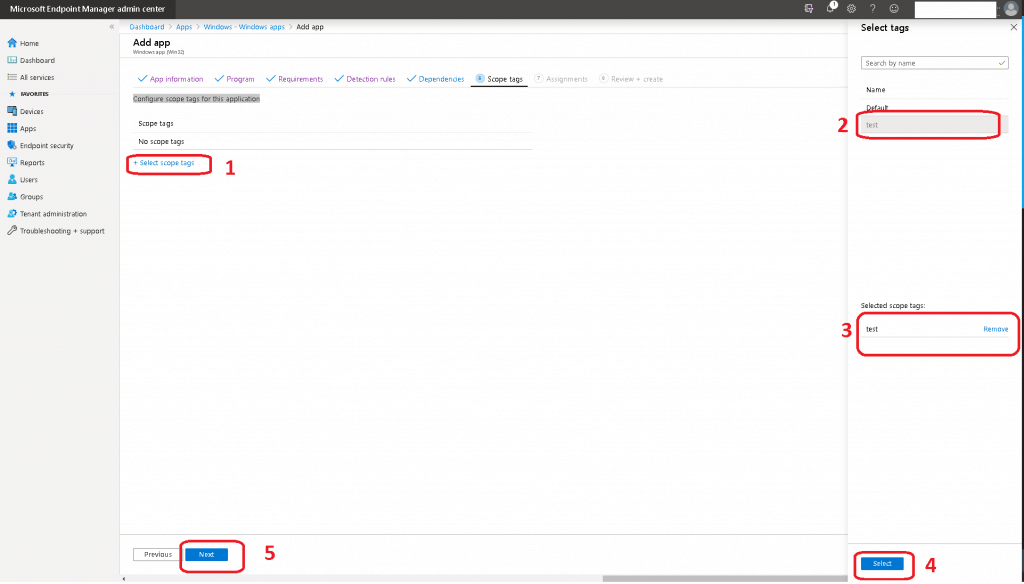
In the scope tag section, you can Configure scope tags for this Windows App Win32 application.
- Click on the +Select Scope Tags hyperlink option
- Search for the scope tag to add
- Click on the SELECT button
- Click on the Next button to continue
Assignments
Let’s define which devices or users shall get the Windows Apps Win32 application. In this scenario, I’m going to deploy this to all devices (why can’t I use a GB OS? Well, I can use it and avoid this scenario). Targeting in Intune is always via either Azure AD devices or User groups.
NOTE! Any Win32 app deployed using Intune will not be automatically removed from the device when it is retired. The app and the data it contains will remain on the device. If the app is not removed prior to retiring the device, the end-user will need to take explicit action on the device to remove it.
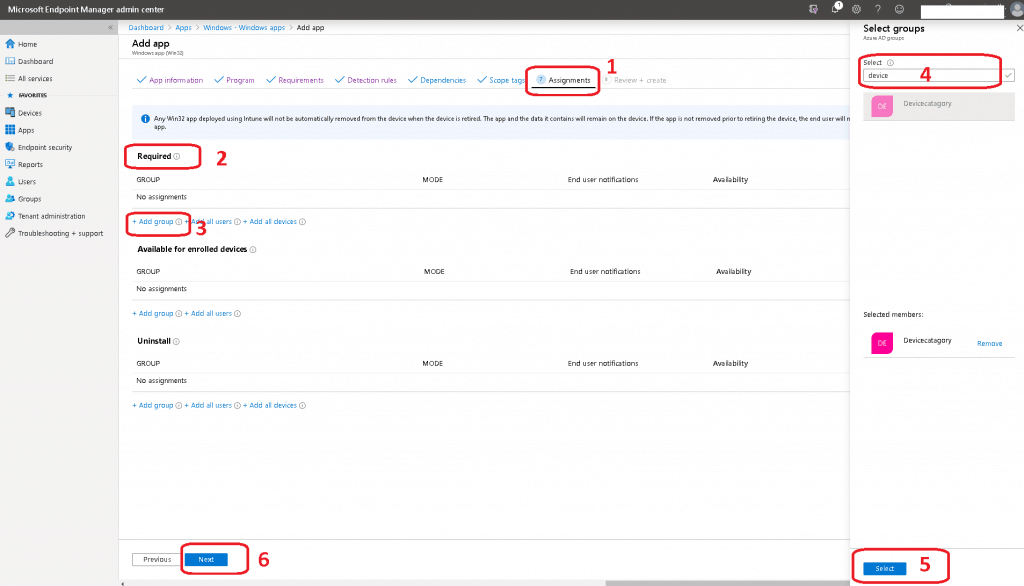
Let’s decide whether you want this application deployed as REQUIRED, AVAILABLE, or UNINSTALL. Intune assignment offers three options.
- Required – Select the groups for which you want to make this app required. Required apps are installed automatically on enrolled devices. Some platforms may have additional prompts for the end-user to acknowledge before app installation begins.
- Available for enrolled devices—Select the groups for which you want to make this app available. Apps available for enrolled devices are displayed in the Company Portal app and website for users to install optionally. Available assignments are only valid for User Groups, not device groups.
- Uninstall – Select the groups for which you want to uninstall the app. Apps with this assignment are uninstalled from managed devices in the selected groups if Intune has previously installed the application onto the device via an “Available for enrolled devices” or “Required” assignment on the same deployment.
Language pack deployment should be a required application in this scenario.
- Required
- Click on +Add Group
- Search for Azure AD groups
- Confirm the selected members
- Click on the Select button to continue with the Win32 application assignment
- Click on the NEXT button to finish the assignment option
Review + Create
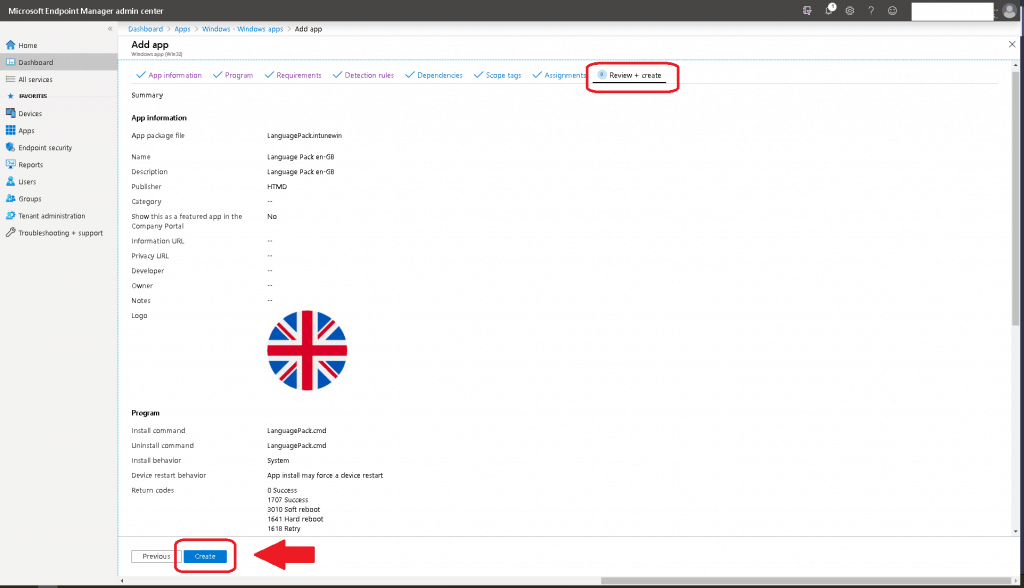
- Let’s click on the CREATE button to finish the Windows app Win32 application
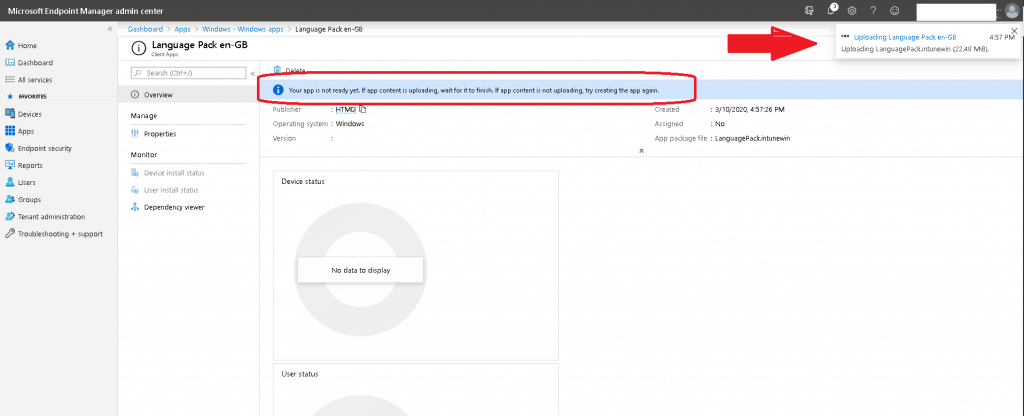
- This process shall start the uploading process of the IntuneWin application package to Intune
- Upload is in progress – How long will it take to complete the upload? It depends on the size of the application and the Speed of internet connectivity
Results
Below are the results of the successful installation of the language pack.
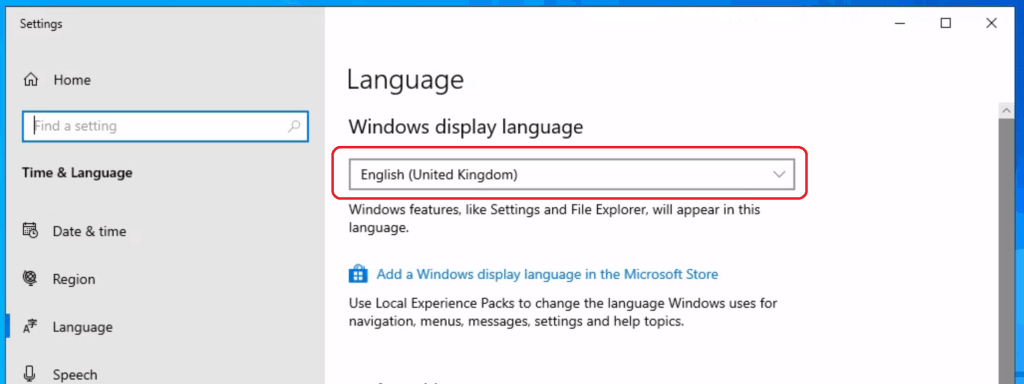
- Deploy Windows App Win32 Using Intune Status!!

Resources
- Intune Win32 App Failure Log Collection Backend Secrets
- Intune Management Extension Level 3 Troubleshooting Guide Intune win32 App
- Intune Scope Tags Implementation Guide
- Intune Application Model Deployment Guide
We are on WhatsApp. To get the latest step-by-step guides and news updates, Join our Channel. Click here –HTMD WhatsApp.
Author
Anoop C Nair is Microsoft MVP! He is a Device Management Admin with more than 20 years of experience (calculation done in 2021) in IT. He is a Blogger, Speaker, and Local User Group HTMD Community leader. His main focus is on Device Management technologies like SCCM 2012, Current Branch, and Intune. He writes about ConfigMgr, Windows 11, Windows 10, Azure AD, Microsoft Intune, Windows 365, AVD, etc.

Anoop, thanks so much for one of many articles that you have guided me with. My purpose for this particular application (and 10 more language packs) is to install them to devices in dynamic device groups. Those groups are based on specific Group Tags (Order ID) that are uploaded during the Autopilot import process. These groups are also used to join the devices to the correct OU across the globe.
I followed this one and the installation was successful in Intune, yet when I look at the Language Settings page on the client, the Windows Display Language is still English (United States) instead of the Czech LP that was installed. I realize the text file is the detection method and it is true, but there are no visible errors or failures. Can you help with the next steps to troubleshoot? Thanks
Hello – Yes there are caveats. Sometimes it needs a restart. To be honest, I didn’t get the solution working 100% all the time 🙁 I have explained this in the related post, we need to use PowerShell commands to make this work. Sometimes from user context and other times from system context More details.https://www.anoopcnair.com/intune-learn-to-deploy-windows-10-language-pack-step-by-step-mem/#Tips
Does this make sense?
Yes sir. I switched to your option #1 and used the store for business to assign the language experience pack to dynamic device groups. Our tenant admin had to approve the download for the organization, then a sync made them available. The PowerShell script to force the settings is a required assignment on those dynamic groups as well. Now if I import a device into AutoPilot with the correct Group Tag, the language piece is automatic. Works perfect! Thanks!!
Great! Thank you for the feedback.
Have you seen any issues with Win32 app detections? I have been trying to push the sccm client after wrapping it in intunewinapputil. During autopilot the deployment works, the client installs, but the detection of c:\windows\ccm folder never works. the logs show detecting c:\windows\ccm result failed so autopilot won’t continue or waits for 180 minutes for the timeout.
Is this a co-managed system? Are you sure the ccm folder is already created in the system? The detection works ok with the script which I mentioned in this post.